
User Manual
Page 2
... the user to the presence of important operating and maintenance (servicing) instructions in the operating instructions unless you are for use by qualified service personnel only. POWER SUPPLY: Connect one end of time, disconnect the power and remove the batteries form the remote. O The lightning flash with ...the user to the AC100-240V wall outlet. CAUTION: These servicing instructions are qualified to constitute a risk of electric shock, do so. POWER MANAGEMENT Before plugging the power cord into the AC outlet, make sure that may be used for servicing instructions. ...
... the user to the presence of important operating and maintenance (servicing) instructions in the operating instructions unless you are for use by qualified service personnel only. POWER SUPPLY: Connect one end of time, disconnect the power and remove the batteries form the remote. O The lightning flash with ...the user to the AC100-240V wall outlet. CAUTION: These servicing instructions are qualified to constitute a risk of electric shock, do so. POWER MANAGEMENT Before plugging the power cord into the AC outlet, make sure that may be used for servicing instructions. ...
User Manual
Page 3
... placed on bed, sofa or anything that is intended for replacement of time. 14.Refer all servicing to instructions. 8. Important Safety Instruction 1. Read these instructions. 3. Follow all warnings. 4. Do not block any way, such as power-supply cord or plug is prohibited. Do not put product on the apparatus. Do not install near water. 6. Do not defeat the safety purpose of...
... placed on bed, sofa or anything that is intended for replacement of time. 14.Refer all servicing to instructions. 8. Important Safety Instruction 1. Read these instructions. 3. Follow all warnings. 4. Do not block any way, such as power-supply cord or plug is prohibited. Do not put product on the apparatus. Do not install near water. 6. Do not defeat the safety purpose of...

User Manual
Page 5
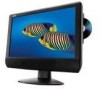
if any items are included with your dealer. COST 04 40 TFT-LCD as _ •a. C,aoO. . 0 ag O'. • • 0 C C,ct- (.7* Remote Control RCA Cable Power Cord 1 Unpacking Please make sure the following items are missing, contact your LCD TV/monitor.
if any items are included with your dealer. COST 04 40 TFT-LCD as _ •a. C,aoO. . 0 ag O'. • • 0 C C,ct- (.7* Remote Control RCA Cable Power Cord 1 Unpacking Please make sure the following items are missing, contact your LCD TV/monitor.

User Manual
Page 6
... the plastic part and remove it fall from its mountings. See the Specification page for VESA informaiton. 2 VGA IN Plastic part x2 Unit Stand (e.g. PHONE JACK 19. TF-DVD1594 Rear Cabinet) 25. VOL+/10. AUDIO IN((R/L)) 22. REMOTE SENSOR 3. POWER INDICATOR 4. PLAY/PAUSE 8. POWER 14. VIDEO IN 23. COMPONENT IN 21. Release the screws inside and take off the unit stand. 2. Unit View 1 5 6 timumumiii 2 7 8 9 9 9 10 9 11 12 4 3 13 1. LCD SETUP 12. VGAAUDIO...
... the plastic part and remove it fall from its mountings. See the Specification page for VESA informaiton. 2 VGA IN Plastic part x2 Unit Stand (e.g. PHONE JACK 19. TF-DVD1594 Rear Cabinet) 25. VOL+/10. AUDIO IN((R/L)) 22. REMOTE SENSOR 3. POWER INDICATOR 4. PLAY/PAUSE 8. POWER 14. VIDEO IN 23. COMPONENT IN 21. Release the screws inside and take off the unit stand. 2. Unit View 1 5 6 timumumiii 2 7 8 9 9 9 10 9 11 12 4 3 13 1. LCD SETUP 12. VGAAUDIO...

User Manual
Page 7
... viewed channel. 8. EPG button Press to change the display format as CC on the list, the button does not function. 17. FORMAT button Press to show the mode selective menu (TV, AV, S-VIDEO, COMPONENT, DVD, PC). CC button Set the Close Caption mode as Zoom, Cinema, Full. 3 OPEN/CLOSE button 3 9 Press to muffle/release the sound. 20. MODE button Press to set the audio language. 13 MOON St. SLEEP button Press to show the Electronic Program Guide. 16. INFO button Press to set the sleep timer...
... viewed channel. 8. EPG button Press to change the display format as CC on the list, the button does not function. 17. FORMAT button Press to show the mode selective menu (TV, AV, S-VIDEO, COMPONENT, DVD, PC). CC button Set the Close Caption mode as Zoom, Cinema, Full. 3 OPEN/CLOSE button 3 9 Press to muffle/release the sound. 20. MODE button Press to set the audio language. 13 MOON St. SLEEP button Press to show the Electronic Program Guide. 16. INFO button Press to set the sleep timer...
User Manual
Page 8
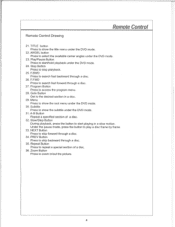
... forward through a disc. 35. Remote Control Drawing Remote Control 21. Goto Button Get to starUhold playback under the DVD mode. 24. PREV Button Press to search fast forward through a disc. 26. Play/Pause Button Press to the desired section in a disc. 29. Program Button Press to select the available camer angles under the DVD mode. 31. ANGEL button Press to access the program menu. 28. F.FWD Press to...
... forward through a disc. 35. Remote Control Drawing Remote Control 21. Goto Button Get to starUhold playback under the DVD mode. 24. PREV Button Press to search fast forward through a disc. 26. Play/Pause Button Press to the desired section in a disc. 29. Program Button Press to select the available camer angles under the DVD mode. 31. ANGEL button Press to access the program menu. 28. F.FWD Press to...

User Manual
Page 10
... plug of time, please disconnect the power. 6 Connect the "L" "R" port to input the AV signal. Cable connections • • O Set the unit to the relative input mode to the antenna port. oC 0o9pg0000 0 AC-100-240V Outlet External AV Source C. When input the AV signal, refer to input the video signal by the audio cable. TV RF signals include: receiving antenna/CATV net. S-Video - Connect the "S-Video" port by the S-Video cable(not supplied) to input the audio signal by the white&red plug of the RCA cable. Connect the "Video" port to the manual...
... plug of time, please disconnect the power. 6 Connect the "L" "R" port to input the AV signal. Cable connections • • O Set the unit to the relative input mode to the antenna port. oC 0o9pg0000 0 AC-100-240V Outlet External AV Source C. When input the AV signal, refer to input the video signal by the audio cable. TV RF signals include: receiving antenna/CATV net. S-Video - Connect the "S-Video" port by the S-Video cable(not supplied) to input the audio signal by the white&red plug of the RCA cable. Connect the "Video" port to the manual...

User Manual
Page 11
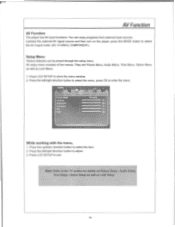
... power supply cord. buttons to skip channels or press numeric buttons to adjust 3. Press MODE to show the menu window. 2. Press LCD SETUP to select TV. 4. They are Picture Menu, Audio Menu, Time Menu, Option Menu, Lock Menu as well as Channel Menu. 1. Press the left /right direction button to input channel directly. Press LCD SETUP to enter the menu. Press CH+/- Connect the antenna to the antenna jack on the the player. 3. Up rij/4 Personal 51 50 13 0 SO staromiaiiiimilli e Aim" While working...
... power supply cord. buttons to skip channels or press numeric buttons to adjust 3. Press MODE to show the menu window. 2. Press LCD SETUP to select TV. 4. They are Picture Menu, Audio Menu, Time Menu, Option Menu, Lock Menu as well as Channel Menu. 1. Press the left /right direction button to input channel directly. Press LCD SETUP to enter the menu. Press CH+/- Connect the antenna to the antenna jack on the the player. 3. Up rij/4 Personal 51 50 13 0 SO staromiaiiiimilli e Aim" While working...

User Manual
Page 12
...ITEM Sleep Timer Time Zone Daylight Saving Time DESCRIPTION Setup the sleep timer. (15130/6019011201180/240 Min/Off). Select the time zone. (Central, Mountain, Pacific, Alaska, Hawaii, Eastern). Adjust the sound balance. Option Setup ITEM OSD Languagt, Transparency Color Mode Zoom Mode Closed Caption Restore Default DESCRIPTION Setup the OSD language. Adjust the display definition. Refer to the factory default. 8 Setup the closed caption type. Picture Setup ITEM Picture Mode Contrast Brightness Sharpness Tint Color TV Function DESCRIPTION Setup the picture mode...
...ITEM Sleep Timer Time Zone Daylight Saving Time DESCRIPTION Setup the sleep timer. (15130/6019011201180/240 Min/Off). Select the time zone. (Central, Mountain, Pacific, Alaska, Hawaii, Eastern). Adjust the sound balance. Option Setup ITEM OSD Languagt, Transparency Color Mode Zoom Mode Closed Caption Restore Default DESCRIPTION Setup the OSD language. Adjust the display definition. Refer to the factory default. 8 Setup the closed caption type. Picture Setup ITEM Picture Mode Contrast Brightness Sharpness Tint Color TV Function DESCRIPTION Setup the picture mode...

User Manual
Page 13
... CC type. (service 1-service 6). Setup the US parental control. PG-13, R, NC-17, X, N/A, G, PG) Press the direction buttons to move between options, press OK to enter TV Function GC 14..!3#4! E, G, 8ans+, l3ans+, l6ans+, l8ans+. on /off . Set the rating region table. TV(TV Rating) - Option Setup Closed Caption Setup Select "Closed Caption" from the Option menu, press OK to set block. Lock Setup (Parental Control) You are required to enter the four digit password to the default...
... CC type. (service 1-service 6). Setup the US parental control. PG-13, R, NC-17, X, N/A, G, PG) Press the direction buttons to move between options, press OK to enter TV Function GC 14..!3#4! E, G, 8ans+, l3ans+, l6ans+, l8ans+. on /off . Set the rating region table. TV(TV Rating) - Option Setup Closed Caption Setup Select "Closed Caption" from the Option menu, press OK to set block. Lock Setup (Parental Control) You are required to enter the four digit password to the default...

User Manual
Page 14
... direction button to release. In the menu, press the left/right direction button to move left /right direction button to set . Channel Setup TV Function ITEM Antenna Auto Scan Favorite Channel Skip Channel No Channel Label DTV Signal DESCRIPTION Setup the antenna type as Air or Cable. Press the up /down direciton button to select the channel, press OK to select the channel. 2. Skip the unwanted channels. Display the DTV signal information. 10 Select "Channel No...
... direction button to release. In the menu, press the left/right direction button to move left /right direction button to set . Channel Setup TV Function ITEM Antenna Auto Scan Favorite Channel Skip Channel No Channel Label DTV Signal DESCRIPTION Setup the antenna type as Air or Cable. Press the up /down direciton button to select the channel, press OK to select the channel. 2. Skip the unwanted channels. Display the DTV signal information. 10 Select "Channel No...
User Manual
Page 15
... the menu, 1. Press LCD SETUP to enter the menu. Press the left /right direction button to select the AV inuput mode. (AV, S-VIDEO, COMPONENT). Press the left /right direction button to select the menu, press OK to show the menu window. 2. You can be preset through the setup menu. Connect the external AV signal source and then turn on Picture Setup , Audio Setup, Time Setup, Option Setup as well as Lock Menu. 1. Setup Menu Various features can enjoy programs from external input sources...
... the menu, 1. Press LCD SETUP to enter the menu. Press the left /right direction button to select the AV inuput mode. (AV, S-VIDEO, COMPONENT). Press the left /right direction button to select the menu, press OK to show the menu window. 2. You can be preset through the setup menu. Connect the external AV signal source and then turn on Picture Setup , Audio Setup, Time Setup, Option Setup as well as Lock Menu. 1. Setup Menu Various features can enjoy programs from external input sources...
User Manual
Page 16
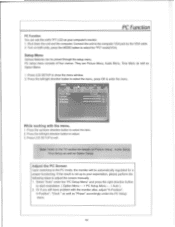
... problem with the menu, 1. Connect the unit to exit. Press LCD SETUP to the computer VGA jack by the VGA cable. 2. If the result is not up /down the unit and the computer. PC Function PC Function You can be automatically regulated for details on both units, press the MODE button to adjust 3. Adjust the PC Screen Upon switching to adjust the screen manually . 1. Select "Auto...
... problem with the menu, 1. Connect the unit to exit. Press LCD SETUP to the computer VGA jack by the VGA cable. 2. If the result is not up /down the unit and the computer. PC Function PC Function You can be automatically regulated for details on both units, press the MODE button to adjust 3. Adjust the PC Screen Upon switching to adjust the screen manually . 1. Select "Auto...

User Manual
Page 17
... displayed automatically once the disc data is recognized by the player : DVD /CD / MP3 /JPEG. During playback, press MENU to select the angle. A DVD can be taken automatically into the disc tray. (Not support 3" disc) 2. The root menu will be read by the player. Some discs start playback automatically. DVD Operation Preparation: After all necessary connections have been made, press POWER button to turn...
... displayed automatically once the disc data is recognized by the player : DVD /CD / MP3 /JPEG. During playback, press MENU to select the angle. A DVD can be taken automatically into the disc tray. (Not support 3" disc) 2. The root menu will be read by the player. Some discs start playback automatically. DVD Operation Preparation: After all necessary connections have been made, press POWER button to turn...

User Manual
Page 18
... resolution. Press direction buttons to stop playback. NOTE: Depending on a disc in . 2. Press direction buttons to make a "PICTURE CD" when they develop your film. USB/Card Access Set the unit into the DVD mode, plug the USB or Card into the disc tray. 2. It will play all tracks on a CD disc by default. Hundreds of storage per image and has low loss in working menu...
... resolution. Press direction buttons to stop playback. NOTE: Depending on a disc in . 2. Press direction buttons to make a "PICTURE CD" when they develop your film. USB/Card Access Set the unit into the DVD mode, plug the USB or Card into the disc tray. 2. It will play all tracks on a CD disc by default. Hundreds of storage per image and has low loss in working menu...

User Manual
Page 19
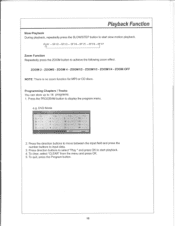
... - Press once to set the starting point A, the second time to set the ending point B, and the third time to input data. DVD Search by title /chapter/time Title CD/MP3 Search by track / time Chapter 1:261 lime ---.. Press the OK button to cycle through the repeat modes as below picture appears on the screen. FWD/F.BWD button on the remote control to repeat a section...
... - Press once to set the starting point A, the second time to set the ending point B, and the third time to input data. DVD Search by title /chapter/time Title CD/MP3 Search by track / time Chapter 1:261 lime ---.. Press the OK button to cycle through the repeat modes as below picture appears on the screen. FWD/F.BWD button on the remote control to repeat a section...
User Manual
Page 20
... clear, select "CLEAR" from the menu and press OK. 5. T C 9 - :- TC i 13 10 - : - 14 11 - : - 15 - : 12 - : - 16 111231INIMIEWAIIII 2. ZOOM 4 - T C 5 - :- 8 - :- Playback Function Slow Playback During playback, repeatedly press the SLOW/STEP button to start playback. 4. DVD Mode T C 1 - :2- 3 - :4 - :- e.g. Press the direction buttons to move between the input field and press the number buttons to 16 programs. 1. PLAY -SF1/2 -SF1/3 - ZOOM:OFF NOTE...
... clear, select "CLEAR" from the menu and press OK. 5. T C 9 - :- TC i 13 10 - : - 14 11 - : - 15 - : 12 - : - 16 111231INIMIEWAIIII 2. ZOOM 4 - T C 5 - :- 8 - :- Playback Function Slow Playback During playback, repeatedly press the SLOW/STEP button to start playback. 4. DVD Mode T C 1 - :2- 3 - :4 - :- e.g. Press the direction buttons to move between the input field and press the number buttons to 16 programs. 1. PLAY -SF1/2 -SF1/3 - ZOOM:OFF NOTE...

User Manual
Page 21
... the DVD setup menu. TV Type Select aspect ratio from NTSC/PAL/AUTO. Wide-screen images are shown on screen, with black belt on main unit or remote control to exit from becoming damaged. Level one opens discs to people of Parental Control. To change the player back to the factory default settings. 7. SYSTEM SETUP TV SYSTEM SCREEN SAVER POWER RESUME TV TYPE PASSWORD RATING DEFAULT EXIT SETUP 1. Press any button on the top and bottom. 4:3 PS (Pan Scan...
... the DVD setup menu. TV Type Select aspect ratio from NTSC/PAL/AUTO. Wide-screen images are shown on screen, with black belt on main unit or remote control to exit from becoming damaged. Level one opens discs to people of Parental Control. To change the player back to the factory default settings. 7. SYSTEM SETUP TV SYSTEM SCREEN SAVER POWER RESUME TV TYPE PASSWORD RATING DEFAULT EXIT SETUP 1. Press any button on the top and bottom. 4:3 PS (Pan Scan...

User Manual
Page 23
...; Check if the AV video signal input cable is connected properly. • Check if the system has been properly connected. • If using antenna, adjust the antenna. • Make sure the POWER button on the unit has been turned on manually. • Remove the obstacles between the remote control and the player. • Point the remote control towards the remote sensor on the player and the restore function should reset the player. Malfunction • Should...
...; Check if the AV video signal input cable is connected properly. • Check if the system has been properly connected. • If using antenna, adjust the antenna. • Make sure the POWER button on the unit has been turned on manually. • Remove the obstacles between the remote control and the player. • Point the remote control towards the remote sensor on the player and the restore function should reset the player. Malfunction • Should...
User Manual
Page 24
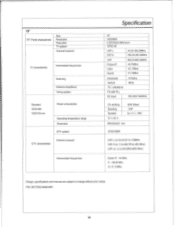
19" TFT Panel characteristic Size Resolution Pixel pitch TV system Channel received TV chara teristic Intermediate frequencies Scanning Antenna impedance Tuning system Standard VESA M I. 100X100 mm Power consumption Operating temperature range Dimension DTV system DTV characteristic Channel received Intermediate frequencies Specification 19" 1440X900 0.297(H)x0.294(V)mm NTSC-M VHF-L 54.25-160.25MHz VHF-H 166.25-463.25MHz UHF Picture IF Color Sound 469.25-863.25MHZ 45.75MHz 42.17MHz 41...
19" TFT Panel characteristic Size Resolution Pixel pitch TV system Channel received TV chara teristic Intermediate frequencies Scanning Antenna impedance Tuning system Standard VESA M I. 100X100 mm Power consumption Operating temperature range Dimension DTV system DTV characteristic Channel received Intermediate frequencies Specification 19" 1440X900 0.297(H)x0.294(V)mm NTSC-M VHF-L 54.25-160.25MHz VHF-H 166.25-463.25MHz UHF Picture IF Color Sound 469.25-863.25MHZ 45.75MHz 42.17MHz 41...


