
User Manual
Page 2
... to radio or television reception, which the receiver is connected. •• Consult the dealer or an experienced radio/TV technician for help Use of shielded cable is subject to Part 15 of the FCC rules. However, there is no response or powers off and on ...comply with the instructions, may be determined by turning the equipment off , an electrostatic discharge may cause harmful interference to the equipment unless otherwise specified in a particular installation. Do not make any interference received, including interference that may cause undesired operation. Note: If...
... to radio or television reception, which the receiver is connected. •• Consult the dealer or an experienced radio/TV technician for help Use of shielded cable is subject to Part 15 of the FCC rules. However, there is no response or powers off and on ...comply with the instructions, may be determined by turning the equipment off , an electrostatic discharge may cause harmful interference to the equipment unless otherwise specified in a particular installation. Do not make any interference received, including interference that may cause undesired operation. Note: If...
User Manual
Page 3
... your equipment. Seek service if any of the serial/model plate. 1111 Never overload wall outlets and extensions. 1111 Use and handle the power cord with care. Before operating this equipment, please read before cleaning the equipment. 2222 Never use liquid or aerosol cleaners on a surface that is sturdy, level, stable and strong enough to support the weight of the equipment...
... your equipment. Seek service if any of the serial/model plate. 1111 Never overload wall outlets and extensions. 1111 Use and handle the power cord with care. Before operating this equipment, please read before cleaning the equipment. 2222 Never use liquid or aerosol cleaners on a surface that is sturdy, level, stable and strong enough to support the weight of the equipment...
User Manual
Page 4
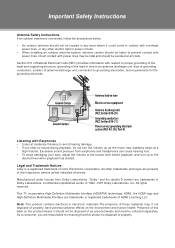
...owners unless indicated otherwise. Legal and Trademark Notices Coby is connected, follow the precautions below: •• An outdoor antenna should be collected separately. "Dolby" and the double-D symbol are responsible for ensuring that this label on the environment and human health. HDMI, the HDMI... adjust the Volume to the lowest level before playback, and turn the Volume up to avoid hearing damage. •• If you are trademarks of Coby Electronics Corporation. All other electric light or power circuits. •• When installing an outdoor antenna ...
...owners unless indicated otherwise. Legal and Trademark Notices Coby is connected, follow the precautions below: •• An outdoor antenna should be collected separately. "Dolby" and the double-D symbol are responsible for ensuring that this label on the environment and human health. HDMI, the HDMI... adjust the Volume to the lowest level before playback, and turn the Volume up to avoid hearing damage. •• If you are trademarks of Coby Electronics Corporation. All other electric light or power circuits. •• When installing an outdoor antenna ...
User Manual
Page 6
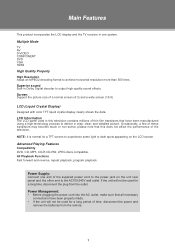
... supplied power cord to the power jack on the LCD screen. LCD Information The LCD panel used for a long period of time, disconnect the power and remove the batteries from the outlet. Superior sound Built-in this television contains millions of thin film transistors that this does not affect the performance of the television. P ow er Supply: Connect one system. Multiple Mode TV AV S-VIDEO COMPONENT DVD VGA HDMI High Quality Property High Resolution...
... supplied power cord to the power jack on the LCD screen. LCD Information The LCD panel used for a long period of time, disconnect the power and remove the batteries from the outlet. Superior sound Built-in this television contains millions of thin film transistors that this does not affect the performance of the television. P ow er Supply: Connect one system. Multiple Mode TV AV S-VIDEO COMPONENT DVD VGA HDMI High Quality Property High Resolution...
User Manual
Page 8
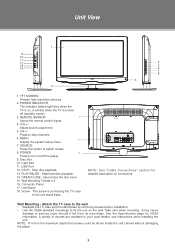
... instructions when installing the unit. REMOTE SENSOR 9 Sense the remote control signal. 4. CH+/- POWER 11 Press to skip channels. 6. USB Port 12. STOP - NOTE: See "Cable Connections" section for VESA informaiton. Attach the TV case to the wall • Separate the TV case and the stand-base by removing screws before installation. • Use the VESA standard mountings to switch modes. 8. NOTE: 10 mm is connecting the TV case to the unit stand-base. MENU 10 Display the system setup menu. 7. OPEN/CLOSE - Wall Mounting...
... instructions when installing the unit. REMOTE SENSOR 9 Sense the remote control signal. 4. CH+/- POWER 11 Press to skip channels. 6. USB Port 12. STOP - NOTE: See "Cable Connections" section for VESA informaiton. Attach the TV case to the wall • Separate the TV case and the stand-base by removing screws before installation. • Use the VESA standard mountings to switch modes. 8. NOTE: 10 mm is connecting the TV case to the unit stand-base. MENU 10 Display the system setup menu. 7. OPEN/CLOSE - Wall Mounting...
User Manual
Page 9
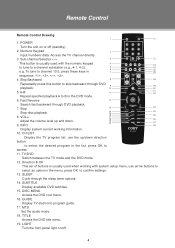
.... Remote Control Remote Control Drawing 1 21 1. VOL+/- 16 35 17 Adjust the volume level up /down . 18 19 20 36 37 9. Direction & OK This set of buttons is usually used when working information. 10. LIGHT Turn the front panel light on or off . 4 MTS Set the audio mode. 18. Stop 13 33 Stop disc playback. 14 34 15 8. Access the TV channel directly. 3. POWER Turn the unit on /off (standby). 2. DISC MENU Access the DVD...
.... Remote Control Remote Control Drawing 1 21 1. VOL+/- 16 35 17 Adjust the volume level up /down . 18 19 20 36 37 9. Direction & OK This set of buttons is usually used when working information. 10. LIGHT Turn the front panel light on or off . 4 MTS Set the audio mode. 18. Stop 13 33 Stop disc playback. 14 34 15 8. Access the TV channel directly. 3. POWER Turn the unit on /off (standby). 2. DISC MENU Access the DVD...
User Manual
Page 10
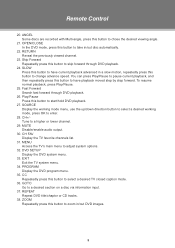
... via information input. 37. CC Repeatedly press this button to select a desired TV closed caption mode. 36. Play/Pause Press this button to start/hold DVD playback. 27. GOTO Go to a higher or lower channel. 29. REPEAT Repeat DVD title/chaptor or CD tracks. 38. EXIT Exit the TV system menu. 34. RETURN Reveal the previously viewed channel. 23. SOURCE Display the working mode menu, use the up/down...
... via information input. 37. CC Repeatedly press this button to select a desired TV closed caption mode. 36. Play/Pause Press this button to start/hold DVD playback. 27. GOTO Go to a higher or lower channel. 29. REPEAT Repeat DVD title/chaptor or CD tracks. 38. EXIT Exit the TV system menu. 34. RETURN Reveal the previously viewed channel. 23. SOURCE Display the working mode menu, use the up/down...
User Manual
Page 12
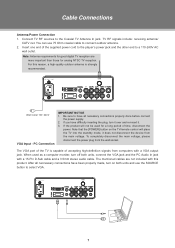
... power plug from computers with a 15-Pin D-Sub cable and a 3.5mm stereo audio cable. The VGA port of accepting high-definition signals from the wall socket. Note: Antenna requirements for analog NTSC TV reception. Note that the [POWER] button on the TV/remote control will place the TV into the standby mode, it . 333 If the product will not be used as a computer moniter, turn on both units, connect...
... power plug from computers with a 15-Pin D-Sub cable and a 3.5mm stereo audio cable. The VGA port of accepting high-definition signals from the wall socket. Note: Antenna requirements for analog NTSC TV reception. Note that the [POWER] button on the TV/remote control will place the TV into the standby mode, it . 333 If the product will not be used as a computer moniter, turn on both units, connect...
User Manual
Page 13
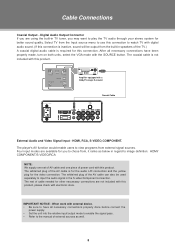
... digital audio sound. (If this product. The white/red plug of external sources as below in TV tuner, you may want to play the TV audio through your stereo system for this connection to watch TV with electronic store. After all necessary connections properly done before connect the power supply. •• Set the unit into the relative input/output mode to enable the signal pass. •• Refer to input the audio signal...
... digital audio sound. (If this product. The white/red plug of external sources as below in TV tuner, you may want to play the TV audio through your stereo system for this connection to watch TV with electronic store. After all necessary connections properly done before connect the power supply. •• Set the unit into the relative input/output mode to enable the signal pass. •• Refer to input the audio signal...
User Manual
Page 14
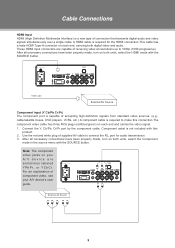
... , turn on both units, select the HDMI mode with the SOURCE button. HDMI Cable External AV Source Component Input (Y Cb/Pb Cr/Pr) The component port is capable of accepting high-definition signals from standard video sources. (e.g., cable/satellite boxes, DVD players, VCRs, etc.) A component cable is not included with this connection.The component video cable has three RCA plugs (red/blue/green) on each end, carrying both digital video and audio. Component cabel is required to make this product. 222 Use the red and white plug...
... , turn on both units, select the HDMI mode with the SOURCE button. HDMI Cable External AV Source Component Input (Y Cb/Pb Cr/Pr) The component port is capable of accepting high-definition signals from standard video sources. (e.g., cable/satellite boxes, DVD players, VCRs, etc.) A component cable is not included with this connection.The component video cable has three RCA plugs (red/blue/green) on each end, carrying both digital video and audio. Component cabel is required to make this product. 222 Use the red and white plug...

User Manual
Page 15
...turn on both units, select the S-Video mode with the SOURCE button. Cable Connections S-Video Input The S-Video port is capable of the supplied AV cable to input the video signal. External AV Source RCA Input The CVBS port is capable of accepting signals from standard video sources(e.g., cable/satellite boxes, DVD players, VCRs, etc.) A composite A/V is required to make this product 222 Connect the L, R port by the white/red plug of accepting signals from standard video sources. (e.g., cable/satellite boxes, DVD players, VCRs, etc.) 111 Connect the S-Video port by the S-Video cable...
...turn on both units, select the S-Video mode with the SOURCE button. Cable Connections S-Video Input The S-Video port is capable of the supplied AV cable to input the video signal. External AV Source RCA Input The CVBS port is capable of accepting signals from standard video sources(e.g., cable/satellite boxes, DVD players, VCRs, etc.) A composite A/V is required to make this product 222 Connect the L, R port by the white/red plug of accepting signals from standard video sources. (e.g., cable/satellite boxes, DVD players, VCRs, etc.) 111 Connect the S-Video port by the S-Video cable...
User Manual
Page 16
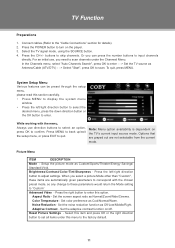
... menu to turn on the player. 333 Select the TV signal mode, using the SOURCE button. 444 Press the CH+/- Press MENU to back up/exit the setup menu, or press EXIT to skip channels. Adaptive Contrast - buttons to quit. Reset Picture Settings - Set the adaptive contrast function on the TV's current input source mode. TV Function Preparations 111 Connect cables.(Refer to the "Cable Connections" section for details). 222 Press the POWER button to the factory default. 11 System Setup Menu...
... menu to turn on the player. 333 Select the TV signal mode, using the SOURCE button. 444 Press the CH+/- Press MENU to back up/exit the setup menu, or press EXIT to skip channels. Adaptive Contrast - buttons to quit. Reset Picture Settings - Set the adaptive contrast function on the TV's current input source mode. TV Function Preparations 111 Connect cables.(Refer to the "Cable Connections" section for details). 222 Press the POWER button to the factory default. 11 System Setup Menu...
User Manual
Page 17
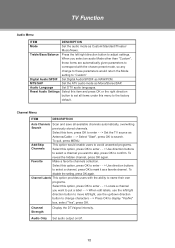
... Mono/Stereo/SAP. Channel Strength Display the DTVsignal intensity. Reset Audio Settings Select this item and press OK or the right direction button to the factory default. Channel Menu ITEM DESCRIPTION Auto Channels Scan and save all items under this option, press OK to enter - - > Use direction buttons to select a channel you select an audio Mode other than "Custom", these parameters would enable users to avoid unwanted programs. Ch ann...
... Mono/Stereo/SAP. Channel Strength Display the DTVsignal intensity. Reset Audio Settings Select this item and press OK or the right direction button to the factory default. Channel Menu ITEM DESCRIPTION Auto Channels Scan and save all items under this option, press OK to enter - - > Use direction buttons to select a channel you select an audio Mode other than "Custom", these parameters would enable users to avoid unwanted programs. Ch ann...
User Manual
Page 18
.... Button Lock - French Rating - Set the rating region table. Mode - Set the closed caption mode as CS1~6/Off. Set the digital caption type as CC Off/CC On/CC On Mute. Digital CC Settings - USA Parental Locks Setup the US parental control. There are four options listed under the Closed Caption menu. There are English Rating and French Rating. This option would enable users to enter. Select this option, press OK to lock buttons on the unit panel. Use...
.... Button Lock - French Rating - Set the rating region table. Mode - Set the closed caption mode as CS1~6/Off. Set the digital caption type as CC Off/CC On/CC On Mute. Digital CC Settings - USA Parental Locks Setup the US parental control. There are four options listed under the Closed Caption menu. There are English Rating and French Rating. This option would enable users to enter. Select this option, press OK to lock buttons on the unit panel. Use...
User Manual
Page 19
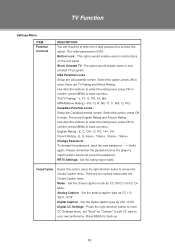
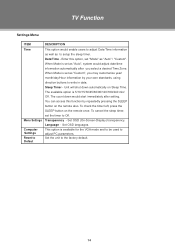
TV Function Settings Menu ITEM DESCRIPTION Time Menu Settings Computer Se ttin gs Reset to Defaut This option would enable users to adjust Date/Time information as well as to adjust PC parameters. When Mode is available for the VGA mode and to be used to setup the sleep timer. Sleep Timer - Set OSD (On-Screen-Display) transparency. This option is set as "Auto", system would start immediately after you may customerize year/ month...
TV Function Settings Menu ITEM DESCRIPTION Time Menu Settings Computer Se ttin gs Reset to Defaut This option would enable users to adjust Date/Time information as well as to adjust PC parameters. When Mode is available for the VGA mode and to be used to setup the sleep timer. Sleep Timer - Set OSD (On-Screen-Display) transparency. This option is set as "Auto", system would start immediately after you may customerize year/ month...
User Manual
Page 20
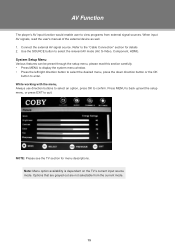
... setup menu, please read the user's manual of the external device as well. 111 Connect the external AV signal source. Press MENU to back up/exit the setup menu, or press EXIT to select the relevant AV mode (AV, S-Video, Component, HDMI). Options that are grayed out are not selectable from external signal sources. While working with the menu, Always use direction buttons to select an option, press OK to view programs from the current mode...
... setup menu, please read the user's manual of the external device as well. 111 Connect the external AV signal source. Press MENU to back up/exit the setup menu, or press EXIT to select the relevant AV mode (AV, S-Video, Component, HDMI). Options that are grayed out are not selectable from external signal sources. While working with the menu, Always use direction buttons to select an option, press OK to view programs from the current mode...

User Manual
Page 21
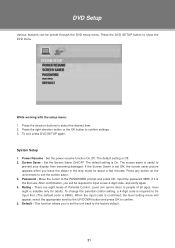
... jack. See the "Cable Connection" section. 222 Turn on units and use the SOURCE button to select VGA System Setup Menu Various features can use direction buttons to select an option, press OK to confirm. While working with the menu, Always use the unit's TFT LCD as your expectation, please adjust the moniter manually via the "Computer Settings" menu which is not up /exit the setup menu, or press EXIT...
... jack. See the "Cable Connection" section. 222 Turn on units and use the SOURCE button to select VGA System Setup Menu Various features can use direction buttons to select an option, press OK to confirm. While working with the menu, Always use the unit's TFT LCD as your expectation, please adjust the moniter manually via the "Computer Settings" menu which is not up /exit the setup menu, or press EXIT...
User Manual
Page 23
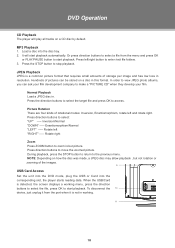
... picture format that requires small amounts of pictures can ask your film. Enantiomorphism/Normal "LEFT" ----- Press direction buttons to access. Normal Playback Load a JPEG disc in working menu, press the direction buttons to select the file, press OK to enter /exit file folders. 3. Picture Rotation There are four kinds of the images. 9 USB/Card Access Set the unit into the DVD mode, plug the USB or...
... picture format that requires small amounts of pictures can ask your film. Enantiomorphism/Normal "LEFT" ----- Press direction buttons to access. Normal Playback Load a JPEG disc in working menu, press the direction buttons to select the file, press OK to enter /exit file folders. 3. Picture Rotation There are four kinds of the images. 9 USB/Card Access Set the unit into the DVD mode, plug the USB or...
User Manual
Page 26
.... 555 Default - The default setting is confirmed, the level setting menu will be input first. (The default code is required to be required to the factory default. 21 Press any button on the unit/remote to the PASSWORD prompt and press OK. Set the Screen Saver ON/OFF. If the Screen Saver is set the unit back to input a new 4-digit code, and verify again. 444 Rating - To change the parental control setting, a 4-digit code is...
.... 555 Default - The default setting is confirmed, the level setting menu will be input first. (The default code is required to be required to the factory default. 21 Press any button on the unit/remote to the PASSWORD prompt and press OK. Set the Screen Saver ON/OFF. If the Screen Saver is set the unit back to input a new 4-digit code, and verify again. 444 Rating - To change the parental control setting, a 4-digit code is...
User Manual
Page 28
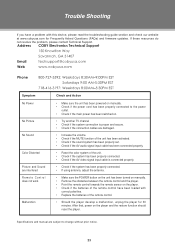
... player for Frequently Asked Questions (FAQs) and firmware updates. Trouble Shooting If you have a problem with correct polarities. •• Replace the batteries of the remote control have been loaded with this device, please read the troubleshooting guide section and check our website at www.cobyusa.com for 30 minutes. Symptom No Power No Picture No Sound Color Distorted Picture and Sound are interfered Remote Control does not work...
... player for Frequently Asked Questions (FAQs) and firmware updates. Trouble Shooting If you have a problem with correct polarities. •• Replace the batteries of the remote control have been loaded with this device, please read the troubleshooting guide section and check our website at www.cobyusa.com for 30 minutes. Symptom No Power No Picture No Sound Color Distorted Picture and Sound are interfered Remote Control does not work...


