
Instruction Manual
Page 2
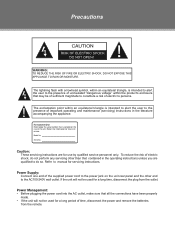
... sufficient magnitude to constitute a risk of electric shock, do so. If the unit will not be used for a long time, disconnect the plug from the remote. Caution: These servicing instructions are qualified to do not perform any servicing other end to the presence of uninsulated "dangerous voltage" within an equilateral triangle...
... sufficient magnitude to constitute a risk of electric shock, do so. If the unit will not be used for a long time, disconnect the plug from the remote. Caution: These servicing instructions are qualified to do not perform any servicing other end to the presence of uninsulated "dangerous voltage" within an equilateral triangle...
Instruction Manual
Page 8
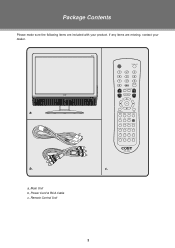
Package Contents Please make sure the following items are missing, contact your product. a, Main Unit b, Power Cord & RCA Cable c, Remote Control Unit 2 C.C MTS/SOUND DVD SETUP EXIT MODE SLEEP CH-LIST INFO EPG FAV FORMAT TITLE ANGLE SUBTITLE MENU PLAY/PAUSE STOP SLOW/STEP F.BWD F.FWD PREV NEXT PROGRAM GOTO ZOOM REPEAT b. If any items are included with your dealer. c. OPEN/CLOSE a.
Package Contents Please make sure the following items are missing, contact your product. a, Main Unit b, Power Cord & RCA Cable c, Remote Control Unit 2 C.C MTS/SOUND DVD SETUP EXIT MODE SLEEP CH-LIST INFO EPG FAV FORMAT TITLE ANGLE SUBTITLE MENU PLAY/PAUSE STOP SLOW/STEP F.BWD F.FWD PREV NEXT PROGRAM GOTO ZOOM REPEAT b. If any items are included with your dealer. c. OPEN/CLOSE a.
Instruction Manual
Page 9
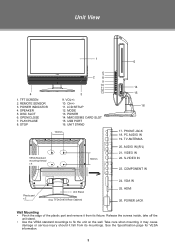
... 6 2 7 8 9 10 11 12 3 13 9. POWER 14. TV ANTENNA 20. Release the screws inside, take off the unit stand. •...injury should it from its fixture. SPEAKER 5. PHONE JACK 18. AUDIO IN((R/L) 21. See the Specification page for VESA information. 3 TFT SCREEN 2. REMOTE SENSOR 3. UNIT STAND 100mm < > > VESA Standard mounting thread x 4 < 100mm > Plastic part x 2 Unit Stand (e.g. PC AUDIO IN 19...Pinch the edge of the plastic part and remove it fall from its mountings. LCD SETUP 12. PLAY/PAUSE 8. MMC/SD/MS CARD SLOT 15. USB PORT 16. VIDEO IN 22.
... 6 2 7 8 9 10 11 12 3 13 9. POWER 14. TV ANTENNA 20. Release the screws inside, take off the unit stand. •...injury should it from its fixture. SPEAKER 5. PHONE JACK 18. AUDIO IN((R/L) 21. See the Specification page for VESA information. 3 TFT SCREEN 2. REMOTE SENSOR 3. UNIT STAND 100mm < > > VESA Standard mounting thread x 4 < 100mm > Plastic part x 2 Unit Stand (e.g. PC AUDIO IN 19...Pinch the edge of the plastic part and remove it fall from its mountings. LCD SETUP 12. PLAY/PAUSE 8. MMC/SD/MS CARD SLOT 15. USB PORT 16. VIDEO IN 22.
Instruction Manual
Page 10
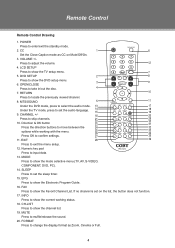
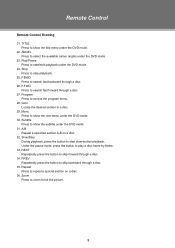
LCD SETUP Press to confirm settings. 25 33 26 PROGRAM GOTO ZOOM REPEAT 34 27 35 11. Press OK to show the TV setup menu. 5. Numeric key pad... list, the button does not function. 17. Press to set the audio language. 14 15 EPG FAV FORMAT 18 19 9. MTS/SOUND 5 11 DVD SETUP EXIT Under the DVD mode...Remote Control Drawing 1. CC 1 OPEN/CLOSE 6 Set the Close Caption mode as Zoom, Cinema or Full. 4 DVD SETUP 7 2 C.C MTS/SOUND 8 Press to locate the previously viewed channel. 8. RETURN 10 Press to show the mode selective menu (TV...
LCD SETUP Press to confirm settings. 25 33 26 PROGRAM GOTO ZOOM REPEAT 34 27 35 11. Press OK to show the TV setup menu. 5. Numeric key pad... list, the button does not function. 17. Press to set the audio language. 14 15 EPG FAV FORMAT 18 19 9. MTS/SOUND 5 11 DVD SETUP EXIT Under the DVD mode...Remote Control Drawing 1. CC 1 OPEN/CLOSE 6 Set the Close Caption mode as Zoom, Cinema or Full. 4 DVD SETUP 7 2 C.C MTS/SOUND 8 Press to locate the previously viewed channel. 8. RETURN 10 Press to show the mode selective menu (TV...
Instruction Manual
Page 11
... root menu under the DVD mode. 22. Menu Press to start slow-motion playback. F.BWD Press to show the subtitle under the DVD mode. 31. Remote Control Remote Control Drawing 21. TITLE Press to search fast backward through a disc. 35. Stop Press to play a disc frame by frame. 33. Program Press to...
... root menu under the DVD mode. 22. Menu Press to start slow-motion playback. F.BWD Press to show the subtitle under the DVD mode. 31. Remote Control Remote Control Drawing 21. TITLE Press to search fast backward through a disc. 35. Stop Press to play a disc frame by frame. 33. Program Press to...

Instruction Manual
Page 12
... of batteries. •• Remove the batteries from children. Using the Remote Control To use the remote, point it will last for a long period of time. Warnings: The battery used in the remote will not be used for approximately 6 months under the normal use this ...device may vary depending on the brightness around. Do not recharge, disassemble, incinerate, or heat the battery (~212ºF). Remote Control Preparation •• Remove the battery compartment cover located on the inside of the compartment. Insert 2 x "AAA" batteries, making ...
... of batteries. •• Remove the batteries from children. Using the Remote Control To use the remote, point it will last for a long period of time. Warnings: The battery used in the remote will not be used for approximately 6 months under the normal use this ...device may vary depending on the brightness around. Do not recharge, disassemble, incinerate, or heat the battery (~212ºF). Remote Control Preparation •• Remove the battery compartment cover located on the inside of the compartment. Insert 2 x "AAA" batteries, making ...
Instruction Manual
Page 16
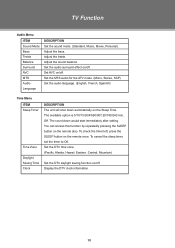
TV Function Audio Menu ITEM Sound Mode Bass Treble Balance Surround AVC MTS Audio Language DESCRIPTION Set the sound mode. (Standard, ... timer, set the timer to Off. Adjust the treble. Set the audio surround effect on the remote also. Display the DTV clock information. 10 The available option is 5/10/15/30/45/60/90/120/180/240 min, Off. To check the timer left, press the... Set the DTV time zone. (Pacific, Alaska, Hawaii, Eastern, Central, Mountain) Set the DTV daylight saving function on the remote once. Adjust the sound balance. Set AVC on the Sleep Time. Adjust the bass.
TV Function Audio Menu ITEM Sound Mode Bass Treble Balance Surround AVC MTS Audio Language DESCRIPTION Set the sound mode. (Standard, ... timer, set the timer to Off. Adjust the treble. Set the audio surround effect on the remote also. Display the DTV clock information. 10 The available option is 5/10/15/30/45/60/90/120/180/240 min, Off. To check the timer left, press the... Set the DTV time zone. (Pacific, Alaska, Hawaii, Eastern, Central, Mountain) Set the DTV daylight saving function on the remote once. Adjust the sound balance. Set AVC on the Sleep Time. Adjust the bass.
Instruction Manual
Page 23
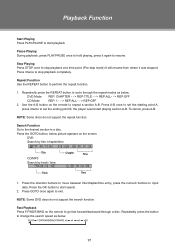
... as below, DVD Mode REP: CHAPTER - - > REP:TITLE - - > REP:ALL- - > REP:OFF CD Mode REP: 1 - - > REP:ALL - - > REP:OFF 222 Use the A-B button on the remote to start playing section A-B. To cancel, press A-B. DVD Search by title /chapter/time DVD TT 06 / 12 CH 018 / 029 00 : 01 : 26 Title CD... REPEAT button to perform the repeat function. 111 Repeatedly press the REPEAT button to cycle through the repeat modes as below picture appears on the remote to stop playback completely. Search Function Go to input data.
... as below, DVD Mode REP: CHAPTER - - > REP:TITLE - - > REP:ALL- - > REP:OFF CD Mode REP: 1 - - > REP:ALL - - > REP:OFF 222 Use the A-B button on the remote to start playing section A-B. To cancel, press A-B. DVD Search by title /chapter/time DVD TT 06 / 12 CH 018 / 029 00 : 01 : 26 Title CD... REPEAT button to perform the repeat function. 111 Repeatedly press the REPEAT button to cycle through the repeat modes as below picture appears on the remote to stop playback completely. Search Function Go to input data.
Instruction Manual
Page 25
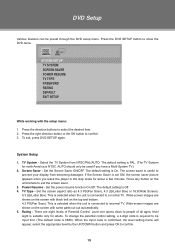
...Pan Scan): This is selected when the unit is connected to people of Parental Control. Level one opens discs to anormal TV. SYSTEM SETUP TV SYSTEM SCREEN SAVER POWER RESUME TV TYPE PASSWORD RATING DEFAULT EXIT SETUP While working with black belt on the screen with the setup menu: 111 Press the ...- If the Screen Saver is set ON, the screen saver picture appears when you have a Multi-System TV). 222 Screen Saver - There are shown on the unit/remote to show the DVD menu. System Setup 111 TV System - Set the screen aspect ratio as 4:3 PS(Pan Scan), 4:3 LB(Letter Box) or 16:9(Wide...
...Pan Scan): This is selected when the unit is connected to people of Parental Control. Level one opens discs to anormal TV. SYSTEM SETUP TV SYSTEM SCREEN SAVER POWER RESUME TV TYPE PASSWORD RATING DEFAULT EXIT SETUP While working with black belt on the screen with the setup menu: 111 Press the ...- If the Screen Saver is set ON, the screen saver picture appears when you have a Multi-System TV). 222 Screen Saver - There are shown on the unit/remote to show the DVD menu. System Setup 111 TV System - Set the screen aspect ratio as 4:3 PS(Pan Scan), 4:3 LB(Letter Box) or 16:9(Wide...
Instruction Manual
Page 27
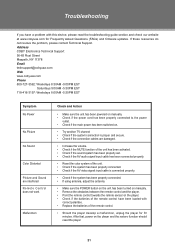
Address COBY Electronics Technical Support 56-65 Rust Street Maspeth, NY 11378 Email [email protected] ...416-3197: Weekdays 8:00AM -5:30PM EST Symptom No Power No Picture No Sound Color Distorted Picture and Sound are interfered Remote Control does not work Malfunction Check and Action •• Make sure the unit has been powered on manually. &#... to the power outlet. •• Check if the main power has been switched on. •• Try another TV channel •• Check if the system connection is proper and secure. •• Check if the connection cables are...
Address COBY Electronics Technical Support 56-65 Rust Street Maspeth, NY 11378 Email [email protected] ...416-3197: Weekdays 8:00AM -5:30PM EST Symptom No Power No Picture No Sound Color Distorted Picture and Sound are interfered Remote Control does not work Malfunction Check and Action •• Make sure the unit has been powered on manually. &#... to the power outlet. •• Check if the main power has been switched on. •• Try another TV channel •• Check if the system connection is proper and secure. •• Check if the connection cables are...


