
Instruction Manual
Page 2
... of time, disconnect the power and remove the batteries from the outlet. For Customer Use: Enter below the serial number that may be used for a long time, disconnect the plug from the remote. Serial No. Caution: These servicing instructions are qualified to persons. The exclamation point within the product's enclosure that is located on the unit rear panel and the other than that all the connections have...
... of time, disconnect the power and remove the batteries from the outlet. For Customer Use: Enter below the serial number that may be used for a long time, disconnect the plug from the remote. Serial No. Caution: These servicing instructions are qualified to persons. The exclamation point within the product's enclosure that is located on the unit rear panel and the other than that all the connections have...
Instruction Manual
Page 3
... the performance of the television. LCD Information The LCD panel used in a residential installation. Operation is subject to the following two conditions: •• This device may not cause harmful interference, and •• This device must be authorized by one or more of the following measures: •• Reorient or relocate the receiving antenna. •• Increase the...
... the performance of the television. LCD Information The LCD panel used in a residential installation. Operation is subject to the following two conditions: •• This device may not cause harmful interference, and •• This device must be authorized by one or more of the following measures: •• Reorient or relocate the receiving antenna. •• Increase the...
Instruction Manual
Page 4
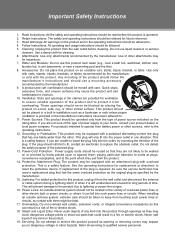
... from battery power or other similar surface. Use only with carts, stands, tripods, brackets, or tables recommended by the manufacturer. These openings should never be operated only from overheating. This is a safety feature. When installing an outside antenna system should not be fatal. 1111 Overloading: Do not overload wall outlets, extension cords, or integral convenience receptacles as opening or removing covers...
... from battery power or other similar surface. Use only with carts, stands, tripods, brackets, or tables recommended by the manufacturer. These openings should never be operated only from overheating. This is a safety feature. When installing an outside antenna system should not be fatal. 1111 Overloading: Do not overload wall outlets, extension cords, or integral convenience receptacles as opening or removing covers...
Instruction Manual
Page 5
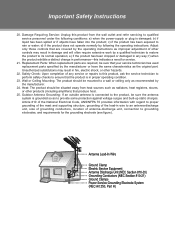
... the power-supply or plug is grounded so as the original part. e) if the product has been dropped or damaged in wire to an antenna-discharge unit, size of grounding conductors, location of antenna-discharge unit, connection to grounding electrodes, and requirements for service. 2222 Replacement Parts: When replacement parts are covered by the operating instructions as improper adjustment of other controls may result in proper operating condition. 2222 Wall...
... the power-supply or plug is grounded so as the original part. e) if the product has been dropped or damaged in wire to an antenna-discharge unit, size of grounding conductors, location of antenna-discharge unit, connection to grounding electrodes, and requirements for service. 2222 Replacement Parts: When replacement parts are covered by the operating instructions as improper adjustment of other controls may result in proper operating condition. 2222 Wall...
Instruction Manual
Page 7
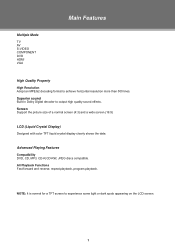
... compatible. Superior sound Built-in Dolby Digital decoder to experience some light or dark spots appearing on the LCD screen. 1 NOTE: It is normal for a TFT screen to output high quality sound effects. All Playback Functions Fast forward and reverse, repeat playback, program playback. Multiple Mode TV AV S-VIDEO COMPONENT DVD HDMI VGA Main Features High Quality Property High Resolution Adopt an MPEG2 decoding format to achieve horizontal resolution...
... compatible. Superior sound Built-in Dolby Digital decoder to experience some light or dark spots appearing on the LCD screen. 1 NOTE: It is normal for a TFT screen to output high quality sound effects. All Playback Functions Fast forward and reverse, repeat playback, program playback. Multiple Mode TV AV S-VIDEO COMPONENT DVD HDMI VGA Main Features High Quality Property High Resolution Adopt an MPEG2 decoding format to achieve horizontal resolution...
Instruction Manual
Page 9
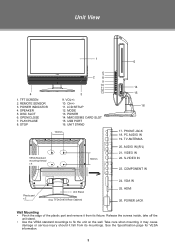
.... SPEAKER 5. LCD SETUP 12. TV ANTENNA 20. Take care when mounting, it may cause damage or serious injury should it from its fixture. STOP 6 2 7 8 9 10 11 12 3 13 9. MODE 13. VIDEO IN 22. HDMI 26. UNIT STAND 100mm < > > VESA Standard mounting thread x 4 < 100mm > Plastic part x 2 Unit Stand (e.g. REMOTE SENSOR 3. VOL+/10. POWER JACK Wall Mounting •• Pinch the edge of the plastic part and remove it fall from its mountings. TFDVD1973 Rear...
.... SPEAKER 5. LCD SETUP 12. TV ANTENNA 20. Take care when mounting, it may cause damage or serious injury should it from its fixture. STOP 6 2 7 8 9 10 11 12 3 13 9. MODE 13. VIDEO IN 22. HDMI 26. UNIT STAND 100mm < > > VESA Standard mounting thread x 4 < 100mm > Plastic part x 2 Unit Stand (e.g. REMOTE SENSOR 3. VOL+/10. POWER JACK Wall Mounting •• Pinch the edge of the plastic part and remove it fall from its mountings. TFDVD1973 Rear...
Instruction Manual
Page 10
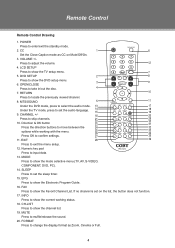
... MENU 20 Press to set the audio language. 14 15 EPG FAV FORMAT 18 19 9. Numeric key pad Press to show the TV setup menu. 5. If no channel is set the sleep timer. 15. INFO Press to input data. 13. RETURN 10 Press to show the channel list. 19. MODE Press to locate the previously viewed channel. 8. CH-LIST Press to set on Mute/Off/On. 3. SLEEP Press to show the mode selective menu (TV, AV, S-VIDEO, COMPONENT, DVD...
... MENU 20 Press to set the audio language. 14 15 EPG FAV FORMAT 18 19 9. Numeric key pad Press to show the TV setup menu. 5. If no channel is set the sleep timer. 15. INFO Press to input data. 13. RETURN 10 Press to show the channel list. 19. MODE Press to locate the previously viewed channel. 8. CH-LIST Press to set on Mute/Off/On. 3. SLEEP Press to show the mode selective menu (TV, AV, S-VIDEO, COMPONENT, DVD...
Instruction Manual
Page 13
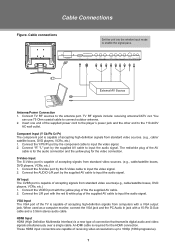
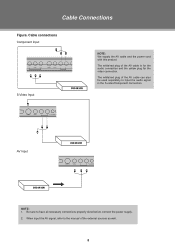
... video connection. External AV Source Antenna/Power Connection 111 Connect TV RF sources to enable the signal pass. The red/white plug of receiving video at resolutions up to the 110-240V AC wall outlet. When used as a computer moniter, connect the VGA jack and the PC Audio In jack with the red & white plug of accepting signals from standard video sources. (e.g., cable/ satellite boxes, DVD players, VCRs, etc.) 111 Connect the Y/Pb/Pr port by the component cable to input the video signal. 222 Connect "R" "L" port by the supplied AV cable...
... video connection. External AV Source Antenna/Power Connection 111 Connect TV RF sources to enable the signal pass. The red/white plug of receiving video at resolutions up to the 110-240V AC wall outlet. When used as a computer moniter, connect the VGA jack and the PC Audio In jack with the red & white plug of accepting signals from standard video sources. (e.g., cable/ satellite boxes, DVD players, VCRs, etc.) 111 Connect the Y/Pb/Pr port by the component cable to input the video signal. 222 Connect "R" "L" port by the supplied AV cable...
Instruction Manual
Page 14
The white/red plug of the external sources as well. 8 AV Input NOTE: 111 Be sure to have all necessary connections properly done before connect the power supply. 222 When input the AV signal, refer to the manual of the AV cable can also be used separately to input the audio signal in the S-video/Component connection. The white/red plug of the AV cable is for the audio connection and the yellow plug for the video connection. Cable Connections Figure. Cable connections Component Input S-Video Input NOTE: We supply the AV cable and the power cord with this product.
The white/red plug of the external sources as well. 8 AV Input NOTE: 111 Be sure to have all necessary connections properly done before connect the power supply. 222 When input the AV signal, refer to the manual of the AV cable can also be used separately to input the audio signal in the S-video/Component connection. The white/red plug of the AV cable is for the audio connection and the yellow plug for the video connection. Cable Connections Figure. Cable connections Component Input S-Video Input NOTE: We supply the AV cable and the power cord with this product.

Instruction Manual
Page 15
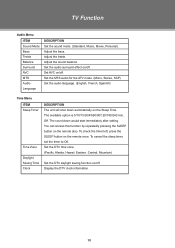
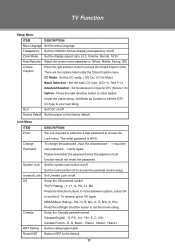
buttons to enter. TV Setup Menu Various features can press the number buttons to scan channels under the Channel Menu. Or you need to input channels directly. Warm Picture Menu ITEM Picture Mode Contrast Brightness Color Tint Sharpness Color Mode DESCRIPTION Setup the picture mode (Personal, Standard, Dynamic, Soft). Adjust the display contrast Adjust the display brightness Adjust the display color Adjust the display tint Adjust the image sharpness Set the color mode (Normal, Warm, Cool). 9 For the initial use, you can be preset through the TV setup menu, please read...
buttons to enter. TV Setup Menu Various features can press the number buttons to scan channels under the Channel Menu. Or you need to input channels directly. Warm Picture Menu ITEM Picture Mode Contrast Brightness Color Tint Sharpness Color Mode DESCRIPTION Setup the picture mode (Personal, Standard, Dynamic, Soft). Adjust the display contrast Adjust the display brightness Adjust the display color Adjust the display tint Adjust the image sharpness Set the color mode (Normal, Warm, Cool). 9 For the initial use, you can be preset through the TV setup menu, please read...
Instruction Manual
Page 16
... remote also. The available option is 5/10/15/30/45/60/90/120/180/240 min, Off. You can access this function by repeatedly pressing the SLEEP button on /off . To cancel the sleep timer, set the timer to Off. Display the DTV clock information. 10 Set the MTS audio for the ATV mode. (Mono, Stereo, SAP) Set the audio language. (English, French, Spanish) Time Menu ITEM Sleep Timer Time...
... remote also. The available option is 5/10/15/30/45/60/90/120/180/240 min, Off. You can access this function by repeatedly pressing the SLEEP button on /off . To cancel the sleep timer, set the timer to Off. Display the DTV clock information. 10 Set the MTS audio for the ATV mode. (Mono, Stereo, SAP) Set the audio language. (English, French, Spanish) Time Menu ITEM Sleep Timer Time...
Instruction Manual
Page 17
... Change Password System Lock Unrated Lock US Canada RRT Setting Reset RRT DESCRIPTION You are four options listed under the Closed Caption menu. The initial password is 0000. Set the lock function On to access the Lock menu. Set the rating region table. There are required to enter the 4-digit password to access the parental control setup. Set the advanced CC type for DTV. (Service 1~6) Option - Press the right direction button to the default. 11 Setup the US parental control. Setup the Canada parental control...
... Change Password System Lock Unrated Lock US Canada RRT Setting Reset RRT DESCRIPTION You are four options listed under the Closed Caption menu. The initial password is 0000. Set the lock function On to access the Lock menu. Set the rating region table. There are required to enter the 4-digit password to access the parental control setup. Set the advanced CC type for DTV. (Service 1~6) Option - Press the right direction button to the default. 11 Setup the US parental control. Setup the Canada parental control...
Instruction Manual
Page 18
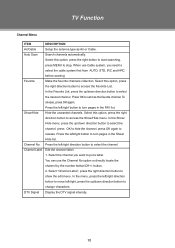
..., press the right button to start searching, press MENU to put a label. Channel No Press the left /right button to select the desired channel. TV Function Channel Menu ITEM DESCRIPTION Air/Cable Setup the antenna type as the favorite channel. Auto Scan Search channels automatically. Press the left /right, press the up/down direction button to turn pages in the Show/ Hide list. DTV Signal Display the DTV signal intensity. 12 Favorite...
..., press the right button to start searching, press MENU to put a label. Channel No Press the left /right button to select the desired channel. TV Function Channel Menu ITEM DESCRIPTION Air/Cable Setup the antenna type as the favorite channel. Auto Scan Search channels automatically. Press the left /right, press the up/down direction button to turn pages in the Show/ Hide list. DTV Signal Display the DTV signal intensity. 12 Favorite...
Instruction Manual
Page 19
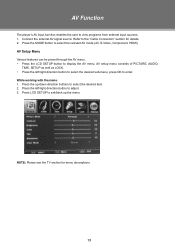
... left /right direction button to select the desired sub-menu, press OK to view programs from external input sources. 111 Connect the external AV signal source. Refer to the "Cable Connection" section for menu descriptions 13 AV setup menu consists of PICTURE, AUDIO, TIME, SETUP as well as LOCK. •• Press the left /right direction button to adjust. 333 Press LCD SETUP to display the AV menu. AV Function The player's AV input function enables the user to enter.
... left /right direction button to select the desired sub-menu, press OK to view programs from external input sources. 111 Connect the external AV signal source. Refer to the "Cable Connection" section for menu descriptions 13 AV setup menu consists of PICTURE, AUDIO, TIME, SETUP as well as LOCK. •• Press the left /right direction button to adjust. 333 Press LCD SETUP to display the AV menu. AV Function The player's AV input function enables the user to enter.
Instruction Manual
Page 20
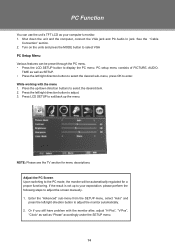
... menu. •• Press the LCD SETUP button to adjust the monitor automatically. 222 Or if you still have problem with the menu 111 Press the up the menu. See the "Cable Connection" section. 222 Turn on the units and press the MODE button to select VGA PC Setup Menu Various features can use the unit's TFT LCD as "Phase" accordingly under the SETUP menu. 14 While working with the monitor after, adjust...
... menu. •• Press the LCD SETUP button to adjust the monitor automatically. 222 Or if you still have problem with the menu 111 Press the up the menu. See the "Cable Connection" section. 222 Turn on the units and press the MODE button to select VGA PC Setup Menu Various features can use the unit's TFT LCD as "Phase" accordingly under the SETUP menu. 14 While working with the monitor after, adjust...
Instruction Manual
Page 22
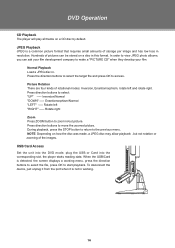
... by default. Normal Playback Load a JPEG disc in resolution. Enantiomorphism/Normal "LEFT" ----- Rotate right Zoom Press ZOOM button to move the zoomed picture. Press direction buttons to zoom in this format. Press direction buttons to access. When the USB/Card is detected, the screen displays a working . 16 Rotate left and rotate right. To disconnect the device, just unplug it from the port when...
... by default. Normal Playback Load a JPEG disc in resolution. Enantiomorphism/Normal "LEFT" ----- Rotate right Zoom Press ZOOM button to move the zoomed picture. Press direction buttons to zoom in this format. Press direction buttons to access. When the USB/Card is detected, the screen displays a working . 16 Rotate left and rotate right. To disconnect the device, just unplug it from the port when...
Instruction Manual
Page 23
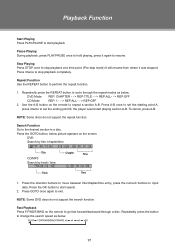
... input data. Stop Playing Press STOP once to stop playback at a time point. (Pre-stop playback completely. Repeatedly press the button to change the search speed as below, DVD Mode REP: CHAPTER - - > REP:TITLE - - > REP:ALL- - > REP:OFF CD Mode REP: 1 - - > REP:ALL - - > REP:OFF 222 Use the A-B button on the screen. Playback Function Start Playing Press PLAY/PAUSE to start playback Pause Playing...
... input data. Stop Playing Press STOP once to stop playback at a time point. (Pre-stop playback completely. Repeatedly press the button to change the search speed as below, DVD Mode REP: CHAPTER - - > REP:TITLE - - > REP:ALL- - > REP:OFF CD Mode REP: 1 - - > REP:ALL - - > REP:OFF 222 Use the A-B button on the screen. Playback Function Start Playing Press PLAY/PAUSE to start playback Pause Playing...
Instruction Manual
Page 25
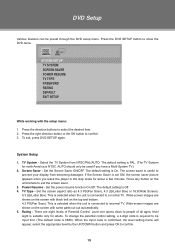
... screen saver picture appears when you have a Multi-System TV). 222 Screen Saver - DVD Setup Various features can be used if you leave the player in the stop mode for about a few minutes. The default setting is connected to confirm. 333 To exit, press DVD SETUP again. SYSTEM SETUP TV SYSTEM SCREEN SAVER POWER RESUME TV TYPE PASSWORD RATING DEFAULT EXIT SETUP While working with some parts cut out automatically. 555 Rating - Press the DVD SETUP button to...
... screen saver picture appears when you have a Multi-System TV). 222 Screen Saver - DVD Setup Various features can be used if you leave the player in the stop mode for about a few minutes. The default setting is connected to confirm. 333 To exit, press DVD SETUP again. SYSTEM SETUP TV SYSTEM SCREEN SAVER POWER RESUME TV TYPE PASSWORD RATING DEFAULT EXIT SETUP While working with some parts cut out automatically. 555 Rating - Press the DVD SETUP button to...
Instruction Manual
Page 26
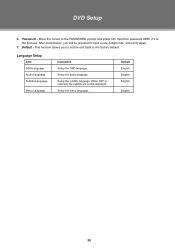
... the factory default. This function allows you will not be required to the PASSWORD prompt and press OK. Setup the audio language. Setup the menu language. Input the password 8888, if it is selected, the subtitle will be displayed. Setup the subtitle language. Default English English English English 20 Language Setup Item OSD Language Audio Language Subtitle Language Menu Language Instruction Setup the OSD language. DVD Setup 666 Password - When...
... the factory default. This function allows you will not be required to the PASSWORD prompt and press OK. Setup the audio language. Setup the menu language. Input the password 8888, if it is selected, the subtitle will be displayed. Setup the subtitle language. Default English English English English 20 Language Setup Item OSD Language Audio Language Subtitle Language Menu Language Instruction Setup the OSD language. DVD Setup 666 Password - When...
Instruction Manual
Page 27
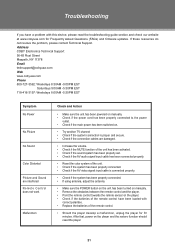
... AV video signal input cable is connected properly. •• Check if the system has been properly connected. •• If using antenna, adjust the antenna. •• Make sure the POWER button on the unit has been turned on manually. •• Remove the obstacles between the remote control and the player. •• Point the remote control towards the remote sensor on the player and the restore function should reset the player. 21 Troubleshooting...
... AV video signal input cable is connected properly. •• Check if the system has been properly connected. •• If using antenna, adjust the antenna. •• Make sure the POWER button on the unit has been turned on manually. •• Remove the obstacles between the remote control and the player. •• Point the remote control towards the remote sensor on the player and the restore function should reset the player. 21 Troubleshooting...


