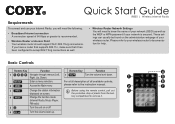
Quick Setup Guide
Page 1
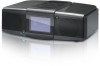
... wireless router's documentation for help. These setings can usually be found on the administration webpage of plastic from the bat- 4 Change the function mode tery compartment to the instruction manual. 2 7 3 Change the station information Before using the remote control, pull out 3 displayed on or off 6 Turn the volume level up. Quick Start Guide IR850 | Wireless Internet Radio Requirements To connect and use your Internet Radio, you have a router that supports 802.11n, make sure that it . (Internet Radio, Music Player, FM radio) 5 Turn...
... wireless router's documentation for help. These setings can usually be found on the administration webpage of plastic from the bat- 4 Change the function mode tery compartment to the instruction manual. 2 7 3 Change the station information Before using the remote control, pull out 3 displayed on or off 6 Turn the volume level up. Quick Start Guide IR850 | Wireless Internet Radio Requirements To connect and use your Internet Radio, you have a router that supports 802.11n, make sure that it . (Internet Radio, Music Player, FM radio) 5 Turn...
Quick Setup Guide
Page 2
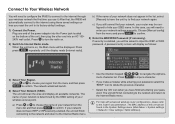
... the Power jack located on . 2) Switch to the Internet Radio menu. • Use the direction keypad ( meric character list. Plug one end of the power adapter into an AC 100- 240V wall outlet. figured to the router's documentation. The network wizard will finish connecting to the network and return to Internet Radio mode. If your network does not have finished entering your network settings manually.
... the Power jack located on . 2) Switch to the Internet Radio menu. • Use the direction keypad ( meric character list. Plug one end of the power adapter into an AC 100- 240V wall outlet. figured to the router's documentation. The network wizard will finish connecting to the network and return to Internet Radio mode. If your network does not have finished entering your network settings manually.
Quick Setup Guide
Page 3
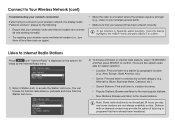
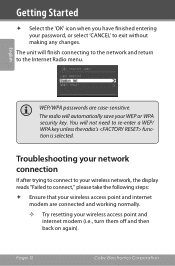
...) Troubleshooting your network connection If after trying to connect to your wireless network, the display reads "Failed to connect," please try the following: • Ensure that your wireless router and internet modem are connected and working normally. • Try resetting your wireless router and internet modem (i.e., turn them off and then back on again). • Move the radio to a location where the wireless signal is displayed on -line...
...) Troubleshooting your network connection If after trying to connect to your wireless network, the display reads "Failed to connect," please try the following: • Ensure that your wireless router and internet modem are connected and working normally. • Try resetting your wireless router and internet modem (i.e., turn them off and then back on again). • Move the radio to a location where the wireless signal is displayed on -line...
Quick Setup Guide
Page 4
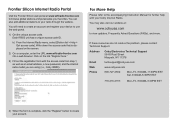
... website. b) From the Internet Radio menu, select [Station list > Help > Get access code]. For More Help Please refer to the accompanying Instruction Manual for further help with the access code from step 1, as well as an email address, a new password, and the internet radio model you are using (i.e., Coby IR850). Frontier Silicon Internet Radio Portal Visit the Frontier Silicon web portal at : www.cobyusa.com to view updates, Frequently Asked Questions...
... website. b) From the Internet Radio menu, select [Station list > Help > Get access code]. For More Help Please refer to the accompanying Instruction Manual for further help with the access code from step 1, as well as an email address, a new password, and the internet radio model you are using (i.e., Coby IR850). Frontier Silicon Internet Radio Portal Visit the Frontier Silicon web portal at : www.cobyusa.com to view updates, Frequently Asked Questions...
User Manual
Page 2
... 8 Using the Menu Controls 9 Connect to Your Wireless Network 9 Step 1: Connecting Power 9 Step 2: Connecting to the Internet 10 Step 3: Select Your Region 10 Step 4: Select Your Network (SSID 10 Step 5: Enter Your WEP/WPA Password 11 Troubleshooting your network connection 12 Controls at a Glance 14 Front View 14 Bottom View 14 Top View 15 Guide to Controls 17 Remote Control 19 About the Remote Control Battery 20 Internet Radio Mode 21 Choosing a Station...
... 8 Using the Menu Controls 9 Connect to Your Wireless Network 9 Step 1: Connecting Power 9 Step 2: Connecting to the Internet 10 Step 3: Select Your Region 10 Step 4: Select Your Network (SSID 10 Step 5: Enter Your WEP/WPA Password 11 Troubleshooting your network connection 12 Controls at a Glance 14 Front View 14 Bottom View 14 Top View 15 Guide to Controls 17 Remote Control 19 About the Remote Control Battery 20 Internet Radio Mode 21 Choosing a Station...
User Manual
Page 3
... 25 Station Updates 26 Preset Station Memory 26 Storing a Preset Station 26 Selecting a Preset station 27 FM Radio Mode 29 General Operation 29 Access the FM Radio Menu 30 Scan Setting 30 Audio Setting 31 Preset Station Memory 31 Storing a Preset Station 31 Selecting a Preset station 32 Music Player Mode 34 Music Player Menu 34 Play shared media 35 Play shared folders 35 PC settings 35 Setting the Clock 36 Manual Time/Date Setting 36 Automatic Time/Date Setting 37 Other Clock Options 38 Using the Alarms/Timers 39 Setting the Alarms 39 Alarm Snooze/Off 40 Sleep Function...
... 25 Station Updates 26 Preset Station Memory 26 Storing a Preset Station 26 Selecting a Preset station 27 FM Radio Mode 29 General Operation 29 Access the FM Radio Menu 30 Scan Setting 30 Audio Setting 31 Preset Station Memory 31 Storing a Preset Station 31 Selecting a Preset station 32 Music Player Mode 34 Music Player Menu 34 Play shared media 35 Play shared folders 35 PC settings 35 Setting the Clock 36 Manual Time/Date Setting 36 Automatic Time/Date Setting 37 Other Clock Options 38 Using the Alarms/Timers 39 Setting the Alarms 39 Alarm Snooze/Off 40 Sleep Function...

User Manual
Page 5
... read display with digital tuner Alarm clock with sleep and snooze functions 3.5mm headphone jack for private listening ¹ Requires a 64 Kbps internet connection or greater and an 802.11g wireless access point ² Requires a computer running Windows Media Player 11. www.cobyusa.com Page 5 Features Free wireless access to thousands of stations from around the world ¹ Browse stations...
... read display with digital tuner Alarm clock with sleep and snooze functions 3.5mm headphone jack for private listening ¹ Requires a 64 Kbps internet connection or greater and an 802.11g wireless access point ² Requires a computer running Windows Media Player 11. www.cobyusa.com Page 5 Features Free wireless access to thousands of stations from around the world ¹ Browse stations...
User Manual
Page 8
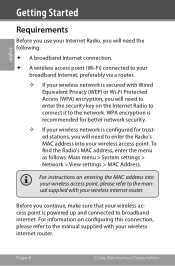
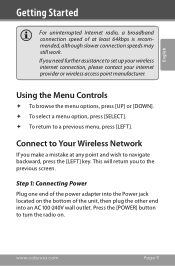
... refer to the manual supplied with your wireless internet router. Page 8 Coby Electronics Corporation English Getting Started Requirements Before you use your Internet Radio, you will need the following: A broadband Internet connection. A wireless access point (Wi-Fi) connected to your broadband Internet, preferably via a router. —— If your wireless network is powered up and connected to broadband internet. To find the Radio's MAC address, enter...
... refer to the manual supplied with your wireless internet router. Page 8 Coby Electronics Corporation English Getting Started Requirements Before you use your Internet Radio, you will need the following: A broadband Internet connection. A wireless access point (Wi-Fi) connected to your broadband Internet, preferably via a router. —— If your wireless network is powered up and connected to broadband internet. To find the Radio's MAC address, enter...
User Manual
Page 9
Connect to Your Wireless Network If you make a mistake at least 64kbps is recommended, although slower connection speeds may still work. This will return you need further assistance to a previous menu, press [LEFT]. www.cobyusa.com Page 9 Step 1: Connecting Power Plug one end of the power adapter into the Power jack located on . Using the Menu Controls To browse the menu options, press [UP] or...
Connect to Your Wireless Network If you make a mistake at least 64kbps is recommended, although slower connection speeds may still work. This will return you need further assistance to a previous menu, press [LEFT]. www.cobyusa.com Page 9 Step 1: Connecting Power Plug one end of the power adapter into the Power jack located on . Using the Menu Controls To browse the menu options, press [UP] or...
User Manual
Page 11
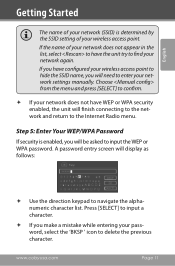
... will display as follows: Use the direction keypad to the Internet Radio menu. Step 5: Enter Your WEP/WPA Password If security is determined by the SSID setting of your network does not appear in the list, select to have the unit try to find your network again. A password entry screen will need to enter your network settings manually. www.cobyusa...
... will display as follows: Use the direction keypad to the Internet Radio menu. Step 5: Enter Your WEP/WPA Password If security is determined by the SSID setting of your network does not appear in the list, select to have the unit try to find your network again. A password entry screen will need to enter your network settings manually. www.cobyusa...
User Manual
Page 12
Page 12 Coby Electronics Corporation You will not need to the Internet Radio menu. The unit will automatically save your wireless network, the display reads "Failed to exit without making any changes. The radio will finish connecting to the network and return to re-enter a WEP/ WPA key unless the radio's function is selected. Getting Started Select the 'OK' icon when you have...
Page 12 Coby Electronics Corporation You will not need to the Internet Radio menu. The unit will automatically save your wireless network, the display reads "Failed to exit without making any changes. The radio will finish connecting to the network and return to re-enter a WEP/ WPA key unless the radio's function is selected. Getting Started Select the 'OK' icon when you have...
User Manual
Page 17
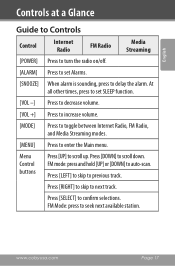
... available station. FM Mode: press to auto-scan. Press [RIGHT] to skip to previous track. Press [LEFT] to skip to next track. www.cobyusa.com Page 17 Menu Control buttons Press [UP] to confirm selections. English Controls at a Glance Guide to Controls Control Internet Radio FM Radio Media Streaming [POWER] Press to turn the radio on/off. [ALARM] Press to set SLEEP function. [VOL -] Press to decrease volume. [VOL +] Press to increase volume. [MODE...
... available station. FM Mode: press to auto-scan. Press [RIGHT] to skip to previous track. Press [LEFT] to skip to next track. www.cobyusa.com Page 17 Menu Control buttons Press [UP] to confirm selections. English Controls at a Glance Guide to Controls Control Internet Radio FM Radio Media Streaming [POWER] Press to turn the radio on/off. [ALARM] Press to set SLEEP function. [VOL -] Press to decrease volume. [VOL +] Press to increase volume. [MODE...
User Manual
Page 29
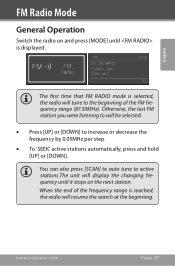
... changing frequency until it stops on and press [MODE] until is displayed. You can also press [SCAN] to auto tune to increase or decrease the frequency by 0.05MHz per step. • To 'SEEK' active stations automatically, press and hold [UP] or [DOWN]. English FM Radio Mode General Operation Switch the radio on the next station. www.cobyusa.com Page 29 The first time that FM RADIO mode...
... changing frequency until it stops on and press [MODE] until is displayed. You can also press [SCAN] to auto tune to increase or decrease the frequency by 0.05MHz per step. • To 'SEEK' active stations automatically, press and hold [UP] or [DOWN]. English FM Radio Mode General Operation Switch the radio on the next station. www.cobyusa.com Page 29 The first time that FM RADIO mode...
User Manual
Page 30
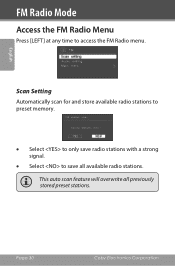
Page 30 Coby Electronics Corporation This auto scan feature will overwrite all available radio stations. English FM Radio Mode Access the FM Radio Menu Press [LEFT] at any time to save radio stations with a strong signal. • Select to access the FM Radio menu. Scan Setting Automatically scan for and store available radio stations to preset memory. • Select to only save all previously stored preset stations.
Page 30 Coby Electronics Corporation This auto scan feature will overwrite all available radio stations. English FM Radio Mode Access the FM Radio Menu Press [LEFT] at any time to save radio stations with a strong signal. • Select to access the FM Radio menu. Scan Setting Automatically scan for and store available radio stations to preset memory. • Select to only save all previously stored preset stations.
User Manual
Page 31
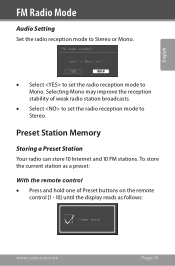
English FM Radio Mode Audio Setting Set the radio reception mode to Stereo or Mono. • Select to set the radio reception mode to Mono. Selecting Mono may improve the reception stability of Preset buttons on the remote control [1 - 10] until the display reads as follows: www.cobyusa.com Page 31 Preset Station Memory Storing a Preset Station Your radio can store 10 Internet and 10 FM stations. To store the current station as a preset: With the remote control • Press and hold one...
English FM Radio Mode Audio Setting Set the radio reception mode to Stereo or Mono. • Select to set the radio reception mode to Mono. Selecting Mono may improve the reception stability of Preset buttons on the remote control [1 - 10] until the display reads as follows: www.cobyusa.com Page 31 Preset Station Memory Storing a Preset Station Your radio can store 10 Internet and 10 FM stations. To store the current station as a preset: With the remote control • Press and hold one...
User Manual
Page 39
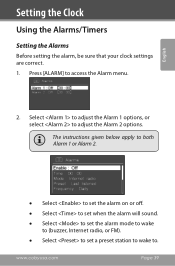
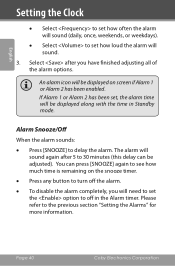
Press [ALARM] to adjust the Alarm 2 options. Select to adjust the Alarm 1 options, or select to access the Alarm menu. 2. The instructions given below apply to both Alarm 1 or Alarm 2. • Select to set the alarm on or off. • Select to set when the alarm will sound. • Select to set the alarm mode to wake to (buzzer, Internet radio, or FM). • Select to set a preset station to wake to. www.cobyusa.com Page 39 English Setting the Clock Using the Alarms/Timers Setting the Alarms Before setting the alarm, be sure that your clock settings are correct. 1.
Press [ALARM] to adjust the Alarm 2 options. Select to adjust the Alarm 1 options, or select to access the Alarm menu. 2. The instructions given below apply to both Alarm 1 or Alarm 2. • Select to set the alarm on or off. • Select to set when the alarm will sound. • Select to set the alarm mode to wake to (buzzer, Internet radio, or FM). • Select to set a preset station to wake to. www.cobyusa.com Page 39 English Setting the Clock Using the Alarms/Timers Setting the Alarms Before setting the alarm, be sure that your clock settings are correct. 1.
User Manual
Page 40
... set, the alarm time will be adjusted). Alarm Snooze/Off When the alarm sounds: • Press [SNOOZE] to the previous section "Setting the Alarms" for more information. Page 40 Coby Electronics Corporation The alarm will sound. 3. An alarm icon will need to set the option to off the alarm. • To disable the alarm completely, you have finished adjusting all of the alarm options. You can be displayed along with the time in the Alarm timer...
... set, the alarm time will be adjusted). Alarm Snooze/Off When the alarm sounds: • Press [SNOOZE] to the previous section "Setting the Alarms" for more information. Page 40 Coby Electronics Corporation The alarm will sound. 3. An alarm icon will need to set the option to off the alarm. • To disable the alarm completely, you have finished adjusting all of the alarm options. You can be displayed along with the time in the Alarm timer...
User Manual
Page 41
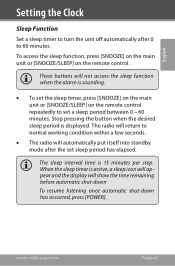
... sleep function when the alarm is displayed. These buttons will show the time remaining before automatic shut-down To resume listening once automatic shut-down has occurred, press [POWER]. Stop pressing the button when the desired sleep period is sounding. • To set a sleep period between 0 - 60 minutes. To access the sleep function, press [SNOOZE] on the main unit or [SNOOZE/SLEEP] on the remote control repeatedly to set the sleep timer, press [SNOOZE] on the main unit or [SNOOZE/SLEEP...
... sleep function when the alarm is displayed. These buttons will show the time remaining before automatic shut-down To resume listening once automatic shut-down has occurred, press [POWER]. Stop pressing the button when the desired sleep period is sounding. • To set a sleep period between 0 - 60 minutes. To access the sleep function, press [SNOOZE] on the main unit or [SNOOZE/SLEEP] on the remote control repeatedly to set the sleep timer, press [SNOOZE] on the main unit or [SNOOZE/SLEEP...
User Manual
Page 54
..., 8:00AM-5:30PM EST For your wireless Internet radio, please visit the help with this device, please read the troubleshooting guide below and check our website at www.cobyusa.com for Frequently Asked Questions (FAQs) and firmware updates. English Troubleshooting If you have a problem with your safety, never attempt to do not resolve the problem, please contact Technical Support. Internal components of the device carry...
..., 8:00AM-5:30PM EST For your wireless Internet radio, please visit the help with this device, please read the troubleshooting guide below and check our website at www.cobyusa.com for Frequently Asked Questions (FAQs) and firmware updates. English Troubleshooting If you have a problem with your safety, never attempt to do not resolve the problem, please contact Technical Support. Internal components of the device carry...

User Manual
Page 58
...the appliance. Page 58 Coby Electronics Corporation Do not open the cabinet. Bring the product to a collection point for future reference. Model No. WARNING: To prevent fire or shock hazard, do not expose this equipment and its operating life, this information for... to alert the user to the presence of uninsulated "dangerous voltage" within an equilateral triangle is intended to alert the user to the presence of important operation and servicing instructions in the ears or hearing loss, discontinue use of personal stereos played at high volume. IR850 Serial No.
...the appliance. Page 58 Coby Electronics Corporation Do not open the cabinet. Bring the product to a collection point for future reference. Model No. WARNING: To prevent fire or shock hazard, do not expose this equipment and its operating life, this information for... to alert the user to the presence of uninsulated "dangerous voltage" within an equilateral triangle is intended to alert the user to the presence of important operation and servicing instructions in the ears or hearing loss, discontinue use of personal stereos played at high volume. IR850 Serial No.


