
Quick Setup Guide
Page 2
... end of an (optional) HDMI cable into the "HDMI Out" socket of the DVD968 into the "Video In" socket of your TV has a digital HDMI connection, use the basic connection shown below to the accompanying Instruction Manual. Plug the other end into an AC power outlet. For a complete guide to ...below . For an HDMI video connection: Plug one end of the supplied composite video cable (yellow plug) into the "HDMI In" socket of the DVD968. Plug the other end into the "Video Out" socket of your connection options, please refer to enable advanced features such as DVD upconversion.
... end of an (optional) HDMI cable into the "HDMI Out" socket of the DVD968 into the "Video In" socket of your TV has a digital HDMI connection, use the basic connection shown below to the accompanying Instruction Manual. Plug the other end into an AC power outlet. For a complete guide to ...below . For an HDMI video connection: Plug one end of the supplied composite video cable (yellow plug) into the "HDMI In" socket of the DVD968. Plug the other end into the "Video Out" socket of your connection options, please refer to enable advanced features such as DVD upconversion.
Quick Setup Guide
Page 3
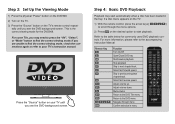
.../resume playback Stop playback Skip to the DVD menu Navigate through the menu options. 2) Press on the desired option to the accompanying Instruction Manual. Mute volume Return to the DVD Title menu Return to next chapter/track. For more information, please refer to start automatically when a ...in the tray. Step 3: Set Up the Viewing Mode 1) Press the physical "Power" button on the DVD968. 2) Turn on the TV. 3) Press the "Source" button on your TV's instruction manual. edly until you are unable to find the correct viewing mode, check the connections again or refer to ...
.../resume playback Stop playback Skip to the DVD menu Navigate through the menu options. 2) Press on the desired option to the accompanying Instruction Manual. Mute volume Return to the DVD Title menu Return to next chapter/track. For more information, please refer to start automatically when a ...in the tray. Step 3: Set Up the Viewing Mode 1) Press the physical "Power" button on the DVD968. 2) Turn on the TV. 3) Press the "Source" button on your TV's instruction manual. edly until you are unable to find the correct viewing mode, check the connections again or refer to ...
Quick Setup Guide
Page 4
If these resources do not resolve the problem, please contact Technical Support. You may also visit our website at: www.cobyusa.com to the accompanying Instruction Manual for further help with your Coby Home Theater System. For More Help Please refer to view updates, Frequently Asked Questions (FAQs), and more. Address Coby Electronics Technical Support 56-65 Rust Street Maspeth, NY 11378 Email [email protected] Web www.cobyusa.com Phone 800-727-3592: Mon-Fri, 8:00AM-11:00PM EST Saturdays, 9:00AM-5:30PM EST 718-416-3197: Mon-Fri, 8:00AM-5:30PM EST
If these resources do not resolve the problem, please contact Technical Support. You may also visit our website at: www.cobyusa.com to the accompanying Instruction Manual for further help with your Coby Home Theater System. For More Help Please refer to view updates, Frequently Asked Questions (FAQs), and more. Address Coby Electronics Technical Support 56-65 Rust Street Maspeth, NY 11378 Email [email protected] Web www.cobyusa.com Phone 800-727-3592: Mon-Fri, 8:00AM-11:00PM EST Saturdays, 9:00AM-5:30PM EST 718-416-3197: Mon-Fri, 8:00AM-5:30PM EST
User Manual
Page 6
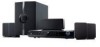
...; AM/FM stereo tuning system High-quality integrated amplifier Page 6 Coby Electronics Corporation This DVD player is a new generation home player that can produce high-quality video and audio for purchasing a Coby Home Theater System! Please read this manual carefully before connection and operation and keep it for future reference.
...; AM/FM stereo tuning system High-quality integrated amplifier Page 6 Coby Electronics Corporation This DVD player is a new generation home player that can produce high-quality video and audio for purchasing a Coby Home Theater System! Please read this manual carefully before connection and operation and keep it for future reference.
User Manual
Page 14
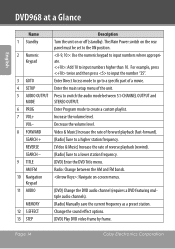
... 10 to a higher station frequency. REVERSE [Video & Music] Increase the rate of forward playback (fast-forward). Page 14 Coby Electronics Corporation MEMORY [Radio] Manually save the current frequency as a preset station. 12 S.EFFECT Change the sound effect options. 13 STEP [DVD} Play DVD video... the main setup menu of the unit. 5 AUDIO OUTPUT Press to a lower station frequency. 9 TITLE [DVD] Enter the DVD Title menu. DVD968 at a Glance English Name Description 1 Standby Turn the unit on -screen menus. 11 AUDIO [DVD] Change the DVD audio channel (requires a DVD...
... 10 to a higher station frequency. REVERSE [Video & Music] Increase the rate of forward playback (fast-forward). Page 14 Coby Electronics Corporation MEMORY [Radio] Manually save the current frequency as a preset station. 12 S.EFFECT Change the sound effect options. 13 STEP [DVD} Play DVD video... the main setup menu of the unit. 5 AUDIO OUTPUT Press to a lower station frequency. 9 TITLE [DVD] Enter the DVD Title menu. DVD968 at a Glance English Name Description 1 Standby Turn the unit on -screen menus. 11 AUDIO [DVD] Change the DVD audio channel (requires a DVD...
User Manual
Page 17
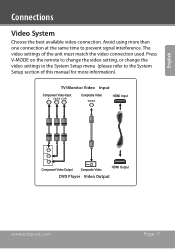
The video settings of this manual for more information). Press V-MODE on the remote to change the video setting, or change the video settings in the System Setup menu (please refer ...
The video settings of this manual for more information). Press V-MODE on the remote to change the video setting, or change the video settings in the System Setup menu (please refer ...
User Manual
Page 19
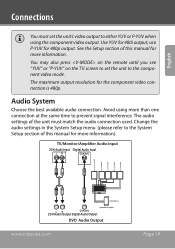
... available audio connection. Change the audio settings in the System Setup menu (please refer to the System Setup section of this manual for more information. See the Setup section of this manual for the component video connection is 480p. English Connections You must match the audio connection used. use P-YUV for 480i...
... available audio connection. Change the audio settings in the System Setup menu (please refer to the System Setup section of this manual for more information. See the Setup section of this manual for the component video connection is 480p. English Connections You must match the audio connection used. use P-YUV for 480i...
User Manual
Page 24
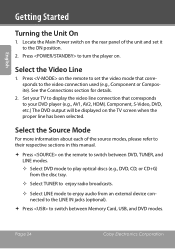
... Select the Video Line 1. Select the Source Mode For more information about each of the source modes, please refer to their respective sections in this manual. Press on the remote to switch between DVD, TUNER, and LINE modes. —— Select DVD mode to play optical discs ... to the video connection used (e.g., Component or Composite). Press to switch between Memory Card, USB, and DVD modes. Page 24 Coby Electronics Corporation English Getting Started Turning the Unit On 1. See the Connections section for details. 2. Locate the Main Power switch on .
... Select the Video Line 1. Select the Source Mode For more information about each of the source modes, please refer to their respective sections in this manual. Press on the remote to switch between DVD, TUNER, and LINE modes. —— Select DVD mode to play optical discs ... to the video connection used (e.g., Component or Composite). Press to switch between Memory Card, USB, and DVD modes. Page 24 Coby Electronics Corporation English Getting Started Turning the Unit On 1. See the Connections section for details. 2. Locate the Main Power switch on .
User Manual
Page 49
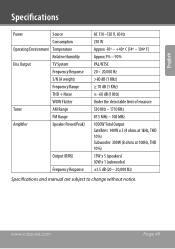
...: 140W x 5 (4 ohms at 1kHz, THD 10%) Subwoofer: 300W (8 ohms at 100Hz, THD 10%) 15W x 5 (speakers) 30W x 1 (subwoofer) ±1.5 dB (20 - 20,000 Hz) Specifications and manual are subject to change without notice.
...: 140W x 5 (4 ohms at 1kHz, THD 10%) Subwoofer: 300W (8 ohms at 100Hz, THD 10%) 15W x 5 (speakers) 30W x 1 (subwoofer) ±1.5 dB (20 - 20,000 Hz) Specifications and manual are subject to change without notice.

User Manual
Page 52
The disc is incompatible with new ones. remote. feet of this manual to review disc compatibility requirements. Clean the disc. their charge. Make sure that the disc is loaded incor- Refer to the About Optical Discs section ...of the sensor. The disc is within 15 yond its label side upwards. Switch the unit off and unplug the unit. Page 52 Coby Electronics Corporation Reset or lower the Parental Control settings in the the remote control. The unit has shut down. Load a compatible disc. Then coninterfered temporarily...
The disc is incompatible with new ones. remote. feet of this manual to review disc compatibility requirements. Clean the disc. their charge. Make sure that the disc is loaded incor- Refer to the About Optical Discs section ...of the sensor. The disc is within 15 yond its label side upwards. Switch the unit off and unplug the unit. Page 52 Coby Electronics Corporation Reset or lower the Parental Control settings in the the remote control. The unit has shut down. Load a compatible disc. Then coninterfered temporarily...
User Manual
Page 59
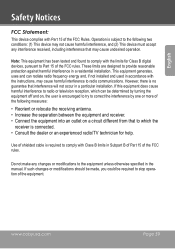
... two conditions: (1) This device may not cause harmful interference, and (2) This device must accept any changes or modifications to comply with Class B limits in the manual. If such changes or modifications should be made, you could be determined by one or more of the FCC rules. Operation is subject to the...
... two conditions: (1) This device may not cause harmful interference, and (2) This device must accept any changes or modifications to comply with Class B limits in the manual. If such changes or modifications should be made, you could be determined by one or more of the FCC rules. Operation is subject to the...


