Quick Setup Guide
Page 1
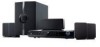
... for your convenience. Package List • DVD968 Main Unit • Remote Control • "AA" batteries (x 2) Quick Start Guide DVD968 | 5.1-Channel DVD Home Theater System • Front Speakers (x 2) • Center Speaker (x 1) • Surround Speakers (x 2) • Subwoofer (x 1) • Speaker Wire (x 5) • AV Cable • AM Antenna (Loop) • FM Antenna (Wire) Step 1: Connecting the Speakers 1) If necessary, strip 3/8" (10 mm) of insulation from the wall outlet before making any connections. SW FL SL SPEAKER OUT CEN FR SR Do not...
... for your convenience. Package List • DVD968 Main Unit • Remote Control • "AA" batteries (x 2) Quick Start Guide DVD968 | 5.1-Channel DVD Home Theater System • Front Speakers (x 2) • Center Speaker (x 1) • Surround Speakers (x 2) • Subwoofer (x 1) • Speaker Wire (x 5) • AV Cable • AM Antenna (Loop) • FM Antenna (Wire) Step 1: Connecting the Speakers 1) If necessary, strip 3/8" (10 mm) of insulation from the wall outlet before making any connections. SW FL SL SPEAKER OUT CEN FR SR Do not...
Quick Setup Guide
Page 3
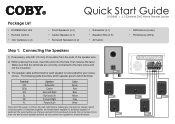
... menu Return to the DVD menu Navigate through the menu options. 2) Press on the TV's remote control repeat- Remote Key Function Turn On/Off Open/Close DVD tray Start/resume playback Stop playback Skip to next chapter/track. Select fast reverse speed. If you see the DVD background screen. This is the correct viewing mode for commonly used DVD playback controls. Step 3: Set Up the Viewing Mode 1) Press the physical "Power" button on the DVD968. 2) Turn...
... menu Return to the DVD menu Navigate through the menu options. 2) Press on the TV's remote control repeat- Remote Key Function Turn On/Off Open/Close DVD tray Start/resume playback Stop playback Skip to next chapter/track. Select fast reverse speed. If you see the DVD background screen. This is the correct viewing mode for commonly used DVD playback controls. Step 3: Set Up the Viewing Mode 1) Press the physical "Power" button on the DVD968. 2) Turn...
User Manual
Page 2
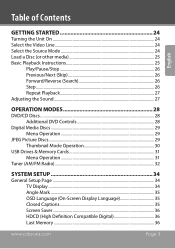
...6 About Optical Discs 7 Disc Requirements...7 DVD Features...7 DVD Region Codes...8 Disc Care and Maintenance 8 Handling a Disc 9 Cleaning a Disc 9 DVD968 at a Glance 10 Front Panel...10 Rear Panel...11 Remote Control...12 Battery Installation 12 Remote Key Functions 13 Connections 17 Video System...17 Composite Video Out (Standard 18 Component Video Out (Good 18 HDMI Video Out (Best 18 Audio System...19 Speakers...20 RCA Stereo Audio Out (Optional, Standard 21 Coaxial Digital Audio Out (Optional, Best 21 Stereo Line Input 22 Power Supply & Installation 22 Power Supply 22 Power...
...6 About Optical Discs 7 Disc Requirements...7 DVD Features...7 DVD Region Codes...8 Disc Care and Maintenance 8 Handling a Disc 9 Cleaning a Disc 9 DVD968 at a Glance 10 Front Panel...10 Rear Panel...11 Remote Control...12 Battery Installation 12 Remote Key Functions 13 Connections 17 Video System...17 Composite Video Out (Standard 18 Component Video Out (Good 18 HDMI Video Out (Best 18 Audio System...19 Speakers...20 RCA Stereo Audio Out (Optional, Standard 21 Coaxial Digital Audio Out (Optional, Best 21 Stereo Line Input 22 Power Supply & Installation 22 Power Supply 22 Power...
User Manual
Page 3
... Repeat Playback 27 Adjusting the Sound 27 Operation Modes 28 DVD/CD Discs...28 Additional DVD Controls 28 Digital Media Discs...29 Menu Operation 29 JPEG Picture Discs...29 Thumbnail Mode Operation 30 USB Drives & Memory Cards 31 Menu Operation 31 Tuner (AM/FM Radio 32 System Setup 34 General Setup Page 34 TV Display...34 Angle Mark...35 OSD Language (On-Screen Display Language 35 Closed Captions 35 Screen Saver 36 HDCD (High Definition Compatible Digital 36 Last...
... Repeat Playback 27 Adjusting the Sound 27 Operation Modes 28 DVD/CD Discs...28 Additional DVD Controls 28 Digital Media Discs...29 Menu Operation 29 JPEG Picture Discs...29 Thumbnail Mode Operation 30 USB Drives & Memory Cards 31 Menu Operation 31 Tuner (AM/FM Radio 32 System Setup 34 General Setup Page 34 TV Display...34 Angle Mark...35 OSD Language (On-Screen Display Language 35 Closed Captions 35 Screen Saver 36 HDCD (High Definition Compatible Digital 36 Last...
User Manual
Page 6
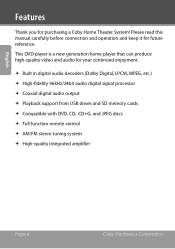
..., etc.) High-fidelity 96kHz/24bit audio digital signal processor Coaxial digital audio output Playback support from USB drives and SD memory cards Compatible with DVD, CD, CD+G, and JPEG discs Full function remote control AM/FM stereo tuning system High-quality integrated amplifier Page 6 Coby Electronics Corporation English Features Thank you for purchasing a Coby Home Theater System!
..., etc.) High-fidelity 96kHz/24bit audio digital signal processor Coaxial digital audio output Playback support from USB drives and SD memory cards Compatible with DVD, CD, CD+G, and JPEG discs Full function remote control AM/FM stereo tuning system High-quality integrated amplifier Page 6 Coby Electronics Corporation English Features Thank you for purchasing a Coby Home Theater System!
User Manual
Page 8
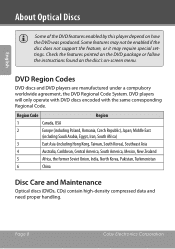
... high-density compressed data and need proper handling. Some features may not be enabled if the disc does not support the feature, or it may require special settings. Check the features printed on the DVD package or follow the instructions found on the disc's on how the DVD was produced. DVD players will only operate with DVD discs encoded with the same corresponding Regional Code.
... high-density compressed data and need proper handling. Some features may not be enabled if the disc does not support the feature, or it may require special settings. Check the features printed on the DVD package or follow the instructions found on the disc's on how the DVD was produced. DVD players will only operate with DVD discs encoded with the same corresponding Regional Code.
User Manual
Page 14
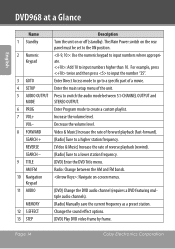
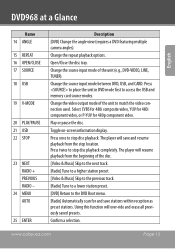
...input numbers higher than 10. The Main Power switch on or off (standby). SEARCH - [Radio] Tune to a higher station frequency. MEMORY [Radio] Manually save the current frequency as a preset station. 12 S.EFFECT Change the sound effect options. 13 STEP [DVD} Play DVD video frame by frame. SEARCH + [Radio] Tune to a lower station frequency. 9 TITLE [DVD] Enter the DVD Title menu. VOL- AM/FM Radio: Change between 5.1-CHANNEL OUTPUT and MODE STEREO OUTPUT. 6 PROG Enter Program mode to create a custom playlist. 7 VOL+ Increase the volume level. REVERSE [Video...
...input numbers higher than 10. The Main Power switch on or off (standby). SEARCH - [Radio] Tune to a higher station frequency. MEMORY [Radio] Manually save the current frequency as a preset station. 12 S.EFFECT Change the sound effect options. 13 STEP [DVD} Play DVD video frame by frame. SEARCH + [Radio] Tune to a lower station frequency. 9 TITLE [DVD] Enter the DVD Title menu. VOL- AM/FM Radio: Change between 5.1-CHANNEL OUTPUT and MODE STEREO OUTPUT. 6 PROG Enter Program mode to create a custom playlist. 7 VOL+ Increase the volume level. REVERSE [Video...
User Manual
Page 15
... station preset. [DVD] Return to the DVD Root menu. [Radio] Automatically scan for 480p component video. Play or pause the disc. Toggle on-screen information display. The player will over-ride and erase all previously saved presets. Change the video output mode of the unit to stop disc playback completely. Change the repeat playback options. Open/Close the disc tray. www.cobyusa.com Page 15 Press once to match the video connection used. Using this function will...
... station preset. [DVD] Return to the DVD Root menu. [Radio] Automatically scan for 480p component video. Play or pause the disc. Toggle on-screen information display. The player will over-ride and erase all previously saved presets. Change the video output mode of the unit to stop disc playback completely. Change the repeat playback options. Open/Close the disc tray. www.cobyusa.com Page 15 Press once to match the video connection used. Using this function will...
User Manual
Page 16
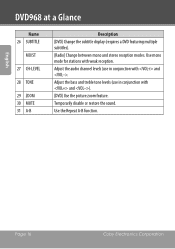
Page 16 Coby Electronics Corporation Temporarily disable or restore the sound. Use the Repeat A-B function. Use mono mode for stations with and . English DVD968 at a Glance Name 26 SUBTITLE MO/ST 27 CH-LEVEL 28 TONE 29 ZOOM 30 MUTE 31 A-B Description [DVD] Change the subtitle display (requires a DVD featuring multiple subtitles). [Radio] Change between mono and stereo reception modes. Adjust the audio channel levels (use in conjunction with weak reception. Adjust the bass and treble tone levels (use in conjunction with and ). [DVD] Use the picture zoom feature.
Page 16 Coby Electronics Corporation Temporarily disable or restore the sound. Use the Repeat A-B function. Use mono mode for stations with and . English DVD968 at a Glance Name 26 SUBTITLE MO/ST 27 CH-LEVEL 28 TONE 29 ZOOM 30 MUTE 31 A-B Description [DVD] Change the subtitle display (requires a DVD featuring multiple subtitles). [Radio] Change between mono and stereo reception modes. Adjust the audio channel levels (use in conjunction with weak reception. Adjust the bass and treble tone levels (use in conjunction with and ). [DVD] Use the picture zoom feature.

User Manual
Page 18
.../Pr Component Video Out jacks of the unit. 2. If an HDMI input jack is 480i. English Connections Composite Video Out (Standard) Using the supplied AV cable: 1. Connect the other end of the HDMI cable to the yellow Video In jack of the player. 2. Press on the remote until you see "CVBS" on your TV/monitor. The maximum output resolution for the composite video connection is present on the TV screen to set...
.../Pr Component Video Out jacks of the unit. 2. If an HDMI input jack is 480i. English Connections Composite Video Out (Standard) Using the supplied AV cable: 1. Connect the other end of the HDMI cable to the yellow Video In jack of the player. 2. Press on the remote until you see "CVBS" on your TV/monitor. The maximum output resolution for the composite video connection is present on the TV screen to set...
User Manual
Page 19
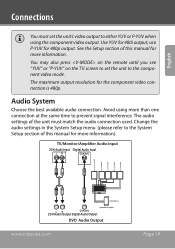
... SXW DVD Audio Output www.cobyusa.com Page 19 Audio System Choose the best available audio connection. The audio settings of this manual for more information). See the Setup section of the unit must set the unit to prevent signal interference. Change the audio settings in the System Setup menu (please refer to either YUV or P-YUV when using more than one connection at the same time to the component video mode. use P-YUV...
... SXW DVD Audio Output www.cobyusa.com Page 19 Audio System Choose the best available audio connection. The audio settings of this manual for more information). See the Setup section of the unit must set the unit to prevent signal interference. Change the audio settings in the System Setup menu (please refer to either YUV or P-YUV when using more than one connection at the same time to the component video mode. use P-YUV...
User Manual
Page 20
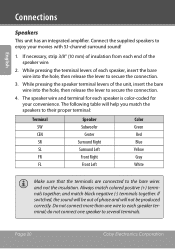
... speaker wire and terminal for your movies with 5.1-channel surround sound! 1. If switched, the sound will be produced correctly. Page 20 Coby Electronics Corporation While pressing the terminal levers of phase and will help you match the speakers to their proper terminal: Terminal SW CEN SR SL FR FL Speaker Subwoofer Center Surround Right Surround Left Front Right Front Left Color Green Red Blue Yellow Gray White Make...
... speaker wire and terminal for your movies with 5.1-channel surround sound! 1. If switched, the sound will be produced correctly. Page 20 Coby Electronics Corporation While pressing the terminal levers of phase and will help you match the speakers to their proper terminal: Terminal SW CEN SR SL FR FL Speaker Subwoofer Center Surround Right Surround Left Front Right Front Left Color Green Red Blue Yellow Gray White Make...
User Manual
Page 22
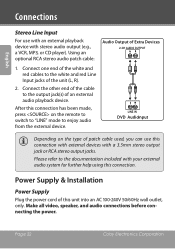
... this connection. Page 22 Coby Electronics Corporation Please refer to the documentation included with stereo audio output (e.g., a VCR, MP3, or CD player). Power Supply & Installation Power Supply Plug the power cord of an external audio playback device. Connect the other end of the cable to the white and red Line Input jacks of Extra Devices 2-CH AUDIO OUTPUT LR 1. English Connections Stereo Line Input For use this connection has been made, press on the remote to switch...
... this connection. Page 22 Coby Electronics Corporation Please refer to the documentation included with stereo audio output (e.g., a VCR, MP3, or CD player). Power Supply & Installation Power Supply Plug the power cord of an external audio playback device. Connect the other end of the cable to the white and red Line Input jacks of Extra Devices 2-CH AUDIO OUTPUT LR 1. English Connections Stereo Line Input For use this connection has been made, press on the remote to switch...
User Manual
Page 24
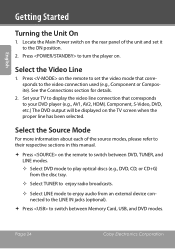
... Power switch on the rear panel of the source modes, please refer to their respective sections in this manual. Press on . Set your DVD player (e.g., AV1, AV2, HDMI, Component, S-Video, DVD, etc.) The DVD output will be displayed on the remote to set it to switch between DVD, TUNER, and LINE modes. —— Select DVD mode to play optical discs (e.g., DVD, CD, or CD+G) from the disc tray. —— Select TUNER to enjoy radio broadcasts. —— Select LINE mode to enjoy audio...
... Power switch on the rear panel of the source modes, please refer to their respective sections in this manual. Press on . Set your DVD player (e.g., AV1, AV2, HDMI, Component, S-Video, DVD, etc.) The DVD output will be displayed on the remote to set it to switch between DVD, TUNER, and LINE modes. —— Select DVD mode to play optical discs (e.g., DVD, CD, or CD+G) from the disc tray. —— Select TUNER to enjoy radio broadcasts. —— Select LINE mode to enjoy audio...
User Manual
Page 28
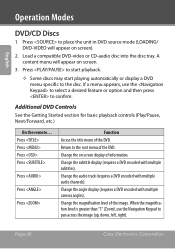
... in DVD source mode (LOADING/ DVD-VIDEO will appear on screen display of the DVD. Change the on screen. 3. Change the angle display (requires a DVD encoded with multiple audio channels). Load a compatible DVD-video or CD-audio disc into the disc tray. If a menu appears, use the Navigation Keypad to confirm. Change the subtitle display (requires a DVD encoded with multiple subtitles). Press to start playback. —— Some discs may start playing automatically or display a DVD menu specific to the root menu of...
... in DVD source mode (LOADING/ DVD-VIDEO will appear on screen display of the DVD. Change the on screen. 3. Change the angle display (requires a DVD encoded with multiple audio channels). Load a compatible DVD-video or CD-audio disc into the disc tray. If a menu appears, use the Navigation Keypad to confirm. Change the subtitle display (requires a DVD encoded with multiple subtitles). Press to start playback. —— Some discs may start playing automatically or display a DVD menu specific to the root menu of...
User Manual
Page 32
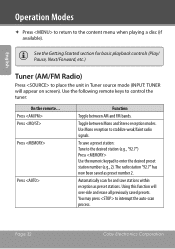
... enter the desired preset station number (e.g., 2). Press Press Press Press Function Toggle between Mono and Stereo reception modes. Automatically scan for basic playback controls (Play/ Pause, Next/Forward, etc.) Tuner (AM/FM Radio) Press to control the tuner: On the remote... Page 32 Coby Electronics Corporation The radio station "92.7" has now been saved as preset stations. Use the following remote keys to place the unit in Tuner source mode (INPUT: TUNER will over-ride...
... enter the desired preset station number (e.g., 2). Press Press Press Press Function Toggle between Mono and Stereo reception modes. Automatically scan for basic playback controls (Play/ Pause, Next/Forward, etc.) Tuner (AM/FM Radio) Press to control the tuner: On the remote... Page 32 Coby Electronics Corporation The radio station "92.7" has now been saved as preset stations. Use the following remote keys to place the unit in Tuner source mode (INPUT: TUNER will over-ride...
User Manual
Page 38
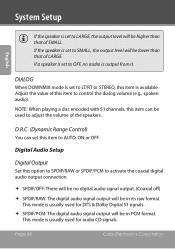
... be used for audio CD signals. Digital Audio Setup Digital Output Set this item to AUTO, ON or OFF. If a speaker is set to OFF, no digital audio signal output. (Coaxial off) SPDIF/RAW: The digital audio signal output will be in PCM format. This mode is usually used to adjust the volume of the speakers. NOTE: When playing a disc encoded with 5.1 channels, this item can set this option to SPDIF/RAW or SPDIF/PCM to activate the coaxial digital audio output connection. ...
... be used for audio CD signals. Digital Audio Setup Digital Output Set this item to AUTO, ON or OFF. If a speaker is set to OFF, no digital audio signal output. (Coaxial off) SPDIF/RAW: The digital audio signal output will be in PCM format. This mode is usually used to adjust the volume of the speakers. NOTE: When playing a disc encoded with 5.1 channels, this item can set this option to SPDIF/RAW or SPDIF/PCM to activate the coaxial digital audio output connection. ...
User Manual
Page 39
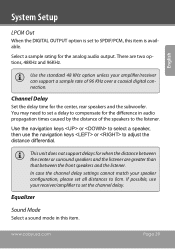
... Sound Mode Select a sound mode in audio propagation times caused by the distance of 96 KHz over a coaxial digital connection. Select a sample rating for the difference in this item is set a delay to SPDIF/PCM, this item. You may need to set to compensate for the analog audio output. This unit does not support delays for the center, rear speakers and the subwoofer. Channel Delay Set the delay time for when the distance between the center or surround speakers...
... Sound Mode Select a sound mode in audio propagation times caused by the distance of 96 KHz over a coaxial digital connection. Select a sample rating for the difference in this item is set a delay to SPDIF/PCM, this item. You may need to set to compensate for the analog audio output. This unit does not support delays for the center, rear speakers and the subwoofer. Channel Delay Set the delay time for when the distance between the center or surround speakers...
User Manual
Page 40
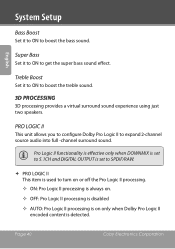
... only when Dolby Pro Logic II encoded content is detected. Pro Logic II functionality is effective only when DOWNMIX is set to 5.1CH and DIGITAL OUTPUT is set to SPDIF/RAW. PRO LOGIC II This item is used to expand 2-channel source audio into full -channel surround sound. Super Bass Set it to ON to get the super bass sound effect. Page 40 Coby Electronics Corporation...
... only when Dolby Pro Logic II encoded content is detected. Pro Logic II functionality is effective only when DOWNMIX is set to 5.1CH and DIGITAL OUTPUT is set to SPDIF/RAW. PRO LOGIC II This item is used to expand 2-channel source audio into full -channel surround sound. Super Bass Set it to ON to get the super bass sound effect. Page 40 Coby Electronics Corporation...
User Manual
Page 45
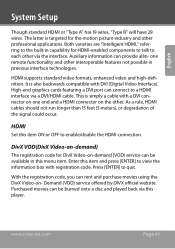
... the motion picture industry and other interoperable features not possible in this player. one end and a HDMI connector on -demand (VOD) service can be burned onto a disc and played back via a DVI/HDMI cable. It is simply a cable with a DVI connector on one remote functionality and other professional applications. English System Setup Though standard HDMI or "Type A" has 19 wires, "Type B" will have 29 wires. HDMI Set this item...
... the motion picture industry and other interoperable features not possible in this player. one end and a HDMI connector on -demand (VOD) service can be burned onto a disc and played back via a DVI/HDMI cable. It is simply a cable with a DVI connector on one remote functionality and other professional applications. English System Setup Though standard HDMI or "Type A" has 19 wires, "Type B" will have 29 wires. HDMI Set this item...


