
Quick Setup Guide
Page 1
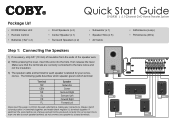
... the speaker wire. 2) While pressing the lever, insert the wire into the hole, then release the lever. Package List • DVD938 Main Unit • Remote Control • Batteries ("AA" x 2) Quick Start Guide DVD938 | 5.1-Channel DVD Home Theater System • Front Speakers (x 2) • Center Speaker (x 1) • Surround Speakers (x 2) • Subwoofer (x 1) • Speaker Wire (x 5) •...
... the speaker wire. 2) While pressing the lever, insert the wire into the hole, then release the lever. Package List • DVD938 Main Unit • Remote Control • Batteries ("AA" x 2) Quick Start Guide DVD938 | 5.1-Channel DVD Home Theater System • Front Speakers (x 2) • Center Speaker (x 1) • Surround Speakers (x 2) • Subwoofer (x 1) • Speaker Wire (x 5) •...
Quick Setup Guide
Page 2
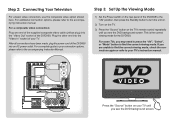
... viewing mode for the DVD938. If you may need to press the "AV", "Select", or "Mode" button to find the correct viewing mode, check the connections again or refer to turn the unit on. 2) Turn on the TV. 3) Press the "Source" button on the TV's remote control repeatedly until you ...see the DVD background screen. For a composite video connection: Plug one end of the supplied composite video cable (yellow plug) into the "Video Out" socket of the DVD938 into the "Video In" socket of the DVD938 to the "ON" position, then ...
... viewing mode for the DVD938. If you may need to press the "AV", "Select", or "Mode" button to find the correct viewing mode, check the connections again or refer to turn the unit on. 2) Turn on the TV. 3) Press the "Source" button on the TV's remote control repeatedly until you ...see the DVD background screen. For a composite video connection: Plug one end of the supplied composite video cable (yellow plug) into the "Video Out" socket of the DVD938 into the "Video In" socket of the DVD938 to the "ON" position, then ...
Quick Setup Guide
Page 3
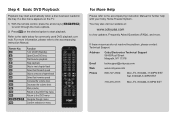
...volume Return to the DVD Title menu Return to the DVD menu Navigate through the menu options. 2) Press on the TV: 1) With the remote control, press the arrow keys [ ] to scroll through menu Confirm selection in menu For More Help Please refer to start automatically when a ... Manual for commonly used DVD playback controls. For more . If these resources do not resolve the problem, please contact Technical Support. Address Coby Electronics Technical Support 56-65 Rust Street Maspeth, NY 11378 Email [email protected] Web www.cobyusa.com Phone 800-727-3592: Mon-Fri...
...volume Return to the DVD Title menu Return to the DVD menu Navigate through the menu options. 2) Press on the TV: 1) With the remote control, press the arrow keys [ ] to scroll through menu Confirm selection in menu For More Help Please refer to start automatically when a ... Manual for commonly used DVD playback controls. For more . If these resources do not resolve the problem, please contact Technical Support. Address Coby Electronics Technical Support 56-65 Rust Street Maspeth, NY 11378 Email [email protected] Web www.cobyusa.com Phone 800-727-3592: Mon-Fri...
User Manual
Page 2
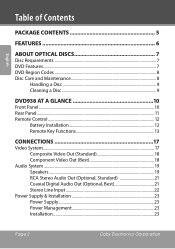
... 6 About Optical Discs 7 Disc Requirements 7 DVD Features...7 DVD Region Codes 8 Disc Care and Maintenance 8 Handling a Disc 9 Cleaning a Disc 9 DVD938 at a Glance 10 Front Panel...10 Rear Panel...11 Remote Control...12 Battery Installation 12 Remote Key Functions 13 Connections 17 Video System...17 Composite Video Out (Standard 18 Component Video Out (Best 18... 21 Coaxial Digital Audio Out (Optional, Best 21 Stereo Line Input 22 Power Supply & Installation 23 Power Supply 23 Power Management 23 Installation 23 Page 2 Coby Electronics Corporation
... 6 About Optical Discs 7 Disc Requirements 7 DVD Features...7 DVD Region Codes 8 Disc Care and Maintenance 8 Handling a Disc 9 Cleaning a Disc 9 DVD938 at a Glance 10 Front Panel...10 Rear Panel...11 Remote Control...12 Battery Installation 12 Remote Key Functions 13 Connections 17 Video System...17 Composite Video Out (Standard 18 Component Video Out (Best 18... 21 Coaxial Digital Audio Out (Optional, Best 21 Stereo Line Input 22 Power Supply & Installation 23 Power Supply 23 Power Management 23 Installation 23 Page 2 Coby Electronics Corporation
User Manual
Page 5
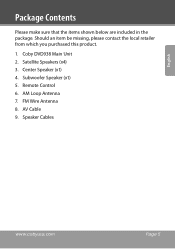
Coby DVD938 Main Unit 2. Center Speaker (x1) 4. Subwoofer Speaker (x1) 5. AM Loop Antenna 7. AV Cable 9. Speaker Cables www.cobyusa.com Page 5 Remote Control 6. FM Wire Antenna 8. English Package Contents Please make sure that the items shown below are included in the package. Satellite Speakers (x4) 3. Should an item be missing, please contact the local retailer from which you purchased this product. 1.
Coby DVD938 Main Unit 2. Center Speaker (x1) 4. Subwoofer Speaker (x1) 5. AM Loop Antenna 7. AV Cable 9. Speaker Cables www.cobyusa.com Page 5 Remote Control 6. FM Wire Antenna 8. English Package Contents Please make sure that the items shown below are included in the package. Satellite Speakers (x4) 3. Should an item be missing, please contact the local retailer from which you purchased this product. 1.
User Manual
Page 6
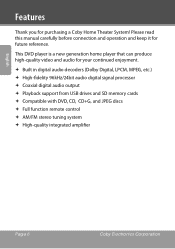
...; Compatible with DVD, CD, CD+G, and JPEG discs Full function remote control AM/FM stereo tuning system High-quality integrated amplifier Page 6 Coby Electronics Corporation This DVD player is a new generation home player that can produce high-...quality video and audio for purchasing a Coby Home Theater System! Please read this manual carefully before connection and operation...
...; Compatible with DVD, CD, CD+G, and JPEG discs Full function remote control AM/FM stereo tuning system High-quality integrated amplifier Page 6 Coby Electronics Corporation This DVD player is a new generation home player that can produce high-...quality video and audio for purchasing a Coby Home Theater System! Please read this manual carefully before connection and operation...
User Manual
Page 12
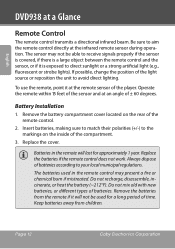
... according to the markings on the rear of the remote control. 2. Page 12 Coby Electronics Corporation Replace the cover. Remove the batteries from children. Batteries in the remote will not be used in the remote control may not be able to receive signals properly ... making sure to match their polarities (+/-) to your local municipal regulations. English DVD938 at the remote sensor of the player. The sensor may present a fire or chemical burn if mistreated. To use the remote, point it at a Glance Remote Control The remote control transmits a directional infrared beam.
... according to the markings on the rear of the remote control. 2. Page 12 Coby Electronics Corporation Replace the cover. Remove the batteries from children. Batteries in the remote will not be used in the remote control may not be able to receive signals properly ... making sure to match their polarities (+/-) to your local municipal regulations. English DVD938 at the remote sensor of the player. The sensor may present a fire or chemical burn if mistreated. To use the remote, point it at a Glance Remote Control The remote control transmits a directional infrared beam.
User Manual
Page 17
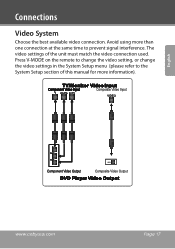
The video settings of this manual for more than one connection at the same time to the System Setup section of the unit must match the video connection used. Press V-MODE on the remote to change the video setting, or change the video settings in the System Setup menu (please refer to prevent signal interference. English www.cobyusa.com Page 17 Connections Video System Choose the best available video connection. Avoid using more information).
The video settings of this manual for more than one connection at the same time to the System Setup section of the unit must match the video connection used. Press V-MODE on the remote to change the video setting, or change the video settings in the System Setup menu (please refer to prevent signal interference. English www.cobyusa.com Page 17 Connections Video System Choose the best available video connection. Avoid using more information).

User Manual
Page 18
...for 480p output. use P-YUV for the composite video connection is 480p. Page 18 Coby Electronics Corporation You must set the unit to the component video mode. See the ...component video connection is 480i. The maximum output resolution for more information. You may also press on the remote until you see "CVBS" on the TV screen to set the unit's video output to the yellow ...YUV or P-YUV when using the component video output. Connect one end of the unit. 2. Press on the remote until you see "YUV" or "P-YUV" on the TV screen to set the unit to the Y, Cb/Pb...
...for 480p output. use P-YUV for the composite video connection is 480p. Page 18 Coby Electronics Corporation You must set the unit to the component video mode. See the ...component video connection is 480i. The maximum output resolution for more information. You may also press on the remote until you see "CVBS" on the TV screen to set the unit's video output to the yellow ...YUV or P-YUV when using the component video output. Connect one end of the unit. 2. Press on the remote until you see "YUV" or "P-YUV" on the TV screen to set the unit to the Y, Cb/Pb...
User Manual
Page 22
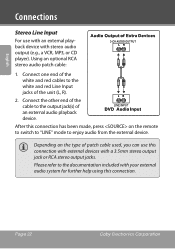
... and red Line Input jacks of an external audio playback device. After this connection. Page 22 Coby Electronics Corporation Connect the other end of the cable to enjoy audio from the external device. Depending on the remote to switch to "LINE" mode to the output jack(s) of the unit (L, R). 2. Using an optional...
... and red Line Input jacks of an external audio playback device. After this connection. Page 22 Coby Electronics Corporation Connect the other end of the cable to enjoy audio from the external device. Depending on the remote to switch to "LINE" mode to the output jack(s) of the unit (L, R). 2. Using an optional...
User Manual
Page 23
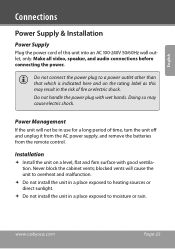
... Supply Plug the power cord of time, turn the unit off and unplug it from the AC power supply, and remove the batteries from the remote control.
... Supply Plug the power cord of time, turn the unit off and unplug it from the AC power supply, and remove the batteries from the remote control.
User Manual
Page 24
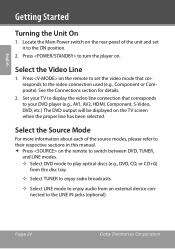
... video mode that corresponds to your DVD player (e.g., AV1, AV2, HDMI, Component, S-Video, DVD, etc.) The DVD output will be displayed on the remote to switch between DVD, TUNER, and LINE modes. —— Select DVD mode to play optical discs (e.g., DVD, CD, or CD+G) from the...please refer to their respective sections in this manual. Press on the TV screen when the proper line has been selected. Page 24 Coby Electronics Corporation Press on . Select the Video Line 1. See the Connections section for details. 2. English Getting Started Turning the Unit On 1. Set...
... video mode that corresponds to your DVD player (e.g., AV1, AV2, HDMI, Component, S-Video, DVD, etc.) The DVD output will be displayed on the remote to switch between DVD, TUNER, and LINE modes. —— Select DVD mode to play optical discs (e.g., DVD, CD, or CD+G) from the...please refer to their respective sections in this manual. Press on the TV screen when the proper line has been selected. Page 24 Coby Electronics Corporation Press on . Select the Video Line 1. See the Connections section for details. 2. English Getting Started Turning the Unit On 1. Set...
User Manual
Page 25
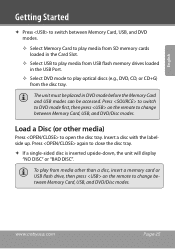
... (e.g., DVD, CD, or CD+G) from media other media) Press to open the disc tray. Press to switch to DVD mode first, then press on the remote to play from the disc tray. www.cobyusa.com Page 25 Insert a disc with the labelside up. Press again to change between Memory Card, USB... between Memory Card, USB, and DVD/Disc modes. Load a Disc (or other than a disc, insert a memory card or USB flash drive, then press on the remote to close the disc tray. If a single-sided disc is inserted upside-down, the unit will display "NO DISC" or "BAD DISC".
... (e.g., DVD, CD, or CD+G) from media other media) Press to open the disc tray. Press to switch to DVD mode first, then press on the remote to play from the disc tray. www.cobyusa.com Page 25 Insert a disc with the labelside up. Press again to change between Memory Card, USB... between Memory Card, USB, and DVD/Disc modes. Load a Disc (or other than a disc, insert a memory card or USB flash drive, then press on the remote to close the disc tray. If a single-sided disc is inserted upside-down, the unit will display "NO DISC" or "BAD DISC".
User Manual
Page 28
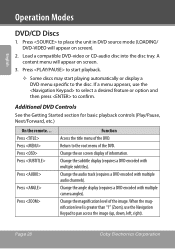
... image (up, down, left, right). Change the subtitle display (requires a DVD encoded with multiple audio channels). Change the magnification level of the DVD. Page 28 Coby Electronics Corporation A content menu will appear on screen). 2. Press Press Press Press Press Press Press Function Access the title menu of the image. Change the... on screen display of the DVD. Additional DVD Controls See the Getting Started section for basic playback controls (Play/Pause, Next/Forward, etc.) On the remote...
... image (up, down, left, right). Change the subtitle display (requires a DVD encoded with multiple audio channels). Change the magnification level of the DVD. Page 28 Coby Electronics Corporation A content menu will appear on screen). 2. Press Press Press Press Press Press Press Function Access the title menu of the image. Change the... on screen display of the DVD. Additional DVD Controls See the Getting Started section for basic playback controls (Play/Pause, Next/Forward, etc.) On the remote...
User Manual
Page 31
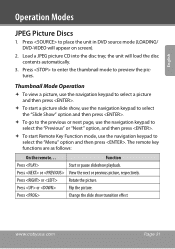
... go to the previous or next page, use the navigation keypad to select the "Previous" or "Next" option, and then press . To start Remote Key Function mode, use the navigation keypad to select a picture and then press . To start a picture slide show transition effect www.cobyusa.com...; To view a picture, use the navigation keypad to select the "Menu" option and then press . Load a JPEG picture CD into the disc tray; The remote key functions are as follows: On the remote... Press or Flip the picture. Press to preview the pictures.
... go to the previous or next page, use the navigation keypad to select the "Previous" or "Next" option, and then press . To start Remote Key Function mode, use the navigation keypad to select a picture and then press . To start a picture slide show transition effect www.cobyusa.com...; To view a picture, use the navigation keypad to select the "Menu" option and then press . Load a JPEG picture CD into the disc tray; The remote key functions are as follows: On the remote... Press or Flip the picture. Press to preview the pictures.

User Manual
Page 32
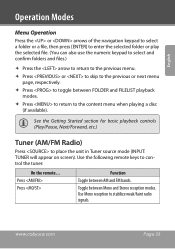
English Operation Modes On the remote... Press to normal status. Load a USB flash drive or memory card with compatible digital media files into the USB port or memory card slot, respectively. ... or Card source mode (USB will appear on screen). 3. When the magnification level is above 100%, use the navigation keypad to thumbnail mode. Page 32 Coby Electronics Corporation A content menu will only read certified USB drives/memory cards. The USB drive or memory card may not be compatible; Press again to...
English Operation Modes On the remote... Press to normal status. Load a USB flash drive or memory card with compatible digital media files into the USB port or memory card slot, respectively. ... or Card source mode (USB will appear on screen). 3. When the magnification level is above 100%, use the navigation keypad to thumbnail mode. Page 32 Coby Electronics Corporation A content menu will only read certified USB drives/memory cards. The USB drive or memory card may not be compatible; Press again to...
User Manual
Page 33
... or to skip to the previous or next menu page, respectively. Press to toggle between Mono and Stereo reception modes. Use the following remote keys to control the tuner: On the remote... Press Press Function Toggle between AM and FM bands.
... or to skip to the previous or next menu page, respectively. Press to toggle between Mono and Stereo reception modes. Use the following remote keys to control the tuner: On the remote... Press Press Function Toggle between AM and FM bands.
User Manual
Page 34
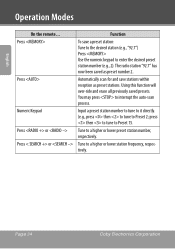
... scan for and save a preset station: Tune to the desired station (e.g., "92.7") Press Use the numeric keypad to interrupt the auto-scan process. Page 34 Coby Electronics Corporation press then to tune to a higher or lower station frequency, respectively. You may press to enter the desired preset station number (e.g., 2). The radio...
... scan for and save a preset station: Tune to the desired station (e.g., "92.7") Press Use the numeric keypad to interrupt the auto-scan process. Page 34 Coby Electronics Corporation press then to tune to a higher or lower station frequency, respectively. You may press to enter the desired preset station number (e.g., 2). The radio...
User Manual
Page 35
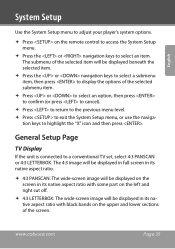
The submenu of the selected item will be displayed in its native aspect ratio with some part on the remote control to access the System Setup menu. Press the or navigation keys to select an item. tion keys to a conventional TV set, select 4:3 ...
The submenu of the selected item will be displayed in its native aspect ratio with some part on the remote control to access the System Setup menu. Press the or navigation keys to select an item. tion keys to a conventional TV set, select 4:3 ...
User Manual
Page 36
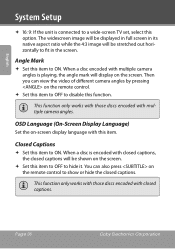
Then you can also press on the remote control. Set this item to OFF to disable this function. Closed Captions Set this item to fit in its native aspect ... OFF to hide it. You can view the video of different camera angles by pressing on the remote control to show or hide the closed captions will be shown on the screen. Page 36 Coby Electronics Corporation This function only works with those discs encoded with multiple camera angles. When a disc is...
Then you can also press on the remote control. Set this item to OFF to disable this function. Closed Captions Set this item to fit in its native aspect ... OFF to hide it. You can view the video of different camera angles by pressing on the remote control to show or hide the closed captions will be shown on the screen. Page 36 Coby Electronics Corporation This function only works with those discs encoded with multiple camera angles. When a disc is...


