
Quick Setup Guide
Page 1
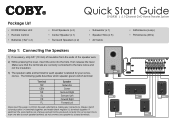
... and will not be produced correctly. and match black negative (-) terminals together. SW FL SL CEN FR SR Package List • DVD938 Main Unit • Remote Control • Batteries ("AA" x 2) Quick Start Guide DVD938 | 5.1-Channel DVD Home Theater System • Front Speakers (x 2) • Center Speaker (x 1) • Surround Speakers (x 2) • Subwoofer (x 1) • Speaker Wire (x 5) •...
... and will not be produced correctly. and match black negative (-) terminals together. SW FL SL CEN FR SR Package List • DVD938 Main Unit • Remote Control • Batteries ("AA" x 2) Quick Start Guide DVD938 | 5.1-Channel DVD Home Theater System • Front Speakers (x 2) • Center Speaker (x 1) • Surround Speakers (x 2) • Subwoofer (x 1) • Speaker Wire (x 5) •...
Quick Setup Guide
Page 2
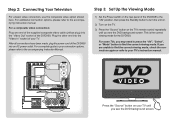
... 1 IN AV 1 Press the "Source" button on the TV's remote control repeatedly until you see the DVD background screen. For a composite video connection: Plug one end of the DVD938. After all connections have been made, plug the power cord of the DVD938 into the "Video Out" socket of the supplied composite video cable (... on the rear panel of your TV until you see the DVD background screen. Plug the other end into the "Video In" socket of the DVD938 to the "ON" position, then press the Standby button to turn the unit on. 2) Turn on the TV. 3) Press the "Source" button on your ...
... 1 IN AV 1 Press the "Source" button on the TV's remote control repeatedly until you see the DVD background screen. For a composite video connection: Plug one end of the DVD938. After all connections have been made, plug the power cord of the DVD938 into the "Video Out" socket of the supplied composite video cable (... on the rear panel of your TV until you see the DVD background screen. Plug the other end into the "Video In" socket of the DVD938 to the "ON" position, then press the Standby button to turn the unit on. 2) Turn on the TV. 3) Press the "Source" button on your ...
Quick Setup Guide
Page 3
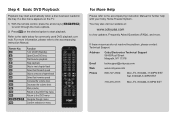
...to the table below for further help with your Coby Home Theater System. Refer to the accompanying Instruction Manual for commonly used DVD playback controls. Address Coby Electronics Technical Support 56-65 Rust Street Maspeth,... 8:00AM-5:30PM EST If a disc menu appears on the desired option to the accompanying Instruction Manual. Remote Key Function Turn On/Off (Standby) Open/Close DVD tray Start/resume playback Stop playback Skip to...options. 2) Press on the TV: 1) With the remote control, press the arrow keys [ ] to scroll through menu Confirm selection in the tray.
...to the table below for further help with your Coby Home Theater System. Refer to the accompanying Instruction Manual for commonly used DVD playback controls. Address Coby Electronics Technical Support 56-65 Rust Street Maspeth,... 8:00AM-5:30PM EST If a disc menu appears on the desired option to the accompanying Instruction Manual. Remote Key Function Turn On/Off (Standby) Open/Close DVD tray Start/resume playback Stop playback Skip to...options. 2) Press on the TV: 1) With the remote control, press the arrow keys [ ] to scroll through menu Confirm selection in the tray.
User Manual
Page 2
... 6 About Optical Discs 7 Disc Requirements 7 DVD Features...7 DVD Region Codes 8 Disc Care and Maintenance 8 Handling a Disc 9 Cleaning a Disc 9 DVD938 at a Glance 10 Front Panel...10 Rear Panel...11 Remote Control...12 Battery Installation 12 Remote Key Functions 13 Connections 17 Video System...17 Composite Video Out (Standard 18 Component Video Out (Best 18 Audio... 21 Coaxial Digital Audio Out (Optional, Best 21 Stereo Line Input 22 Power Supply & Installation 23 Power Supply 23 Power Management 23 Installation 23 Page 2 Coby Electronics Corporation
... 6 About Optical Discs 7 Disc Requirements 7 DVD Features...7 DVD Region Codes 8 Disc Care and Maintenance 8 Handling a Disc 9 Cleaning a Disc 9 DVD938 at a Glance 10 Front Panel...10 Rear Panel...11 Remote Control...12 Battery Installation 12 Remote Key Functions 13 Connections 17 Video System...17 Composite Video Out (Standard 18 Component Video Out (Best 18 Audio... 21 Coaxial Digital Audio Out (Optional, Best 21 Stereo Line Input 22 Power Supply & Installation 23 Power Supply 23 Power Management 23 Installation 23 Page 2 Coby Electronics Corporation
User Manual
Page 5
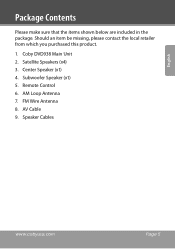
Center Speaker (x1) 4. AM Loop Antenna 7. FM Wire Antenna 8. Satellite Speakers (x4) 3. Speaker Cables www.cobyusa.com Page 5 Remote Control 6. Should an item be missing, please contact the local retailer from which you purchased this product. 1. AV Cable 9. Coby DVD938 Main Unit 2. English Package Contents Please make sure that the items shown below are included in the package. Subwoofer Speaker (x1) 5.
Center Speaker (x1) 4. AM Loop Antenna 7. FM Wire Antenna 8. Satellite Speakers (x4) 3. Speaker Cables www.cobyusa.com Page 5 Remote Control 6. Should an item be missing, please contact the local retailer from which you purchased this product. 1. AV Cable 9. Coby DVD938 Main Unit 2. English Package Contents Please make sure that the items shown below are included in the package. Subwoofer Speaker (x1) 5.
User Manual
Page 6
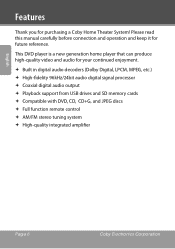
... Playback support from USB drives and SD memory cards Compatible with DVD, CD, CD+G, and JPEG discs Full function remote control AM/FM stereo tuning system High-quality integrated amplifier Page 6 Coby Electronics Corporation English Features Thank you for purchasing...
... Playback support from USB drives and SD memory cards Compatible with DVD, CD, CD+G, and JPEG discs Full function remote control AM/FM stereo tuning system High-quality integrated amplifier Page 6 Coby Electronics Corporation English Features Thank you for purchasing...
User Manual
Page 12
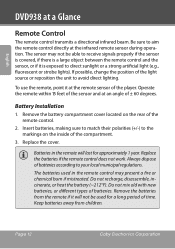
...DVD938 at the remote sensor of the light source or reposition the unit to your local municipal regulations. Insert batteries, making sure to match their polarities (+/-) to aim the remote control directly at an angle of batteries. Replace the batteries if the remote control does not work. Always dispose of the compartment. 3. Page 12 Coby... Electronics Corporation Operate the remote within 15 feet of ...
...DVD938 at the remote sensor of the light source or reposition the unit to your local municipal regulations. Insert batteries, making sure to match their polarities (+/-) to aim the remote control directly at an angle of batteries. Replace the batteries if the remote control does not work. Always dispose of the compartment. 3. Page 12 Coby... Electronics Corporation Operate the remote within 15 feet of ...
User Manual
Page 23
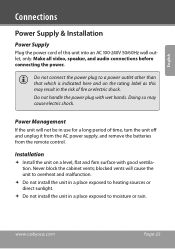
... in use for a long period of time, turn the unit off and unplug it from the AC power supply, and remove the batteries from the remote control.
... in use for a long period of time, turn the unit off and unplug it from the AC power supply, and remove the batteries from the remote control.
User Manual
Page 28
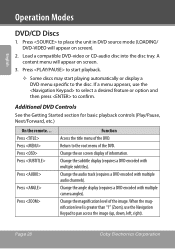
...Navigation Keypad to pan across the image (up, down, left, right). Additional DVD Controls See the Getting Started section for basic playback controls (Play/Pause, Next/Forward, etc.) On the remote... Return to confirm. Change the on screen. 3. English Operation Modes DVD/CD ...Discs 1. Change the subtitle display (requires a DVD encoded with multiple audio channels). Page 28 Coby Electronics Corporation Change ...
...Navigation Keypad to pan across the image (up, down, left, right). Additional DVD Controls See the Getting Started section for basic playback controls (Play/Pause, Next/Forward, etc.) On the remote... Return to confirm. Change the on screen. 3. English Operation Modes DVD/CD ...Discs 1. Change the subtitle display (requires a DVD encoded with multiple audio channels). Page 28 Coby Electronics Corporation Change ...
User Manual
Page 33
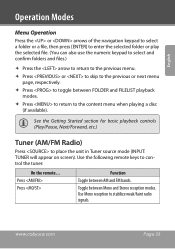
... to place the unit in Tuner source mode (INPUT: TUNER will appear on screen). See the Getting Started section for basic playback controls (Play/Pause, Next/Forward, etc.) Tuner (AM/FM Radio) Press to stabilize weak/faint radio signals. English Operation Modes Menu Operation... respectively. Press to toggle between FOLDER and FILELIST playback modes. Press to return to control the tuner: On the remote... Use the following remote keys to the content menu when playing a disc (if available). Press Press Function Toggle between Mono and Stereo reception ...
... to place the unit in Tuner source mode (INPUT: TUNER will appear on screen). See the Getting Started section for basic playback controls (Play/Pause, Next/Forward, etc.) Tuner (AM/FM Radio) Press to stabilize weak/faint radio signals. English Operation Modes Menu Operation... respectively. Press to toggle between FOLDER and FILELIST playback modes. Press to return to control the tuner: On the remote... Use the following remote keys to the content menu when playing a disc (if available). Press Press Function Toggle between Mono and Stereo reception ...
User Manual
Page 35
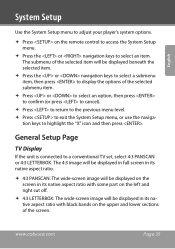
... left and right cut off. 4:3 LETTERBOX: The wide-screen image will be displayed in its native aspect ratio with black bands on the remote control to access the System Setup menu. Press the or navigation keys to highlight the "X" icon and then press . www.cobyusa.com Page 35...
... left and right cut off. 4:3 LETTERBOX: The wide-screen image will be displayed in its native aspect ratio with black bands on the remote control to access the System Setup menu. Press the or navigation keys to highlight the "X" icon and then press . www.cobyusa.com Page 35...
User Manual
Page 36
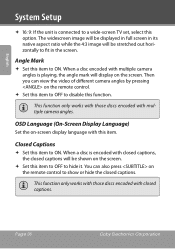
...TV set, select this item to OFF to hide it. When a disc is encoded with closed captions. Then you can also press on the remote control to ON. This function only works with those discs encoded with closed captions, the closed captions will be stretched out horizontally to ON. Angle ... while the 4:3 image will be shown on the screen. Set this option. Closed Captions Set this item. Page 36 Coby Electronics Corporation English System Setup 16: 9: If the unit is playing, the angle mark will display on the screen. The widescreen image ...
...TV set, select this item to OFF to hide it. When a disc is encoded with closed captions. Then you can also press on the remote control to ON. This function only works with those discs encoded with closed captions, the closed captions will be stretched out horizontally to ON. Angle ... while the 4:3 image will be shown on the screen. Set this option. Closed Captions Set this item. Page 36 Coby Electronics Corporation English System Setup 16: 9: If the unit is playing, the angle mark will display on the screen. The widescreen image ...
User Manual
Page 44
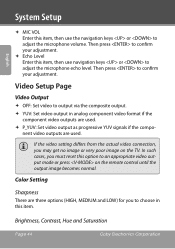
... no image or very poor image on the remote control until the output image becomes normal. System Setup English MIC VOL Enter this item, then use the navigation keys or to adjust the microphone volume. Brightness, Contrast, Hue and Saturation Page 44 Coby Electronics Corporation nent video outputs are used . Then...
... no image or very poor image on the remote control until the output image becomes normal. System Setup English MIC VOL Enter this item, then use the navigation keys or to adjust the microphone volume. Brightness, Contrast, Hue and Saturation Page 44 Coby Electronics Corporation nent video outputs are used . Then...
User Manual
Page 46
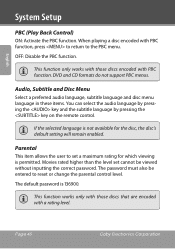
...PBC menu. Movies rated higher than the level set a maximum rating for the disc, the disc's default setting will remain enabled. Page 46 Coby Electronics Corporation This function only works with those discs that are encoded with a rating level. Audio, Subtitle and Disc Menu Select a preferred audio ... in these items. You can select the audio language by pressing the key and the subtitle language by pressing the key on the remote control. The password must also be viewed without inputting the correct password. DVD and CD formats do not support PBC menus. The default ...
...PBC menu. Movies rated higher than the level set a maximum rating for the disc, the disc's default setting will remain enabled. Page 46 Coby Electronics Corporation This function only works with those discs that are encoded with a rating level. Audio, Subtitle and Disc Menu Select a preferred audio ... in these items. You can select the audio language by pressing the key and the subtitle language by pressing the key on the remote control. The password must also be viewed without inputting the correct password. DVD and CD formats do not support PBC menus. The default ...
User Manual
Page 50
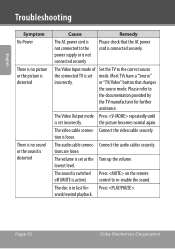
...). Connect the audio cables securely. lowest level. ward/rewind playback. the picture becomes normal again. The sound is switched Press on the remote off (MUTE is loose. Page 50 Coby Electronics Corporation The Video Input mode of Set the TV to the correct source the connected TV is in fast for further... mode Press repeatedly until is set at the Turn up the volume. Connect the video cable securely. tions are loose. The volume is set mode. control to the documentation provided by the TV manufacturer for -
...). Connect the audio cables securely. lowest level. ward/rewind playback. the picture becomes normal again. The sound is switched Press on the remote off (MUTE is loose. Page 50 Coby Electronics Corporation The Video Input mode of Set the TV to the correct source the connected TV is in fast for further... mode Press repeatedly until is set at the Turn up the volume. Connect the video cable securely. tions are loose. The volume is set mode. control to the documentation provided by the TV manufacturer for -
User Manual
Page 52
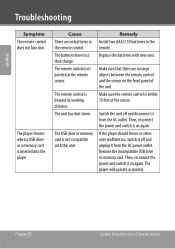
... within 15 feet of the unit. Make sure the remote control is beyond its working distance. The batteries have lost their charge. The USB drive or memory card is not compatible with new ones. Page 52 Coby Electronics Corporation Replace the batteries with this unit. Then, ...reconnect the power and switch it from the AC outlet. Switch the unit off and unplug it on again. Remedy Install two AAA/1.5V batteries in the remote control. English Troubleshooting Symptom The remote control does not ...
... within 15 feet of the unit. Make sure the remote control is beyond its working distance. The batteries have lost their charge. The USB drive or memory card is not compatible with new ones. Page 52 Coby Electronics Corporation Replace the batteries with this unit. Then, ...reconnect the power and switch it from the AC outlet. Switch the unit off and unplug it on again. Remedy Install two AAA/1.5V batteries in the remote control. English Troubleshooting Symptom The remote control does not ...


