
Instruction Manual
Page 2
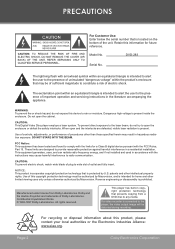
... Unpublished Works. © 1992-1997 Dolby Laboratories. All rights reserved. For recycling or disposal information about this information for home and other limited viewing uses only unless otherwise authorized by Macrovision, and is intended to alert the user to comply with the limits for a Class B digital device pursuant with the instructions may result in the literature accompanying the appliance. DVD-283 Serial...
... Unpublished Works. © 1992-1997 Dolby Laboratories. All rights reserved. For recycling or disposal information about this information for home and other limited viewing uses only unless otherwise authorized by Macrovision, and is intended to alert the user to comply with the limits for a Class B digital device pursuant with the instructions may result in the literature accompanying the appliance. DVD-283 Serial...

Instruction Manual
Page 6
...11 Rear Panel...11 Remote Control...12 Composite Video or S-Video Connection 14 Component Video Connection (Progressive Scan 16 HDMI Connection (Upconversion 17 Audio Connections...18 2-Channel Stereo...18 Coaxial Digital Audio...19 Power Supply...20 Power Management...20 BASIC OPERATIONS...21 Basic Playback...21 Play/Pause/Stop...21 Previous/Next (Skip)...21 Forward/Reverse (Search)...21 Slow/Step...22 Menu Navigation...22 Numeric Keypad...22 Adjusting the Volume...22 Disc Error Messages...22 PLAYER FUNCTIONS...24 Menu / Title ...24 Setup...24 On-Screen Display...24 Repeat Mode...24 Repeat...
...11 Rear Panel...11 Remote Control...12 Composite Video or S-Video Connection 14 Component Video Connection (Progressive Scan 16 HDMI Connection (Upconversion 17 Audio Connections...18 2-Channel Stereo...18 Coaxial Digital Audio...19 Power Supply...20 Power Management...20 BASIC OPERATIONS...21 Basic Playback...21 Play/Pause/Stop...21 Previous/Next (Skip)...21 Forward/Reverse (Search)...21 Slow/Step...22 Menu Navigation...22 Numeric Keypad...22 Adjusting the Volume...22 Disc Error Messages...22 PLAYER FUNCTIONS...24 Menu / Title ...24 Setup...24 On-Screen Display...24 Repeat Mode...24 Repeat...
Instruction Manual
Page 8
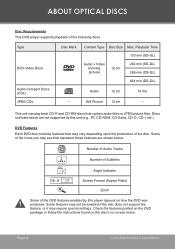
Some of the DVD features enabled by this player depend on -screen menu. Number of Audio Tracks Number of Subtitles Angle Indicator Screen Format (Aspect Ratio) Zoom Some of the icons you may see that contain audio titles or JPEG picture files. ABOUT OPTICAL DISCS Disc Requirements This DVD player supports playback of the disc. Still Picture 12 cm -- Playback Time 133 min (SS-SL) Audio + Video (moving picture) 12 cm 242 min (SS-DL) 266 min (DS-SL...
Some of the DVD features enabled by this player depend on -screen menu. Number of Audio Tracks Number of Subtitles Angle Indicator Screen Format (Aspect Ratio) Zoom Some of the icons you may see that contain audio titles or JPEG picture files. ABOUT OPTICAL DISCS Disc Requirements This DVD player supports playback of the disc. Still Picture 12 cm -- Playback Time 133 min (SS-SL) Audio + Video (moving picture) 12 cm 242 min (SS-DL) 266 min (DS-SL...
Instruction Manual
Page 9
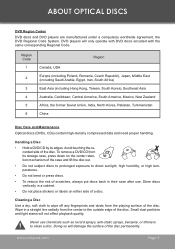
... To remove a DVD/CD from the playing surface of the disc. Cleaning a Disc Use a dry, soft cloth to the outside edge of the disc. Region Code 1 2 3 4 5 6 Region Canada, ...discs. • To reduce the risk of a disc. DVD players will damage the surface of the disc. corded side of the disc permanently. Small dust particles and light stains will not affect playback quality. ABOUT OPTICAL DISCS DVD Region Codes DVD discs and DVD players are manufactured under a compulsory worldwide agreement, the DVD Regional Code System. Wipe in their case after use chemicals such as record...
... To remove a DVD/CD from the playing surface of the disc. Cleaning a Disc Use a dry, soft cloth to the outside edge of the disc. Region Code 1 2 3 4 5 6 Region Canada, ...discs. • To reduce the risk of a disc. DVD players will damage the surface of the disc. corded side of the disc permanently. Small dust particles and light stains will not affect playback quality. ABOUT OPTICAL DISCS DVD Region Codes DVD discs and DVD players are manufactured under a compulsory worldwide agreement, the DVD Regional Code System. Wipe in their case after use chemicals such as record...

Instruction Manual
Page 10
... for use with HDTVs (720p/1080i) • DVD, DVD±R/RW, CD, CD-R/RW, and JPEG Compatible • Dolby Digital Decoder • HDMI Output for Perfect Digital Signal Transmission to Home Theater Systems over a Single Cable • Digital and Analog AV Outputs for Home Theater Use • NTSC/PAL Compatible • Convenient On-Screen Display • Multiple Language, Subtitle, and Camera Angle Support • Picture Zoom Function • Parental Lock Control • 100-240V Automatic Power Switching Page 10 Coby Electronics...
... for use with HDTVs (720p/1080i) • DVD, DVD±R/RW, CD, CD-R/RW, and JPEG Compatible • Dolby Digital Decoder • HDMI Output for Perfect Digital Signal Transmission to Home Theater Systems over a Single Cable • Digital and Analog AV Outputs for Home Theater Use • NTSC/PAL Compatible • Convenient On-Screen Display • Multiple Language, Subtitle, and Camera Angle Support • Picture Zoom Function • Parental Lock Control • 100-240V Automatic Power Switching Page 10 Coby Electronics...
Instruction Manual
Page 13
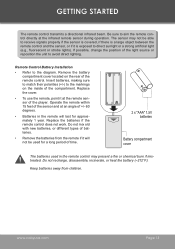
... the player. GETTING STARTED The remote control transmits a directional infrared beam. The batteries used for approximately 1 year. www.cobyusa.com Page 13 Keep batteries away from the remote if it will last for a long period of batteries. • Remove the batteries from children. Replace the batteries if the remote control does not work. If possible, change the position of the remote control. Insert batteries, making sure to match their polarities (+/-) to receive signals...
... the player. GETTING STARTED The remote control transmits a directional infrared beam. The batteries used for approximately 1 year. www.cobyusa.com Page 13 Keep batteries away from the remote if it will last for a long period of batteries. • Remove the batteries from children. Replace the batteries if the remote control does not work. If possible, change the position of the remote control. Insert batteries, making sure to match their polarities (+/-) to receive signals...
Instruction Manual
Page 14
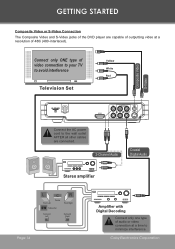
... Composite Video or S-Video Connection The Composite Video and S-Video jacks of the DVD player are connected. 2-Channel Audio Coaxial Digital Audio Front Left Center Subwoofer Front Right Surround Left Surround Right Page 14 Amplifier with Digital Decoding Connect only one type of audio or video connection at a time to the wall outlet AFTER all other cables are capable of outputting video at a resolution of video connection to your TV to avoid interference Composite Video S-Video Connect the AC power cord to...
... Composite Video or S-Video Connection The Composite Video and S-Video jacks of the DVD player are connected. 2-Channel Audio Coaxial Digital Audio Front Left Center Subwoofer Front Right Surround Left Surround Right Page 14 Amplifier with Digital Decoding Connect only one type of audio or video connection at a time to the wall outlet AFTER all other cables are capable of outputting video at a resolution of video connection to your TV to avoid interference Composite Video S-Video Connect the AC power cord to...
Instruction Manual
Page 15
... that prevents copying from broadcast reception mode to the player, the video output image will be equipped with composite Audio/Video (AV) outputs located on the model, the DVD player may need to press a button labeled Line, Input, or Video/TV. www.cobyusa.com Page 15 Stereo or surround sound will require a Stereo TV or Surround AV receiver, respectively. • For Mono TVs, you may connect either 2-channel stereo or 5.1-channel surround sound outputs. Some...
... that prevents copying from broadcast reception mode to the player, the video output image will be equipped with composite Audio/Video (AV) outputs located on the model, the DVD player may need to press a button labeled Line, Input, or Video/TV. www.cobyusa.com Page 15 Stereo or surround sound will require a Stereo TV or Surround AV receiver, respectively. • For Mono TVs, you may connect either 2-channel stereo or 5.1-channel surround sound outputs. Some...
Instruction Manual
Page 16
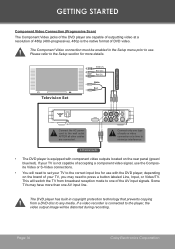
... rear panel (green/ blue/red). The Component Video connection must be distorted during recording. Green (Y) Blue (Cb) Red (Cr) Component Video Connect the AC power cord to the wall outlet AFTER all other cables are capable of outputting video at a time to one AV input line. This will be enabled in copyright protection technology that prevents copying from broadcast reception mode to minimize interference. 2-Channel Audio • The DVD player is the native format of DVD video...
... rear panel (green/ blue/red). The Component Video connection must be distorted during recording. Green (Y) Blue (Cb) Red (Cr) Component Video Connect the AC power cord to the wall outlet AFTER all other cables are capable of outputting video at a time to one AV input line. This will be enabled in copyright protection technology that prevents copying from broadcast reception mode to minimize interference. 2-Channel Audio • The DVD player is the native format of DVD video...
Instruction Manual
Page 17
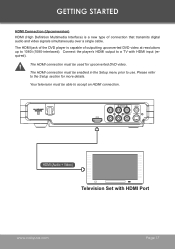
... an HDMI connection. Please refer to use. The HDMI connection must be used for more details. HDMI (Audio + Video) Television Set with HDMI input (required). The HDMI connection must be enabled in the Setup menu prior to the Setup section for upconverted DVD video. GETTING STARTED HDMI Connection (Upconversion) HDMI (High Definition Multimedia Interface) is capable of connection that transmits digital audio and video signals simultaneously over a single cable. The HDMI jack of the DVD player is a new type of outputting upconverted DVD video at resolutions...
... an HDMI connection. Please refer to use. The HDMI connection must be used for more details. HDMI (Audio + Video) Television Set with HDMI input (required). The HDMI connection must be enabled in the Setup menu prior to the Setup section for upconverted DVD video. GETTING STARTED HDMI Connection (Upconversion) HDMI (High Definition Multimedia Interface) is capable of connection that transmits digital audio and video signals simultaneously over a single cable. The HDMI jack of the DVD player is a new type of outputting upconverted DVD video at resolutions...

Instruction Manual
Page 18
... Audio Connections Use only one of Stereo Amplifier (optional) Page 18 Coby Electronics Corporation Component, Composite, or S-Video Connection To L/R Audio Input of Stereo TV 2-Channel Audio To L/R Audio Input of the following connections to a stereo TV (or optionally, a stereo amplifier). Coaxial Digital Audio Out Coaxial Digital Audio requires an amplifier with digital decoding capabilities. 2-Channel Stereo The DVD player is equipped with 2-channel Stereo (Composite) Audio outputs located on the rear panel (red/white). Connect the player's audio outputs to avoid signal...
... Audio Connections Use only one of Stereo Amplifier (optional) Page 18 Coby Electronics Corporation Component, Composite, or S-Video Connection To L/R Audio Input of Stereo TV 2-Channel Audio To L/R Audio Input of the following connections to a stereo TV (or optionally, a stereo amplifier). Coaxial Digital Audio Out Coaxial Digital Audio requires an amplifier with digital decoding capabilities. 2-Channel Stereo The DVD player is equipped with 2-channel Stereo (Composite) Audio outputs located on the rear panel (red/white). Connect the player's audio outputs to avoid signal...
Instruction Manual
Page 19
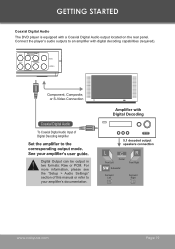
....cobyusa.com Page 19 For more information, please see the "Setup > Audio Settings" section of Digital Decoding Amplifier Amplifier with digital decoding capabilities (required). Component, Composite, or S-Video Connection Coaxial Digital Audio To Coaxial Digital Audio Input of this manual or refer to an amplifier with Digital Decoding Digital Output can be output in two formats: Raw or PCM. GETTING STARTED Coaxial Digital Audio The DVD player is equipped with a Coaxial Digital Audio output located on the rear panel.
....cobyusa.com Page 19 For more information, please see the "Setup > Audio Settings" section of Digital Decoding Amplifier Amplifier with digital decoding capabilities (required). Component, Composite, or S-Video Connection Coaxial Digital Audio To Coaxial Digital Audio Input of this manual or refer to an amplifier with Digital Decoding Digital Output can be output in two formats: Raw or PCM. GETTING STARTED Coaxial Digital Audio The DVD player is equipped with a Coaxial Digital Audio output located on the rear panel.

Instruction Manual
Page 21
... will start playing automatically or display a DVD menu specific to stop playback completely. (When is inserted upside-down, the player will change www.cobyusa.com Page 21 Press to reverse through the current track. Normal x2 x4 x8 x16 x32 • Press to turn the player on the TV screen when the proper line has been selected. 3. Prepare the connections and power supply. Select the video line...
... will start playing automatically or display a DVD menu specific to stop playback completely. (When is inserted upside-down, the player will change www.cobyusa.com Page 21 Press to reverse through the current track. Normal x2 x4 x8 x16 x32 • Press to turn the player on the TV screen when the proper line has been selected. 3. Prepare the connections and power supply. Select the video line...

Instruction Manual
Page 22
... access track numbers higher than the parental rating level setting of slow-motion playback. Press to select a desired feature or option in the menu. • For some menu options, you may play the disc at a lower quality or stop play completely, depending on -screen if there is equipped with the format of STEP will not play the disc. • WRONG DISC. Audio will change the rate of the player. The player...
... access track numbers higher than the parental rating level setting of slow-motion playback. Press to select a desired feature or option in the menu. • For some menu options, you may play the disc at a lower quality or stop play completely, depending on -screen if there is equipped with the format of STEP will not play the disc. • WRONG DISC. Audio will change the rate of the player. The player...
Instruction Manual
Page 24
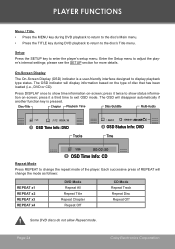
.... Setup Press the SETUP key to adjust the player's internal settings; The OSD indicator will change the repeat mode of the player. Press DISPLAY once to the disc's Title menu. press it twice to display playback type status. Page 24 Coby Electronics Corporation OSD Time Info: DVD Tracks CH1/1 ENG1/1 OSD Status Info: DVD Time 1/20 OSD Time Info: CD Repeat Mode Press REPEAT to exit OSD mode. PLAYER FUNCTIONS Menu / Title • Press the MENU key during DVD playback to...
.... Setup Press the SETUP key to adjust the player's internal settings; The OSD indicator will change the repeat mode of the player. Press DISPLAY once to the disc's Title menu. press it twice to display playback type status. Page 24 Coby Electronics Corporation OSD Time Info: DVD Tracks CH1/1 ENG1/1 OSD Status Info: DVD Time 1/20 OSD Time Info: CD Repeat Mode Press REPEAT to exit OSD mode. PLAYER FUNCTIONS Menu / Title • Press the MENU key during DVD playback to...

Instruction Manual
Page 25
.../100%, use the Navigation Keypad to be repeated. 2. Press A-B again to change the magnification level of the picture. • During DVD playback, each successive press of ZOOM will change the level of magnification. • During JPEG CD playback, each successive press of ZOOM will decrease as a loop. The picture quality will change the level of magnification. PLAYER FUNCTIONS Repeat A-B Mode To repeat a specific section of a disc (play repeatedly as...
.../100%, use the Navigation Keypad to be repeated. 2. Press A-B again to change the magnification level of the picture. • During DVD playback, each successive press of ZOOM will change the level of magnification. • During JPEG CD playback, each successive press of ZOOM will decrease as a loop. The picture quality will change the level of magnification. PLAYER FUNCTIONS Repeat A-B Mode To repeat a specific section of a disc (play repeatedly as...

Instruction Manual
Page 26
PLAYER FUNCTIONS Program To create a custom sequence of tracks to be played, press PRG to enter Program Mode. • Use the Numeric Keypad to select a field. DVD Program Mode • Load a DVD and enter Program mode. • Use the Navigation Keypad to enter numbers directly into the fields. bers in the left "Tt" columns (or press CLEAR to delete). • Use the numeric keypad to enter chapter numbers in the right...
PLAYER FUNCTIONS Program To create a custom sequence of tracks to be played, press PRG to enter Program Mode. • Use the Numeric Keypad to select a field. DVD Program Mode • Load a DVD and enter Program mode. • Use the Navigation Keypad to enter numbers directly into the fields. bers in the left "Tt" columns (or press CLEAR to delete). • Use the numeric keypad to enter chapter numbers in the right...
Instruction Manual
Page 27
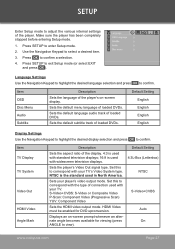
... player has been completely stopped before entering Setup mode. 1. Use the Navigation Keypad to confirm a selection. 4. Sets the default language audio track of loaded DVDs. Default Setting English English English English Display Settings Use the Navigation Keypad to highlight the desired display selection and press to confirm. HDMI Video must be enabled for viewing (press ANGLE to adjust the various internal settings of connection used with your TV. Default Setting 4:3L-Box (Letterbox) NTSC S-Video+CVBS Auto On www.cobyusa.com Page 27 Item OSD Disc Menu Audio Subtitle...
... player has been completely stopped before entering Setup mode. 1. Use the Navigation Keypad to confirm a selection. 4. Sets the default language audio track of loaded DVDs. Default Setting English English English English Display Settings Use the Navigation Keypad to highlight the desired display selection and press to confirm. HDMI Video must be enabled for viewing (press ANGLE to adjust the various internal settings of connection used with your TV. Default Setting 4:3L-Box (Letterbox) NTSC S-Video+CVBS Auto On www.cobyusa.com Page 27 Item OSD Disc Menu Audio Subtitle...
Instruction Manual
Page 28
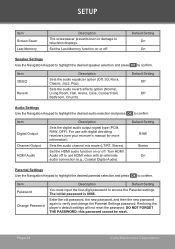
...Default Setting Off Off Audio Settings Use the Navigation Keypad to access the Parental settings. Restoring the player's default settings will not reset the password. Turn HDMI Audio off . this password cannot be reset. Item Password Change Password Description Default Setting You must input the four-digit password to highlight the desired audio selection and press Item Digital Output Channel Output HDMI Audio Description Sets the digital audio output signal type (PCM, RAW, OFF). to use with an alternate audio connection (e.g., Coaxial Digital Audio). Page 28 Coby...
...Default Setting Off Off Audio Settings Use the Navigation Keypad to access the Parental settings. Restoring the player's default settings will not reset the password. Turn HDMI Audio off . this password cannot be reset. Item Password Change Password Description Default Setting You must input the four-digit password to highlight the desired audio selection and press Item Digital Output Channel Output HDMI Audio Description Sets the digital audio output signal type (PCM, RAW, OFF). to use with an alternate audio connection (e.g., Coaxial Digital Audio). Page 28 Coby...
Instruction Manual
Page 31
... the connection cables are damaged. • Restore the player to the TV (and not through a VCR, cable box, satellite receiver, etc.) The picture is connected directly to it's factory-default settings: open the disc tray, and then press the PRG and ZOOM together on for Frequently Asked Questions (FAQs) and firmware updates. If these resources do not resolve the problem, please contact Technical Support. Remove the disc and leave the player on the remote control.
... the connection cables are damaged. • Restore the player to the TV (and not through a VCR, cable box, satellite receiver, etc.) The picture is connected directly to it's factory-default settings: open the disc tray, and then press the PRG and ZOOM together on for Frequently Asked Questions (FAQs) and firmware updates. If these resources do not resolve the problem, please contact Technical Support. Remove the disc and leave the player on the remote control.


