
User Manual
Page 1
COBY Electronics Corp. 56-65 Rust Street Maspeth, NY 11378 www.cobyusa.com www.ecoby.com DP860/862 8″ Widescreen Digital Photo Frame with Multimedia Playback DP860 DP862 INSTRUCTION MANUAL Please read this manual carefully before operation
COBY Electronics Corp. 56-65 Rust Street Maspeth, NY 11378 www.cobyusa.com www.ecoby.com DP860/862 8″ Widescreen Digital Photo Frame with Multimedia Playback DP860 DP862 INSTRUCTION MANUAL Please read this manual carefully before operation
User Manual
Page 8
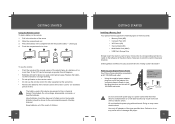
Replace the batteries if the remote is indicated here or on the left panel of your Digital Picture Frame Your Picture Frame should be in to orient the card in the remote: 1. Attention should be easier! Take care to close 1 2 3 4 To use the remote control for other ... cards: • Memory Stick (MS) • Compact Flash (CF) • XD-Picture (XD) • Secure Digital (SD) • Multi Media Card (MMC) • USB Flash Storage Drive Simply insert the memory card of the photo frame. DC OUT: 9V 1A Do not connect the power plug to the environmental aspects of no...
Replace the batteries if the remote is indicated here or on the left panel of your Digital Picture Frame Your Picture Frame should be in to orient the card in the remote: 1. Attention should be easier! Take care to close 1 2 3 4 To use the remote control for other ... cards: • Memory Stick (MS) • Compact Flash (CF) • XD-Picture (XD) • Secure Digital (SD) • Multi Media Card (MMC) • USB Flash Storage Drive Simply insert the memory card of the photo frame. DC OUT: 9V 1A Do not connect the power plug to the environmental aspects of no...
User Manual
Page 9
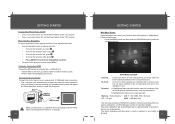
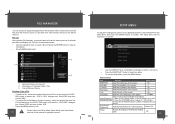
... in approximately 8 seconds if there is pressed. 17 GETTING STARTED Turning Your Photo Frame On/Off • To turn your photo frame on, set the Power Switch to the "On" position. • To turn your digital photo frame: • Use the Navigation keys to make a selection. • To move...; To return to the previous screen, press MENU. Only card slots with a USB cable to: • Transfer files to your photo frame's installed memory cards. • Perform basic file management functions. Menu Interface Navigation To select the different menu options and files of ...
... in approximately 8 seconds if there is pressed. 17 GETTING STARTED Turning Your Photo Frame On/Off • To turn your photo frame on, set the Power Switch to the "On" position. • To turn your digital photo frame: • Use the Navigation keys to make a selection. • To move...; To return to the previous screen, press MENU. Only card slots with a USB cable to: • Transfer files to your photo frame's installed memory cards. • Perform basic file management functions. Menu Interface Navigation To select the different menu options and files of ...
User Manual
Page 11
.... • To view the previous photo, press the LEFT button (or the UP button on the DP frame). • To view the next photo, press the RIGHT button (or the DOWN button on the DP frame). • To change between the screen ratio modes Full Screen, Fit to Screen and Crop to... Fill. 20 MOVIE MODE To play AVI, MOV, MP4, 3GP video files, support MPEG4, MJPEG, H264 video formats. 21 Video List Screen Upon entering Video Mode, your digital video files...
.... • To view the previous photo, press the LEFT button (or the UP button on the DP frame). • To view the next photo, press the RIGHT button (or the DOWN button on the DP frame). • To change between the screen ratio modes Full Screen, Fit to Screen and Crop to... Fill. 20 MOVIE MODE To play AVI, MOV, MP4, 3GP video files, support MPEG4, MJPEG, H264 video formats. 21 Video List Screen Upon entering Video Mode, your digital video files...
User Manual
Page 12
...• Use the direction keys to select an audio file and press t h e ENTER b u t t o n to start playback. Your photo frame can play your photo frame will display supported audio files, only. During playback: • To pause playback, press the PLAY / PAUSE button. FLODER A FLODER B FLODER C FLODER...button to start playback. The Music List displays the filenames of the selected File. 3. Music List Upon entering Music Mode, your digital audio files, select Music icon from the Main Menu screen and press the ENTER button. A music file is being selected. ...
...• Use the direction keys to select an audio file and press t h e ENTER b u t t o n to start playback. Your photo frame can play your photo frame will display supported audio files, only. During playback: • To pause playback, press the PLAY / PAUSE button. FLODER A FLODER B FLODER C FLODER...button to start playback. The Music List displays the filenames of the selected File. 3. Music List Upon entering Music Mode, your digital audio files, select Music icon from the Main Menu screen and press the ENTER button. A music file is being selected. ...
User Manual
Page 14
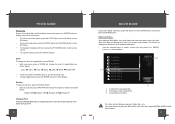
... Mode, Music Mode, and Video Mode 26 sections of this manual for playback controls SETUP MENU To adjust the settings and options of your photo frame will be displayed on screen. Please refer to the built-in the File List 2. FLODER A PHOTO VIDEO 1 VVD MUSIC FILE A MUSIC FILE B LYH55144. ... file from the Main Menu and press the ENTER button to access the " COPY / DEL" dialogue box. File List Upon entering File Manager, your digital photo frame, select SETUP from the File List and press the COPY / DEL button to confirm. Select DEL and then Confirm YES. • To copy a ...
... Mode, Music Mode, and Video Mode 26 sections of this manual for playback controls SETUP MENU To adjust the settings and options of your photo frame will be displayed on screen. Please refer to the built-in the File List 2. FLODER A PHOTO VIDEO 1 VVD MUSIC FILE A MUSIC FILE B LYH55144. ... file from the Main Menu and press the ENTER button to access the " COPY / DEL" dialogue box. File List Upon entering File Manager, your digital photo frame, select SETUP from the File List and press the COPY / DEL button to confirm. Select DEL and then Confirm YES. • To copy a ...


