User Manual
Page 2
... Operating the Recorder 12 Making a Recording 12 Playing Back a Recording 14 Editing a Recording 15 Split 16 Remove a Section 16 Deleting a Recording 17 Setup Options 19 Setting the Record Options 19 Record Mode Quality 19 Microphone Record Sensitivity 20 Voice-Activated Recording (VAS 20 Setting the Date and Time 21 Using microSD Cards 23 Formatting the Recorder 24 Page 2 Coby Electronics Corporation
... Operating the Recorder 12 Making a Recording 12 Playing Back a Recording 14 Editing a Recording 15 Split 16 Remove a Section 16 Deleting a Recording 17 Setup Options 19 Setting the Record Options 19 Record Mode Quality 19 Microphone Record Sensitivity 20 Voice-Activated Recording (VAS 20 Setting the Date and Time 21 Using microSD Cards 23 Formatting the Recorder 24 Page 2 Coby Electronics Corporation
User Manual
Page 3
English Table of Contents PC Connection & Software 25 Transferring Recordings to Your PC 25 Voice Manager Software 27 Installation 27 Starting the Voice Manager Software 28 Converting Recordings to WAV 29 Care & Maintenance 30 Support 32 Specifications 33 Safety Notices 34 www.cobyusa.com Page 3
English Table of Contents PC Connection & Software 25 Transferring Recordings to Your PC 25 Voice Manager Software 27 Installation 27 Starting the Voice Manager Software 28 Converting Recordings to WAV 29 Care & Maintenance 30 Support 32 Specifications 33 Safety Notices 34 www.cobyusa.com Page 3

User Manual
Page 4
... speaker LED recording indicator Time/date display 3.5mm headphone jack for private listening 3.5mm microphone jack for optional external microphones USB port for file transfers Audio transcoding software included Requires 2 x "AAA" batteries (not included) Page 4 Coby Electronics Corporation
... speaker LED recording indicator Time/date display 3.5mm headphone jack for private listening 3.5mm microphone jack for optional external microphones USB port for file transfers Audio transcoding software included Requires 2 x "AAA" batteries (not included) Page 4 Coby Electronics Corporation
User Manual
Page 5
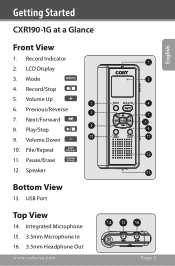
Play/Stop 9. Volume Down 10 10. Record Indicator 2. LCD Display 3. Next/Forward 6 8. Pause/Erase 12. Volume Up 3 6. Previous/Reverse 5 7. Record/Stop 5. Mode 4. File/Repeat 11. USB Port Top View 14. Integrated Microphone 15. 3.5mm Microphone In 16. 3.5mm Headphone Out www.cobyusa.com 1 2 4 7 8 9 11 12 13 14 15 16 Page 5 English Getting Started CXR190-1G at a Glance Front View 1. Speaker Bottom View 13.
Play/Stop 9. Volume Down 10 10. Record Indicator 2. LCD Display 3. Next/Forward 6 8. Pause/Erase 12. Volume Up 3 6. Previous/Reverse 5 7. Record/Stop 5. Mode 4. File/Repeat 11. USB Port Top View 14. Integrated Microphone 15. 3.5mm Microphone In 16. 3.5mm Headphone Out www.cobyusa.com 1 2 4 7 8 9 11 12 13 14 15 16 Page 5 English Getting Started CXR190-1G at a Glance Front View 1. Speaker Bottom View 13.
User Manual
Page 7
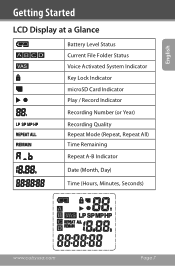
English Getting Started LCD Display at a Glance Battery Level Status Current File Folder Status Voice Activated System Indicator Key Lock Indicator microSD Card Indicator Play / Record Indicator Recording Number (or Year) Recording Quality Repeat Mode (Repeat, Repeat All) Time Remaining Repeat A-B Indicator Date (Month, Day) Time (Hours, Minutes, Seconds) www.cobyusa.com Page 7
English Getting Started LCD Display at a Glance Battery Level Status Current File Folder Status Voice Activated System Indicator Key Lock Indicator microSD Card Indicator Play / Record Indicator Recording Number (or Year) Recording Quality Repeat Mode (Repeat, Repeat All) Time Remaining Repeat A-B Indicator Date (Month, Day) Time (Hours, Minutes, Seconds) www.cobyusa.com Page 7
User Manual
Page 8
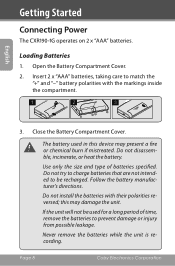
... to charge batteries that are not intended to match the "+" and "-" battery polarities with their polarities reversed; Page 8 Coby Electronics Corporation this device may damage the unit. English Getting Started Connecting Power The CXR190-1G operates on 2 x "AAA" batteries. Insert 2 x "AAA" batteries, taking care to be used in this may present a fire...
... to charge batteries that are not intended to match the "+" and "-" battery polarities with their polarities reversed; Page 8 Coby Electronics Corporation this device may damage the unit. English Getting Started Connecting Power The CXR190-1G operates on 2 x "AAA" batteries. Insert 2 x "AAA" batteries, taking care to be used in this may present a fire...
User Manual
Page 9
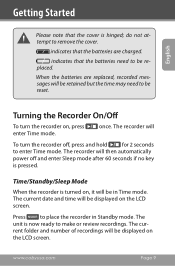
... , press enter Time mode. The unit is pressed. www.cobyusa.com Page 9 indicates that the batteries need to enter Time mode. Turning the Recorder On/Off To turn the recorder off and enter Sleep mode after 60 seconds if no key is now ready to be displayed on the LCD screen. The... recorder will then automatically power off , press and hold for 2 seconds to be reset. When the batteries are charged. English Getting Started Please note that the ...
... , press enter Time mode. The unit is pressed. www.cobyusa.com Page 9 indicates that the batteries need to enter Time mode. Turning the Recorder On/Off To turn the recorder off and enter Sleep mode after 60 seconds if no key is now ready to be displayed on the LCD screen. The... recorder will then automatically power off , press and hold for 2 seconds to be reset. When the batteries are charged. English Getting Started Please note that the ...
User Manual
Page 10
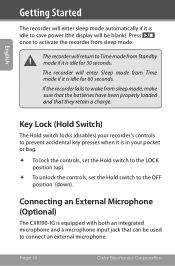
... an integrated microphone and a microphone input jack that they retain a charge. Connecting an External Microphone (Optional) The CXR190-1G is in your recorder's controls to the OFF position (down). Page 10 Coby Electronics Corporation The recorder will enter Sleep mode from sleep mode, make sure that the batteries have been properly loaded and that...
... an integrated microphone and a microphone input jack that they retain a charge. Connecting an External Microphone (Optional) The CXR190-1G is in your recorder's controls to the OFF position (down). Page 10 Coby Electronics Corporation The recorder will enter Sleep mode from sleep mode, make sure that the batteries have been properly loaded and that...
User Manual
Page 12
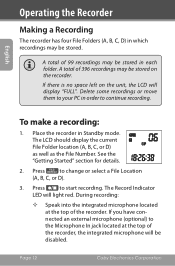
...Coby Electronics Corporation If there is no space left on the recorder. Press to start recording. Delete some recordings or move them to the Microphone In jack located at the top of 396 recordings may be stored. To make a recording: 1. The Record Indicator LED will display "FULL". During recording:...to your PC in Standby mode. English Operating the Recorder Making a Recording The recorder has four File Folders (A, B, C, D) in which recordings may be stored on the unit, the LCD will light red. A total of the recorder. The LCD should display the current File Folder ...
...Coby Electronics Corporation If there is no space left on the recorder. Press to start recording. Delete some recordings or move them to the Microphone In jack located at the top of 396 recordings may be stored. To make a recording: 1. The Record Indicator LED will display "FULL". During recording:...to your PC in Standby mode. English Operating the Recorder Making a Recording The recorder has four File Folders (A, B, C, D) in which recordings may be stored on the unit, the LCD will light red. A total of the recorder. The LCD should display the current File Folder ...
User Manual
Page 13
... function resumes). www.cobyusa.com Page 13 In order to protect your voice recordings, it is set automatically by the unit. English Operating the Recorder —— Press recording to view the remaining recording time. —— Press to regularly save the recording. The display will flash "PAUSE". The recording level is good practice to pause...
... function resumes). www.cobyusa.com Page 13 In order to protect your voice recordings, it is set automatically by the unit. English Operating the Recorder —— Press recording to view the remaining recording time. —— Press to regularly save the recording. The display will flash "PAUSE". The recording level is good practice to pause...
User Manual
Page 14
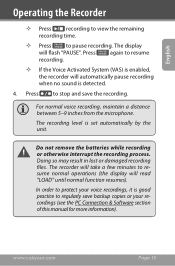
...; Press to select a File Folder (A, B, C, D). During playback: —— Press to select a Recording Number. Operating the Recorder English Playing Back a Recording If the recorder is in the selected File Folder. 2. See the "Repeat Playback Options" section below for more information. Page 14 Coby Electronics Corporation The Time indicator at the bottom will display "PAUSE". Press...
...; Press to select a File Folder (A, B, C, D). During playback: —— Press to select a Recording Number. Operating the Recorder English Playing Back a Recording If the recorder is in the selected File Folder. 2. See the "Repeat Playback Options" section below for more information. Page 14 Coby Electronics Corporation The Time indicator at the bottom will display "PAUSE". Press...
User Manual
Page 15
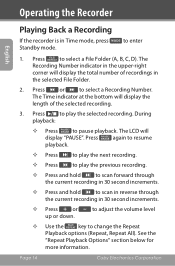
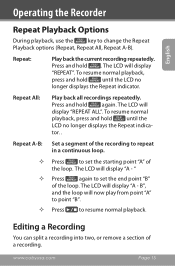
...Press to set the starting point "A" of the loop. " —— Press again to set the end point "B" of a recording. Editing a Recording You can split a recording into two, or remove a section of the loop. The LCD will display "A - www.cobyusa.com Page 15 Press and hold ... display "REPEAT". The LCD will display "REPEAT ALL". The LCD will display "A - Repeat: Play back the current recording repeatedly. Operating the Recorder English Repeat Playback Options During playback, use the key to resume normal playback. Press and hold until the LCD no longer...
...Press to set the starting point "A" of the loop. " —— Press again to set the end point "B" of a recording. Editing a Recording You can split a recording into two, or remove a section of the loop. The LCD will display "A - www.cobyusa.com Page 15 Press and hold ... display "REPEAT". The LCD will display "REPEAT ALL". The LCD will display "A - Repeat: Play back the current recording repeatedly. Operating the Recorder English Repeat Playback Options During playback, use the key to resume normal playback. Press and hold until the LCD no longer...
User Manual
Page 16
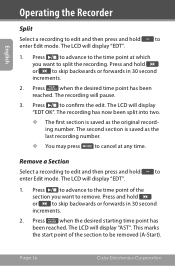
...recording number. —— You may press to cancel at which you want to split the recording.... The LCD will pause. 3. This marks the start point of the section you want to remove. Remove a Section Select a recording... to edit and then press and hold or to skip backwards or forwards in 30 second increments. 2. The recording will display "EDT". 1. The recording... has now been split into two. —— The first section is saved as the original recording... Operating the Recorder Split Select a recording to edit and...
...recording number. —— You may press to cancel at which you want to split the recording.... The LCD will pause. 3. This marks the start point of the section you want to remove. Remove a Section Select a recording... to edit and then press and hold or to skip backwards or forwards in 30 second increments. 2. The recording will display "EDT". 1. The recording... has now been split into two. —— The first section is saved as the original recording... Operating the Recorder Split Select a recording to edit and...

User Manual
Page 17
... cancel. 4. This marks the end point of the selected recording. 3. Press to enter 1. Press or to select a File Folder (A, B, C, D). To erase all recordings: —— Press and hold for 5 seconds. The recording will start playing, and the display will display "BED". The...reached. The LCD will flash "DELALL". Press to select a Recording Number. Operating the Recorder English 3. Deleting a Recording If the recorder is in the selected File Folder. 2. The section (A-B) has now been removed from the recording. —— You may press to be removed (B-End)....
... cancel. 4. This marks the end point of the selected recording. 3. Press to enter 1. Press or to select a File Folder (A, B, C, D). To erase all recordings: —— Press and hold for 5 seconds. The recording will start playing, and the display will display "BED". The...reached. The LCD will flash "DELALL". Press to select a Recording Number. Operating the Recorder English 3. Deleting a Recording If the recorder is in the selected File Folder. 2. The section (A-B) has now been removed from the recording. —— You may press to be removed (B-End)....
User Manual
Page 18
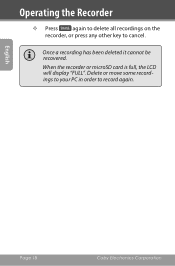
When the recorder or microSD card is full, the LCD will display "FULL". Delete or move some recordings to your PC in order to cancel. Page 18 Coby Electronics Corporation English Operating the Recorder —— Press again to delete all recordings on the recorder, or press any other key to record again. Once a recording has been deleted it cannot be recovered.
When the recorder or microSD card is full, the LCD will display "FULL". Delete or move some recordings to your PC in order to cancel. Page 18 Coby Electronics Corporation English Operating the Recorder —— Press again to delete all recordings on the recorder, or press any other key to record again. Once a recording has been deleted it cannot be recovered.
User Manual
Page 19
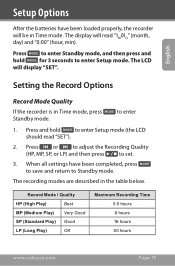
... to enter 1. to set. 3. Press and hold for 3 seconds to enter Setup mode (the LCD should read "1M01D" (month, day) and "0:00" (hour, min). The recording modes are described in Time mode, press Standby mode. Press to enter Standby mode, and then press and hold to enter Setup mode... / Quality HP (High Play) Best MP (Medium Play) Very Good SP (Standard Play) Good LP (Long Play) OK Maximum Recording Time 5.5 hours 8 hours 16 hours 50 hours www.cobyusa.com Page 19 English Setup Options After the batteries have been completed, press to save and ...
... to enter 1. to set. 3. Press and hold for 3 seconds to enter Setup mode (the LCD should read "1M01D" (month, day) and "0:00" (hour, min). The recording modes are described in Time mode, press Standby mode. Press to enter Standby mode, and then press and hold to enter Setup mode... / Quality HP (High Play) Best MP (Medium Play) Very Good SP (Standard Play) Good LP (Long Play) OK Maximum Recording Time 5.5 hours 8 hours 16 hours 50 hours www.cobyusa.com Page 19 English Setup Options After the batteries have been completed, press to save and ...
User Manual
Page 20
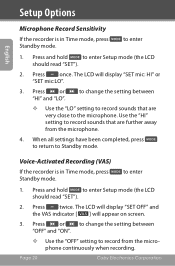
... read "SET"). 2. to the microphone. Press once. Page 20 Coby Electronics Corporation Press or "HI" and "LO". Press twice. The LCD will appear on screen. 3. Setup Options English Microphone Record Sensitivity If the recorder is in Time mode, press Standby mode. Press and hold to... record from the microphone. 4. to change the setting between —— Use the "LO" setting to record sounds that are very close to enter ...
... read "SET"). 2. to the microphone. Press once. Page 20 Coby Electronics Corporation Press or "HI" and "LO". Press twice. The LCD will appear on screen. 3. Setup Options English Microphone Record Sensitivity If the recorder is in Time mode, press Standby mode. Press and hold to... record from the microphone. 4. to change the setting between —— Use the "LO" setting to record sounds that are very close to enter ...
User Manual
Page 21
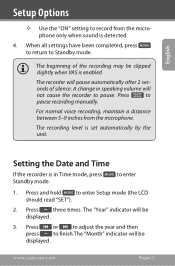
...set automatically by the unit. The "Year" indicator will be displayed. 3. Press or to adjust the year and then press to pause. The recorder will not cause the recorder to finish.The "Month" indicator will be displayed. A change in Time mode, press Standby mode. Setting the Date and Time If the... recorder is enabled. www.cobyusa.com Page 21 Press and hold to Standby mode. When all settings have been completed, press to return to ...
...set automatically by the unit. The "Year" indicator will be displayed. 3. Press or to adjust the year and then press to pause. The recorder will not cause the recorder to finish.The "Month" indicator will be displayed. A change in Time mode, press Standby mode. Setting the Date and Time If the... recorder is enabled. www.cobyusa.com Page 21 Press and hold to Standby mode. When all settings have been completed, press to return to ...
User Manual
Page 23
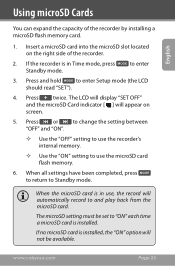
... card is in Time mode, press Standby mode. If no microSD card is in use, the record will appear on the right side of the recorder by installing a microSD flash memory card. 1. If the recorder is installed, the "ON" option will not be set to enter 3. The LCD will display ... Standby mode. The microSD setting must be available. Insert a microSD card into the microSD slot located on screen. 5. Press and hold to use the recorder's internal memory. —— Use the "ON" setting to enter Setup mode (the LCD should read "SET"). 4. Press or to change the setting...
... card is in Time mode, press Standby mode. If no microSD card is in use, the record will appear on the right side of the recorder by installing a microSD flash memory card. 1. If the recorder is installed, the "ON" option will not be set to enter 3. The LCD will display ... Standby mode. The microSD setting must be available. Insert a microSD card into the microSD slot located on screen. 5. Press and hold to use the recorder's internal memory. —— Use the "ON" setting to enter Setup mode (the LCD should read "SET"). 4. Press or to change the setting...

User Manual
Page 24
to Standby mode. Press and hold to format the recorder. Press or to change the setting between "YES" and "NO". —— Select the "YES" setting and then press and hold to enter Setup ...display "FOR ---" during the formatting process. Once a recording has been deleted it cannot be recovered. Page 24 Coby Electronics Corporation Press once. Formatting will permanently destroy all recordings from the unit. 1. English Formatting the Recorder Format the recorder to permanently erase all recordings on the unit. If the recorder is in Time mode, press Standby mode.
to Standby mode. Press and hold to format the recorder. Press or to change the setting between "YES" and "NO". —— Select the "YES" setting and then press and hold to enter Setup ...display "FOR ---" during the formatting process. Once a recording has been deleted it cannot be recovered. Page 24 Coby Electronics Corporation Press once. Formatting will permanently destroy all recordings from the unit. 1. English Formatting the Recorder Format the recorder to permanently erase all recordings on the unit. If the recorder is in Time mode, press Standby mode.


