User Manual
Page 2
... Power 8 Loading Batteries 8 Turning the Recorder On/Off 9 Time/Standby/Sleep Mode 9 Key Lock (Hold Switch 10 Connecting an External Microphone (Optional 10 Connecting Headphones (Optional 11 Operating the Recorder 12 Making a Recording 12 Playing Back a Recording 14 Editing a Recording 15 Split 16 Remove a Section 16 Deleting a Recording 17 Setup Options 19 Setting the Record Options 19 Record Mode Quality 19 Microphone Record Sensitivity 20 Voice-Activated Recording (VAS 20 Setting the Date and Time 21 Using microSD Cards 23 Formatting the Recorder 24 Page 2 Coby...
... Power 8 Loading Batteries 8 Turning the Recorder On/Off 9 Time/Standby/Sleep Mode 9 Key Lock (Hold Switch 10 Connecting an External Microphone (Optional 10 Connecting Headphones (Optional 11 Operating the Recorder 12 Making a Recording 12 Playing Back a Recording 14 Editing a Recording 15 Split 16 Remove a Section 16 Deleting a Recording 17 Setup Options 19 Setting the Record Options 19 Record Mode Quality 19 Microphone Record Sensitivity 20 Voice-Activated Recording (VAS 20 Setting the Date and Time 21 Using microSD Cards 23 Formatting the Recorder 24 Page 2 Coby...
User Manual
Page 3
English Table of Contents PC Connection & Software 25 Transferring Recordings to Your PC 25 Voice Manager Software 27 Installation 27 Starting the Voice Manager Software 28 Converting Recordings to WAV 29 Care & Maintenance 30 Support 32 Specifications 33 Safety Notices 34 www.cobyusa.com Page 3
English Table of Contents PC Connection & Software 25 Transferring Recordings to Your PC 25 Voice Manager Software 27 Installation 27 Starting the Voice Manager Software 28 Converting Recordings to WAV 29 Care & Maintenance 30 Support 32 Specifications 33 Safety Notices 34 www.cobyusa.com Page 3

User Manual
Page 4
... flash memory Up to 140 hours of recording time microSD card slot for additional recording time Voice-activated recording system 4 recording-quality modes Integrated omni-directional microphone High-output speaker LED recording indicator Time/date display 3.5mm headphone jack for private listening 3.5mm microphone jack for optional external microphones USB port for file transfers...
... flash memory Up to 140 hours of recording time microSD card slot for additional recording time Voice-activated recording system 4 recording-quality modes Integrated omni-directional microphone High-output speaker LED recording indicator Time/date display 3.5mm headphone jack for private listening 3.5mm microphone jack for optional external microphones USB port for file transfers...
User Manual
Page 5
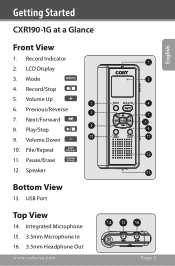
Next/Forward 6 8. Play/Stop 9. Volume Down 10 10. USB Port Top View 14. Record/Stop 5. Pause/Erase 12. Getting Started CXR190-1G at a Glance Front View 1. Record Indicator 2. Mode 4. Volume Up 3 6. Integrated Microphone 15. 3.5mm Microphone In 16. 3.5mm Headphone Out www.cobyusa.com 1 2 4 7 8 9 11 12 13 14 15 16 Page 5 English Speaker Bottom View 13. LCD Display 3. Previous/Reverse 5 7. File/Repeat 11.
Next/Forward 6 8. Play/Stop 9. Volume Down 10 10. USB Port Top View 14. Record/Stop 5. Pause/Erase 12. Getting Started CXR190-1G at a Glance Front View 1. Record Indicator 2. Mode 4. Volume Up 3 6. Integrated Microphone 15. 3.5mm Microphone In 16. 3.5mm Headphone Out www.cobyusa.com 1 2 4 7 8 9 11 12 13 14 15 16 Page 5 English Speaker Bottom View 13. LCD Display 3. Previous/Reverse 5 7. File/Repeat 11.
User Manual
Page 7
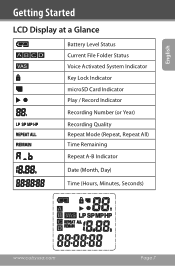
English Getting Started LCD Display at a Glance Battery Level Status Current File Folder Status Voice Activated System Indicator Key Lock Indicator microSD Card Indicator Play / Record Indicator Recording Number (or Year) Recording Quality Repeat Mode (Repeat, Repeat All) Time Remaining Repeat A-B Indicator Date (Month, Day) Time (Hours, Minutes, Seconds) www.cobyusa.com Page 7
English Getting Started LCD Display at a Glance Battery Level Status Current File Folder Status Voice Activated System Indicator Key Lock Indicator microSD Card Indicator Play / Record Indicator Recording Number (or Year) Recording Quality Repeat Mode (Repeat, Repeat All) Time Remaining Repeat A-B Indicator Date (Month, Day) Time (Hours, Minutes, Seconds) www.cobyusa.com Page 7
User Manual
Page 8
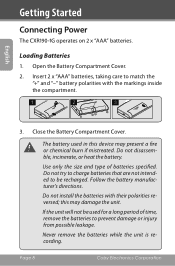
... or injury from possible leakage. Follow the battery manufacturer's directions. Close the Battery Compartment Cover. Use only the size and type of time, remove the batteries to match the "+" and "-" battery polarities with their polarities reversed; Page 8 Coby Electronics Corporation Open the Battery Compartment Cover. 2. Never remove the batteries while the unit is recording. English Getting Started Connecting Power The CXR190-1G operates on 2 x "AAA" batteries. If the unit will not be...
... or injury from possible leakage. Follow the battery manufacturer's directions. Close the Battery Compartment Cover. Use only the size and type of time, remove the batteries to match the "+" and "-" battery polarities with their polarities reversed; Page 8 Coby Electronics Corporation Open the Battery Compartment Cover. 2. Never remove the batteries while the unit is recording. English Getting Started Connecting Power The CXR190-1G operates on 2 x "AAA" batteries. If the unit will not be...
User Manual
Page 9
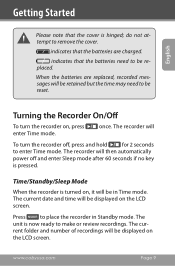
... recorder in Time mode. Time/Standby/Sleep Mode When the recorder is hinged; The unit is pressed. Press to enter Time mode. do not attempt to be reset. When the batteries are charged. once. The current date and time will be displayed on the LCD screen. indicates that the batteries need to make or review recordings. English Getting Started Please note that the cover is turned on , press enter Time mode. The current folder and number of recordings...
... recorder in Time mode. Time/Standby/Sleep Mode When the recorder is hinged; The unit is pressed. Press to enter Time mode. do not attempt to be reset. When the batteries are charged. once. The current date and time will be displayed on the LCD screen. indicates that the batteries need to make or review recordings. English Getting Started Please note that the cover is turned on , press enter Time mode. The current folder and number of recordings...
User Manual
Page 10
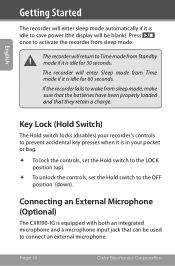
... (down). English Getting Started The recorder will enter sleep mode automatically if it is idle for 60 seconds. The recorder will return to save power (the display will be used to connect an external microphone. Press once to activate the recorder from Standby mode if it is equipped with both an integrated microphone and a microphone input jack that they retain a charge. Page 10 Coby Electronics Corporation Connecting an External Microphone (Optional) The CXR190-1G...
... (down). English Getting Started The recorder will enter sleep mode automatically if it is idle for 60 seconds. The recorder will return to save power (the display will be used to connect an external microphone. Press once to activate the recorder from Standby mode if it is equipped with both an integrated microphone and a microphone input jack that they retain a charge. Page 10 Coby Electronics Corporation Connecting an External Microphone (Optional) The CXR190-1G...
User Manual
Page 12
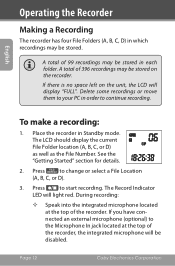
... Standby mode. English Operating the Recorder Making a Recording The recorder has four File Folders (A, B, C, D) in which recordings may be stored on the unit, the LCD will display "FULL". To make a recording: 1. Page 12 Coby Electronics Corporation See the "Getting Started" section for details. 2. A total of the recorder. The LCD should display the current File Folder location (A, B, C, or D) as well as the File Number. If you have connected an external microphone (optional) to change or select a File...
... Standby mode. English Operating the Recorder Making a Recording The recorder has four File Folders (A, B, C, D) in which recordings may be stored on the unit, the LCD will display "FULL". To make a recording: 1. Page 12 Coby Electronics Corporation See the "Getting Started" section for details. 2. A total of the recorder. The LCD should display the current File Folder location (A, B, C, or D) as well as the File Number. If you have connected an external microphone (optional) to change or select a File...
User Manual
Page 13
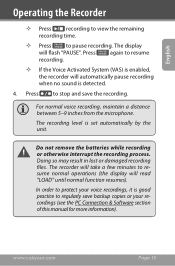
... your recordings (see the PC Connection & Software section of this manual for more information). For normal voice recording, maintain a distance between 5-9 inches from the microphone. The recorder will take a few minutes to stop and save backup copies or your voice recordings, it is detected. 4. www.cobyusa.com Page 13 The display will read "LOAD" until normal function resumes). Press to resume normal operations (the display will flash "PAUSE". Doing...
... your recordings (see the PC Connection & Software section of this manual for more information). For normal voice recording, maintain a distance between 5-9 inches from the microphone. The recorder will take a few minutes to stop and save backup copies or your voice recordings, it is detected. 4. www.cobyusa.com Page 13 The display will read "LOAD" until normal function resumes). Press to resume normal operations (the display will flash "PAUSE". Doing...
User Manual
Page 14
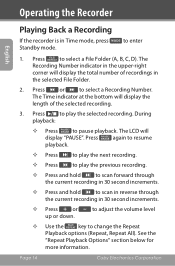
... down. The LCD will display the total number of the selected recording. 3. to adjust the volume level —— Use the key to pause playback. Press or to enter 1. Operating the Recorder English Playing Back a Recording If the recorder is in the selected File Folder. 2. to select a Recording Number. Page 14 Coby Electronics Corporation Press to select a File Folder (A, B, C, D). The Time indicator at the bottom will display the length of recordings in Time mode, press Standby...
... down. The LCD will display the total number of the selected recording. 3. to adjust the volume level —— Use the key to pause playback. Press or to enter 1. Operating the Recorder English Playing Back a Recording If the recorder is in the selected File Folder. 2. to select a Recording Number. Page 14 Coby Electronics Corporation Press to select a File Folder (A, B, C, D). The Time indicator at the bottom will display the length of recordings in Time mode, press Standby...
User Manual
Page 15
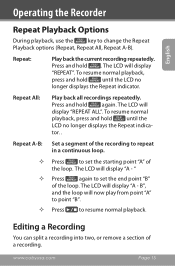
... a recording. Repeat: Play back the current recording repeatedly. Repeat A-B: Set a segment of the recording to repeat in a continuous loop. —— Press to set the starting point "A" of the loop. Press and hold . Press and hold again. The LCD will display "REPEAT ALL". The LCD will display "REPEAT". Editing a Recording You can split a recording into two, or remove a section of the loop. www.cobyusa.com Page 15 Operating the Recorder English Repeat Playback Options During playback, use the...
... a recording. Repeat: Play back the current recording repeatedly. Repeat A-B: Set a segment of the recording to repeat in a continuous loop. —— Press to set the starting point "A" of the loop. Press and hold . Press and hold again. The LCD will display "REPEAT ALL". The LCD will display "REPEAT". Editing a Recording You can split a recording into two, or remove a section of the loop. www.cobyusa.com Page 15 Operating the Recorder English Repeat Playback Options During playback, use the...

User Manual
Page 17
... at the bottom will flash "DELALL". The recording will pause, and the LCD will flash "DEL 1". —— Press again to be removed (B-End). 4. to confirm the edit. Press or to select a File Folder (A, B, C, D). Press to select a Recording Number. To erase all recordings: —— Press and hold for 5 seconds. Operating the Recorder English 3. The recording will start playing, and the display will display "BED". Deleting a Recording If the recorder is in the...
... at the bottom will flash "DELALL". The recording will pause, and the LCD will flash "DEL 1". —— Press again to be removed (B-End). 4. to confirm the edit. Press or to select a File Folder (A, B, C, D). Press to select a Recording Number. To erase all recordings: —— Press and hold for 5 seconds. Operating the Recorder English 3. The recording will start playing, and the display will display "BED". Deleting a Recording If the recorder is in the...
User Manual
Page 20
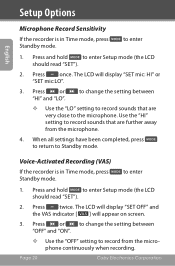
.... Voice-Activated Recording (VAS) If the recorder is in Time mode, press Standby mode. The LCD will display "SET OFF" and the VAS indicator [ ] will display "SET mic: HI" or "SET mic:LO". 3. The LCD will appear on screen. 3. to Standby mode. to record from the microphone. 4. to change the setting between —— Use the "LO" setting to record sounds that are very close to record sounds that are further away from the microphone continuously when recording. Use the...
.... Voice-Activated Recording (VAS) If the recorder is in Time mode, press Standby mode. The LCD will display "SET OFF" and the VAS indicator [ ] will display "SET mic: HI" or "SET mic:LO". 3. The LCD will appear on screen. 3. to Standby mode. to record from the microphone. 4. to change the setting between —— Use the "LO" setting to record sounds that are very close to record sounds that are further away from the microphone continuously when recording. Use the...
User Manual
Page 21
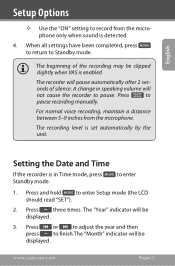
... Setup mode (the LCD should read "SET"). 2. The recording level is detected. 4. Press three times. The recorder will not cause the recorder to finish.The "Month" indicator will be clipped slightly when VAS is in speaking volume will pause automatically after 2 sec- Press and hold to pause recording manually. onds of the recording may be displayed. 3. to Standby mode. A change in Time mode, press Standby mode. Setting the Date and Time If the recorder...
... Setup mode (the LCD should read "SET"). 2. The recording level is detected. 4. Press three times. The recorder will not cause the recorder to finish.The "Month" indicator will be clipped slightly when VAS is in speaking volume will pause automatically after 2 sec- Press and hold to pause recording manually. onds of the recording may be displayed. 3. to Standby mode. A change in Time mode, press Standby mode. Setting the Date and Time If the recorder...
User Manual
Page 23
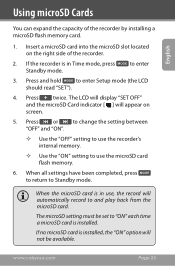
... be set to "ON" each time a microSD card is in use the microSD card flash memory. 6. Press or to change the setting between "OFF" and "ON". —— Use the "OFF" setting to use the recorder's internal memory. —— Use the "ON" setting to use , the record will automatically record to enter Setup mode (the LCD should read "SET"). 4. If no microSD card is in Time mode, press Standby mode. When the microSD card is installed, the...
... be set to "ON" each time a microSD card is in use the microSD card flash memory. 6. Press or to change the setting between "OFF" and "ON". —— Use the "OFF" setting to use the recorder's internal memory. —— Use the "ON" setting to use , the record will automatically record to enter Setup mode (the LCD should read "SET"). 4. If no microSD card is in Time mode, press Standby mode. When the microSD card is installed, the...
User Manual
Page 25
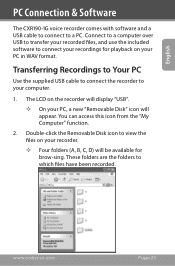
English PC Connection & Software The CXR190-1G voice recorder comes with software and a USB cable to connect to which files have been recorded. These folders are the folders to a PC. Connect to a computer over USB to transfer your recorded files, and use the included software to connect your recordings for brow-sing. Double-click the Removable Disk icon to your PC in WAV format. The LCD on your computer. 1. You can access this icon from the "My...
English PC Connection & Software The CXR190-1G voice recorder comes with software and a USB cable to connect to which files have been recorded. These folders are the folders to a PC. Connect to a computer over USB to transfer your recorded files, and use the included software to connect your recordings for brow-sing. Double-click the Removable Disk icon to your PC in WAV format. The LCD on your computer. 1. You can access this icon from the "My...
User Manual
Page 27
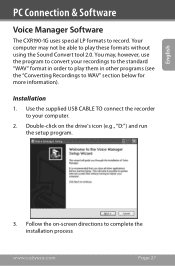
... setup program. 3. Use the supplied USB CABLE TO connect the recorder to your recordings to the standard "WAV" format in other programs (see the "Converting Recordings to WAV" section below for more information). Double-click on -screen directions to record. English PC Connection & Software Voice Manager Software The CXR190-1G uses special LP formats to complete the installation process www.cobyusa.com Page 27 Your computer may , however, use the program to play...
... setup program. 3. Use the supplied USB CABLE TO connect the recorder to your recordings to the standard "WAV" format in other programs (see the "Converting Recordings to WAV" section below for more information). Double-click on -screen directions to record. English PC Connection & Software Voice Manager Software The CXR190-1G uses special LP formats to complete the installation process www.cobyusa.com Page 27 Your computer may , however, use the program to play...
User Manual
Page 30
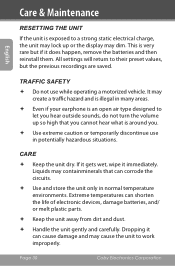
... is an open air type designed to their preset values, but if it does happen, remove the batteries and then reinstall them. Liquids may dim. English TRAFFIC SAFETY Do not use in normal temperature environments. Page 30 Coby Electronics Corporation All settings will return to let you . Use extreme caution or temporarily discontinue use while operating a motorized...
... is an open air type designed to their preset values, but if it does happen, remove the batteries and then reinstall them. Liquids may dim. English TRAFFIC SAFETY Do not use in normal temperature environments. Page 30 Coby Electronics Corporation All settings will return to let you . Use extreme caution or temporarily discontinue use while operating a motorized...
User Manual
Page 33
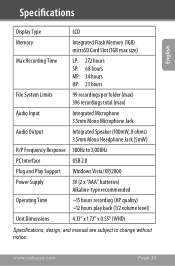
... recordings per folder (max) 396 recordings total (max) Audio Input Integrated Microphone 3.5mm Mono Microphone Jack Audio Output Integrated Speaker (100mW, 8 ohms) 3.5mm Mono Headphone Jack (5mW) R/P Frequency Response 300Hz to 3,000Hz PC Interface USB 2.0 Plug and Play Support Windows Vista/XP/2000 Power Supply 3V (2 x "AAA" batteries) Alkaline-type recommended Operating Time ~15 hours recording (HP quality) ~12 hours play back (1/2 volume level) Unit Dimensions 4.33" x 1.73" x 0.55" (WHD) Specifications, design, and manual...
... recordings per folder (max) 396 recordings total (max) Audio Input Integrated Microphone 3.5mm Mono Microphone Jack Audio Output Integrated Speaker (100mW, 8 ohms) 3.5mm Mono Headphone Jack (5mW) R/P Frequency Response 300Hz to 3,000Hz PC Interface USB 2.0 Plug and Play Support Windows Vista/XP/2000 Power Supply 3V (2 x "AAA" batteries) Alkaline-type recommended Operating Time ~15 hours recording (HP quality) ~12 hours play back (1/2 volume level) Unit Dimensions 4.33" x 1.73" x 0.55" (WHD) Specifications, design, and manual...


