User Manual
Page 2
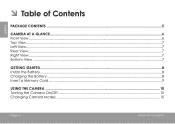
English ÂÂ Table of Contents Package Contents ...5 Camera at a Glance...6 Front View...6 Top View...7 Left View...7 Rear View...7 Right View...7 Bottom View...7 Getting Started...8 Install the Battery...8 Charging the Battery...8 Insert a Memory Card...9 Using the Camera...10 Turning the Camera On/Off...10 Changing Camera Modes...10 Page 2 Table Of Contents
English ÂÂ Table of Contents Package Contents ...5 Camera at a Glance...6 Front View...6 Top View...7 Left View...7 Rear View...7 Right View...7 Bottom View...7 Getting Started...8 Install the Battery...8 Charging the Battery...8 Insert a Memory Card...9 Using the Camera...10 Turning the Camera On/Off...10 Changing Camera Modes...10 Page 2 Table Of Contents

User Manual
Page 5
... missing, please contact the dealer from whom you for future reference. Be sure to children. Package Contents Page 5 This package includes: CAM5001 camera Rechargeable battery HDMI cable A/V cable USB extension cable Detachable hand strap Pouch ...after opening. English ÂÂ Package Contents Thank you purchased this product. Please read these instructions before using your camcorder, and retain them for purchasing a Coby Snapp™ CAM5001 HD Digital Video Camera.
... missing, please contact the dealer from whom you for future reference. Be sure to children. Package Contents Page 5 This package includes: CAM5001 camera Rechargeable battery HDMI cable A/V cable USB extension cable Detachable hand strap Pouch ...after opening. English ÂÂ Package Contents Thank you purchased this product. Please read these instructions before using your camcorder, and retain them for purchasing a Coby Snapp™ CAM5001 HD Digital Video Camera.
User Manual
Page 7
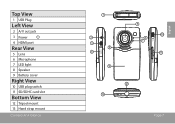
Top View 1 USB Plug Left View 2 A/V out jack 3 Power 4 HDMI port Rear View 5 Lens 6 Microphone 7 LED light 8 Speaker 9 Battery cover Right View 10 USB plug switch 11 SD/SDHC card slot Bottom View 12 Tripod mount 13 Hand strap mount Camera At A Glance 1 2 3 8 4 9 5 10 6 7 11 12 13 Page 7 English
Top View 1 USB Plug Left View 2 A/V out jack 3 Power 4 HDMI port Rear View 5 Lens 6 Microphone 7 LED light 8 Speaker 9 Battery cover Right View 10 USB plug switch 11 SD/SDHC card slot Bottom View 12 Tripod mount 13 Hand strap mount Camera At A Glance 1 2 3 8 4 9 5 10 6 7 11 12 13 Page 7 English
User Manual
Page 8
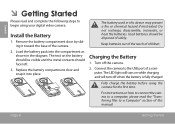
... steps to begin using the camera for the first time. Do not recharge, disassemble, incinerate, or heat the batteries. Used batteries should face left. 3. Turn off when the battery is fully charged. The LED light will turn on while charging and will turn off the camera. 2. Page ... by sliding it into the compartment as shown in this manual. Charging the Battery 1. Fully charge the battery before using your digital video camera. Load the battery pack into place. For instructions on the battery should be visible and the metal contacts should be disposed of safely. English ...
... steps to begin using the camera for the first time. Do not recharge, disassemble, incinerate, or heat the batteries. Used batteries should face left. 3. Turn off when the battery is fully charged. The LED light will turn on while charging and will turn off the camera. 2. Page ... by sliding it into the compartment as shown in this manual. Charging the Battery 1. Fully charge the battery before using your digital video camera. Load the battery pack into place. For instructions on the battery should be visible and the metal contacts should be disposed of safely. English ...
User Manual
Page 22
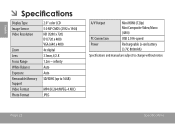
... to 16GB) MP4 (H.264/MPEG-4 AVC) JPEG A/V Output Mini HDMI (720p) Mini Composite Video/Mono (480i) PC Connection USB 2.0 Hi-speed Power Rechargeable Li-ion battery (3.7V, 800mAh) Specifications and manual are subject to change without notice.
... to 16GB) MP4 (H.264/MPEG-4 AVC) JPEG A/V Output Mini HDMI (720p) Mini Composite Video/Mono (480i) PC Connection USB 2.0 Hi-speed Power Rechargeable Li-ion battery (3.7V, 800mAh) Specifications and manual are subject to change without notice.
User Manual
Page 23
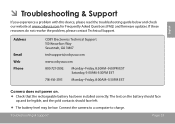
If these resources do not resolve the problem, please contact Technical Support. Address Email Web Phone COBY Electronics Technical Support 150 Knowlton Way Savannah, GA 31407 [email protected] www.cobyusa.com 800-727-3592: Monday-Friday, 8:30AM-9:00PM EST Saturday, 9:...00AM-5:30PM EST 718-416-3197: Monday-Friday, 8:00AM-5:30PM EST Camera does not power on the battery should face up and be legible, and the gold contacts should face left. The battery level may be low. English ÂÂ Troubleshooting & Support If you experience a problem with this device, ...
If these resources do not resolve the problem, please contact Technical Support. Address Email Web Phone COBY Electronics Technical Support 150 Knowlton Way Savannah, GA 31407 [email protected] www.cobyusa.com 800-727-3592: Monday-Friday, 8:30AM-9:00PM EST Saturday, 9:...00AM-5:30PM EST 718-416-3197: Monday-Friday, 8:00AM-5:30PM EST Camera does not power on the battery should face up and be legible, and the gold contacts should face left. The battery level may be low. English ÂÂ Troubleshooting & Support If you experience a problem with this device, ...
User Manual
Page 27
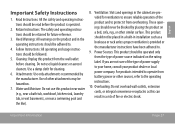
Do not use this product from overheating. These openings should never be operated only from battery power or other sources, refer to your home, consult your product dealer or local power company. Overloading: Do not overload wall outlets, extension cords, or ...
Do not use this product from overheating. These openings should never be operated only from battery power or other sources, refer to your home, consult your product dealer or local power company. Overloading: Do not overload wall outlets, extension cords, or ...
User Manual
Page 29
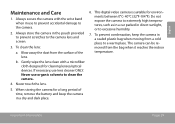
Blow away the dust from the surface of time, remove the battery and keep the camera in a sealed plastic bag when moving from the bag when it reaches the indoor temperature. Never use organic solvents to the ...
Blow away the dust from the surface of time, remove the battery and keep the camera in a sealed plastic bag when moving from the bag when it reaches the indoor temperature. Never use organic solvents to the ...

