
User Manual
Page 3
English Camera Mode...22 Camera Screen at a Glance...22 Taking a Photo...23 Camera Controls ...24 Camera Options Menu...25 Review Mode...27 Review Screen at a Glance...27 Review Mode Controls...28 Review Options Menu...29 Connecting to a TV...32 Managing Files on the Camcorder 33 Transferring Video and Photo Files 33 Deleting Files on the Camcorder 35 Setting the System Options...36 Using the Included Software 39 Installing muvee™ autoProducer 40 Using muvee™ autoProducer...45 Making a muvee™...46 Table Of Contents Page 3
English Camera Mode...22 Camera Screen at a Glance...22 Taking a Photo...23 Camera Controls ...24 Camera Options Menu...25 Review Mode...27 Review Screen at a Glance...27 Review Mode Controls...28 Review Options Menu...29 Connecting to a TV...32 Managing Files on the Camcorder 33 Transferring Video and Photo Files 33 Deleting Files on the Camcorder 35 Setting the System Options...36 Using the Included Software 39 Installing muvee™ autoProducer 40 Using muvee™ autoProducer...45 Making a muvee™...46 Table Of Contents Page 3

User Manual
Page 8
Use with the included USB cable. Page 8 Camcorder At A Glance Review Press and hold to turn the camcorder on a TV. Connection to charge/transfer files to view your photos and videos on or off. Use with the included A/V cable. English ÂÂ Camcorder at a Glance Part Name 1 Strap mount 2 SD card slot 3 [Power] 4 A/V output connector 5 USB connector Function Mode/Description Camcorder Camera Attach the included hand strap here. Connection to a computer. Load SD or SDHC memory cards here.
Use with the included USB cable. Page 8 Camcorder At A Glance Review Press and hold to turn the camcorder on a TV. Connection to charge/transfer files to view your photos and videos on or off. Use with the included A/V cable. English ÂÂ Camcorder at a Glance Part Name 1 Strap mount 2 SD card slot 3 [Power] 4 A/V output connector 5 USB connector Function Mode/Description Camcorder Camera Attach the included hand strap here. Connection to a computer. Load SD or SDHC memory cards here.

User Manual
Page 10
... when the camcorder is charging. tion. Access the option menu. -- -- -- -- Change the photo resolu- During video review only: Toggle the on-screen display. Change the connection mode when connected to a computer (camcorder, MSDC disk, PC web cam) Change the movie record- Delete ...
... when the camcorder is charging. tion. Access the option menu. -- -- -- -- Change the photo resolu- During video review only: Toggle the on-screen display. Change the connection mode when connected to a computer (camcorder, MSDC disk, PC web cam) Change the movie record- Delete ...

User Manual
Page 12
...zoom level. Menu: Return to the next option screen. View the next file. Menu: Go to the previous screen. -- -- Page 12 Camcorder At A Glance Photo review only: Increase the zoom level. Decrease the zoom level. Menu: Browse the menu list. -- -- Menu: Browse the menu list. Photo... review only: Decrease the zoom level. Start or stop recording a video. Decrease the zoom level. Take a photo. English Part Name [UP] [DOWN] 12 [LEFT] [RIGHT] 13 ...
...zoom level. Menu: Return to the next option screen. View the next file. Menu: Go to the previous screen. -- -- Page 12 Camcorder At A Glance Photo review only: Increase the zoom level. Decrease the zoom level. Menu: Browse the menu list. -- -- Menu: Browse the menu list. Photo... review only: Decrease the zoom level. Start or stop recording a video. Decrease the zoom level. Take a photo. English Part Name [UP] [DOWN] 12 [LEFT] [RIGHT] 13 ...

User Manual
Page 14
Reinitializes the unit. Shoot video and photos. Gently press this button with a paper clip should the unit freeze or otherwise behave abnormally. Avoid touching or scratching the lens surface. Page 14 Camcorder At A Glance English Part Name 14 Speakers 15 Lens 16 [RESET] Function Mode/Description Camcorder Camera Review Sound output.
Reinitializes the unit. Shoot video and photos. Gently press this button with a paper clip should the unit freeze or otherwise behave abnormally. Avoid touching or scratching the lens surface. Page 14 Camcorder At A Glance English Part Name 14 Speakers 15 Lens 16 [RESET] Function Mode/Description Camcorder Camera Review Sound output.

User Manual
Page 18
Select to play/view video and photo files. Press the button to take photos. Page 18 Getting Started Camera Mode. Select to change the function mode. The mode icon displayed at the top of the screen indicates the current function mode. Icon Function Mode Camcorder Mode. Review Mode. English Function Modes Your camcorder has three function modes. Select to record video clips.
Select to play/view video and photo files. Press the button to take photos. Page 18 Getting Started Camera Mode. Select to change the function mode. The mode icon displayed at the top of the screen indicates the current function mode. Icon Function Mode Camcorder Mode. Review Mode. English Function Modes Your camcorder has three function modes. Select to record video clips.
User Manual
Page 28
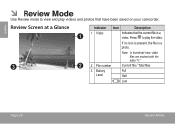
Note: In thumbnail view, video files are marked with the letter "V." 2 File number Current file / Total files 3 Battery Full Level Half Low Page 28 Review Mode Press to view and play the video. English ÂÂ Review Mode Use Review mode to play videos and photos that the current file is a photo. Review Screen at a Glance 1 3 2 8 / 8 Indicator Icon Description 1 Video Indicates that have been saved on your camcorder. If no icon is present, the file is a video.
Note: In thumbnail view, video files are marked with the letter "V." 2 File number Current file / Total files 3 Battery Full Level Half Low Page 28 Review Mode Press to view and play the video. English ÂÂ Review Mode Use Review mode to play videos and photos that the current file is a photo. Review Screen at a Glance 1 3 2 8 / 8 Indicator Icon Description 1 Video Indicates that have been saved on your camcorder. If no icon is present, the file is a video.
User Manual
Page 29
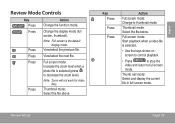
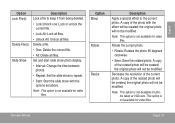
... the file above. Thumb nail mode: Select and display the current file in full screen mode. Change the display mode (full screen, thumbnail). Review Mode Page 29 View/select the previous file. Key Press Press Press Action Full screen mode: Change to decrease the zoom level). Full screen mode... to thumbnail mode. Note: Zoom will not work for video files. Thumbnail mode: Select the file below. View/select the next file. English Review Mode Controls Key Press Press Press Press Press Press Action Change the function mode. Note: Full screen is the default display mode.
... the file above. Thumb nail mode: Select and display the current file in full screen mode. Change the display mode (full screen, thumbnail). Review Mode Page 29 View/select the previous file. Key Press Press Press Action Full screen mode: Change to decrease the zoom level). Full screen mode... to thumbnail mode. Note: Zoom will not work for video files. Thumbnail mode: Select the file below. View/select the next file. English Review Mode Controls Key Press Press Press Press Press Press Action Change the function mode. Note: Full screen is the default display mode.
User Manual
Page 30
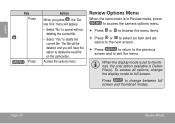
... file. • Select "Yes" to delete the current file. To access all options, change between full screen and thumbnail modes. Page 30 Review Mode Review Options Menu When the camcorder is Delete File(s). Press to change the display mode to full screen. Access the options menu. When the display mode... is set to thumbnail, the only option available is in Review mode, press to access the camera options menu. Press or to browse the menu items. Press or to select...
... file. • Select "Yes" to delete the current file. To access all options, change between full screen and thumbnail modes. Page 30 Review Mode Review Options Menu When the camcorder is Delete File(s). Press to change the display mode to full screen. Access the options menu. When the display mode... is set to thumbnail, the only option available is in Review mode, press to access the camera options menu. Press or to browse the menu items. Press or to select...
User Manual
Page 31
... Description Apply a special effect to repeat. • Start: Start the slide show with the effect will not be created; the original photo will be modified. Review Mode Page 31 Rotate the current photo. • Rotate: Rotates the photo 90 degrees clockwise. • Save: Save the rotated photo. English Option Lock File...
... Description Apply a special effect to repeat. • Start: Start the slide show with the effect will not be created; the original photo will be modified. Review Mode Page 31 Rotate the current photo. • Rotate: Rotates the photo 90 degrees clockwise. • Save: Save the rotated photo. English Option Lock File...
User Manual
Page 32
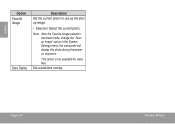
Note: After the Favorite Image selection has been made, change the "Startup Image" option in the System Settings menu; This option is not available for use as the start up image. • Selection: Select the current photo. the camcorder will display this photo during the poweron sequence. English Option Favorite Image Date Stamp Description Set the current photo for video files. Set a date/time overlay. Page 32 Review Mode
Note: After the Favorite Image selection has been made, change the "Startup Image" option in the System Settings menu; This option is not available for use as the start up image. • Selection: Select the current photo. the camcorder will display this photo during the poweron sequence. English Option Favorite Image Date Stamp Description Set the current photo for video files. Set a date/time overlay. Page 32 Review Mode
User Manual
Page 33
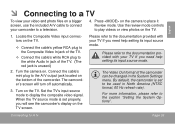
... its input source mode. Set the TV's input source mode to the section "Setting the System Options". Connect the cable's mini plug to place it Review mode. Turn the camera on the camera to the A/V output jack located on the TV. Please refer to the documentation provided with your camcorder to... the white Audio In jack of the camcorder can be used in the System Settings menu. Press on . Use the review mode controls to play videos or view photos on the TV. —— Connect the cable's yellow RCA plug to the Composite Video In jack...
... its input source mode. Set the TV's input source mode to the section "Setting the System Options". Connect the cable's mini plug to place it Review mode. Turn the camera on the camera to the A/V output jack located on the TV. Please refer to the documentation provided with your camcorder to... the white Audio In jack of the camcorder can be used in the System Settings menu. Press on . Use the review mode controls to play videos or view photos on the TV. —— Connect the cable's yellow RCA plug to the Composite Video In jack...

User Manual
Page 36
Press to delete. 3. Page 36 Managing Files On The Camcorder Press to place the camcorder in Review mode to delete files. 1. English Deleting Files on the Camcorder If you do not have immediate access to a computer, place the camcorder in Review mode. 2. Press or to select a photo or video to delete the file.
Press to delete. 3. Page 36 Managing Files On The Camcorder Press to place the camcorder in Review mode to delete files. 1. English Deleting Files on the Camcorder If you do not have immediate access to a computer, place the camcorder in Review mode. 2. Press or to select a photo or video to delete the file.
User Manual
Page 37
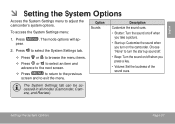
.... To access the System Settings menu: 1. Setting The System Options Page 37 The System Settings tab can be accessed in all modes (Camcorder, Camera, and Review).
.... To access the System Settings menu: 1. Setting The System Options Page 37 The System Settings tab can be accessed in all modes (Camcorder, Camera, and Review).
User Manual
Page 38
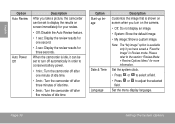
...three seconds. Note: The "My image" option is available only if you turn on screen immediately for your review. • Off: Disable the Auto Review feature. • 1 sec: Display the review results for one minute of idle time. • 3min.: Turn the camcorder off after three minutes of idle ... • 1min.: Turn the camcorder off after one second. • 3 sec: Display the review results for more information. Set the menu display language. Please refer to turn off automatically in Review mode. When the camcorder is shown on screen when you have saved a "Favorite Image" in ...
...three seconds. Note: The "My image" option is available only if you turn on screen immediately for your review. • Off: Disable the Auto Review feature. • 1 sec: Display the review results for one minute of idle time. • 3min.: Turn the camcorder off after three minutes of idle ... • 1min.: Turn the camcorder off after one second. • 3 sec: Display the review results for more information. Set the menu display language. Please refer to turn off automatically in Review mode. When the camcorder is shown on screen when you have saved a "Favorite Image" in ...