Instruction Manual
Page 2
...blade of important operation and servicing instructions in the ears or hearing loss, discontinue use of outlet and fully insert. NOTICE: This product is protected by certain intellectual property rights of the unit. REFER SERVICING ONLY TO QUALIFIED SERVICE PERSONNEL. WARNING: Handling the cords on the bottom... REMOVE THE COVER (OR BACK) OF THE UNIT. If you to lead, a chemical known to the State of California to wide slot of personal stereos played at high volume. PRECAUTIONS CAUTION RISK OF ELECTRIC SHOCK DO NOT OPEN For Customer Use: Enter below the serial number that...
...blade of important operation and servicing instructions in the ears or hearing loss, discontinue use of outlet and fully insert. NOTICE: This product is protected by certain intellectual property rights of the unit. REFER SERVICING ONLY TO QUALIFIED SERVICE PERSONNEL. WARNING: Handling the cords on the bottom... REMOVE THE COVER (OR BACK) OF THE UNIT. If you to lead, a chemical known to the State of California to wide slot of personal stereos played at high volume. PRECAUTIONS CAUTION RISK OF ELECTRIC SHOCK DO NOT OPEN For Customer Use: Enter below the serial number that...

Instruction Manual
Page 6
... SAFETY INSTRUCTIONS 4 FEATURES...5 TABLE OF CONTENTS...6 PACKAGE CONTENTS...8 POWERING YOUR PLAYER...9 Charging the Battery...9 Turning Your Player On/Off...9 Locking/Unlocking Your Player's Keys (Hold 10 Resetting Your Player...10 LOCATION OF CONTROLS...11 Top View...11 Front View...11 Side View...11 DISPLAY OVERVIEW...12 BASIC OPERATIONS...13 Using the Touchpad Controls 13 Using the Controls to Navigate 13 Main Menu Overview...13 Smart Menu Options...14 Browsing/Playback...14 Volume...15 EQ...
... SAFETY INSTRUCTIONS 4 FEATURES...5 TABLE OF CONTENTS...6 PACKAGE CONTENTS...8 POWERING YOUR PLAYER...9 Charging the Battery...9 Turning Your Player On/Off...9 Locking/Unlocking Your Player's Keys (Hold 10 Resetting Your Player...10 LOCATION OF CONTROLS...11 Top View...11 Front View...11 Side View...11 DISPLAY OVERVIEW...12 BASIC OPERATIONS...13 Using the Touchpad Controls 13 Using the Controls to Navigate 13 Main Menu Overview...13 Smart Menu Options...14 Browsing/Playback...14 Volume...15 EQ...

Instruction Manual
Page 7
...Required for Windows 98 SE Only 24 Connecting to a Computer...25 USB-MTP Mode...25 USB-MSC Mode...26 Transferring Files...26 USB-MTP Mode...27 USB-MSC Mode...27 Disconnecting from a Computer 28 USB-MTP Mode...28 USB-MSC Mode...28 Build Music Library (USB-MSC Mode Only 28 VIDEO CONVERSION...29 Installation...29 Converting Video...29 WINDOWS MEDIA PLAYER...31 Windows Media Player 9 (WMP9 31 Music File Transfers...31 Windows Media Player 10 (WMP10 32 Music File Transfers...32 Creating Playlists...33 Automatic Windows Media Playlist Synchronization 35 TROUBLESHOOTING...38 SPECIFICATIONS...40...
...Required for Windows 98 SE Only 24 Connecting to a Computer...25 USB-MTP Mode...25 USB-MSC Mode...26 Transferring Files...26 USB-MTP Mode...27 USB-MSC Mode...27 Disconnecting from a Computer 28 USB-MTP Mode...28 USB-MSC Mode...28 Build Music Library (USB-MSC Mode Only 28 VIDEO CONVERSION...29 Installation...29 Converting Video...29 WINDOWS MEDIA PLAYER...31 Windows Media Player 9 (WMP9 31 Music File Transfers...31 Windows Media Player 10 (WMP10 32 Music File Transfers...32 Creating Playlists...33 Automatic Windows Media Playlist Synchronization 35 TROUBLESHOOTING...38 SPECIFICATIONS...40...

Instruction Manual
Page 9
... the player turns off , slide and hold the Power/Key Lock switch to the right until you see the "Initializing" screen. • To turn the player on computer. • When connected to a USB hub, the hub must be self-powered to do so may case a fire or damage the player. USB Port Plug one end of music play time. AC 100-240V Wall Outlet WARNING: • The battery used in...
... the player turns off , slide and hold the Power/Key Lock switch to the right until you see the "Initializing" screen. • To turn the player on computer. • When connected to a USB hub, the hub must be self-powered to do so may case a fire or damage the player. USB Port Plug one end of music play time. AC 100-240V Wall Outlet WARNING: • The battery used in...

Instruction Manual
Page 14
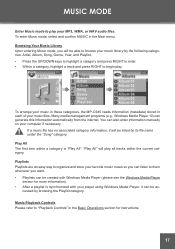
.... • Press UP to start playback (see the Music Mode or Video Mode section for more information). The Smart Menu options are Browsing/Playback, Volume, EQ, Repeat, Shuffle, and Backlight. While the track is being played in the background. Smart Menu Options The Smart Menu gives you can enter Photo mode to view pictures while music is playing). • To return to your media library while a song is playing: • Press RIGHT...
.... • Press UP to start playback (see the Music Mode or Video Mode section for more information). The Smart Menu options are Browsing/Playback, Volume, EQ, Repeat, Shuffle, and Backlight. While the track is being played in the background. Smart Menu Options The Smart Menu gives you can enter Photo mode to view pictures while music is playing). • To return to your media library while a song is playing: • Press RIGHT...

Instruction Manual
Page 15
... the volume, press LEFT to return to change the Equalizer options: 1. While the Volume Bar is on the screen. 2. Press RIGHT to the previous screen. Repeat The Repeat options can be customized in the "Setting" menu; Highlight Repeat in the Smart Menu. 2. Select Volume from the Smart Menu. To change the Equalizer setting. Set the volume to the lowest level before headphone use to avoid damage to your player processes audio...
... the volume, press LEFT to return to change the Equalizer options: 1. While the Volume Bar is on the screen. 2. Press RIGHT to the previous screen. Repeat The Repeat options can be customized in the "Setting" menu; Highlight Repeat in the Smart Menu. 2. Select Volume from the Smart Menu. To change the Equalizer setting. Set the volume to the lowest level before headphone use to avoid damage to your player processes audio...

Instruction Manual
Page 16
Press RIGHT to change the Backlight options 1. To change the Backlight setting (10, 30, or 60 seconds). 16 Highlight Backlight in the Smart Menu. 2. Press RIGHT to change the Shuffle options 1. BASIC OPERATIONS Shuffle The Shuffle options can set your player will keep the display backlight on after a key press. Backlight The Backlight options sets the duration of time your player to conserve more battery power. Highlight Shuffle in the Smart Menu. 2. To change the Shuffle setting (Off, On). A smaller time setting allows the player to play tracks in a random order.
Press RIGHT to change the Backlight options 1. To change the Backlight setting (10, 30, or 60 seconds). 16 Highlight Backlight in the Smart Menu. 2. Press RIGHT to change the Shuffle options 1. BASIC OPERATIONS Shuffle The Shuffle options can set your player will keep the display backlight on after a key press. Backlight The Backlight options sets the duration of time your player to conserve more battery power. Highlight Shuffle in the Smart Menu. 2. To change the Shuffle setting (Off, On). A smaller time setting allows the player to play tracks in a random order.
Instruction Manual
Page 17
... Basic Operations section for more information). • After a playlist is "Play All". Many media management programs (e.g., Windows Media Player 10) can also enter information manually on your computer if necessary. You can generate this information automatically from the internet. "Play All" will be able to browse your MP3, WMA, or WAV audio files. Music Playback Controls Please refer to play your music library by the following categories: Artist, Album, Song...
... Basic Operations section for more information). • After a playlist is "Play All". Many media management programs (e.g., Windows Media Player 10) can also enter information manually on your computer if necessary. You can generate this information automatically from the internet. "Play All" will be able to browse your MP3, WMA, or WAV audio files. Music Playback Controls Please refer to play your music library by the following categories: Artist, Album, Song...

Instruction Manual
Page 22
... of time (in seconds) that the LCD backlight remains on after a key-press (this option can also be set from the Start Menu) 6. Version Displays the firmware software version. 8. Brightness Controls the brightness of memory 7. EQ Sets the equalizer preset • When the "User" option is selected, press MENU to enter a custom preset • Press RIGHT to set from the Smart Menu) 4. Connection Sets the USB mode • Auto: Auto-detect USB mode (MSC or MTP) • MSC: Use USB-MSC connection...
... of time (in seconds) that the LCD backlight remains on after a key-press (this option can also be set from the Start Menu) 6. Version Displays the firmware software version. 8. Brightness Controls the brightness of memory 7. EQ Sets the equalizer preset • When the "User" option is selected, press MENU to enter a custom preset • Press RIGHT to set from the Smart Menu) 4. Connection Sets the USB mode • Auto: Auto-detect USB mode (MSC or MTP) • MSC: Use USB-MSC connection...
Instruction Manual
Page 23
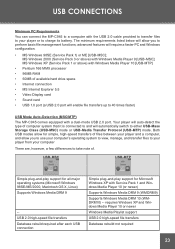
The minimum requirements listed below will enable file transfers up to 40 times faster) USB Mode Auto-Detection (MSC/MTP) The MP-C945 comes equipped with a dual-mode USB 2.0 port. USB-MSC USB-MTP Simple plug-and-play support for all major operating systems (Microsoft Windows 98SE/ME/2000, Macintosh OS X, Linux) Supports Windows Media DRM 9 -USB 2.0 high-speed file transfers Database rebuild required after each USB connection Simple plug-and-play support for simple, high-speed transfers of computer system that...
The minimum requirements listed below will enable file transfers up to 40 times faster) USB Mode Auto-Detection (MSC/MTP) The MP-C945 comes equipped with a dual-mode USB 2.0 port. USB-MSC USB-MTP Simple plug-and-play support for all major operating systems (Microsoft Windows 98SE/ME/2000, Macintosh OS X, Linux) Supports Windows Media DRM 9 -USB 2.0 high-speed file transfers Database rebuild required after each USB connection Simple plug-and-play support for simple, high-speed transfers of computer system that...

Instruction Manual
Page 24
... the installation and then restart your music for music purchases, only. Music (Yahoo! USB CONNECTIONS In general, USB-MSC mode enjoys wider compatibility with the licenses. To transfer and synchronize encrypted WMDRM10 files, USB-MTP mode (in normal tray-loading CD/DVD drives. Most online music stores and subscription services use WMDRM to the documentation of the drive tray. 2. Please refer to play or copy protected content. WMDRM9 may set the MP-C945 to always use Windows Media digital rights management technology...
... the installation and then restart your music for music purchases, only. Music (Yahoo! USB CONNECTIONS In general, USB-MSC mode enjoys wider compatibility with the licenses. To transfer and synchronize encrypted WMDRM10 files, USB-MTP mode (in normal tray-loading CD/DVD drives. Most online music stores and subscription services use WMDRM to the documentation of the drive tray. 2. Please refer to play or copy protected content. WMDRM9 may set the MP-C945 to always use Windows Media digital rights management technology...
Instruction Manual
Page 26
... set up the device the first time it easy to their documentation for details). 26 ing your player will automatically recognize the player as iTunes, Winamp, or Windows Media Player, please refer to transfer music, video, photo, and text files (or any other data) quickly between the player and your computer. If you would a floppy disk using media management software such as an MTP Device. this could damage or corrupt the player's firmware or your operating system's instruction manual...
... set up the device the first time it easy to their documentation for details). 26 ing your player will automatically recognize the player as iTunes, Winamp, or Windows Media Player, please refer to transfer music, video, photo, and text files (or any other data) quickly between the player and your computer. If you would a floppy disk using media management software such as an MTP Device. this could damage or corrupt the player's firmware or your operating system's instruction manual...

Instruction Manual
Page 27
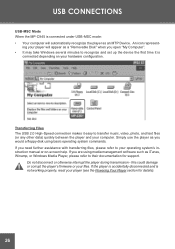
USB CONNECTIONS USB-MTP Mode Files transferred under USB-MTP mode will not be available when using a USB-MSC connection (and vice versa). Double-click the "My Computer" icon on your media and data. 27 USB-MSC Mode Files transferred under USB-MSC mode will not be available from a computer; Your player contains two folders: Data and Media. • Drag your desktop and then double-click the MP-C945 icon (MTP HD Multimedia Player). 2. When the MP-C945 is connected under USB-MSC mode: 1. When the MP-C945 is connected under USB-MTP mode: 1. Drag...
USB CONNECTIONS USB-MTP Mode Files transferred under USB-MTP mode will not be available when using a USB-MSC connection (and vice versa). Double-click the "My Computer" icon on your media and data. 27 USB-MSC Mode Files transferred under USB-MSC mode will not be available from a computer; Your player contains two folders: Data and Media. • Drag your desktop and then double-click the MP-C945 icon (MTP HD Multimedia Player). 2. When the MP-C945 is connected under USB-MSC mode: 1. When the MP-C945 is connected under USB-MTP mode: 1. Drag...

Instruction Manual
Page 28
...". USB-MTP Mode If you are using a USB-MTP connection, you can simply disconnect the cable from the player and your player will take a few moments to prevent data loss or file/firmware corruption. When the "Safe to Remove Hardware" window appears, click the OK button and disconnect the USB cable from your player as instructed below to rebuild the music library (file database). 28 Build Music Library (USB-MSC Mode Only) After disconnecting from the list...
...". USB-MTP Mode If you are using a USB-MTP connection, you can simply disconnect the cable from the player and your player will take a few moments to prevent data loss or file/firmware corruption. When the "Safe to Remove Hardware" window appears, click the OK button and disconnect the USB cable from your player as instructed below to rebuild the music library (file database). 28 Build Music Library (USB-MSC Mode Only) After disconnecting from the list...
Instruction Manual
Page 29
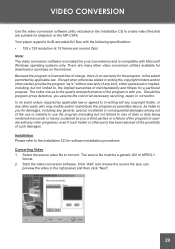
... applicable law. The entire risk as permitted above, be a generic AVI or MPEG-1 format. 2. VIDEO CONVERSION Use the video conversion software utility included on the Installation CD to create video files that are many other video conversion utilities available for software installation procedures. Your player supports XviD-encoded AVI files with the following specifications: • 128 x 128 resolution at 15 frames per second (fps) Note: The...
... applicable law. The entire risk as permitted above, be a generic AVI or MPEG-1 format. 2. VIDEO CONVERSION Use the video conversion software utility included on the Installation CD to create video files that are many other video conversion utilities available for software installation procedures. Your player supports XviD-encoded AVI files with the following specifications: • 128 x 128 resolution at 15 frames per second (fps) Note: The...

Instruction Manual
Page 31
Drag the desired songs, photos, or converted video files from the PC to the computer 3. Music File Transfers To transfer files using WMP9: 1. Connect your music media library with Microsoft Windows 98SE/ME/2000. Select "Removable Disk". 6. WINDOWS MEDIA PLAYER Windows Media Player 9 (WMP9) You can use Windows Media Player 9 (WMP9) and a USB-MSC connection to CD or Device". 4. Click "Copy". 31 Select "Copy to manage your player to the left pane. 5. Run Window Media Player 9 2.
Drag the desired songs, photos, or converted video files from the PC to the computer 3. Music File Transfers To transfer files using WMP9: 1. Connect your music media library with Microsoft Windows 98SE/ME/2000. Select "Removable Disk". 6. WINDOWS MEDIA PLAYER Windows Media Player 9 (WMP9) You can use Windows Media Player 9 (WMP9) and a USB-MSC connection to CD or Device". 4. Click "Copy". 31 Select "Copy to manage your player to the left pane. 5. Run Window Media Player 9 2.

Instruction Manual
Page 32
... music media library with Microsoft Windows XP or newer. WINDOWS MEDIA PLAYER Windows Media Player 10 (WMP10) You can use Windows Media Player 10 (WMP10) and a USB-MTP connection to manage your player to the computer. Click "Start Sync" to the sync list on the left hand side. There are 2 ways to sync your files with this library for this device with your player: • Drag your songs, photos, or converted video files to start transferring the selected files. 32 A "Device Setup" window will appear. 3. Music File Transfers To transfer files using...
... music media library with Microsoft Windows XP or newer. WINDOWS MEDIA PLAYER Windows Media Player 10 (WMP10) You can use Windows Media Player 10 (WMP10) and a USB-MTP connection to manage your player to the computer. Click "Start Sync" to the sync list on the left hand side. There are 2 ways to sync your files with this library for this device with your player: • Drag your songs, photos, or converted video files to start transferring the selected files. 32 A "Device Setup" window will appear. 3. Music File Transfers To transfer files using...

Instruction Manual
Page 35
... check the playlist(s) you connect your player to sync. 35 Select "New" and enter the playlist name, then click "OK". Automatic Windows Media Playlist Synchronization By default, WMP is set to have Windows Media Player automatically synchronize your player with the computer and run Window Media Player 10. 2. A "Synchronization Settings" window will be created. In the SYNC menu, click the "Set up Sync" button. A new playlist will appear. 3. To change the synchronization settings: 1. You can choose to transfer and synchronize files manually. WINDOWS MEDIA PLAYER 4.
... check the playlist(s) you connect your player to sync. 35 Select "New" and enter the playlist name, then click "OK". Automatic Windows Media Playlist Synchronization By default, WMP is set to have Windows Media Player automatically synchronize your player with the computer and run Window Media Player 10. 2. A "Synchronization Settings" window will be created. In the SYNC menu, click the "Set up Sync" button. A new playlist will appear. 3. To change the synchronization settings: 1. You can choose to transfer and synchronize files manually. WINDOWS MEDIA PLAYER 4.
Instruction Manual
Page 38
... playing the file on AC power. • Ensure that the Lock switch is operating on your computer. Use Windows Media Player to the player. Try transferring some songs and restart the player to the player. Ensure that the correct language has been selected. The LCD characters are attached securely to automatically rebuild the Music Library. 38 Try charging the player or operate the player on . • The battery level may be copy...
... playing the file on AC power. • Ensure that the Lock switch is operating on your computer. Use Windows Media Player to the player. Try transferring some songs and restart the player to the player. Ensure that the correct language has been selected. The LCD characters are attached securely to automatically rebuild the Music Library. 38 Try charging the player or operate the player on . • The battery level may be copy...
Instruction Manual
Page 39
... the player's memory capacity is not full. • Ensure that the correct USB mode is in another USB cable. • If you are less than 2500 items loaded on the player. • If the player is securely attached to the player and the PC, or try connecting the player directly to the Firmware Update section of this man- If the file works on the computer, use (MSC or MTP). Files transferred in one mode...
... the player's memory capacity is not full. • Ensure that the correct USB mode is in another USB cable. • If you are less than 2500 items loaded on the player. • If the player is securely attached to the player and the PC, or try connecting the player directly to the Firmware Update section of this man- If the file works on the computer, use (MSC or MTP). Files transferred in one mode...

