Manual
Page 2
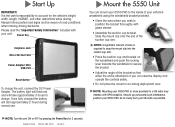
... Earphone Jack Micro SD Card Slot Power Adapter/ Mini USB Port Reset Button To charge the unit, connect the DC Power Adapter. NOTE: Turn the unit ON or OFF by pressing the Power Key for the vehicle's height, width, length, HAZMAT, and other restrictions while driving. Please read the "Important Safety Information" included with GPS reception. Slide the mount clip onto the end of road conditions when making driving decisions...
... Earphone Jack Micro SD Card Slot Power Adapter/ Mini USB Port Reset Button To charge the unit, connect the DC Power Adapter. NOTE: Turn the unit ON or OFF by pressing the Power Key for the vehicle's height, width, length, HAZMAT, and other restrictions while driving. Please read the "Important Safety Information" included with GPS reception. Slide the mount clip onto the end of road conditions when making driving decisions...

Manual
Page 3
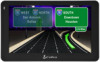
Basic Map Screen Quick Info Tab Map Screen Scroll/Zoom Tab Quick Info Tab Routing Tab Volume/Brightness Control Speed/Time Toggle Scroll/Zoom Tab NOTE: Touch anywhere on the map to next Weigh Station Routing Tab Zoom In Zoom Out Scroll Map Stop Route Program Detour View Turn List Change MultiRoute Settings View Trip CPU Change Route Status Log Timers Status Toggle Next Mile Marker Distance to next Rest Area Distance to next Travel Center Distance to enter the Main Menu.
Basic Map Screen Quick Info Tab Map Screen Scroll/Zoom Tab Quick Info Tab Routing Tab Volume/Brightness Control Speed/Time Toggle Scroll/Zoom Tab NOTE: Touch anywhere on the map to next Weigh Station Routing Tab Zoom In Zoom Out Scroll Map Stop Route Program Detour View Turn List Change MultiRoute Settings View Trip CPU Change Route Status Log Timers Status Toggle Next Mile Marker Distance to next Rest Area Distance to next Travel Center Distance to enter the Main Menu.
Manual
Page 4
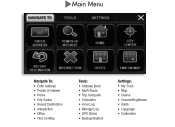
Main Menu Navigate To: • Enter Address • Points of Interest • Home • City Center • Recent Destination • Intersection • Office • Find on Map Tools: • Address Book • Multi-Route • Trip Computer • Calculator • Hour Log • Mileage Log • GPS Status • Backup/Restore Settings: • My Truck • Map • Device • Volume/Brightness • Alerts • Language • Calibration
Main Menu Navigate To: • Enter Address • Points of Interest • Home • City Center • Recent Destination • Intersection • Office • Find on Map Tools: • Address Book • Multi-Route • Trip Computer • Calculator • Hour Log • Mileage Log • GPS Status • Backup/Restore Settings: • My Truck • Map • Device • Volume/Brightness • Alerts • Language • Calibration

Manual
Page 5
...; Tap each box to enter your truck name and customize your truck information and press again. Now you type using the keyboard, the list will automatically filter your destination's State/Zip, City, Street, and House Number. • As you are ready to navigate. Enter Truck Info • Under the Settings tab in the main menu, tap the Enter Address icon to navigate to an address. • Click the...
...; Tap each box to enter your truck name and customize your truck information and press again. Now you type using the keyboard, the list will automatically filter your destination's State/Zip, City, Street, and House Number. • As you are ready to navigate. Enter Truck Info • Under the Settings tab in the main menu, tap the Enter Address icon to navigate to an address. • Click the...

Manual
Page 6
... begin navigating. This page allows you to avoid tollways and freeways, give preference to STAA routes, avoid specific roads, add via locations, or change your starting point. • Press Turn List for detailed turn instructions and warnings. • Press Route Options to Customize your route. The 5550 PRO does not have truck specific data for the unit to run a real time simulation of all categories. Route Option • The Route Option...
... begin navigating. This page allows you to avoid tollways and freeways, give preference to STAA routes, avoid specific roads, add via locations, or change your starting point. • Press Turn List for detailed turn instructions and warnings. • Press Route Options to Customize your route. The 5550 PRO does not have truck specific data for the unit to run a real time simulation of all categories. Route Option • The Route Option...
Manual
Page 7
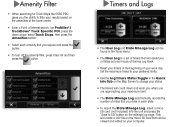
... the 5550 PRO gives you the ability to filter your results based on the amenities of the travel center. • Enter a Point of your computer. This will create a CSV file on the micro SD card that can be viewed and edited on the Map Screen to SD" button on the mileage log page. Timers and Logs • The Hour Log and State Mileage Log can...
... the 5550 PRO gives you the ability to filter your results based on the amenities of the travel center. • Enter a Point of your computer. This will create a CSV file on the micro SD card that can be viewed and edited on the Map Screen to SD" button on the mileage log page. Timers and Logs • The Hour Log and State Mileage Log can...
Manual
Page 8
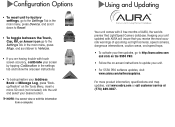
... view or edit this information from a computer. Using and Updating Your unit comes with AURA will insure that you are having trouble with touch screen accuracy, calibrate your screen by tapping Calibration in the settings tab and follow the onscreen instructions. • To backup/restore your Address Book or Mileage Log, press "Backup/Restore" on -screen instructions to http://aura.cobra.com and click on the 5550 PRO. • Follow the on the Tools Menu, insert a micro SD card...
... view or edit this information from a computer. Using and Updating Your unit comes with AURA will insure that you are having trouble with touch screen accuracy, calibrate your screen by tapping Calibration in the settings tab and follow the onscreen instructions. • To backup/restore your Address Book or Mileage Log, press "Backup/Restore" on -screen instructions to http://aura.cobra.com and click on the 5550 PRO. • Follow the on the Tools Menu, insert a micro SD card...
Operating Guide
Page 2
... settings SECTION 3: USING THE MAP SCREEN 3.1 - Viewing the turn list (while you have programmed a destination 4.8 - How to a city (no specific address) 4.4 - Creating a Multi-Route 4.12 - Entering an address 4.2 - Preview a route (starting from a different location) 4.6 - Running a Multi-Route 4.13 - Panning 3.2 - Stopping a trip 4.10 - Adding an intermediate destination 4.11 - SECTION 1: INSTALLATION 1.1 - Description of weight settings 2.3 - Preview a route (starting from your current location) 4.5 - Click on the map screen and save the location into the address book...
... settings SECTION 3: USING THE MAP SCREEN 3.1 - Viewing the turn list (while you have programmed a destination 4.8 - How to a city (no specific address) 4.4 - Creating a Multi-Route 4.12 - Entering an address 4.2 - Preview a route (starting from a different location) 4.6 - Running a Multi-Route 4.13 - Panning 3.2 - Stopping a trip 4.10 - Adding an intermediate destination 4.11 - SECTION 1: INSTALLATION 1.1 - Description of weight settings 2.3 - Preview a route (starting from your current location) 4.5 - Click on the map screen and save the location into the address book...
Operating Guide
Page 3
... 5: POINTS OF INTEREST (POI) 5.1 - My unit will not turn on the National Network" 8.2 - I am receiving satellites? 8.6 - Searching for truck stops by amenity SECTION 6: LOGS 6.1 - Using the Hour Log 6.6 - Resetting / Customizing the Hour Log SECTION 7: SOFTWARE & DATABASE UPDATES 7.1 - Poor routing 8.3 - Auto-brightness is the Mileage Log? 6.2 - How to show / hide POI icons on the map screen 8.8 - It says "Some of the roads on this route are not on 8.5 - Trouble locking onto satellites 8.9 - How to check the map version and update the maps SECTION 8: TROUBLESHOOTING...
... 5: POINTS OF INTEREST (POI) 5.1 - My unit will not turn on the National Network" 8.2 - I am receiving satellites? 8.6 - Searching for truck stops by amenity SECTION 6: LOGS 6.1 - Using the Hour Log 6.6 - Resetting / Customizing the Hour Log SECTION 7: SOFTWARE & DATABASE UPDATES 7.1 - Poor routing 8.3 - Auto-brightness is the Mileage Log? 6.2 - How to show / hide POI icons on the map screen 8.8 - It says "Some of the roads on this route are not on 8.5 - Trouble locking onto satellites 8.9 - How to check the map version and update the maps SECTION 8: TROUBLESHOOTING...

Operating Guide
Page 4
Observing satellite lock status 9.5 - Saving / backing up the Address Book 9.8 - Adjusting the volume 9.3 - Backing up the Mileage Log SECTION 10: OPTIONAL ACCESSORIES 10.1 - The STAA National Network 9.2 - Viewing your "current location" 9.4 - Viewing your elevation (altitude) 9.6 - SECTION 9: MISC 9.1 - Micro SD Card Slot Power light status 9.7 -
Observing satellite lock status 9.5 - Saving / backing up the Address Book 9.8 - Adjusting the volume 9.3 - Backing up the Mileage Log SECTION 10: OPTIONAL ACCESSORIES 10.1 - The STAA National Network 9.2 - Viewing your "current location" 9.4 - Viewing your elevation (altitude) 9.6 - SECTION 9: MISC 9.1 - Micro SD Card Slot Power light status 9.7 -

Operating Guide
Page 6
...the dash with a rubber bumper to remove the plate, it . NOTE: To create a secure mount, the plate uses a strong adhesive. Make sure the locking lever is installed, it does not block the top of your unit. The 7750 PLT comes with the ...Installation Hints Make sure to the windshield: 1. If you really want to protect your dash. The GPS antenna is a separate piece. Peel the backing from the adhesive pad and then press the mounting plate into position on the dash, stick the rubber bumper onto the bottom of your unit. Using the Mounting Disc Note: The adhesive pad is located...
...the dash with a rubber bumper to remove the plate, it . NOTE: To create a secure mount, the plate uses a strong adhesive. Make sure the locking lever is installed, it does not block the top of your unit. The 7750 PLT comes with the ...Installation Hints Make sure to the windshield: 1. If you really want to protect your dash. The GPS antenna is a separate piece. Peel the backing from the adhesive pad and then press the mounting plate into position on the dash, stick the rubber bumper onto the bottom of your unit. Using the Mounting Disc Note: The adhesive pad is located...

Operating Guide
Page 7
... gives an explanation of numbers for weight and length. If you can accept the default settings, or you tap on MY TRUCK. Tap on one of the fields. To make a change, simply tap on SETTINGS (at this screen: You can change the LOAD TYPE. 2.1) Setting up a truck 1. You should now be sure to find your truck. After selecting the truck you are...
... gives an explanation of numbers for weight and length. If you can accept the default settings, or you tap on MY TRUCK. Tap on one of the fields. To make a change, simply tap on SETTINGS (at this screen: You can change the LOAD TYPE. 2.1) Setting up a truck 1. You should now be sure to find your truck. After selecting the truck you are...

Operating Guide
Page 13
... the checkmark or − Tap on MAP to change the routing criteria. When entering the street, just enter the basic street name. 4.1) Entering an Address 1. enter Main enter 32 enter 22nd If you do not have a specific address, you are some examples: 112 S. When you can just enter the state and city. A menu should now be at this screen: Tap on the MAP screen. Main St. 5716 Highway 32 1117...
... the checkmark or − Tap on MAP to change the routing criteria. When entering the street, just enter the basic street name. 4.1) Entering an Address 1. enter Main enter 32 enter 22nd If you do not have a specific address, you are some examples: 112 S. When you can just enter the state and city. A menu should now be at this screen: Tap on the MAP screen. Main St. 5716 Highway 32 1117...

Operating Guide
Page 15
... should now be at this screen: Enter the state and city. The 7750 PLT will choose an arbitrary address. If you are done, tap the checkmark or − Tap on MAP to view the location on the map. − Tap on ROUTE OPTION to a city without entering a specific address. When you keep getting "Route Calculate Failure", then try using Points of Interest and choosing a business...
... should now be at this screen: Enter the state and city. The 7750 PLT will choose an arbitrary address. If you are done, tap the checkmark or − Tap on MAP to view the location on the map. − Tap on ROUTE OPTION to a city without entering a specific address. When you keep getting "Route Calculate Failure", then try using Points of Interest and choosing a business...

Operating Guide
Page 17
... the nav unit will get this screen: NOTE: If you tap on the checkmark OPTION 2 - Change the Route Options If you tap on ROUTE OPTION at the bottom of the screen, you will try extra hard to keep you on the X in and out by dragging your finger across the screen. buttons. When done..., tap on the National Network (established truck routes) as much as possible. View the Map Screen If...
... the nav unit will get this screen: NOTE: If you tap on the checkmark OPTION 2 - Change the Route Options If you tap on ROUTE OPTION at the bottom of the screen, you will try extra hard to keep you on the X in and out by dragging your finger across the screen. buttons. When done..., tap on the National Network (established truck routes) as much as possible. View the Map Screen If...

Operating Guide
Page 23
... on VIA LOCATION. 3. The nav unit will first bring you to the intermediate destination, and then automatically direct you to stop . Or maybe you are traveling to your favorite sausages. 1. Tap on ROUTE OPTION. 2. If you need to pick up a load before traveling to a final destination. 4.10) Adding an intermediate destination Maybe you need to add more than one intermediate destination. Enter the intermediate...
... on VIA LOCATION. 3. The nav unit will first bring you to the intermediate destination, and then automatically direct you to stop . Or maybe you are traveling to your favorite sausages. 1. Tap on ROUTE OPTION. 2. If you need to pick up a load before traveling to a final destination. 4.10) Adding an intermediate destination Maybe you need to add more than one intermediate destination. Enter the intermediate...

Operating Guide
Page 38
...on the RESET button will then see this screen: To enter a custom time, tap on the desired field. Tap on the back arrow in the lower-right corner to save your changes. PLEASE ...reset individual timers, or reset ALL timers. The factory default for these are countdown timers, based on the DEFAULT button will set the timer to the factory default. When done, tap on TOOLS at the top. 3. 6.6) Resetting / Customizing the Hour Log 1. Tap anywhere on HOUR LOG. You will reset the MAXIMUM TIME to the MAXIMUM TIME value. Tap on the map screen. 2. Tapping on allowable work times...
...on the RESET button will then see this screen: To enter a custom time, tap on the desired field. Tap on the back arrow in the lower-right corner to save your changes. PLEASE ...reset individual timers, or reset ALL timers. The factory default for these are countdown timers, based on the DEFAULT button will set the timer to the factory default. When done, tap on TOOLS at the top. 3. 6.6) Resetting / Customizing the Hour Log 1. Tap anywhere on HOUR LOG. You will reset the MAXIMUM TIME to the MAXIMUM TIME value. Tap on the map screen. 2. Tapping on allowable work times...

Operating Guide
Page 43
... on the map screen. Try setting up a new truck, and just use the default settings. If the restriction is inaccessible by truck. Please be prepared to get a Route Calculate Failure. a. Tap anywhere on these settings, please click . 2. c. If the nav unit now routes, then you chose to travel to the winding mountain roads). If you know that one of your current location. If the...
... on the map screen. Try setting up a new truck, and just use the default settings. If the restriction is inaccessible by truck. Please be prepared to get a Route Calculate Failure. a. Tap anywhere on these settings, please click . 2. c. If the nav unit now routes, then you chose to travel to the winding mountain roads). If you know that one of your current location. If the...
Operating Guide
Page 48
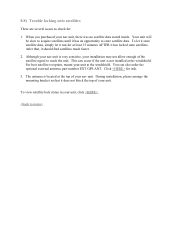
For best satellite reception, mount your unit. During installation, please arrange the mounting bracket so that , it does not block the top of the satellite signal to store satellite data. This can also order the optional external antenna, part number EXT GPS ANT. The antenna is located at the top of your installation may not allow enough of your unit at the windshield. Although your nav unit is not installed at...
For best satellite reception, mount your unit. During installation, please arrange the mounting bracket so that , it does not block the top of the satellite signal to store satellite data. This can also order the optional external antenna, part number EXT GPS ANT. The antenna is located at the top of your installation may not allow enough of your unit at the windshield. Although your nav unit is not installed at...

Operating Guide
Page 49
Tap on ALL. 6. Tap on SETTINGS (at the top). 3. All saved addresses will be erased. The nav unit should turn off. Scroll down until you see RESET. Tap anywhere on OK. 7. Tap on the map screen. 2. All settings will be set to factory defaults. The mileage log will clear everything in your nav unit. DONE! Tap on RESET. 5. 8.9) Master Reset A master reset will be cleared. 1. Tap on DEVICE. 4.
Tap on ALL. 6. Tap on SETTINGS (at the top). 3. All saved addresses will be erased. The nav unit should turn off. Scroll down until you see RESET. Tap anywhere on OK. 7. Tap on the map screen. 2. All settings will be set to factory defaults. The mileage log will clear everything in your nav unit. DONE! Tap on RESET. 5. 8.9) Master Reset A master reset will be cleared. 1. Tap on DEVICE. 4.


