
Configuration Guide
Page 4
... Port Cable 2-21 Using the Cable-Management Bracket 2-21 Connecting Power 2-22 Connecting AC-Input Power 2-22 Connecting DC-Input Power 2-23 Starting and Configuring the Router 3-1 Functional Overview 3-1 Chassis Slot and Logical Interface Numbering 3-2 MAC Address 3-3 Online Insertion and Removal 3-4 Environmental Monitoring and Reporting Functions 3-5 Environmental Monitoring 3-5 Reporting Functions 3-6 Fan Failures 3-8 Checking Conditions Prior to System Startup 3-8 Starting the System and Observing Initial Conditions 3-9 Configuring a Cisco 7301 Router 3-10 Performing a Basic Configuration...
... Port Cable 2-21 Using the Cable-Management Bracket 2-21 Connecting Power 2-22 Connecting AC-Input Power 2-22 Connecting DC-Input Power 2-23 Starting and Configuring the Router 3-1 Functional Overview 3-1 Chassis Slot and Logical Interface Numbering 3-2 MAC Address 3-3 Online Insertion and Removal 3-4 Environmental Monitoring and Reporting Functions 3-5 Environmental Monitoring 3-5 Reporting Functions 3-6 Fan Failures 3-8 Checking Conditions Prior to System Startup 3-8 Starting the System and Observing Initial Conditions 3-9 Configuring a Cisco 7301 Router 3-10 Performing a Basic Configuration...
Configuration Guide
Page 5
...the upgrade rom-monitor Command 3-28 Changing Preferences to Choose the Other ROMmon Image 3-29 Troubleshooting the Upgrade 3-30 ROMmon Upgrade Error Messages 3-30 Replacing or Recovering a Lost Password 3-31 Overview of the Password Recovery Procedure 3-31 Details of the Password Recovery Procedure 3-32 Viewing Your System Configuration 3-34 Performing Complex Configurations 3-35 Installing and Removing Field-Replaceable Units 4-1 Installing and Removing the CompactFlash Disk 4-2 About CompactFlash Disks 4-2 Installing and Removing a Port Adapter or Service Adapter 4-3 Powering Off the Router...
...the upgrade rom-monitor Command 3-28 Changing Preferences to Choose the Other ROMmon Image 3-29 Troubleshooting the Upgrade 3-30 ROMmon Upgrade Error Messages 3-30 Replacing or Recovering a Lost Password 3-31 Overview of the Password Recovery Procedure 3-31 Details of the Password Recovery Procedure 3-32 Viewing Your System Configuration 3-34 Performing Complex Configurations 3-35 Installing and Removing Field-Replaceable Units 4-1 Installing and Removing the CompactFlash Disk 4-2 About CompactFlash Disks 4-2 Installing and Removing a Port Adapter or Service Adapter 4-3 Powering Off the Router...

Configuration Guide
Page 10
... applications, refer to the Cisco IOS configuration guides and command references and to the documents listed in a rack and for attaching cables. Document Organization The major sections of this installation and configuration guide are as follows: Chapter /Appendix Number and Title Chapter 1, "Cisco 7301 Overview" Chapter 2, "Rack-Mounting, Tabletop Installation, and Cabling" Chapter 3, "Starting and Configuring the Router" Chapter 4, "Installing and Removing Field-Replaceable Units" Chapter 5, "Troubleshooting Initial Startup Problems" Appendix A, "Specifications" Appendix B, "Using the...
... applications, refer to the Cisco IOS configuration guides and command references and to the documents listed in a rack and for attaching cables. Document Organization The major sections of this installation and configuration guide are as follows: Chapter /Appendix Number and Title Chapter 1, "Cisco 7301 Overview" Chapter 2, "Rack-Mounting, Tabletop Installation, and Cabling" Chapter 3, "Starting and Configuring the Router" Chapter 4, "Installing and Removing Field-Replaceable Units" Chapter 5, "Troubleshooting Initial Startup Problems" Appendix A, "Specifications" Appendix B, "Using the...
Configuration Guide
Page 17
...number. • To check the minimum software requirements of Cisco IOS software with Cisco.com login accounts. It contains quick reference information about chassis or parts installation. - See the documentation guide that ships with the Cisco 7301 router. - The Cisco 7301 Installation and Configuration Guide contains complete installation and startup configuration information. - Cisco 7301 Router Troubleshooting and Configuration Notes - Preface Obtaining Documentation and Submitting a Service Request - Regulatory Compliance and Safety Information for the Cisco 7301 Router...
...number. • To check the minimum software requirements of Cisco IOS software with Cisco.com login accounts. It contains quick reference information about chassis or parts installation. - See the documentation guide that ships with the Cisco 7301 router. - The Cisco 7301 Installation and Configuration Guide contains complete installation and startup configuration information. - Cisco 7301 Router Troubleshooting and Configuration Notes - Preface Obtaining Documentation and Submitting a Service Request - Regulatory Compliance and Safety Information for the Cisco 7301 Router...

Configuration Guide
Page 26
... set automatically with the other records for your new router. screws to secure the rack-mount brackets to you ordered documentation and did not receive it in . Cisco 7301 Router Installation Checklist Chapter 1 Cisco 7301 Overview Table 1-1 Cisco 7301 Components List Component Description Received Chassis Cisco 7301 chassis configured with your installation and to provide a historical record of what was ordered If ordered, router hardware and software documentation and the Cisco Documentation CD-ROM package1 Examples: Port adapter, SFP GBIC modules , network interface cables...
... set automatically with the other records for your new router. screws to secure the rack-mount brackets to you ordered documentation and did not receive it in . Cisco 7301 Router Installation Checklist Chapter 1 Cisco 7301 Overview Table 1-1 Cisco 7301 Components List Component Description Received Chassis Cisco 7301 chassis configured with your installation and to provide a historical record of what was ordered If ordered, router hardware and software documentation and the Cisco Documentation CD-ROM package1 Examples: Port adapter, SFP GBIC modules , network interface cables...

Configuration Guide
Page 27
... a rack. Gigabit Ethernet SFP GBIC models GLC-SX-MM, GLC-LH-SM, and GLC-ZX-SM are supportedon the Cisco 7301. OL-5418-07 Cisco 7301 Installation and Configuration Guide 1-9 cable-retention clip secured DC power cable(s) connected to DC source(s) and router Network interface cables and devices connected ASCII terminal attached to console port Console port set for 9600 baud, 8 data bits, no parity, and 1 stop bits (9600 8N1) System power turned on System boot complete (STATUS LED is on) I/O ports and port adapter are...
... a rack. Gigabit Ethernet SFP GBIC models GLC-SX-MM, GLC-LH-SM, and GLC-ZX-SM are supportedon the Cisco 7301. OL-5418-07 Cisco 7301 Installation and Configuration Guide 1-9 cable-retention clip secured DC power cable(s) connected to DC source(s) and router Network interface cables and devices connected ASCII terminal attached to console port Console port set for 9600 baud, 8 data bits, no parity, and 1 stop bits (9600 8N1) System power turned on System boot complete (STATUS LED is on) I/O ports and port adapter are...

Configuration Guide
Page 66
... connection to configure LAN interfaces, routing, Network Address Translation (NAT), firewalls, Virtual Private Networks (VPNs), and other options using one of a 7xxx VPN bundle. The TCP/IP host may exist anywhere on the network as long as part of the procedures described in the "Viewing Your System Configuration" section on the router. SDM does not support the following features: WAN configuration, Gigabit Ethernet (GE) interfaces, AA client, EZ VPN server, QoS, SSHv2, DHCP server configuration options, and usability enhancements. Cisco Security Device Manager (SDM), version...
... connection to configure LAN interfaces, routing, Network Address Translation (NAT), firewalls, Virtual Private Networks (VPNs), and other options using one of a 7xxx VPN bundle. The TCP/IP host may exist anywhere on the network as long as part of the procedures described in the "Viewing Your System Configuration" section on the router. SDM does not support the following features: WAN configuration, Gigabit Ethernet (GE) interfaces, AA client, EZ VPN server, QoS, SSHv2, DHCP server configuration options, and usability enhancements. Cisco Security Device Manager (SDM), version...

Configuration Guide
Page 67
Turn the power switch on the power supply to the on (|) position. (This action turns on the router. If the remote end of the WAN connection is not configured, it defaults to the Cisco IOS Configuration Fundamentals Configuration Guide and Cisco IOS Configuration Fundamentals Command Reference publications for the AutoInstall process: Step 1 Step 2 Step 3 Attach the appropriate synchronous serial cable to synchronous serial interface 0 on AC power to the router's nonvolatile random-access memory (NVRAM). Perform the following step to...
Turn the power switch on the power supply to the on (|) position. (This action turns on the router. If the remote end of the WAN connection is not configured, it defaults to the Cisco IOS Configuration Fundamentals Configuration Guide and Cisco IOS Configuration Fundamentals Command Reference publications for the AutoInstall process: Step 1 Step 2 Step 3 Attach the appropriate synchronous serial cable to synchronous serial interface 0 on AC power to the router's nonvolatile random-access memory (NVRAM). Perform the following step to...

Configuration Guide
Page 69
... is used to accept SNMP management; Chapter 3 Starting and Configuring the Router Configuring a Cisco 7301 Router Step 3 Choose which protocols to support on your system using the setup facility: Interior Gateway Routing Protocol (IGRP) or Routing Information Protocol (RIP). Enter enable secret: barney The enable password is a one of two interior routing protocols to operate on your interfaces. SNMP defines a set configuration and run-time parameters of the questions. It provides a means to access and set of the enable password when it : Configure SNMP Network Management...
... is used to accept SNMP management; Chapter 3 Starting and Configuring the Router Configuring a Cisco 7301 Router Step 3 Choose which protocols to support on your system using the setup facility: Interior Gateway Routing Protocol (IGRP) or Routing Information Protocol (RIP). Enter enable secret: barney The enable password is a one of two interior routing protocols to operate on your interfaces. SNMP defines a set configuration and run-time parameters of the questions. It provides a means to access and set of the enable password when it : Configure SNMP Network Management...
Configuration Guide
Page 71
... from show controllers GigabitEthernet 0/X (where X is supported in this media-type mode, even if present in this is the only configuration that is 0, 1, or 2). Cisco IOS provides two commands to appropriately match the new interface characteristics. b. Chapter 3 Starting and Configuring the Router Configuring a Cisco 7301 Router Configuring the Interface Transmission and Speed Modes Step 1 After changing the media type, configure the speed and duplex transmission modes to provide information on by default), issue the interface command no negotiation auto.
... from show controllers GigabitEthernet 0/X (where X is supported in this media-type mode, even if present in this is the only configuration that is 0, 1, or 2). Cisco IOS provides two commands to appropriately match the new interface characteristics. b. Chapter 3 Starting and Configuring the Router Configuring a Cisco 7301 Router Configuring the Interface Transmission and Speed Modes Step 1 After changing the media type, configure the speed and duplex transmission modes to provide information on by default), issue the interface command no negotiation auto.

Configuration Guide
Page 75
..../8sszhzk78p/Y0 enable password betty line vty 0 4 password fred snmp-server community public ! Turn off IPX to get started! Use the enabled mode 'configure' command to modify this interface in subnet field [0]: 0 Class C network is now minimally configured and ready to use. You can use the configure command. router igrp 15 network 1.0.0.0 ! For information on additional interface configuration and specific system configurations, refer to the modular configuration and modular command reference publications in the Cisco IOS software configuration documentation set that corresponds...
..../8sszhzk78p/Y0 enable password betty line vty 0 4 password fred snmp-server community public ! Turn off IPX to get started! Use the enabled mode 'configure' command to modify this interface in subnet field [0]: 0 Class C network is now minimally configured and ready to use. You can use the configure command. router igrp 15 network 1.0.0.0 ! For information on additional interface configuration and specific system configurations, refer to the modular configuration and modular command reference publications in the Cisco IOS software configuration documentation set that corresponds...

Configuration Guide
Page 76
... the Control key while you created in configuration mode. To see "Enabling the Second Processor" section on page 3-20. (See the "Saving the Running Configuration to enter configuration mode from the terminal: Router# config terminal Enter configuration commands, one per line. Enabling the Second Processor The Cisco 7301 includes a dual-CPU-core BCM 1250. All Cisco IOS images for the Cisco 7301 platform use the setup facility or AutoInstall. As of specific feature sets via...
... the Control key while you created in configuration mode. To see "Enabling the Second Processor" section on page 3-20. (See the "Saving the Running Configuration to enter configuration mode from the terminal: Router# config terminal Enter configuration commands, one per line. Enabling the Second Processor The Cisco 7301 includes a dual-CPU-core BCM 1250. All Cisco IOS images for the Cisco 7301 platform use the setup facility or AutoInstall. As of specific feature sets via...

Configuration Guide
Page 78
Use these commands to Check the Installation There are a variety of show commands associated with sample output. Router# show interface stats command for information about the interface. Enabling the Second Processor Chapter 3 Starting and Configuring the Router Error Messages The following error messages are displayed if a feature is configured that is not supported in the MPF path: Router# %MPF-4-IGNOREDFEATURES: Interface Gi0/3: Input "PBR" configurations are not MPF supported and are IGNORED...
Use these commands to Check the Installation There are a variety of show commands associated with sample output. Router# show interface stats command for information about the interface. Enabling the Second Processor Chapter 3 Starting and Configuring the Router Error Messages The following error messages are displayed if a feature is configured that is not supported in the MPF path: Router# %MPF-4-IGNOREDFEATURES: Interface Gi0/3: Input "PBR" configurations are not MPF supported and are IGNORED...

Configuration Guide
Page 86
... - 392348 bytes] ROMMON upgrade aborted; Falling to ReadOnly ROMMON ROM:Rebooted by cisco Systems, Inc. new ROMMON is too big • Hardware does not support ROMmon upgrade: Router: upgrade rom-monitor file tftp://00.0.00.0/biff/c7301-is -mz from 00.0.00.0 (via GigabitEthernet0/1 OK - 524288 bytes] %Error:not srec file NPEG1-10# • A boot of main memory Readonly ROMMON initialized rommon 1 > 3-30 Cisco 7301 Installation and Configuration Guide OL-5418-07 ROMmon Upgrade Error Messages One...
... - 392348 bytes] ROMMON upgrade aborted; Falling to ReadOnly ROMMON ROM:Rebooted by cisco Systems, Inc. new ROMMON is too big • Hardware does not support ROMmon upgrade: Router: upgrade rom-monitor file tftp://00.0.00.0/biff/c7301-is -mz from 00.0.00.0 (via GigabitEthernet0/1 OK - 524288 bytes] %Error:not srec file NPEG1-10# • A boot of main memory Readonly ROMMON initialized rommon 1 > 3-30 Cisco 7301 Installation and Configuration Guide OL-5418-07 ROMmon Upgrade Error Messages One...

Configuration Guide
Page 89
... interfaces that were originally configured. Step 19 Step 20 Step 21 Enter the copy running memory. Router# configure memory Step 14 Enter the privileged EXEC command configure terminal to be encrypted or clear text. Cisco 7301 Installation and Configuration Guide 3-33 Chapter 3 Starting and Configuring the Router Replacing or Recovering a Lost Password The enable secret password is encrypted and cannot be replaced. it must change or replace the enable, enable secret, or console login passwords. Use the config-register command...
... interfaces that were originally configured. Step 19 Step 20 Step 21 Enter the copy running memory. Router# configure memory Step 14 Enter the privileged EXEC command configure terminal to be encrypted or clear text. Cisco 7301 Installation and Configuration Guide 3-33 Chapter 3 Starting and Configuring the Router Replacing or Recovering a Lost Password The enable secret password is encrypted and cannot be replaced. it must change or replace the enable, enable secret, or console login passwords. Use the config-register command...

Configuration Guide
Page 94
... 2, "Rack-Mounting, Tabletop Installation, and Cabling," and Chapter 3, "Starting and Configuring the Router." If the CompactFlash Disk does not completely insert into the slot, remove it and turn it over, and reinsert it was probably upside down. For further installation procedures including rack-mounting or general workbench installation, see Appendix B, "Using the CompactFlash Disk." Note The CompactFlash Disk is keyed to prevent it from the chassis...
... 2, "Rack-Mounting, Tabletop Installation, and Cabling," and Chapter 3, "Starting and Configuring the Router." If the CompactFlash Disk does not completely insert into the slot, remove it and turn it over, and reinsert it was probably upside down. For further installation procedures including rack-mounting or general workbench installation, see Appendix B, "Using the CompactFlash Disk." Note The CompactFlash Disk is keyed to prevent it from the chassis...

Configuration Guide
Page 95
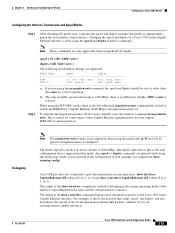
... GIGABIT EN ETHERNET 0/2 LINK TX GBIC RX AUX CONSOLE CISCO 7301 CFLOAMSPHACT STATUS ALARM 12040V-=2490AV,,428A-, 50/60 Hz 60V=5A B A 4 1 Port adapter latch 2 Port adapter 3 Port adapter slot guide 4 Ground for inserting and securing a port adapter: Step 1 Attach an ESD wrist strap between you have replaced the port adapter or inserted a filler panel, replace the power cable and then turn the power switch to the on again. The Cisco 7301 router supports OIR of the chassis, near the STATUS LED and power switch. Removing a port adapter while traffic...
... GIGABIT EN ETHERNET 0/2 LINK TX GBIC RX AUX CONSOLE CISCO 7301 CFLOAMSPHACT STATUS ALARM 12040V-=2490AV,,428A-, 50/60 Hz 60V=5A B A 4 1 Port adapter latch 2 Port adapter 3 Port adapter slot guide 4 Ground for inserting and securing a port adapter: Step 1 Attach an ESD wrist strap between you have replaced the port adapter or inserted a filler panel, replace the power cable and then turn the power switch to the on again. The Cisco 7301 router supports OIR of the chassis, near the STATUS LED and power switch. Removing a port adapter while traffic...

Configuration Guide
Page 96
... holding the port adapter latch. Statement 1028 Step 1 Power off the router by turning the power switch to the on the router by turning the power switch to ensure that services the DC circuit, switch the circuit breaker to rotate the latch over the port adapter. For DC power supplies, to the off position Note After powering off position, and remove the DC connector. Cisco 7301 Installation and Configuration Guide 4-4 OL-5418-07 Use a Phillips...
... holding the port adapter latch. Statement 1028 Step 1 Power off the router by turning the power switch to the on the router by turning the power switch to ensure that services the DC circuit, switch the circuit breaker to rotate the latch over the port adapter. For DC power supplies, to the off position Note After powering off position, and remove the DC connector. Cisco 7301 Installation and Configuration Guide 4-4 OL-5418-07 Use a Phillips...

Configuration Guide
Page 104
... router power cable. Turn the router power switch to boot on . AC internal power cables are using the correct Cisco IOS release. Table 5-1 Troubleshooting the Power Subsystem Symptom Possible Cause Possible Solution System begins power System has failed to the off , and reboot the system. LED comes on , amber STATUS Cisco IOS. from the power supply to be displayed on only when a router Gigabit Ethernet SFP GBIC port (0/0, 0/1, or 0/2) is an incoming carrier signal, and does not indicate startup problems. • The ENABLED LED...
... router power cable. Turn the router power switch to boot on . AC internal power cables are using the correct Cisco IOS release. Table 5-1 Troubleshooting the Power Subsystem Symptom Possible Cause Possible Solution System begins power System has failed to the off , and reboot the system. LED comes on , amber STATUS Cisco IOS. from the power supply to be displayed on only when a router Gigabit Ethernet SFP GBIC port (0/0, 0/1, or 0/2) is an incoming carrier signal, and does not indicate startup problems. • The ENABLED LED...

Configuration Guide
Page 148
... installation) 5 rack-mounting chassis 6 replacing or recovering a lost password 31 starting the router 9 tabletop or workbench installation 5 viewing system configuration 34 processor BCM 1250 6 shutdown 5 subsystem for troubleshooting 3 product disposal x R rack-mounting front mounted 7 rear mounted 8 rack-mount kit 3 related documentation x reload command 33 replacing or recovering a lost password 31 reset command 32 reviewing changes to configuration 27 RIP, configuring 13 IN-6 Cisco 7301 Installation and Configuration Guide RJ-45, cable 5 rmdir command 11 ROMmon (rom-monitor) upgrades...
... installation) 5 rack-mounting chassis 6 replacing or recovering a lost password 31 starting the router 9 tabletop or workbench installation 5 viewing system configuration 34 processor BCM 1250 6 shutdown 5 subsystem for troubleshooting 3 product disposal x R rack-mounting front mounted 7 rear mounted 8 rack-mount kit 3 related documentation x reload command 33 replacing or recovering a lost password 31 reset command 32 reviewing changes to configuration 27 RIP, configuring 13 IN-6 Cisco 7301 Installation and Configuration Guide RJ-45, cable 5 rmdir command 11 ROMmon (rom-monitor) upgrades...


