
Administration Guide
Page 2
Table of Contents 1 Introduction 1 Welcome 1 What's in this User Guide? 1 2 Getting to Know the SFE2010/SFE2010P 2 SFE2010/P Front Panel 2 SFE2010/P Back Panel 4 3 Connecting Devices 5 Sample Network Configuration 5 Maximum Cabling Distances 5 Before You Install the Switch... System Information 17 Management Settings 19 Username & Password Settings 24 Security Settings 25 VLAN Management 28 IP Configuration 29 File Management 43 Restore System Default Settings 46 Reset to Factory Settings 46 Reboot System 46 Stack Configuration 47 Port Status 47 Port ...
Table of Contents 1 Introduction 1 Welcome 1 What's in this User Guide? 1 2 Getting to Know the SFE2010/SFE2010P 2 SFE2010/P Front Panel 2 SFE2010/P Back Panel 4 3 Connecting Devices 5 Sample Network Configuration 5 Maximum Cabling Distances 5 Before You Install the Switch... System Information 17 Management Settings 19 Username & Password Settings 24 Security Settings 25 VLAN Management 28 IP Configuration 29 File Management 43 Restore System Default Settings 46 Reset to Factory Settings 46 Reboot System 46 Stack Configuration 47 Port Status 47 Port ...

Administration Guide
Page 13
... the switch to the address field of the web-based configuration utility. Using Menus in the web-based utility. The default IP address is connected to the same network as the switch. SFE2010/SFE2010P Administration Guide 10 Linksys switch provides a complete web-based utility to choose options in the Web-Based Utility Use...
... the switch to the address field of the web-based configuration utility. Using Menus in the web-based utility. The default IP address is connected to the same network as the switch. SFE2010/SFE2010P Administration Guide 10 Linksys switch provides a complete web-based utility to choose options in the Web-Based Utility Use...

Administration Guide
Page 15
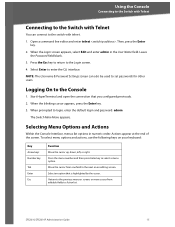
SFE2010/SFE2010P Administration Guide 12 NOTE: The switch also can also be configured ...the Enter key. You can use of the switch. Before you use each time you connect to your switch. The default logon ID is covered in the next chapter. • "Connecting to Your Switch with HyperTerminal," on page 12 •....This chapter describes console interface configuration. Configuration can be performed through a telnet connection. Telnet to the switch IP address 192.168.1.254. 5 Using the Console Connecting to Your Switch with HyperTerminal Using the Console This chapter...
SFE2010/SFE2010P Administration Guide 12 NOTE: The switch also can also be configured ...the Enter key. You can use of the switch. Before you use each time you connect to your switch. The default logon ID is covered in the next chapter. • "Connecting to Your Switch with HyperTerminal," on page 12 •....This chapter describes console interface configuration. Configuration can be performed through a telnet connection. Telnet to the switch IP address 192.168.1.254. 5 Using the Console Connecting to Your Switch with HyperTerminal Using the Console This chapter...
Administration Guide
Page 18
... Action list. Press the Esc key to return to enter the CLI interface. SFE2010/SFE2010P Administration Guide 15 When prompted to select a menu option. Press the menu number and then press Enter key to login, enter the default login and password: admin The Switch Main Menu appears. Logging On to the Console...
... Action list. Press the Esc key to return to enter the CLI interface. SFE2010/SFE2010P Administration Guide 15 When prompted to select a menu option. Press the menu number and then press Enter key to login, enter the default login and password: admin The Switch Main Menu appears. Logging On to the Console...

Administration Guide
Page 20
...24) 4. From the System Configuration Menu, select 1. Back. Username & Password Settings (see page 46) 11. Restore System Default Settings (see page 46) 10. Reset to screens where you are finished using this screen, select 0. System Information The System... Information menu provides access to Factory Settings (see page 46) 9. System Information. 3. SFE2010/SFE2010P Administration Guide 17 IP Configuration (see page 18) 2. Versions (see page 29) 7. General Information (see page 43) 8. File Management (see page 18)...
...24) 4. From the System Configuration Menu, select 1. Back. Username & Password Settings (see page 46) 11. Restore System Default Settings (see page 46) 10. Reset to screens where you are finished using this screen, select 0. System Information The System... Information menu provides access to Factory Settings (see page 46) 9. System Information. 3. SFE2010/SFE2010P Administration Guide 17 IP Configuration (see page 18) 2. Versions (see page 29) 7. General Information (see page 43) 8. File Management (see page 18)...

Administration Guide
Page 35
... (see page 35) 6. IPv6 Default Gateway (see page 34) 5. ... Enable You can use the IPv6 Interface Enable screen to acknowledge the warning. 2. IP Configuration. 2. NOTE: To enable or disable the interface, move the cursor to ... Interface Enable (see page 33) 3. IPv6 Address Settings (see page 32) 2. IP Configuration. 3. On the IPv6 Address Configuration menu, select 1. Press the Tab key... ISATAP Enable (see page 36) To open this screen: 1. From the IP Configuration menu, select 2. On the IP Configuration menu, select 2. When you select ENABLE, a warning appears. If ...
... (see page 35) 6. IPv6 Default Gateway (see page 34) 5. ... Enable You can use the IPv6 Interface Enable screen to acknowledge the warning. 2. IP Configuration. 2. NOTE: To enable or disable the interface, move the cursor to ... Interface Enable (see page 33) 3. IPv6 Address Settings (see page 32) 2. IP Configuration. 3. On the IPv6 Address Configuration menu, select 1. Press the Tab key... ISATAP Enable (see page 36) To open this screen: 1. From the IP Configuration menu, select 2. On the IP Configuration menu, select 2. When you select ENABLE, a warning appears. If ...

Administration Guide
Page 39
...cursor from one field to the Action list. 3. Using the Console System Configuration IPv6 Default Gateway You can use the IPv6 Default Gateway screen to save your settings 4. From the IP Configuration menu, select 2. Press the Tab key to move the cursor to the next.... IP Configuration. 3. To open this screen: 1. From the IPv6 Address Configuration menu, select 6. To edit the IPv6 default gateway settings: 1. Select Edit., and then make the changes. Select Execute to view or edit information about the IPv6 Default Gateway. SFE2010/SFE2010P Administration Guide...
...cursor from one field to the Action list. 3. Using the Console System Configuration IPv6 Default Gateway You can use the IPv6 Default Gateway screen to save your settings 4. From the IP Configuration menu, select 2. Press the Tab key to move the cursor to the next.... IP Configuration. 3. To open this screen: 1. From the IPv6 Address Configuration menu, select 6. To edit the IPv6 default gateway settings: 1. Select Edit., and then make the changes. Select Execute to view or edit information about the IPv6 Default Gateway. SFE2010/SFE2010P Administration Guide...


