Quick Start Guide
Page 9
...From the CLI, enter the activation-key activation-key-four-tuple command, replacing activation-key-four-tuple with the activation key obtained from Cisco. To access the TAC Website go to Flash memory. 1. Reboot the PIX Firewall by powering it off and then on again. After the key ...: https://192.168.1.1/startup.html • Enter the following website for detailed command information and configuration examples: http://www.cisco.com/univercd/cc/td/doc/product/iaabu/pix/pix_sw/v_62/cmdref/index.htm The Cisco TAC website is complete, the system reloads to update the running configuration.
...From the CLI, enter the activation-key activation-key-four-tuple command, replacing activation-key-four-tuple with the activation key obtained from Cisco. To access the TAC Website go to Flash memory. 1. Reboot the PIX Firewall by powering it off and then on again. After the key ...: https://192.168.1.1/startup.html • Enter the following website for detailed command information and configuration examples: http://www.cisco.com/univercd/cc/td/doc/product/iaabu/pix/pix_sw/v_62/cmdref/index.htm The Cisco TAC website is complete, the system reloads to update the running configuration.
User Guide
Page 1
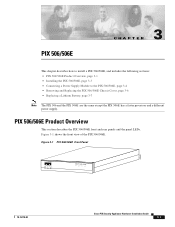
... Panel 67945 POWER ACT NETWORK CISCO PIX 506E F I R E WA L L 78-15170-02 Cisco PIX Security Appliance Hardware Installation Guide 3-1 PIX 506/506E Product Overview This section describes the PIX 506/506E front and rear panels and the panel LEDs. Figure 3-1 shows the front view of the PIX 506/506E. PIX 506/506E CH A P T E R 3 This chapter describes how to install a PIX 506/506E, and includes the following sections...
... Panel 67945 POWER ACT NETWORK CISCO PIX 506E F I R E WA L L 78-15170-02 Cisco PIX Security Appliance Hardware Installation Guide 3-1 PIX 506/506E Product Overview This section describes the PIX 506/506E front and rear panels and the panel LEDs. Figure 3-1 shows the front view of the PIX 506/506E. PIX 506/506E CH A P T E R 3 This chapter describes how to install a PIX 506/506E, and includes the following sections...
User Guide
Page 6
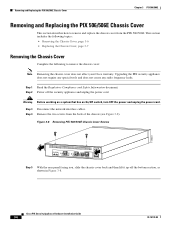
...security appliance and unplug the power cord. Cisco PIX Security Appliance Hardware Installation Guide 3-6 78-15170-02 Step 2 Power off the bottom section, as shown in Figure 3-8. Step 4 Remove the two screws from the PIX 506/506E. Step 3 Disconnect the network interface cables. Upgrading the PIX security appliance... the following to remove and replace the chassis cover from the back of the chassis (see Figure 3-8). Removing and Replacing the PIX 506/506E Chassis Cover Chapter 3 PIX 506/506E Removing and Replacing the PIX 506/506E Chassis Cover This section describes ...
...security appliance and unplug the power cord. Cisco PIX Security Appliance Hardware Installation Guide 3-6 78-15170-02 Step 2 Power off the bottom section, as shown in Figure 3-8. Step 4 Remove the two screws from the PIX 506/506E. Step 3 Disconnect the network interface cables. Upgrading the PIX security appliance... the following to remove and replace the chassis cover from the back of the chassis (see Figure 3-8). Removing and Replacing the PIX 506/506E Chassis Cover Chapter 3 PIX 506/506E Removing and Replacing the PIX 506/506E Chassis Cover This section describes ...
User Guide
Page 7
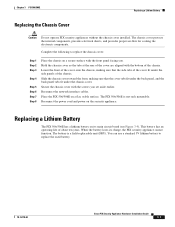
... components, prevents electrical shorts, and provides proper air-flow for cooling the electronic components. Complete the following to replace the used battery. 78-15170-02 Cisco PIX Security Appliance Hardware Installation Guide 3-7 Place the PIX 506/506E on the security appliance. Reconnect the power cord and power on a flat, stable surface. Reconnect the network interface cables. This battery has...
... components, prevents electrical shorts, and provides proper air-flow for cooling the electronic components. Complete the following to replace the used battery. 78-15170-02 Cisco PIX Security Appliance Hardware Installation Guide 3-7 Place the PIX 506/506E on the security appliance. Reconnect the power cord and power on a flat, stable surface. Reconnect the network interface cables. This battery has...
User Guide
Page 8
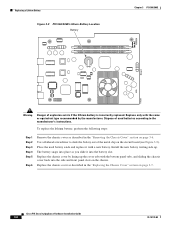
Replacing a Lithium Battery Figure 3-9 PIX 506/506E Lithium Battery Location Battery Chapter 3 PIX 506/506E Front 119680 Warning Danger of used battery aside and replace it into the battery slot. Install the new battery writing side up the cover tabs with the bottom panel ...as you slide it with the same or equivalent type recommended by lining up . Cisco PIX Security Appliance Hardware Installation Guide 3-8 78-15170-02 Dispose of explosion exists if the lithium battery is incorrectly replaced. Place the used batteries according to slide the battery out of the metal clip ...
Replacing a Lithium Battery Figure 3-9 PIX 506/506E Lithium Battery Location Battery Chapter 3 PIX 506/506E Front 119680 Warning Danger of used battery aside and replace it into the battery slot. Install the new battery writing side up the cover tabs with the bottom panel ...as you slide it with the same or equivalent type recommended by lining up . Cisco PIX Security Appliance Hardware Installation Guide 3-8 78-15170-02 Dispose of explosion exists if the lithium battery is incorrectly replaced. Place the used batteries according to slide the battery out of the metal clip ...