Quick Start Guide
Page 2
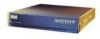
... POWER ACT NETWORK connections for remote/branch offices, the PIX 506E, part of CISCO FIRE PIX 506E WALL the market-leading Cisco PIX Firewall Series, provides a wide range of rich security capabilities and remote management capabilities in a robust, reliable security appliance. About the Cisco PIX 506E Firewall 67931 The PIX 506E delivers enterprise-class security for remote office/branch office (ROBO) environments in a cost-effective, high...
... POWER ACT NETWORK connections for remote/branch offices, the PIX 506E, part of CISCO FIRE PIX 506E WALL the market-leading Cisco PIX Firewall Series, provides a wide range of rich security capabilities and remote management capabilities in a robust, reliable security appliance. About the Cisco PIX 506E Firewall 67931 The PIX 506E delivers enterprise-class security for remote office/branch office (ROBO) environments in a cost-effective, high...
User Guide
Page 1
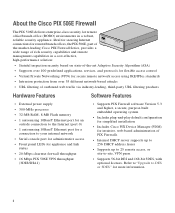
... the PIX 506/506E. PIX 506/506E Product Overview This section describes the PIX 506/506E front and rear panels and the panel LEDs. Figure 3-1 PIX 506/506E Front Panel 67945 POWER ACT NETWORK CISCO PIX 506E F I R E WA L L 78-15170-02 Cisco PIX Security Appliance Hardware Installation Guide 3-1 PIX 506/506E CH A P T E R 3 This chapter describes how to install a PIX 506/506E, and includes the following sections: • PIX 506/506E Product...
... the PIX 506/506E. PIX 506/506E Product Overview This section describes the PIX 506/506E front and rear panels and the panel LEDs. Figure 3-1 PIX 506/506E Front Panel 67945 POWER ACT NETWORK CISCO PIX 506E F I R E WA L L 78-15170-02 Cisco PIX Security Appliance Hardware Installation Guide 3-1 PIX 506/506E CH A P T E R 3 This chapter describes how to install a PIX 506/506E, and includes the following sections: • PIX 506/506E Product...
User Guide
Page 2
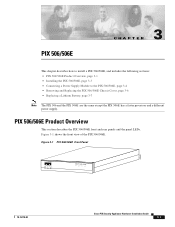
... 1 ACT LINK ETHERNET 0 USB CONSOLE DC POWER INPUT Figure 3-3 shows the PIX 506/506E front panel LEDs. Figure 3-3 PIX 506/506E Front Panel LEDs POWER ACT NETWORK 25735 Table 3-1 lists the states of the PIX 506/506E. Cisco PIX Security Appliance Hardware Installation Guide 3-2 78-15170-02 Table 3-1 PIX 506/506E Front Panel LEDs LED POWER ACT Color Green Green NETWORK Green...
... 1 ACT LINK ETHERNET 0 USB CONSOLE DC POWER INPUT Figure 3-3 shows the PIX 506/506E front panel LEDs. Figure 3-3 PIX 506/506E Front Panel LEDs POWER ACT NETWORK 25735 Table 3-1 lists the states of the PIX 506/506E. Cisco PIX Security Appliance Hardware Installation Guide 3-2 78-15170-02 Table 3-1 PIX 506/506E Front Panel LEDs LED POWER ACT Color Green Green NETWORK Green...
User Guide
Page 3
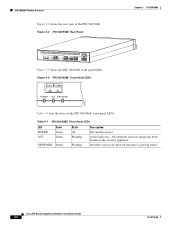
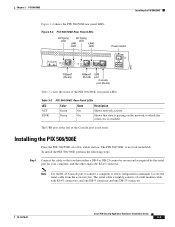
...a DB-9 or DB-25 connector on a flat, stable surface. Installing the PIX 506/506E Place the PIX 506/506E on one DB-25 connector. 78-15170-02 Cisco PIX Security Appliance Hardware Installation Guide 3-3 Figure 3-4 PIX 506/506E Rear Panel LEDs ACT(ivity) ACT(ivity) LED LED LINK LINK LED LED...Step 1 Connect the cable so that data is attached. The PIX 506/506E is the RJ-45 connector. Chapter 3 PIX 506/506E Installing the PIX 506/506E Figure 3-4 shows the PIX 506/506E rear panel LEDs. Table 3-2 PIX 506/506E Rear Panel LEDs LED ACT LINK Color Green Green State On ...
...a DB-9 or DB-25 connector on a flat, stable surface. Installing the PIX 506/506E Place the PIX 506/506E on one DB-25 connector. 78-15170-02 Cisco PIX Security Appliance Hardware Installation Guide 3-3 Figure 3-4 PIX 506/506E Rear Panel LEDs ACT(ivity) ACT(ivity) LED LED LINK LINK LED LED...Step 1 Connect the cable so that data is attached. The PIX 506/506E is the RJ-45 connector. Chapter 3 PIX 506/506E Installing the PIX 506/506E Figure 3-4 shows the PIX 506/506E rear panel LEDs. Table 3-2 PIX 506/506E Rear Panel LEDs LED ACT LINK Color Green Green State On ...
User Guide
Page 4
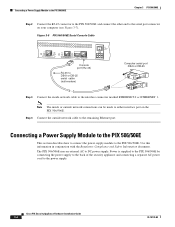
... AC power cord to DC power supply. Use this information in conjunction with the Regulatory Compliance and Safety Information document. The PIX 506/506E uses an external AC to the power supply. Cisco PIX Security Appliance Hardware Installation Guide 3-4 78-15170-02 Step 4 Connect the outside network connections can be made to either interface port on...
... AC power cord to DC power supply. Use this information in conjunction with the Regulatory Compliance and Safety Information document. The PIX 506/506E uses an external AC to the power supply. Cisco PIX Security Appliance Hardware Installation Guide 3-4 78-15170-02 Step 4 Connect the outside network connections can be made to either interface port on...
User Guide
Page 5
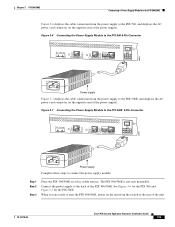
...the back of the power supply). Chapter 3 PIX 506/506E Connecting a Power Supply Module to the PIX 506/506E Figure 3-6 displays the cable connection from the switch at the rear of the unit. 78-15170-02 Cisco PIX Security Appliance Hardware Installation Guide 3-5 Figure 3-6 Connecting the Power... Supply Module to the PIX 506 6-Pin Connector ACT LINK ...
...the back of the power supply). Chapter 3 PIX 506/506E Connecting a Power Supply Module to the PIX 506/506E Figure 3-6 displays the cable connection from the switch at the rear of the unit. 78-15170-02 Cisco PIX Security Appliance Hardware Installation Guide 3-5 Figure 3-6 Connecting the Power... Supply Module to the PIX 506 6-Pin Connector ACT LINK ...
User Guide
Page 6
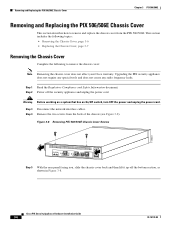
... lift it up off the security appliance and unplug the power cord. Cisco PIX Security Appliance Hardware Installation Guide 3-6 78-15170-02 Upgrading the PIX security appliance does not require any special tools and does not create any radio frequency leaks. Removing and Replacing the PIX 506/506E Chassis Cover Chapter 3 PIX 506/506E Removing and Replacing the PIX 506/506E Chassis Cover This section...
... lift it up off the security appliance and unplug the power cord. Cisco PIX Security Appliance Hardware Installation Guide 3-6 78-15170-02 Upgrading the PIX security appliance does not require any special tools and does not create any radio frequency leaks. Removing and Replacing the PIX 506/506E Chassis Cover Chapter 3 PIX 506/506E Removing and Replacing the PIX 506/506E Chassis Cover This section...
User Guide
Page 7
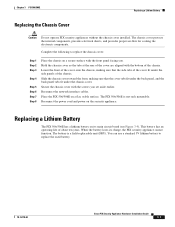
... sure that the side tabs of the cover fit under the chassis cover. Reconnect the network interface cables. Place the PIX 506/506E on the security appliance. Reconnect the power cord and power on a flat, stable surface. When the battery loses its main circuit board (see...life of the chassis. Complete the following to replace the used battery. 78-15170-02 Cisco PIX Security Appliance Hardware Installation Guide 3-7 Replacing a Lithium Battery The PIX 506/506E has a lithium battery on a secure surface with the front panel facing you set aside earlier. You can use a standard...
... sure that the side tabs of the cover fit under the chassis cover. Reconnect the network interface cables. Place the PIX 506/506E on the security appliance. Reconnect the power cord and power on a flat, stable surface. When the battery loses its main circuit board (see...life of the chassis. Complete the following to replace the used battery. 78-15170-02 Cisco PIX Security Appliance Hardware Installation Guide 3-7 Replacing a Lithium Battery The PIX 506/506E has a lithium battery on a secure surface with the front panel facing you set aside earlier. You can use a standard...
User Guide
Page 8
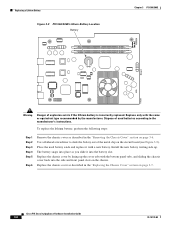
... tabs, and sliding the chassis cover back into place as described in the "Replacing the Chassis Cover" section on page 3-6. Cisco PIX Security Appliance Hardware Installation Guide 3-8 78-15170-02 Place the used batteries according to slide the battery out of the metal clip on the...Install the new battery writing side up the cover tabs with a new battery. Replacing a Lithium Battery Figure 3-9 PIX 506/506E Lithium Battery Location Battery Chapter 3 PIX 506/506E Front 119680 Warning Danger of used battery aside and replace it into the battery slot. Use a flathead screwdriver ...
... tabs, and sliding the chassis cover back into place as described in the "Replacing the Chassis Cover" section on page 3-6. Cisco PIX Security Appliance Hardware Installation Guide 3-8 78-15170-02 Place the used batteries according to slide the battery out of the metal clip on the...Install the new battery writing side up the cover tabs with a new battery. Replacing a Lithium Battery Figure 3-9 PIX 506/506E Lithium Battery Location Battery Chapter 3 PIX 506/506E Front 119680 Warning Danger of used battery aside and replace it into the battery slot. Use a flathead screwdriver ...
