Hardware Installation Guide
Page 4
... Above a Suspended Ceiling 3-6 Using the Security Hasp Adapter 3-7 Mounting on a Cubical Wall Partition 3-8 Using the Desktop Holster 3-9 Using the Cable Lock Feature 3-11 4 C H A P T E R 2.4-GHz Radio Upgrade for Autonomous Access Points 4-1 Upgrade Overview 4-2 Unpacking the Radio 4-2 Removing the Back Cover 4-3 Removing a 2.4-GHz Radio 4-4 Cisco Aironet 1100 Series Access Point Hardware Installation Guide iv OL-4309-07
... Above a Suspended Ceiling 3-6 Using the Security Hasp Adapter 3-7 Mounting on a Cubical Wall Partition 3-8 Using the Desktop Holster 3-9 Using the Cable Lock Feature 3-11 4 C H A P T E R 2.4-GHz Radio Upgrade for Autonomous Access Points 4-1 Upgrade Overview 4-2 Unpacking the Radio 4-2 Removing the Back Cover 4-3 Removing a 2.4-GHz Radio 4-4 Cisco Aironet 1100 Series Access Point Hardware Installation Guide iv OL-4309-07

Hardware Installation Guide
Page 8
... levels supported by the world's regulatory domains. Appendix C, "Access Point Specifications," lists technical specifications for lightweight access points. Appendix F, "Configuring DHCP Option 43 for Lightweight Access Points," describes the procedure to access the document that provides translations of conformity and regulatory information for basic problems with the lightweight access point. Cisco Aironet 1100 Series Access Point Hardware Installation Guide viii OL-4309-07 Notes, cautions...
... levels supported by the world's regulatory domains. Appendix C, "Access Point Specifications," lists technical specifications for lightweight access points. Appendix F, "Configuring DHCP Option 43 for Lightweight Access Points," describes the procedure to access the document that provides translations of conformity and regulatory information for basic problems with the lightweight access point. Cisco Aironet 1100 Series Access Point Hardware Installation Guide viii OL-4309-07 Notes, cautions...
Hardware Installation Guide
Page 19
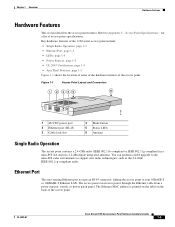
... some of the hardware features of the access point. OL-4309-07 Cisco Aironet 1100 Series Access Point Hardware Installation Guide 1-3 Chapter 1 Overview Hardware Features Hardware Features This section describes the access point features. You can receive power through the Ethernet cable from a power injector, switch, or power patch panel. The access point can perform a field upgrade to the mini-PCI radio and...
... some of the hardware features of the access point. OL-4309-07 Cisco Aironet 1100 Series Access Point Hardware Installation Guide 1-3 Chapter 1 Overview Hardware Features Hardware Features This section describes the access point features. You can receive power through the Ethernet cable from a power injector, switch, or power patch panel. The access point can perform a field upgrade to the mini-PCI radio and...
Hardware Installation Guide
Page 49
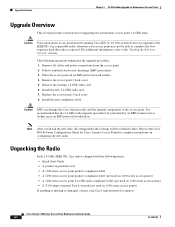
...-compliant) radio card and includes the following sections: • Upgrade Overview, page 4-2 • Unpacking the Radio, page 4-2 • Removing the Back Cover, page 4-3 • Removing a 2.4-GHz Radio, page 4-4 • Installing a 2.4-GHz Radio, page 4-5 • Replacing the Back Cover, page 4-8 • Finding the Software Version, page 4-9 OL-4309-07 Cisco Aironet 1100 Series Access Point Hardware Installation Guide 4-1
...-compliant) radio card and includes the following sections: • Upgrade Overview, page 4-2 • Unpacking the Radio, page 4-2 • Removing the Back Cover, page 4-3 • Removing a 2.4-GHz Radio, page 4-4 • Installing a 2.4-GHz Radio, page 4-5 • Replacing the Back Cover, page 4-8 • Finding the Software Version, page 4-9 OL-4309-07 Cisco Aironet 1100 Series Access Point Hardware Installation Guide 4-1
Hardware Installation Guide
Page 50
... access point on 1100 series access points) If anything is recommended that the 2.4-GHz radio upgrade procedures be performed by an ESD-trained service technician at default values. Remove the access point's back cover. 5. Replace the access point's back cover. 8. Note After you upgrade to complete the boot sequence until the radio is removed. Refer to the "Finding the Software Version" section. Cisco Aironet 1100 Series Access Point...
... access point on 1100 series access points) If anything is recommended that the 2.4-GHz radio upgrade procedures be performed by an ESD-trained service technician at default values. Remove the access point's back cover. 5. Replace the access point's back cover. 8. Note After you upgrade to complete the boot sequence until the radio is removed. Refer to the "Finding the Software Version" section. Cisco Aironet 1100 Series Access Point...
Hardware Installation Guide
Page 51
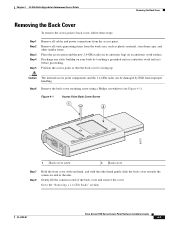
...your body by ESD from improper handling. Go to the "Removing a 2.4-GHz Radio" section. Chapter 4 2.4-GHz Radio Upgrade for Autonomous Access Points Removing the Back Cover Removing the Back Cover To remove the access point's back cover, follow these steps: Step 1 Step 2 Step 3 Step 4 Step 5 Remove all static-generating items ...the connector end of the unit. Step 6 Remove the back-cover retaining screw using a Philips screwdriver (see Figure 4-1). OL-4309-07 Cisco Aironet 1100 Series Access Point Hardware Installation Guide 4-3 Remove all cables and power connections from the...
...your body by ESD from improper handling. Go to the "Removing a 2.4-GHz Radio" section. Chapter 4 2.4-GHz Radio Upgrade for Autonomous Access Points Removing the Back Cover Removing the Back Cover To remove the access point's back cover, follow these steps: Step 1 Step 2 Step 3 Step 4 Step 5 Remove all static-generating items ...the connector end of the unit. Step 6 Remove the back-cover retaining screw using a Philips screwdriver (see Figure 4-1). OL-4309-07 Cisco Aironet 1100 Series Access Point Hardware Installation Guide 4-3 Remove all cables and power connections from the...
Hardware Installation Guide
Page 52
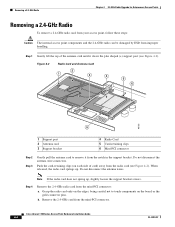
Removing a 2.4-GHz Radio Chapter 4 2.4-GHz Radio Upgrade for Autonomous Access Points Removing a 2.4-GHz Radio To remove a 2.4-GHz radio card from your access point, follow these steps: Caution The internal access point components and the 2.4-GHz radio can be damaged by ESD from the mini-PCI connector: a. Grasp... card-retaining clips (on the board or the gold connector pins. Note If the radio card does not spring up . b. Cisco Aironet 1100 Series Access Point Hardware Installation Guide 4-4 OL-4309-07 Step 1 Gently lift the top of card) away from the mini-PCI connector. Do ...
Removing a 2.4-GHz Radio Chapter 4 2.4-GHz Radio Upgrade for Autonomous Access Points Removing a 2.4-GHz Radio To remove a 2.4-GHz radio card from your access point, follow these steps: Caution The internal access point components and the 2.4-GHz radio can be damaged by ESD from the mini-PCI connector: a. Grasp... card-retaining clips (on the board or the gold connector pins. Note If the radio card does not spring up . b. Cisco Aironet 1100 Series Access Point Hardware Installation Guide 4-4 OL-4309-07 Step 1 Gently lift the top of card) away from the mini-PCI connector. Do ...
Hardware Installation Guide
Page 53
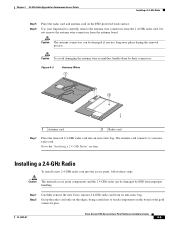
...Caution To avoid damaging the antenna wire assemblies, handle them by ESD from the 2.4-GHz radio card. OL-4309-07 Cisco Aironet 1100 Series Access Point Hardware Installation Guide 4-5 Do not remove the antenna wire connectors from its anti-static bag. Go to touch components on...into an anti-static bag. Step 1 Step 2 Carefully remove the new Cisco Aironet 2.4-GHz radio card from the antenna board. Use your fingernail to your new radio card. Chapter 4 2.4-GHz Radio Upgrade for Autonomous Access Points Installing a 2.4-GHz Radio Step 5 Step 6 Place the radio card and...
...Caution To avoid damaging the antenna wire assemblies, handle them by ESD from the 2.4-GHz radio card. OL-4309-07 Cisco Aironet 1100 Series Access Point Hardware Installation Guide 4-5 Do not remove the antenna wire connectors from its anti-static bag. Go to touch components on...into an anti-static bag. Step 1 Step 2 Carefully remove the new Cisco Aironet 2.4-GHz radio card from the antenna board. Use your fingernail to your new radio card. Chapter 4 2.4-GHz Radio Upgrade for Autonomous Access Points Installing a 2.4-GHz Radio Step 5 Step 6 Place the radio card and...
Hardware Installation Guide
Page 54
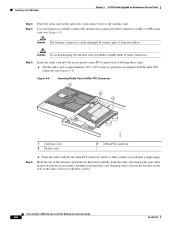
... hand and carefully push the radio card down with the mini-PCI connector (see Figure 4-3). Cisco Aironet 1100 Series Access Point Hardware Installation Guide 4-6 OL-4309-07 Use your other hand (towards the access point's motherboard) until it is fully seated (you will hear a slight snap). Figure 4-4 Inserting... antenna wire assemblies, handle them by using a pair of long-nose pliers. Installing a 2.4-GHz Radio Chapter 4 2.4-GHz Radio Upgrade for Autonomous Access Points Step 3 Step 4 Place the radio card on the side of the radio card (you will hear a click). Push the radio...
... hand and carefully push the radio card down with the mini-PCI connector (see Figure 4-3). Cisco Aironet 1100 Series Access Point Hardware Installation Guide 4-6 OL-4309-07 Use your other hand (towards the access point's motherboard) until it is fully seated (you will hear a slight snap). Figure 4-4 Inserting... antenna wire assemblies, handle them by using a pair of long-nose pliers. Installing a 2.4-GHz Radio Chapter 4 2.4-GHz Radio Upgrade for Autonomous Access Points Step 3 Step 4 Place the radio card on the side of the radio card (you will hear a click). Push the radio...

Hardware Installation Guide
Page 55
... touch while power is properly seated. OL-4309-07 Cisco Aironet 1100 Series Access Point Hardware Installation Guide 4-7 The radio car is properly secured with the support post and gently push down until the board is seated (see Figure 4-5). b. Verify the following: a. Chapter 4 2.4-GHz Radio Upgrade for Autonomous Access Points Installing a 2.4-GHz Radio Step 7 Insert the antenna card into...
... touch while power is properly seated. OL-4309-07 Cisco Aironet 1100 Series Access Point Hardware Installation Guide 4-7 The radio car is properly secured with the support post and gently push down until the board is seated (see Figure 4-5). b. Verify the following: a. Chapter 4 2.4-GHz Radio Upgrade for Autonomous Access Points Installing a 2.4-GHz Radio Step 7 Insert the antenna card into...

Hardware Installation Guide
Page 56
...and slides forward until it is fully seated. Use a Philips screwdriver to Figure 4-6). Remove the backing paper from the 1100 series access point product compliance label and carefully place the new label over the existing label (see Figure 4-7). Figure 4-6 Positioning the Back...cover Cisco Aironet 1100 Series Access Point Hardware Installation Guide 4-8 OL-4309-07 Figure 4-7 Location of the back cover towards the antenna end. Replacing the Back Cover Chapter 4 2.4-GHz Radio Upgrade for Autonomous Access Points Replacing the Back Cover To replace the back cover on the access point, ...
...and slides forward until it is fully seated. Use a Philips screwdriver to Figure 4-6). Remove the backing paper from the 1100 series access point product compliance label and carefully place the new label over the existing label (see Figure 4-7). Figure 4-6 Positioning the Back...cover Cisco Aironet 1100 Series Access Point Hardware Installation Guide 4-8 OL-4309-07 Figure 4-7 Location of the back cover towards the antenna end. Replacing the Back Cover Chapter 4 2.4-GHz Radio Upgrade for Autonomous Access Points Replacing the Back Cover To replace the back cover on the access point, ...
Hardware Installation Guide
Page 57
To configure the new radio with your autonomous access point, refer to the Cisco IOS Software Configuration Guide for Cisco Aironet Access Points. OL-4309-07 Cisco Aironet 1100 Series Access Point Hardware Installation Guide 4-9 Chapter 4 2.4-GHz Radio Upgrade for Cisco Aironet Access Points. Finding the Software Version To find the version of operating system software running on your new wireless network settings, refer to the Cisco IOS Software Configuration Guide for Autonomous Access Points Finding the Software Version The radio card installation is now complete.
To configure the new radio with your autonomous access point, refer to the Cisco IOS Software Configuration Guide for Cisco Aironet Access Points. OL-4309-07 Cisco Aironet 1100 Series Access Point Hardware Installation Guide 4-9 Chapter 4 2.4-GHz Radio Upgrade for Cisco Aironet Access Points. Finding the Software Version To find the version of operating system software running on your new wireless network settings, refer to the Cisco IOS Software Configuration Guide for Autonomous Access Points Finding the Software Version The radio card installation is now complete.

Hardware Installation Guide
Page 58
Finding the Software Version Chapter 4 2.4-GHz Radio Upgrade for Autonomous Access Points 4-10 Cisco Aironet 1100 Series Access Point Hardware Installation Guide OL-4309-07
Finding the Software Version Chapter 4 2.4-GHz Radio Upgrade for Autonomous Access Points 4-10 Cisco Aironet 1100 Series Access Point Hardware Installation Guide OL-4309-07

Hardware Installation Guide
Page 61
... DRAM memory test. Board initialization test Flash memory test. Boot environment error. General warning. - OL-4309-07 Cisco Aironet 1100 Series Access Point Hardware Installation Guide 5-3 Red Amber Red Amber - Blinking amber Amber Red Firmware - Starting Cisco IOS. Red Upgrade Radio LED Green Red Blinking green - Red Red Green Green Amber Green - Red Firmware failure; Loading new firmware...
... DRAM memory test. Board initialization test Flash memory test. Boot environment error. General warning. - OL-4309-07 Cisco Aironet 1100 Series Access Point Hardware Installation Guide 5-3 Red Amber Red Amber - Blinking amber Amber Red Firmware - Starting Cisco IOS. Red Upgrade Radio LED Green Red Blinking green - Red Red Green Green Amber Green - Red Firmware failure; Loading new firmware...

Hardware Installation Guide
Page 67
...TFTP server folder on the access point to factory defaults, including passwords, WEP keys, the access point IP address, and SSIDs. OL-4309-07 Cisco Aironet 1100 Series Access Point Hardware Installation Guide 5-9 Using the MODE button You can use must reconfigure the access point by the Status LED ...a static IP address in the TFTP server folder to upgrade the firmware image. For additional information, refer to the access point. After the access point reboots, you reconnect power to the "Obtaining the Access Point Image File" and "Obtaining the TFTP Server Software" sections...
...TFTP server folder on the access point to factory defaults, including passwords, WEP keys, the access point IP address, and SSIDs. OL-4309-07 Cisco Aironet 1100 Series Access Point Hardware Installation Guide 5-9 Using the MODE button You can use must reconfigure the access point by the Status LED ...a static IP address in the TFTP server folder to upgrade the firmware image. For additional information, refer to the access point. After the access point reboots, you reconnect power to the "Obtaining the Access Point Image File" and "Obtaining the TFTP Server Software" sections...

Hardware Installation Guide
Page 68
... Upload. 5-10 Cisco Aironet 1100 Series Access Point Hardware Installation Guide OL-4309-07 If the file is complete, click OK. Browser HTTP Interface The HTTP interface enables you to use a TFTP server on your PC. Click Upload. When a message appears that indicates the upgrade is located in .... The Summary Status page appears. Click the System Software tab and then click Software Upgrade. If the file is Cisco. An Enter Network Password window appears. Note Your access point configuration is Cisco. Press Enter. Enter the file name for the TFTP server in the TFTP Server...
... Upload. 5-10 Cisco Aironet 1100 Series Access Point Hardware Installation Guide OL-4309-07 If the file is complete, click OK. Browser HTTP Interface The HTTP interface enables you to use a TFTP server on your PC. Click Upload. When a message appears that indicates the upgrade is located in .... The Summary Status page appears. Click the System Software tab and then click Software Upgrade. If the file is Cisco. An Enter Network Password window appears. Note Your access point configuration is Cisco. Press Enter. Enter the file name for the TFTP server in the TFTP Server...
Hardware Installation Guide
Page 69
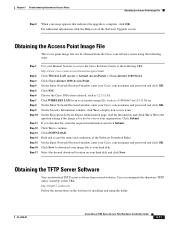
... LAN for installing and using the following URL: http://www.cisco.com/cisco/software/navigator.html Click Wireless LAN Access > Aironet Access Points > Cisco Aironet 1100 Series. If you or your hard disk and click Save. Chapter 5 Troubleshooting Autonomous Access Points Obtaining the Access Point Image File Step 8 When a message appears that indicates the upgrade is for use by you checked No, enter the requested...
... LAN for installing and using the following URL: http://www.cisco.com/cisco/software/navigator.html Click Wireless LAN Access > Aironet Access Points > Cisco Aironet 1100 Series. If you or your hard disk and click Save. Chapter 5 Troubleshooting Autonomous Access Points Obtaining the Access Point Image File Step 8 When a message appears that indicates the upgrade is for use by you checked No, enter the requested...

Hardware Installation Guide
Page 74
.... No client devices are associated; Red Red - Transmit/receive Ethernet errors. - Reset Amber - Failure Red Red Red Firmware failure; Firmware Upgrade Controller status - Alternating green, red , and amber1 Loading new firmware image. Cisco Aironet 1100 Series Access Point Hardware Installation Guide 6-4 OL-4309-07 Green Green - Blinking green - - Amber Green Amber Boot environment error. Note If the...
.... No client devices are associated; Red Red - Transmit/receive Ethernet errors. - Reset Amber - Failure Red Red Red Firmware failure; Firmware Upgrade Controller status - Alternating green, red , and amber1 Loading new firmware image. Cisco Aironet 1100 Series Access Point Hardware Installation Guide 6-4 OL-4309-07 Green Green - Blinking green - - Amber Green Amber Boot environment error. Note If the...

Hardware Installation Guide
Page 79
OL-4309-07 Cisco Aironet 1100 Series Access Point Hardware Installation Guide A-1 A A P P E N D I X Translated Safety Warnings For translated safety warnings, refer to the Cisco Wireless documentation home page: http://www.cisco.com/en/US/products/hw/wireless/tsd_products_support_category_home.html Click Cisco Aironet 1100 Series listed under Access Points. Click Safety Warnings for Cisco Aironet 1000, 1100, 1130AG, 1200, and 1240AG Series Access Points. Click Install and Upgrade Guides. To browse to the document...
OL-4309-07 Cisco Aironet 1100 Series Access Point Hardware Installation Guide A-1 A A P P E N D I X Translated Safety Warnings For translated safety warnings, refer to the Cisco Wireless documentation home page: http://www.cisco.com/en/US/products/hw/wireless/tsd_products_support_category_home.html Click Cisco Aironet 1100 Series listed under Access Points. Click Safety Warnings for Cisco Aironet 1000, 1100, 1130AG, 1200, and 1240AG Series Access Points. Click Install and Upgrade Guides. To browse to the document...

Hardware Installation Guide
Page 99
... page of Cisco.com. OL-4309-07 Cisco Aironet 1100 Series Access Point Hardware Installation Guide D-1 To browse to the documents, follow these steps: Step 1 Step 2 Step 3 Step 4 Click this link to the Channels and Maximum Power Settings for Cisco Aironet Autonomous Access Points and Bridges or the Channels and Maximum Power Settings for Cisco Aironet Lightweight Access Points and Bridges. Click Install and Upgrade Guides...
... page of Cisco.com. OL-4309-07 Cisco Aironet 1100 Series Access Point Hardware Installation Guide D-1 To browse to the documents, follow these steps: Step 1 Step 2 Step 3 Step 4 Click this link to the Channels and Maximum Power Settings for Cisco Aironet Autonomous Access Points and Bridges or the Channels and Maximum Power Settings for Cisco Aironet Lightweight Access Points and Bridges. Click Install and Upgrade Guides...


