User Guide
Page 1
... Cisco ONS 15530 chassis and its components. Before Installing Before you install the Cisco ONS 15530, you must complete the following sections: • Before Installing, page 2-1 • Chassis-Lifting Guidelines, page 2-2 • Rack-Mounting the Shelf, page 2-4 • Grounding the Shelf, page 2-14 • Installing and Removing Line Cards or Motherboards, page 2-17 • Installing and Removing Modules, page 2-24 • Replacing...
... Cisco ONS 15530 chassis and its components. Before Installing Before you install the Cisco ONS 15530, you must complete the following sections: • Before Installing, page 2-1 • Chassis-Lifting Guidelines, page 2-2 • Rack-Mounting the Shelf, page 2-4 • Grounding the Shelf, page 2-14 • Installing and Removing Line Cards or Motherboards, page 2-17 • Installing and Removing Modules, page 2-24 • Replacing...
User Guide
Page 3
...LINK T X R X T 6X R X 6 T X R X 6 T X R X T 7X R X 7 T X R X 7 T X R X T 8 X R X T 8 X R X 8 T X R X T X 9 R X T X 9 R X 9 STATUS STATUS STATUS FAIL OPFEURFLAALTYSINTEGENNTGEHAREGSEPDMOWUPSRETRIOBSREUTPOPLY GOOD 100-240V 8.0-3.5A 50-60HZ 15530-LCMB-0200 15530-LCMB-0200 15530-LCMB-0200 15530-CPU AUX 15530-CPU AUX 15530-LCMB-0200 15530-LCMB-0200 77694 OL-7706-01 Cisco ONS 15530 Hardware Installation Guide 2-3 Chapter 2 Installing the Cisco ONS 15530 Chassis-Lifting Guidelines • Lift the chassis slowly; With the other hand, grasp the handle on...
...LINK T X R X T 6X R X 6 T X R X 6 T X R X T 7X R X 7 T X R X 7 T X R X T 8 X R X T 8 X R X 8 T X R X T X 9 R X T X 9 R X 9 STATUS STATUS STATUS FAIL OPFEURFLAALTYSINTEGENNTGEHAREGSEPDMOWUPSRETRIOBSREUTPOPLY GOOD 100-240V 8.0-3.5A 50-60HZ 15530-LCMB-0200 15530-LCMB-0200 15530-LCMB-0200 15530-CPU AUX 15530-CPU AUX 15530-LCMB-0200 15530-LCMB-0200 77694 OL-7706-01 Cisco ONS 15530 Hardware Installation Guide 2-3 Chapter 2 Installing the Cisco ONS 15530 Chassis-Lifting Guidelines • Lift the chassis slowly; With the other hand, grasp the handle on...
User Guide
Page 4
...-60HZ 15530-LCMB-0200 15530-LCMB-0200 15530-LCMB-0200 15530-CPU AUX 15530-CPU AUX 15530-LCMB-0200 15530-LCMB-0200 77693 Rack-Mounting the Shelf Rack-mounting the shelf is the preferred method of installations: • General Rack-Mount Installation Guidelines, page 2-5 • Flush-Mounting the Cisco ONS 15530 CHAS-N in a 19-Inch Rack, page 2-5 • Flush-Mounting the Cisco ONS 15530 CHAS-E in a 21-Inch Rack, page 2-7 Cisco ONS 15530 Hardware Installation Guide 2-4 OL...
...-60HZ 15530-LCMB-0200 15530-LCMB-0200 15530-LCMB-0200 15530-CPU AUX 15530-CPU AUX 15530-LCMB-0200 15530-LCMB-0200 77693 Rack-Mounting the Shelf Rack-mounting the shelf is the preferred method of installations: • General Rack-Mount Installation Guidelines, page 2-5 • Flush-Mounting the Cisco ONS 15530 CHAS-N in a 19-Inch Rack, page 2-5 • Flush-Mounting the Cisco ONS 15530 CHAS-E in a 21-Inch Rack, page 2-7 Cisco ONS 15530 Hardware Installation Guide 2-4 OL...

User Guide
Page 5
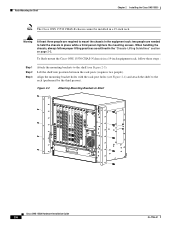
... the line cards and CPU switch modules. Chapter 2 Installing the Cisco ONS 15530 Rack-Mounting the Shelf General Rack-Mount Installation Guidelines When planning your rack-mount installation, consider the following parts: • Two mounting brackets and screws • Cable management brackets • Optional 23-inch rack-mount brackets OL-7706-01 Cisco ONS 15530 Hardware Installation Guide 2-5 Flush-Mounting the Cisco ONS 15530...
... the line cards and CPU switch modules. Chapter 2 Installing the Cisco ONS 15530 Rack-Mounting the Shelf General Rack-Mount Installation Guidelines When planning your rack-mount installation, consider the following parts: • Two mounting brackets and screws • Cable management brackets • Optional 23-inch rack-mount brackets OL-7706-01 Cisco ONS 15530 Hardware Installation Guide 2-5 Flush-Mounting the Cisco ONS 15530...
User Guide
Page 6
...X HICSTLR CUTOFF R 4 T X X R X 5 T X R 5 X T X 1F00DMXBPS LINK T R X 5 X R X T 6X R X 6 T X T R X 6 X R X T 7X R X 7 T X T R X 7 X R X T 8 X R X 8 T X R X T X 9 R X 9 STATUS STATUS STATUS FAIL OPFEURFLAALTYSINTEGENNTGEHAREGSEPDMOWUPSRETRIOBSREUTPOPLY GOOD 100-240V 8.0-3.5A 50-60HZ 15530-FCGE-8P 15530-LCMB-0200 15530-LCMB-0200 15530-CPU AUX 15530-CPU AUX 15530-LCMB-0200 15530-LCMB-0200 FASNTATUS 77898 Cisco ONS 15530 Hardware Installation Guide 2-6 OL-7706-01 Align the mounting bracket holes with the rack post holes (see Figure 2-3). Lift the...
...X HICSTLR CUTOFF R 4 T X X R X 5 T X R 5 X T X 1F00DMXBPS LINK T R X 5 X R X T 6X R X 6 T X T R X 6 X R X T 7X R X 7 T X T R X 7 X R X T 8 X R X 8 T X R X T X 9 R X 9 STATUS STATUS STATUS FAIL OPFEURFLAALTYSINTEGENNTGEHAREGSEPDMOWUPSRETRIOBSREUTPOPLY GOOD 100-240V 8.0-3.5A 50-60HZ 15530-FCGE-8P 15530-LCMB-0200 15530-LCMB-0200 15530-CPU AUX 15530-CPU AUX 15530-LCMB-0200 15530-LCMB-0200 FASNTATUS 77898 Cisco ONS 15530 Hardware Installation Guide 2-6 OL-7706-01 Align the mounting bracket holes with the rack post holes (see Figure 2-3). Lift the...
User Guide
Page 7
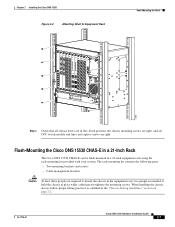
OL-7706-01 Cisco ONS 15530 Hardware Installation Guide 2-7 Flush-Mounting the Cisco ONS 15530 CHAS-E in a 21-Inch Rack The Cisco ONS 15530 CHAS-E can be flush-mounted in the "Chassis-Lifting Guidelines" section on page 2-2. When ...50-60HZ 15530-LCMB-0200 15530-LCMB-0200 15530-LCMB-0200 15530-CPU AUX 15530-CPU AUX 15530-LCMB-0200 15530-LCMB-0200 FASNTATUS 77899 Step 4 Check that all release levers are in the closed position, the chassis mounting screws are tight, and all CPU switch module and line card captive screws are tight. Chapter 2 Installing the Cisco ONS 15530 Figure 2-4...
OL-7706-01 Cisco ONS 15530 Hardware Installation Guide 2-7 Flush-Mounting the Cisco ONS 15530 CHAS-E in a 21-Inch Rack The Cisco ONS 15530 CHAS-E can be flush-mounted in the "Chassis-Lifting Guidelines" section on page 2-2. When ...50-60HZ 15530-LCMB-0200 15530-LCMB-0200 15530-LCMB-0200 15530-CPU AUX 15530-CPU AUX 15530-LCMB-0200 15530-LCMB-0200 FASNTATUS 77899 Step 4 Check that all release levers are in the closed position, the chassis mounting screws are tight, and all CPU switch module and line card captive screws are tight. Chapter 2 Installing the Cisco ONS 15530 Figure 2-4...

User Guide
Page 9
... 0 0 0 1 1 1E 3 3 E 3 5 5 5 8 8 FAIL OPFEURFLAALTYSINTEGENNTGEHAREGSEPDMOWUPSRETRIOBSREUTPOPLY GOOD A H 15530-FCGE-8P 15530-C-000 15530-C-000 15530-CP AU 15530-CP AU 15530-C-000 15530-C-000 FASNTATUS Step 4 Step 5 Check that all release levers are in the closed position, the chassis mounting screws are tight, and all CPU switch module and line card captive screws are tight. Chapter 2 Installing the Cisco ONS 15530 Figure 2-6 Attaching Shelf to...
... 0 0 0 1 1 1E 3 3 E 3 5 5 5 8 8 FAIL OPFEURFLAALTYSINTEGENNTGEHAREGSEPDMOWUPSRETRIOBSREUTPOPLY GOOD A H 15530-FCGE-8P 15530-C-000 15530-C-000 15530-CP AU 15530-CP AU 15530-C-000 15530-C-000 FASNTATUS Step 4 Step 5 Check that all release levers are in the closed position, the chassis mounting screws are tight, and all CPU switch module and line card captive screws are tight. Chapter 2 Installing the Cisco ONS 15530 Figure 2-6 Attaching Shelf to...
User Guide
Page 12
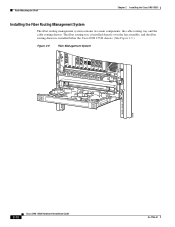
... the fan assembly, and the fiber routing drawer is installed below the Cisco ONS 15530 chassis. (See Figure 2-9.) Figure 2-9 Fiber Management System T X T R X X R X T X T R X X R X T X T R X X T R X X R X T X T R X X T R X X R X 15530-LCMB-0200 15530-LCMB-0200 15530-LCMB-0200 15530-CPU AUX 15530-CPU AUX 15530-LCMB-0200 15530-LCMB-0200 85009 2-12 Cisco ONS 15530 Hardware Installation Guide OL-7706-01 Rack-Mounting the Shelf Chapter 2 Installing the Cisco ONS 15530 Installing the Fiber Routing Management System The fiber routing management system...
... the fan assembly, and the fiber routing drawer is installed below the Cisco ONS 15530 chassis. (See Figure 2-9.) Figure 2-9 Fiber Management System T X T R X X R X T X T R X X R X T X T R X X T R X X R X T X T R X X T R X X R X 15530-LCMB-0200 15530-LCMB-0200 15530-LCMB-0200 15530-CPU AUX 15530-CPU AUX 15530-LCMB-0200 15530-LCMB-0200 85009 2-12 Cisco ONS 15530 Hardware Installation Guide OL-7706-01 Rack-Mounting the Shelf Chapter 2 Installing the Cisco ONS 15530 Installing the Fiber Routing Management System The fiber routing management system...
User Guide
Page 13
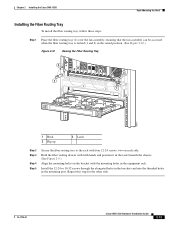
...install the fiber routing tray, follow these steps: Step 1 Place the fiber routing tray (2) over the fan assembly, ensuring that the fan assembly can be accessed when the fiber routing tray is locked (1 and 2) in the raised position. (See Figure 2-10.) Figure 2-10 Raising the Fiber Routing Tray 3 1 15530-LCMB-0200 15530-LCMB-0200 15530-LCMB-0200 15530-CPU AUX 15530... both hands and position it in the rack beneath the chassis. (See Figure 2-9.) Align the mounting holes on each side. OL-7706-01 Cisco ONS 15530 Hardware Installation Guide 2-13 Repeat this step for the other side.
...install the fiber routing tray, follow these steps: Step 1 Place the fiber routing tray (2) over the fan assembly, ensuring that the fan assembly can be accessed when the fiber routing tray is locked (1 and 2) in the raised position. (See Figure 2-10.) Figure 2-10 Raising the Fiber Routing Tray 3 1 15530-LCMB-0200 15530-LCMB-0200 15530-LCMB-0200 15530-CPU AUX 15530... both hands and position it in the rack beneath the chassis. (See Figure 2-9.) Align the mounting holes on each side. OL-7706-01 Cisco ONS 15530 Hardware Installation Guide 2-13 Repeat this step for the other side.
User Guide
Page 15
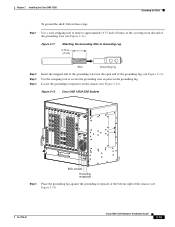
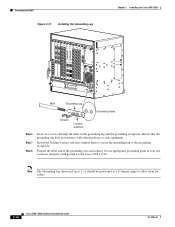
... end of the grounding wire into the open end of the grounding lug (see Figure 2-11). OL-7706-01 Cisco ONS 15530 Hardware Installation Guide 2-15 Figure 2-12 Cisco ONS 15530 ESD Sockets STATUS STATUS STATUS STATUS STATUS STATUS E A E S TT X A S TT TR X XX TR...15530-LCMB-0200 15530-LCMB-0200 15530-LCMB-0200 15530-CPU AUX 15530-CPU AUX 15530-LCMB-0200 15530-LCMB-0200 77692 FASNTATUS ESD sockets Grounding receptacle Step 5 Place the grounding lug against the grounding receptacle at the bottom right of the chassis (see Figure 2-12). Chapter 2 Installing the Cisco ONS 15530...
... end of the grounding wire into the open end of the grounding lug (see Figure 2-11). OL-7706-01 Cisco ONS 15530 Hardware Installation Guide 2-15 Figure 2-12 Cisco ONS 15530 ESD Sockets STATUS STATUS STATUS STATUS STATUS STATUS E A E S TT X A S TT TR X XX TR...15530-LCMB-0200 15530-LCMB-0200 15530-LCMB-0200 15530-CPU AUX 15530-CPU AUX 15530-LCMB-0200 15530-LCMB-0200 77692 FASNTATUS ESD sockets Grounding receptacle Step 5 Place the grounding lug against the grounding receptacle at the bottom right of the chassis (see Figure 2-12). Chapter 2 Installing the Cisco ONS 15530...
User Guide
Page 16
... earth ground for cables. 2-16 Cisco ONS 15530 Hardware Installation Guide OL-7706-01 Grounding the Shelf Figure 2-13 Installing the Grounding Lug Chapter 2 Installing the Cisco ONS 15530 STATUS STATUS STATUS STATUS STATUS STATUS ...15530-LCMB-0200 15530-LCMB-0200 15530-LCMB-0200 15530-CPU AUX 15530-CPU AUX 15530-LCMB-0200 15530-LCMB-0200 FASNTATUS 79144 Wire Grounding lug Grounding holes Screws Locking washers Step 6 Step 7 Step 8 Insert two screws through the holes in Figure 2-13 should be positioned at a 45 degree angle to allow room for the Cisco ONS 15530. Install...
... earth ground for cables. 2-16 Cisco ONS 15530 Hardware Installation Guide OL-7706-01 Grounding the Shelf Figure 2-13 Installing the Grounding Lug Chapter 2 Installing the Cisco ONS 15530 STATUS STATUS STATUS STATUS STATUS STATUS ...15530-LCMB-0200 15530-LCMB-0200 15530-LCMB-0200 15530-CPU AUX 15530-CPU AUX 15530-LCMB-0200 15530-LCMB-0200 FASNTATUS 79144 Wire Grounding lug Grounding holes Screws Locking washers Step 6 Step 7 Step 8 Insert two screws through the holes in Figure 2-13 should be positioned at a 45 degree angle to allow room for the Cisco ONS 15530. Install...
User Guide
Page 17
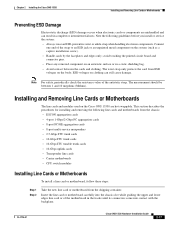
... shipping container. This section describes the procedures for installing and removing the following guidelines before you install or service the system: • Always wear an ESD-preventive wrist or ankle strap when handling electronic components. OL-7706-01 Cisco ONS 15530 Hardware Installation Guide 2-17 Installing and Removing Line Cards or Motherboards The line cards and modules used on the body; avoid...
... shipping container. This section describes the procedures for installing and removing the following guidelines before you install or service the system: • Always wear an ESD-preventive wrist or ankle strap when handling electronic components. OL-7706-01 Cisco ONS 15530 Hardware Installation Guide 2-17 Installing and Removing Line Cards or Motherboards The line cards and modules used on the body; avoid...
User Guide
Page 18
... until you must attach the cable to lock the line card or motherboard into the 8-port multi-service muxponder. 2-18 Cisco ONS 15530 Hardware Installation Guide OL-7706-01 Use a number 1 Philips screwdriver to pull the line card or motherboard out of the chassis. Installing and Removing Line Cards or Motherboards Chapter 2 Installing the Cisco ONS 15530 Step 3 Step 4 Step 5 Step 6 Use the release levers...
... until you must attach the cable to lock the line card or motherboard into the 8-port multi-service muxponder. 2-18 Cisco ONS 15530 Hardware Installation Guide OL-7706-01 Use a number 1 Philips screwdriver to pull the line card or motherboard out of the chassis. Installing and Removing Line Cards or Motherboards Chapter 2 Installing the Cisco ONS 15530 Step 3 Step 4 Step 5 Step 6 Use the release levers...

User Guide
Page 19
... coax connector (for 8-port multi-service muxponders) Each connector requires a different method of the cage. (See Figure 2-15.) OL-7706-01 Cisco ONS 15530 Hardware Installation Guide 2-19 Use your right hand to pull the pull tab on your module. Chapter 2 Installing the Cisco ONS 15530 Installing and Removing Line Cards or Motherboards Figure 2-14 Installing the 15500-XVRA-10E1 SFP 113974...
... coax connector (for 8-port multi-service muxponders) Each connector requires a different method of the cage. (See Figure 2-15.) OL-7706-01 Cisco ONS 15530 Hardware Installation Guide 2-19 Use your right hand to pull the pull tab on your module. Chapter 2 Installing the Cisco ONS 15530 Installing and Removing Line Cards or Motherboards Figure 2-14 Installing the 15500-XVRA-10E1 SFP 113974...

User Guide
Page 20
...to push on the SFP out. Pull the SFP out and place it in a container appropriate for shipping and storage. 2-20 Cisco ONS 15530 Hardware Installation Guide OL-7706-01 Pull the latch on the hinge pin to unlock the SFP cage latch and pull the SFP out from SFP ...3 Remove the cable from the latch lock of the cage. This releases the SFP from the desired SFP. Installing and Removing Line Cards or Motherboards Figure 2-15 Releasing the SFP Chapter 2 Installing the Cisco ONS 15530 120369 Step 5 Pull the SFP out and place it in a container appropriate for shipping and storage. (See...
...to push on the SFP out. Pull the SFP out and place it in a container appropriate for shipping and storage. 2-20 Cisco ONS 15530 Hardware Installation Guide OL-7706-01 Pull the latch on the hinge pin to unlock the SFP cage latch and pull the SFP out from SFP ...3 Remove the cable from the latch lock of the cage. This releases the SFP from the desired SFP. Installing and Removing Line Cards or Motherboards Figure 2-15 Releasing the SFP Chapter 2 Installing the Cisco ONS 15530 120369 Step 5 Pull the SFP out and place it in a container appropriate for shipping and storage. (See...

User Guide
Page 21
...Note You need the SFP extraction and cable installation and removal tool to release it is installed, and removal of cables is required before removing the SFP from the module. (See Figure 2-17.) OL-7706-01 Cisco ONS 15530 Hardware Installation Guide 2-21 Remove the SFP from the module ... SFP with an MT-RJ connector from the ESCON aggregation card, follow these steps: Step 1 Step 2 Remove the cable from the desired SFP. To remove an SFP with the MT-RJ connector. Chapter 2 Installing the Cisco ONS 15530 Installing and Removing Line Cards or Motherboards Note SFPs with RJ-45 connectors ...
...Note You need the SFP extraction and cable installation and removal tool to release it is installed, and removal of cables is required before removing the SFP from the module. (See Figure 2-17.) OL-7706-01 Cisco ONS 15530 Hardware Installation Guide 2-21 Remove the SFP from the module ... SFP with an MT-RJ connector from the ESCON aggregation card, follow these steps: Step 1 Step 2 Remove the cable from the desired SFP. To remove an SFP with the MT-RJ connector. Chapter 2 Installing the Cisco ONS 15530 Installing and Removing Line Cards or Motherboards Note SFPs with RJ-45 connectors ...
User Guide
Page 22
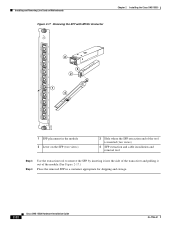
Installing and Removing Line Cards or Motherboards Figure 2-17 Removing the SFP with MT-RJ Connector Chapter 2 Installing the Cisco ONS 15530 STATUS T 0 X R X T 1 X R X T 2 X R X 3 T X R X 4 T X R X T 5 X R X 1 T 6 X R X T 7 X R X T 8 X R X T 9 X R X 2 3 2 4 15530-LCMB-0200 94102 1 SFP placement in the module 2 Lever on the SFP (two views) 3 Hole where the SFP extraction end of the tool is inserted (two views) 4 SFP extraction and cable installation and removal tool Step 3 Step...
Installing and Removing Line Cards or Motherboards Figure 2-17 Removing the SFP with MT-RJ Connector Chapter 2 Installing the Cisco ONS 15530 STATUS T 0 X R X T 1 X R X T 2 X R X 3 T X R X 4 T X R X T 5 X R X 1 T 6 X R X T 7 X R X T 8 X R X T 9 X R X 2 3 2 4 15530-LCMB-0200 94102 1 SFP placement in the module 2 Lever on the SFP (two views) 3 Hole where the SFP extraction end of the tool is inserted (two views) 4 SFP extraction and cable installation and removal tool Step 3 Step...

User Guide
Page 23
OL-7706-01 Cisco ONS 15530 Hardware Installation Guide 2-23 Step 3 Continue to pull the latch down and use the latch to pull the SFP out of the SFP to release it from the desired SFP. Chapter 2 Installing the Cisco ONS 15530 Installing and Removing Line Cards or Motherboards Removing SFP Optics... with LC Connectors To remove an SFP with an LC connector from the 8-port FC/GE aggregation card, follow these steps: Step 1 Step 2 Remove the ...
OL-7706-01 Cisco ONS 15530 Hardware Installation Guide 2-23 Step 3 Continue to pull the latch down and use the latch to pull the SFP out of the SFP to release it from the desired SFP. Chapter 2 Installing the Cisco ONS 15530 Installing and Removing Line Cards or Motherboards Removing SFP Optics... with LC Connectors To remove an SFP with an LC connector from the 8-port FC/GE aggregation card, follow these steps: Step 1 Step 2 Remove the ...

User Guide
Page 24
... 0 of the Cisco ONS 15530 chassis while guiding the upper and lower edges of the Cisco ONS 15530 chassis. Note If you must remove the SFP from the 8-port multi-service muxponder. Step 5 Step 6 Step 7 Twist the connector to the card. Use your right hand to tighten the module locking lever. 2-24 Cisco ONS 15530 Hardware Installation Guide OL-7706-01...
... 0 of the Cisco ONS 15530 chassis while guiding the upper and lower edges of the Cisco ONS 15530 chassis. Note If you must remove the SFP from the 8-port multi-service muxponder. Step 5 Step 6 Step 7 Twist the connector to the card. Use your right hand to tighten the module locking lever. 2-24 Cisco ONS 15530 Hardware Installation Guide OL-7706-01...
User Guide
Page 28
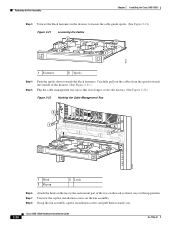
.... Replacing the Fan Assembly Chapter 2 Installing the Cisco ONS 15530 Step 3 Untwist the black fasteners in the drawers to the rack mount part of the drawers. (See Figure 2-21.) Flip the cable management tray up so that it no longer covers the fan tray. (See Figure 2-22.) Figure 2-22 Hooking the Cable Management Tray 3 1 T X T R X X R X T X T 2R X X R X 2 15530-LCMB-0200 15530-LCMB-0200 15530-LCMB-0200 15530-C 15530-C 15530-LCMB-0200 15530-LCMB-0200...
.... Replacing the Fan Assembly Chapter 2 Installing the Cisco ONS 15530 Step 3 Untwist the black fasteners in the drawers to the rack mount part of the drawers. (See Figure 2-21.) Flip the cable management tray up so that it no longer covers the fan tray. (See Figure 2-22.) Figure 2-22 Hooking the Cable Management Tray 3 1 T X T R X X R X T X T 2R X X R X 2 15530-LCMB-0200 15530-LCMB-0200 15530-LCMB-0200 15530-C 15530-C 15530-LCMB-0200 15530-LCMB-0200...