Chassis Replacement Instructions
Page 1
... Number: GSR16-CHASSIS= Document Order Number: DOC-7816082= Introduction This publication describes how to remove and install the Cisco 12016, Cisco 12416, and Cisco 12816 Router chassis. All rights reserved. Contents The following sections are included in this publication: • Chassis Overview, page 2 • Preparing for ... Documentation, page 29 • Obtaining Technical Assistance, page 30 • Obtaining Additional Publications and Information, page 31 Corporate Headquarters: Cisco Systems, Inc., 170 West Tasman Drive, San Jose, CA 95134-1706 USA Copyright © 2004...
... Number: GSR16-CHASSIS= Document Order Number: DOC-7816082= Introduction This publication describes how to remove and install the Cisco 12016, Cisco 12416, and Cisco 12816 Router chassis. All rights reserved. Contents The following sections are included in this publication: • Chassis Overview, page 2 • Preparing for ... Documentation, page 29 • Obtaining Technical Assistance, page 30 • Obtaining Additional Publications and Information, page 31 Corporate Headquarters: Cisco Systems, Inc., 170 West Tasman Drive, San Jose, CA 95134-1706 USA Copyright © 2004...
Chassis Replacement Instructions
Page 2
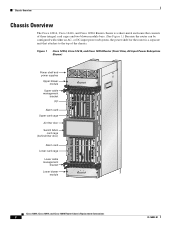
...ALARM FAIL ENABLED FAIL ENABLED 0 CSC 10 SFC 12 ALARM 26194 Cisco 12016, Cisco 12416, and Cisco 12816 Router Chassis Replacement Instructions 2 78-16082-01 Chassis Overview Chassis Overview The Cisco 12016, Cisco 12416, and Cisco 12816 Router chassis is a separate unit that consists of the chassis. or DC...-input power subsystem, the power shelf for the router is a sheet-metal enclosure that attaches to the...
...ALARM FAIL ENABLED FAIL ENABLED 0 CSC 10 SFC 12 ALARM 26194 Cisco 12016, Cisco 12416, and Cisco 12816 Router Chassis Replacement Instructions 2 78-16082-01 Chassis Overview Chassis Overview The Cisco 12016, Cisco 12416, and Cisco 12816 Router chassis is a separate unit that consists of the chassis. or DC...-input power subsystem, the power shelf for the router is a sheet-metal enclosure that attaches to the...
Chassis Replacement Instructions
Page 3
... 0 through a passive system backplane in the lower card cage is an inverted, or head-down orientation. The card slots in the router and provides the physical communication pathway between cards, both for the RP. Cooling The two removable blower modules at all the cards and ...cage (slot 8). Caution All line card slots must be populated with four DC-input power entry modules (PEMs). 78-16082-01 Cisco 12016, Cisco 12416, and Cisco 12816 Router Chassis Replacement Instructions 3 In the power shelf, each power module contains a fan that draws cooler air into the front of the...
... 0 through a passive system backplane in the lower card cage is an inverted, or head-down orientation. The card slots in the router and provides the physical communication pathway between cards, both for the RP. Cooling The two removable blower modules at all the cards and ...cage (slot 8). Caution All line card slots must be populated with four DC-input power entry modules (PEMs). 78-16082-01 Cisco 12016, Cisco 12416, and Cisco 12816 Router Chassis Replacement Instructions 3 In the power shelf, each power module contains a fan that draws cooler air into the front of the...
Chassis Replacement Instructions
Page 4
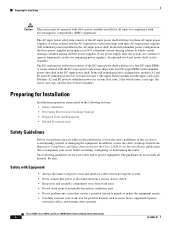
The AC-input power subsystem consists of the DC-input power shelf with bays for the Cisco 12000 Series Internet Router publication that power is also available. Preparing for Installation Installation preparation is divided among all three power supplies. ... and B2 provide redundant power for compliance with electromagnetic compatibility (EMC) regulations. The guidelines do not include all hazards. Cisco 12016, Cisco 12416, and Cisco 12816 Router Chassis Replacement Instructions 4 78-16082-01 If one power supply fails, the system can continue to avoid injuring yourself or...
The AC-input power subsystem consists of the DC-input power shelf with bays for the Cisco 12000 Series Internet Router publication that power is also available. Preparing for Installation Installation preparation is divided among all three power supplies. ... and B2 provide redundant power for compliance with electromagnetic compatibility (EMC) regulations. The guidelines do not include all hazards. Cisco 12016, Cisco 12416, and Cisco 12816 Router Chassis Replacement Instructions 4 78-16082-01 If one power supply fails, the system can continue to avoid injuring yourself or...
Chassis Replacement Instructions
Page 5
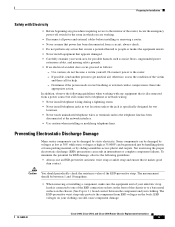
.... • Never install telephone jacks in intermittent or complete component failures. If possible, send another person to the router. - Determine if the person needs rescue breathing or external cardiac compressions; The measurement should periodically check the resistance value...equipment that power has been disconnected from a circuit; Some components can still cause component damage. 78-16082-01 Cisco 12016, Cisco 12416, and Cisco 12816 Router Chassis Replacement Instructions 5 In addition, observe the following guidelines: • Always use an ESD-preventive antistatic wrist...
.... • Never install telephone jacks in intermittent or complete component failures. If possible, send another person to the router. - Determine if the person needs rescue breathing or external cardiac compressions; The measurement should periodically check the resistance value...equipment that power has been disconnected from a circuit; Some components can still cause component damage. 78-16082-01 Cisco 12016, Cisco 12416, and Cisco 12816 Router Chassis Replacement Instructions 5 In addition, observe the following guidelines: • Always use an ESD-preventive antistatic wrist...
Chassis Replacement Instructions
Page 6
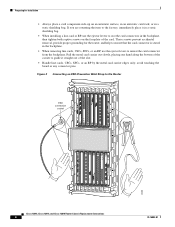
... a line card or RP, use the ejector levers to the factory, immediately place it straight out of the carrier to the Router DOWN LOOP DOWN LOOP CDHNT RA CDHNT RA LA LA CD CD EJECT SSLLOOTT--01 RESET AUX ACTIVCEARRRIXERCELL 0 ACTIVECARRIREXR PKT ESD connection socket...RX 1 1 0 TX TX RX RX 0 0 TX TX CD CD LA LA CDHNT CDHNT RA RA DOWN LOOP DOWN LOOP 26208 Cisco 12016, Cisco 12416, and Cisco 12816 Router Chassis Replacement Instructions 6 78-16082-01 avoid touching the board or any connector pins. Figure 2 Connecting an ESD-Preventive Wrist Strap to ...
... a line card or RP, use the ejector levers to the factory, immediately place it straight out of the carrier to the Router DOWN LOOP DOWN LOOP CDHNT RA CDHNT RA LA LA CD CD EJECT SSLLOOTT--01 RESET AUX ACTIVCEARRRIXERCELL 0 ACTIVECARRIREXR PKT ESD connection socket...RX 1 1 0 TX TX RX RX 0 0 TX TX CD CD LA LA CDHNT CDHNT RA RA DOWN LOOP DOWN LOOP 26208 Cisco 12016, Cisco 12416, and Cisco 12816 Router Chassis Replacement Instructions 6 78-16082-01 avoid touching the board or any connector pins. Figure 2 Connecting an ESD-Preventive Wrist Strap to ...
Chassis Replacement Instructions
Page 7
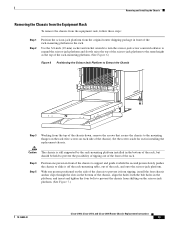
... and Installing the Chassis Required Tools and Equipment The following publications contain additional information: • Cisco 12016, Cisco 12416, and Cisco 12816 Router Installation and Configuration Guide • Regulatory Compliance and Safety Information for use in removing the defective... rack by ten screws (five on each transferred component is mounted in the defective chassis. 78-16082-01 Cisco 12016, Cisco 12416, and Cisco 12816 Router Chassis Replacement Instructions 7 Related Documentation The following tools and equipment are required to remove and install the chassis:...
... and Installing the Chassis Required Tools and Equipment The following publications contain additional information: • Cisco 12016, Cisco 12416, and Cisco 12816 Router Installation and Configuration Guide • Regulatory Compliance and Safety Information for use in removing the defective... rack by ten screws (five on each transferred component is mounted in the defective chassis. 78-16082-01 Cisco 12016, Cisco 12416, and Cisco 12816 Router Chassis Replacement Instructions 7 Related Documentation The following tools and equipment are required to remove and install the chassis:...
Chassis Replacement Instructions
Page 8
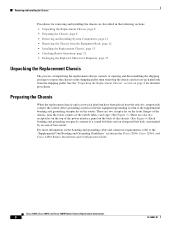
Removing and Installing the Chassis Procedures for removing and installing the chassis are described in the Cisco 12016, Cisco 12416, and Cisco 12816 Router Installation and Configuration Guide. See the "Unpacking the Replacement Chassis" section on the shipping pallet,... the Replacement Chassis, page 15 • Checking Router Operation, page 22 • Packaging the Replaced Chassis for detailed procedures. Cisco 12016, Cisco 12416, and Cisco 12816 Router Chassis Replacement Instructions 8 78-16082-01 For more information on the router. There are also two receptacles on the top of...
Removing and Installing the Chassis Procedures for removing and installing the chassis are described in the Cisco 12016, Cisco 12416, and Cisco 12816 Router Installation and Configuration Guide. See the "Unpacking the Replacement Chassis" section on the shipping pallet,... the Replacement Chassis, page 15 • Checking Router Operation, page 22 • Packaging the Replaced Chassis for detailed procedures. Cisco 12016, Cisco 12416, and Cisco 12816 Router Chassis Replacement Instructions 8 78-16082-01 For more information on the router. There are also two receptacles on the top of...
Chassis Replacement Instructions
Page 9
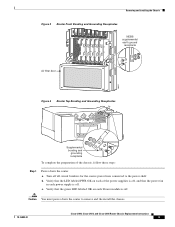
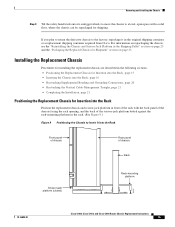
...-16-SCPOS FAST ETERNET OC-12/STM-4 ATM ROUTE PROCESSOR NEBS supplemental earth ground receptacle Air filter door 28022 Figure 4 Router Top Bonding and Grounding Receptacles 29183 Supplemental bonding and grounding receptacle To complete the preparation of the power supplies is off,... Power down the router to the power shelf. Turn off . Verify that the power fan in each power supply is off all circuit breakers for the source power lines connected to remove and the install the chassis. 78-16082-01 Cisco 12016, Cisco 12416, and Cisco 12816 Router Chassis Replacement Instructions ...
...-16-SCPOS FAST ETERNET OC-12/STM-4 ATM ROUTE PROCESSOR NEBS supplemental earth ground receptacle Air filter door 28022 Figure 4 Router Top Bonding and Grounding Receptacles 29183 Supplemental bonding and grounding receptacle To complete the preparation of the power supplies is off,... Power down the router to the power shelf. Turn off . Verify that the power fan in each power supply is off all circuit breakers for the source power lines connected to remove and the install the chassis. 78-16082-01 Cisco 12016, Cisco 12416, and Cisco 12816 Router Chassis Replacement Instructions ...
Chassis Replacement Instructions
Page 10
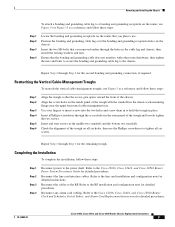
... You must be removed from the chassis before you disconnect the cables. a. Repeat a. Refer to the Cisco 12016, Cisco 12416, and Cisco 12816 Router Installation and Configuration Guide for detailed procedures. b. You will need to the installation and configuration note for your...management troughs. for detailed procedures. Insert a Phillips screwdriver through the access holes in the equipment rack. Cisco 12016, Cisco 12416, and Cisco 12816 Router Chassis Replacement Instructions 10 78-16082-01 Identify the alarm cable connections and write them from the equipment ...
... You must be removed from the chassis before you disconnect the cables. a. Repeat a. Refer to the Cisco 12016, Cisco 12416, and Cisco 12816 Router Installation and Configuration Guide for detailed procedures. b. You will need to the installation and configuration note for your...management troughs. for detailed procedures. Insert a Phillips screwdriver through the access holes in the equipment rack. Cisco 12016, Cisco 12416, and Cisco 12816 Router Chassis Replacement Instructions 10 78-16082-01 Identify the alarm cable connections and write them from the equipment ...
Chassis Replacement Instructions
Page 12
... modules and then install them into the replacement chassis. Cisco 12016, Cisco 12416, and Cisco 12816 Router Chassis Replacement Instructions 12 78-16082-01 Refer to the Cisco 12016, Cisco 12416, and Cisco 12816 Router Installation and Configuration Guide for detailed procedures. Save the ...CSCs, SFCs, and the alarm card, refer to the Cisco 12016, Cisco 12416, and Cisco 12816 Router Installation and Configuration Guide for detailed procedures. Refer to the Cisco 12016, Cisco 12416, and Cisco 12816 Router Installation and Configuration Guide for a second supplemental bonding and...
... modules and then install them into the replacement chassis. Cisco 12016, Cisco 12416, and Cisco 12816 Router Chassis Replacement Instructions 12 78-16082-01 Refer to the Cisco 12016, Cisco 12416, and Cisco 12816 Router Installation and Configuration Guide for detailed procedures. Save the ...CSCs, SFCs, and the alarm card, refer to the Cisco 12016, Cisco 12416, and Cisco 12816 Router Installation and Configuration Guide for detailed procedures. Refer to the Cisco 12016, Cisco 12416, and Cisco 12816 Router Installation and Configuration Guide for a second supplemental bonding and...
Chassis Replacement Instructions
Page 13
... tighten the four bolts to the mounting flanges on the rack (five screws on the scissor-jack platform. (See Figure 7.) 78-16082-01 Cisco 12016, Cisco 12416, and Cisco 12816 Router Chassis Replacement Instructions 13 Removing and Installing the Chassis Removing the Chassis from the Equipment Rack To remove the chassis from the equipment rack... Chassis 29158 Step 3 Working from the top of the chassis down, remove the screws that secure the chassis to prevent the chassis from the original router shipping package in installing the replacement chassis.
... tighten the four bolts to the mounting flanges on the rack (five screws on the scissor-jack platform. (See Figure 7.) 78-16082-01 Cisco 12016, Cisco 12416, and Cisco 12816 Router Chassis Replacement Instructions 13 Removing and Installing the Chassis Removing the Chassis from the Equipment Rack To remove the chassis from the equipment rack... Chassis 29158 Step 3 Working from the top of the chassis down, remove the screws that secure the chassis to prevent the chassis from the original router shipping package in installing the replacement chassis.

Chassis Replacement Instructions
Page 14
..., slide the chassis and scissor-jack platform onto the safety hand truck, and secure the chassis to the hand truck with the locking safety strap. Cisco 12016, Cisco 12416, and Cisco 12816 Router Chassis Replacement Instructions 14 78-16082-01
..., slide the chassis and scissor-jack platform onto the safety hand truck, and secure the chassis to the hand truck with the locking safety strap. Cisco 12016, Cisco 12416, and Cisco 12816 Router Chassis Replacement Instructions 14 78-16082-01
Chassis Replacement Instructions
Page 15
... of the chassis facing the rack opening, and the back of chassis Rack Scissor-jack platform (closed) Rack-mounting platform 29161 78-16082-01 Cisco 12016, Cisco 12416, and Cisco 12816 Router Chassis Replacement Instructions 15 If you plan to return the defective chassis to Insert It into the Rack, page 16 • Reattaching Supplemental... information on repackaging the chassis, see the "Reinstalling the Chassis and Scissor-Jack Platform in the original shipping container or a replacement shipping container acquired from Cisco.
... of the chassis facing the rack opening, and the back of chassis Rack Scissor-jack platform (closed) Rack-mounting platform 29161 78-16082-01 Cisco 12016, Cisco 12416, and Cisco 12816 Router Chassis Replacement Instructions 15 If you plan to return the defective chassis to Insert It into the Rack, page 16 • Reattaching Supplemental... information on repackaging the chassis, see the "Reinstalling the Chassis and Scissor-Jack Platform in the original shipping container or a replacement shipping container acquired from Cisco.

Chassis Replacement Instructions
Page 16
... the opening between the rack posts, you must expand the scissor-jack platform to raise the chassis to the scissor-jack platform. (See Figure 11.) Cisco 12016, Cisco 12416, and Cisco 12816 Router Chassis Replacement Instructions 16 78-16082-01
... the opening between the rack posts, you must expand the scissor-jack platform to raise the chassis to the scissor-jack platform. (See Figure 11.) Cisco 12016, Cisco 12416, and Cisco 12816 Router Chassis Replacement Instructions 16 78-16082-01

Chassis Replacement Instructions
Page 17
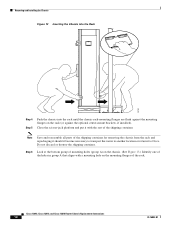
... chassis while it is being inserted into the rack while a second person pushes from an equipment rack. To reduce the risk of the router. EJECT SSLLOOTT--01 RESET AUX CONSOLE Figure 11 Removing the Chassis Retainer Clips Front of chassis ACTIVCEARRRIXERCELL 0 ACTIVECARRIREXR PKT 2 RX TX 3 ... attempt to lift the chassis with the handles on the back of the chassis. (See Figure 12.) 78-16082-01 Cisco 12016, Cisco 12416, and Cisco 12816 Router Chassis Replacement Instructions 17 Step 3 Slide the chassis carefully off of the scissor-jack platform and onto the rack-mounting platform...
... chassis while it is being inserted into the rack while a second person pushes from an equipment rack. To reduce the risk of the router. EJECT SSLLOOTT--01 RESET AUX CONSOLE Figure 11 Removing the Chassis Retainer Clips Front of chassis ACTIVCEARRRIXERCELL 0 ACTIVECARRIREXR PKT 2 RX TX 3 ... attempt to lift the chassis with the handles on the back of the chassis. (See Figure 12.) 78-16082-01 Cisco 12016, Cisco 12416, and Cisco 12816 Router Chassis Replacement Instructions 17 Step 3 Slide the chassis carefully off of the scissor-jack platform and onto the rack-mounting platform...
Chassis Replacement Instructions
Page 18
... against the mounting flanges on the mounting flanges of the rack. Close the scissor-jack platform and put it to Cisco. Do not discard or destroy the shipping container. Cisco 12016, Cisco 12416, and Cisco 12816 Router Chassis Replacement Instructions 18 78-16082-01 Step 6 Look at the bottom group of mounting holes (group A) on the...
... against the mounting flanges on the mounting flanges of the rack. Close the scissor-jack platform and put it to Cisco. Do not discard or destroy the shipping container. Cisco 12016, Cisco 12416, and Cisco 12816 Router Chassis Replacement Instructions 18 78-16082-01 Step 6 Look at the bottom group of mounting holes (group A) on the...

Chassis Replacement Instructions
Page 19
... group B Chassis mounting holes group A 28744 Step 7 Step 8 Step 9 Hold the chassis in the mounting flange on each side of the chassis). 78-16082-01 Cisco 12016, Cisco 12416, and Cisco 12816 Router Chassis Replacement Instructions 19
... group B Chassis mounting holes group A 28744 Step 7 Step 8 Step 9 Hold the chassis in the mounting flange on each side of the chassis). 78-16082-01 Cisco 12016, Cisco 12416, and Cisco 12816 Router Chassis Replacement Instructions 19
Chassis Replacement Instructions
Page 20
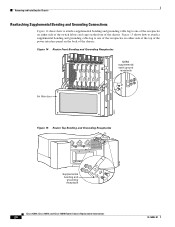
... ETERNET OC-12/STM-4 ATM ROUTE PROCESSOR NEBS supplemental earth ground receptacle Air filter door 28022 Figure 15 Router Top Bonding and Grounding Receptacles 29183 Supplemental bonding and grounding receptacle Cisco 12016, Cisco 12416, and Cisco 12816 Router Chassis Replacement Instructions 20 78-16082-01 Removing and Installing the Chassis Reattaching Supplemental Bonding and Grounding Connections...
... ETERNET OC-12/STM-4 ATM ROUTE PROCESSOR NEBS supplemental earth ground receptacle Air filter door 28022 Figure 15 Router Top Bonding and Grounding Receptacles 29183 Supplemental bonding and grounding receptacle Cisco 12016, Cisco 12416, and Cisco 12816 Router Chassis Replacement Instructions 20 78-16082-01 Removing and Installing the Chassis Reattaching Supplemental Bonding and Grounding Connections...
Chassis Replacement Instructions
Page 21
...on all six holes, then use the Phillips screwdriver to tighten all six screws. Refer to the Cisco 12016, Cisco 12416, and Cisco 12816 Router Power System Procedures Guide for detailed procedures. Refer to the RP installation and configuration note for detailed ...so that you removed earlier through Step 6 for detailed procedures. 78-16082-01 Cisco 12016, Cisco 12416, and Cisco 12816 Router Chassis Replacement Instructions 21 Refer to the Cisco 12016, Cisco 12416, and Cisco 12816 Router Clock and Scheduler, Switch Fabric, and Alarm Card Replacement Instructions for the remaining ...
...on all six holes, then use the Phillips screwdriver to tighten all six screws. Refer to the Cisco 12016, Cisco 12416, and Cisco 12816 Router Power System Procedures Guide for detailed procedures. Refer to the RP installation and configuration note for detailed ...so that you removed earlier through Step 6 for detailed procedures. 78-16082-01 Cisco 12016, Cisco 12416, and Cisco 12816 Router Chassis Replacement Instructions 21 Refer to the Cisco 12016, Cisco 12416, and Cisco 12816 Router Clock and Scheduler, Switch Fabric, and Alarm Card Replacement Instructions for the remaining ...


