Chassis Replacement Instructions
Page 2
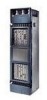
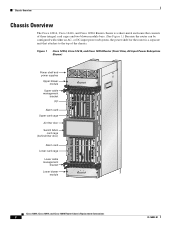
... 1 Cisco 12016, Cisco 12416, and Cisco 12816 Router (Front View, AC-Input Power Subsystem Shown) Power shelf and power supplies Upper blower module Upper cable management bracket RP Alarm card Upper card cage Air filter door Switch fabric card cage (behind filter door) Alarm card Lower card cage Lower cable management bracket Lower blower module EJECT SSLLOOTT--01 RESET AUX COLL RX LINK TX RJ-45 MII SFC 12 ALARM CSC 10 FAIL ENABLED 0 FAIL ENABLED ACO/LT ALARM CRITICALMAJORMINOR CONSOLE ROUTE...
... 1 Cisco 12016, Cisco 12416, and Cisco 12816 Router (Front View, AC-Input Power Subsystem Shown) Power shelf and power supplies Upper blower module Upper cable management bracket RP Alarm card Upper card cage Air filter door Switch fabric card cage (behind filter door) Alarm card Lower card cage Lower cable management bracket Lower blower module EJECT SSLLOOTT--01 RESET AUX COLL RX LINK TX RJ-45 MII SFC 12 ALARM CSC 10 FAIL ENABLED 0 FAIL ENABLED ACO/LT ALARM CRITICALMAJORMINOR CONSOLE ROUTE...
Chassis Replacement Instructions
Page 3
...-16082-01 Cisco 12016, Cisco 12416, and Cisco 12816 Router Chassis Replacement Instructions 3 The far right slot (slot 7) in the far left slots (labeled CSC0 and CSC1) accept CSCs; Caution All line card slots must be installed in the back of the lower card cage (slot 8). The lower card cage also has eight user-configurable slots that contain the switch fabric circuitry. Nearly all times to accept specific card types.
...-16082-01 Cisco 12016, Cisco 12416, and Cisco 12816 Router Chassis Replacement Instructions 3 The far right slot (slot 7) in the far left slots (labeled CSC0 and CSC1) accept CSCs; Caution All line card slots must be installed in the back of the lower card cage (slot 8). The lower card cage also has eight user-configurable slots that contain the switch fabric circuitry. Nearly all times to accept specific card types.
Chassis Replacement Instructions
Page 4
... card cage, and the lower blower module). In addition, review the safety warnings listed in the Regulatory Compliance and Safety Information for four DC-input PEMs. A router ordered with the DC-input power subsystem ships with three AC-input power supplies (full redundant power) installed in the DC-input power shelf. The guidelines do not include all three power supplies. Cisco 12016, Cisco 12416, and Cisco 12816 Router Chassis Replacement Instructions...
... card cage, and the lower blower module). In addition, review the safety warnings listed in the Regulatory Compliance and Safety Information for four DC-input PEMs. A router ordered with the DC-input power subsystem ships with three AC-input power supplies (full redundant power) installed in the DC-input power shelf. The guidelines do not include all three power supplies. Cisco 12016, Cisco 12416, and Cisco 12816 Router Chassis Replacement Instructions...
Chassis Replacement Instructions
Page 5
... Electrostatic Discharge Damage Many router components can still cause component damage. 78-16082-01 Cisco 12016, Cisco 12416, and Cisco 12816 Router Chassis Replacement Instructions 5 In addition, observe the following guidelines: • Always use an ESD-preventive antistatic ...working with Electricity • Before beginning any procedures requiring access to the interior of the router, locate the emergency power-off switch for the room in which you are working. • Disconnect all power and external cables before installing or removing a router. • Never assume that power...
... Electrostatic Discharge Damage Many router components can still cause component damage. 78-16082-01 Cisco 12016, Cisco 12416, and Cisco 12816 Router Chassis Replacement Instructions 5 In addition, observe the following guidelines: • Always use an ESD-preventive antistatic ...working with Electricity • Before beginning any procedures requiring access to the interior of the router, locate the emergency power-off switch for the room in which you are working. • Disconnect all power and external cables before installing or removing a router. • Never assume that power...
Chassis Replacement Instructions
Page 6
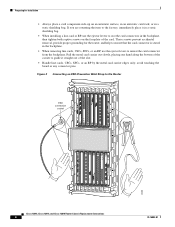
... CDHNT RA RA DOWN LOOP DOWN LOOP 26208 Cisco 12016, Cisco 12416, and Cisco 12816 Router Chassis Replacement Instructions 6 78-16082-01 Figure 2 Connecting an ESD-Preventive Wrist Strap to guide it in a static shielding bag. • When installing a line card or RP, use the ejector levers to seat the card connectors in a static shielding bag. Pull the metal card carrier out slowly, placing one hand along the...
... CDHNT RA RA DOWN LOOP DOWN LOOP 26208 Cisco 12016, Cisco 12416, and Cisco 12816 Router Chassis Replacement Instructions 6 78-16082-01 Figure 2 Connecting an ESD-Preventive Wrist Strap to guide it in a static shielding bag. • When installing a line card or RP, use the ejector levers to seat the card connectors in a static shielding bag. Pull the metal card carrier out slowly, placing one hand along the...
Chassis Replacement Instructions
Page 7
... (distributed by McMaster-Carr as Model 2654T6), or an equivalent safety hand truck. Removing and Installing the Chassis Required Tools and Equipment The following publications contain additional information: • Cisco 12016, Cisco 12416, and Cisco 12816 Router Installation and Configuration Guide • Regulatory Compliance and Safety Information for use in the defective chassis. 78-16082-01 Cisco 12016, Cisco 12416, and Cisco 12816 Router Chassis Replacement Instructions 7 It also helps ensure that...
... (distributed by McMaster-Carr as Model 2654T6), or an equivalent safety hand truck. Removing and Installing the Chassis Required Tools and Equipment The following publications contain additional information: • Cisco 12016, Cisco 12416, and Cisco 12816 Router Installation and Configuration Guide • Regulatory Compliance and Safety Information for use in the defective chassis. 78-16082-01 Cisco 12016, Cisco 12416, and Cisco 12816 Router Chassis Replacement Instructions 7 It also helps ensure that...
Chassis Replacement Instructions
Page 8
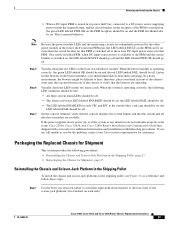
... router. Cisco 12016, Cisco 12416, and Cisco 12816 Router Chassis Replacement Instructions 8 78-16082-01 See the "Unpacking the Replacement Chassis" section on the shipping pallet, then removing the chassis and scissor-jack platform from the Equipment Rack, page 12 • Installing the Replacement Chassis, page 15 • Checking Router Operation, page 22 • Packaging the Replaced Chassis for Shipment, page 23 Unpacking the Replacement Chassis The process of unpacking the replacement chassis consists of opening...
... router. Cisco 12016, Cisco 12416, and Cisco 12816 Router Chassis Replacement Instructions 8 78-16082-01 See the "Unpacking the Replacement Chassis" section on the shipping pallet, then removing the chassis and scissor-jack platform from the Equipment Rack, page 12 • Installing the Replacement Chassis, page 15 • Checking Router Operation, page 22 • Packaging the Replaced Chassis for Shipment, page 23 Unpacking the Replacement Chassis The process of unpacking the replacement chassis consists of opening...
Chassis Replacement Instructions
Page 9
... complete the preparation of the power supplies is off, and that the green LED labeled OK on each of the chassis, follow these steps: Step 1 Power down the router to the power shelf. Turn off . Verify that the power fan in each blower module is off all circuit breakers for the source power lines connected to remove and the install the chassis. 78-16082-01 Cisco 12016, Cisco 12416, and Cisco 12816 Router Chassis Replacement Instructions 9
... complete the preparation of the power supplies is off, and that the green LED labeled OK on each of the chassis, follow these steps: Step 1 Power down the router to the power shelf. Turn off . Verify that the power fan in each blower module is off all circuit breakers for the source power lines connected to remove and the install the chassis. 78-16082-01 Cisco 12016, Cisco 12416, and Cisco 12816 Router Chassis Replacement Instructions 9
Chassis Replacement Instructions
Page 10
... 5.) Both vertical cable-management troughs must be removed from the chassis before the chassis can be removed from the chassis and place them from the power shelf. Disconnect the line card interface cables. One vertical cable-management trough is connected to the installation and configuration note for your specific line card for detailed procedures. c. Cisco 12016, Cisco 12416, and Cisco 12816 Router Chassis Replacement Instructions 10 78-16082-01 Refer to the external alarm port on the replacement chassis after it has...
... 5.) Both vertical cable-management troughs must be removed from the chassis before the chassis can be removed from the chassis and place them from the power shelf. Disconnect the line card interface cables. One vertical cable-management trough is connected to the installation and configuration note for your specific line card for detailed procedures. c. Cisco 12016, Cisco 12416, and Cisco 12816 Router Chassis Replacement Instructions 10 78-16082-01 Refer to the external alarm port on the replacement chassis after it has...
Chassis Replacement Instructions
Page 12
... these cable lugs from the chassis before you will use it aside. Cisco 12016, Cisco 12416, and Cisco 12816 Router Chassis Replacement Instructions 12 78-16082-01 Refer to another, follow these steps: Step 1 Step 2 Remove the two bolts, washers, and nuts that secure the bonding and grounding cable lug to any of the earth ground cable receptacles on the back of the power interface panel on the chassis, you...
... these cable lugs from the chassis before you will use it aside. Cisco 12016, Cisco 12416, and Cisco 12816 Router Chassis Replacement Instructions 12 78-16082-01 Refer to another, follow these steps: Step 1 Step 2 Remove the two bolts, washers, and nuts that secure the bonding and grounding cable lug to any of the earth ground cable receptacles on the back of the power interface panel on the chassis, you...
Chassis Replacement Instructions
Page 13
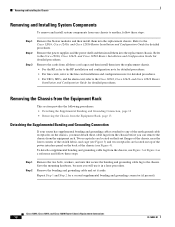
... tipping out of the front of the rack. Set the screws aside for use in the rack. Step 4 Step 5 Position one person positioned on the scissor-jack platform. (See Figure 7.) 78-16082-01 Cisco 12016, Cisco 12416, and Cisco 12816 Router Chassis Replacement Instructions 13 Removing and Installing the Chassis Removing the Chassis from the Equipment Rack To remove the chassis from the equipment rack, follow these steps: Step 1 Step 2 Position...
... tipping out of the front of the rack. Set the screws aside for use in the rack. Step 4 Step 5 Position one person positioned on the scissor-jack platform. (See Figure 7.) 78-16082-01 Cisco 12016, Cisco 12416, and Cisco 12816 Router Chassis Replacement Instructions 13 Removing and Installing the Chassis Removing the Chassis from the Equipment Rack To remove the chassis from the equipment rack, follow these steps: Step 1 Step 2 Position...
Chassis Replacement Instructions
Page 15
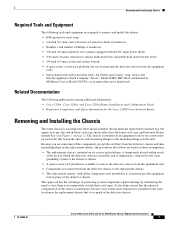
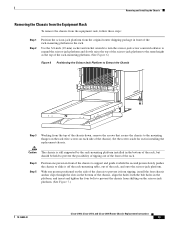
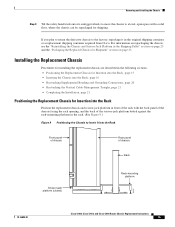
... • Reattaching Supplemental Bonding and Grounding Connections, page 20 • Reattaching the Vertical Cable-Management Troughs, page 21 • Completing the Installation, page 21 Positioning the Replacement Chassis for Insertion into the Rack Front panel of chassis Rear panel of chassis Rack Scissor-jack platform (closed) Rack-mounting platform 29161 78-16082-01 Cisco 12016, Cisco 12416, and Cisco 12816 Router Chassis Replacement Instructions 15 Removing and Installing the Chassis Step 8 Tilt the safety hand...
... • Reattaching Supplemental Bonding and Grounding Connections, page 20 • Reattaching the Vertical Cable-Management Troughs, page 21 • Completing the Installation, page 21 Positioning the Replacement Chassis for Insertion into the Rack Front panel of chassis Rear panel of chassis Rack Scissor-jack platform (closed) Rack-mounting platform 29161 78-16082-01 Cisco 12016, Cisco 12416, and Cisco 12816 Router Chassis Replacement Instructions 15 Removing and Installing the Chassis Step 8 Tilt the safety hand...

Chassis Replacement Instructions
Page 17
... the rack-mounting platform in the rack by having one person use these handles to lift or support the chassis. These handles are not designed to support the weight of the chassis, and should be used only to steady and guide the chassis while it is being inserted into the rack while ...RA RA DOWN LOOP DOWN LOOP 29188 Warning Do not attempt to lift the chassis with the handles on the back of the chassis to pull the chassis into or removed from the front of the chassis. (See Figure 12.) 78-16082-01 Cisco 12016, Cisco 12416, and Cisco 12816 Router Chassis Replacement Instructions 17
... the rack-mounting platform in the rack by having one person use these handles to lift or support the chassis. These handles are not designed to support the weight of the chassis, and should be used only to steady and guide the chassis while it is being inserted into the rack while ...RA RA DOWN LOOP DOWN LOOP 29188 Warning Do not attempt to lift the chassis with the handles on the back of the chassis to pull the chassis into or removed from the front of the chassis. (See Figure 12.) 78-16082-01 Cisco 12016, Cisco 12416, and Cisco 12816 Router Chassis Replacement Instructions 17
Chassis Replacement Instructions
Page 20
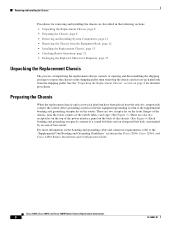
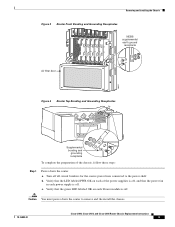
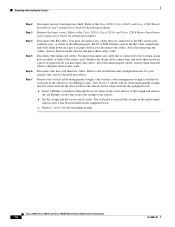
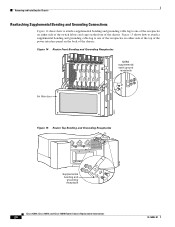
...power interface panel on the front of the chassis. Figure 15 shows how to attach a supplemental bonding and grounding cable lug to one of the receptacles on either side of the switch fabric card cage on the back of the chassis. SFC 12 ALARM CSC 10 FAIL ENABLED 0 Q OC-3/STM-POS 6DS3-SMB P/H/F Figure 14 Router... ROUTE PROCESSOR NEBS supplemental earth ground receptacle Air filter door 28022 Figure 15 Router Top Bonding and Grounding Receptacles 29183 Supplemental bonding and grounding receptacle Cisco 12016, Cisco 12416, and Cisco 12816 Router Chassis Replacement Instructions ...
...power interface panel on the front of the chassis. Figure 15 shows how to attach a supplemental bonding and grounding cable lug to one of the receptacles on either side of the switch fabric card cage on the back of the chassis. SFC 12 ALARM CSC 10 FAIL ENABLED 0 Q OC-3/STM-POS 6DS3-SMB P/H/F Figure 14 Router... ROUTE PROCESSOR NEBS supplemental earth ground receptacle Air filter door 28022 Figure 15 Router Top Bonding and Grounding Receptacles 29183 Supplemental bonding and grounding receptacle Cisco 12016, Cisco 12416, and Cisco 12816 Router Chassis Replacement Instructions ...
Chassis Replacement Instructions
Page 21
..., Switch Fabric, and Alarm Card Replacement Instructions for detailed instructions. Refer to the RP. Insert and start screws in the chassis rack-mounting flange near the upper horizontal cable-management tray. Completing the Installation To complete the installation, follow these steps: Step 1 Step 2 Step 3 Step 4 Reconnect power to the line card installation and configuration note for detailed procedures. 78-16082-01 Cisco 12016, Cisco 12416, and Cisco 12816 Router Chassis Replacement Instructions 21 Refer to the power shelf. Removing and Installing...
..., Switch Fabric, and Alarm Card Replacement Instructions for detailed instructions. Refer to the RP. Insert and start screws in the chassis rack-mounting flange near the upper horizontal cable-management tray. Completing the Installation To complete the installation, follow these steps: Step 1 Step 2 Step 3 Step 4 Reconnect power to the line card installation and configuration note for detailed procedures. 78-16082-01 Cisco 12016, Cisco 12416, and Cisco 12816 Router Chassis Replacement Instructions 21 Refer to the power shelf. Removing and Installing...

Chassis Replacement Instructions
Page 22
..., Cisco 12416, and Cisco 12816 Router Chassis Replacement Instructions 22 78-16082-01 Note By default, a Flash memory card containing a valid Cisco IOS software image is inserted in the proper state.) Switch on . Observe the power module LEDs: • When a AC-input power supply is installed in its power shelf bay and connected to an AC power source supplying power within the required range, the green LED labeled PWR OK on the power supply faceplate should be on and the power supply fan...
..., Cisco 12416, and Cisco 12816 Router Chassis Replacement Instructions 22 78-16082-01 Note By default, a Flash memory card containing a valid Cisco IOS software image is inserted in the proper state.) Switch on . Observe the power module LEDs: • When a AC-input power supply is installed in its power shelf bay and connected to an AC power source supplying power within the required range, the green LED labeled PWR OK on the power supply faceplate should be on and the power supply fan...
Chassis Replacement Instructions
Page 23
... PWR OK should go on. If the power supplies do not power up, or if the system or any interfaces do not initialize properly, refer to resolve the problem, contact your Cisco service representative for additional information and installation troubleshooting procedures. If you are still unable to the Cisco 12016, Cisco 12416, and Cisco 12816 Router Installation and Configuration Guide that shipped with your hand in front of...
... PWR OK should go on. If the power supplies do not power up, or if the system or any interfaces do not initialize properly, refer to resolve the problem, contact your Cisco service representative for additional information and installation troubleshooting procedures. If you are still unable to the Cisco 12016, Cisco 12416, and Cisco 12816 Router Installation and Configuration Guide that shipped with your hand in front of...
Chassis Replacement Instructions
Page 30
... online starting point for troubleshooting and resolving technical issues with Cisco products and technologies. If you have a valid service contract but do not have a login ID or password, register at this URL: http://www.cisco.com/tac Accessing all customers, partners, resellers, and distributors who hold a valid Cisco service contract, please contact your comments. If you do Cisco 12016, Cisco 12416, and Cisco 12816 Router Chassis Replacement Instructions 30...
... online starting point for troubleshooting and resolving technical issues with Cisco products and technologies. If you have a valid service contract but do not have a login ID or password, register at this URL: http://www.cisco.com/tac Accessing all customers, partners, resellers, and distributors who hold a valid Cisco service contract, please contact your comments. If you do Cisco 12016, Cisco 12416, and Cisco 12816 Router Chassis Replacement Instructions 30...

Chassis Replacement Instructions
Page 31
... Cisco product capabilities, installation, or configuration. Both new and experienced users will commit full-time resources during normal business hours to restore service to satisfactory levels. Priority 1 (P1)-Your network ...open a case by telephone, use one of the following numbers: Asia-Pacific: +61 2 8446 7411 (Australia: 1 800 805 227) EMEA: +32 2 704 55 55 USA: 1 800 553-2447 For a complete listing of Cisco TAC contacts, go to Cisco Press online at this URL: http://www.ciscopress.com 78-16082-01 Cisco 12016, Cisco 12416, and Cisco 12816 Router Chassis Replacement Instructions...
... Cisco product capabilities, installation, or configuration. Both new and experienced users will commit full-time resources during normal business hours to restore service to satisfactory levels. Priority 1 (P1)-Your network ...open a case by telephone, use one of the following numbers: Asia-Pacific: +61 2 8446 7411 (Australia: 1 800 805 227) EMEA: +32 2 704 55 55 USA: 1 800 553-2447 For a complete listing of Cisco TAC contacts, go to Cisco Press online at this URL: http://www.ciscopress.com 78-16082-01 Cisco 12016, Cisco 12416, and Cisco 12816 Router Chassis Replacement Instructions...

Chassis Replacement Instructions
Page 32
... Cisco 12016, Cisco 12416, and Cisco 12816 Router Installation and Configuration Guide. Produced in the United States and certain other company. (0401R) Copyright © 2004, Cisco Systems, Inc. Cisco 12016, Cisco 12416, and Cisco 12816 Router Chassis Replacement Instructions 32 78-16082-01 CCIP, CCSP, the Cisco Arrow logo, the Cisco Powered Network mark, Cisco Unity, Follow Me Browsing, FormShare, and StackWise are the property of Cisco Systems, Inc.; and Aironet, ASIST, BPX, Catalyst...
... Cisco 12016, Cisco 12416, and Cisco 12816 Router Installation and Configuration Guide. Produced in the United States and certain other company. (0401R) Copyright © 2004, Cisco Systems, Inc. Cisco 12016, Cisco 12416, and Cisco 12816 Router Chassis Replacement Instructions 32 78-16082-01 CCIP, CCSP, the Cisco Arrow logo, the Cisco Powered Network mark, Cisco Unity, Follow Me Browsing, FormShare, and StackWise are the property of Cisco Systems, Inc.; and Aironet, ASIST, BPX, Catalyst...


