Owners Manual
Page 5
... ❚ Using the Self-timer Self-timer) . . . 52 ❚ Shooting with Face Detection Face Detection) . . . 53 ❚ Reducing the Effects of Camera and Subject Movement . . . . (Anti Shake) . . . 53 ❚ Specifying the Auto Focus Area AF Area) . . . 53 ❚ Using the... . . . 54 ❚ Displaying the On-screen Grid Grid) . . . 54 ❚ Turning Digital Zoom On or Off Digital Zoom) . . . 55 ❚ Turning on Image Review Review) . . . 55 ❚ Using Icon Help Icon Help) . . . 55 ❚ Configuring Power On Default Settings Memory) . . . 56 Image Quality Settings ...
... ❚ Using the Self-timer Self-timer) . . . 52 ❚ Shooting with Face Detection Face Detection) . . . 53 ❚ Reducing the Effects of Camera and Subject Movement . . . . (Anti Shake) . . . 53 ❚ Specifying the Auto Focus Area AF Area) . . . 53 ❚ Using the... . . . 54 ❚ Displaying the On-screen Grid Grid) . . . 54 ❚ Turning Digital Zoom On or Off Digital Zoom) . . . 55 ❚ Turning on Image Review Review) . . . 55 ❚ Using Icon Help Icon Help) . . . 55 ❚ Configuring Power On Default Settings Memory) . . . 56 Image Quality Settings ...
Owners Manual
Page 35
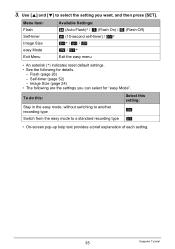
... 26) - Image Size (page 24) • The following for "easy Mode". Use [8] and [2] to a standard recording type Select this setting: k l • On-screen pop-up help text provides a brief explanation of each setting. 35 Snapshot Tutorial Menu Item: Flash Self-timer Image Size easy Mode Exit Menu Available Settings: > (Auto Flash...
... 26) - Image Size (page 24) • The following for "easy Mode". Use [8] and [2] to a standard recording type Select this setting: k l • On-screen pop-up help text provides a brief explanation of each setting. 35 Snapshot Tutorial Menu Item: Flash Self-timer Image Size easy Mode Exit Menu Available Settings: > (Auto Flash...
Owners Manual
Page 42
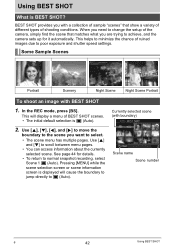
This helps to minimize the chance of sample "scenes" that matches what you want to select. • The scene menu has multiple pages. This will cause the boundary to jump directly to change the setup of the camera, simply find the scene that show a variety of different types ...SHOT What is t (Auto). 2. See page 44 for it automatically. BEST SHOT provides you with a collection of ruined images due to achieve, and the camera sets up for details. • To return to scroll between menu pages. • You can access information about the currently selected scene. Use [8], [2],...
This helps to minimize the chance of sample "scenes" that matches what you want to select. • The scene menu has multiple pages. This will cause the boundary to jump directly to change the setup of the camera, simply find the scene that show a variety of different types ...SHOT What is t (Auto). 2. See page 44 for it automatically. BEST SHOT provides you with a collection of ruined images due to achieve, and the camera sets up for details. • To return to scroll between menu pages. • You can access information about the currently selected scene. Use [8], [2],...
Owners Manual
Page 55
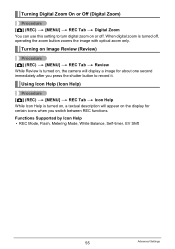
... turned off . Functions Supported by Icon Help • REC Mode, Flash, Metering Mode, White Balance, Self-timer, EV Shift 55 Advanced Settings When digital zoom is turned on, a textual description will display a image for certain icons when you press the shutter button to turn digital zoom on , the camera will appear on the display for about...
... turned off . Functions Supported by Icon Help • REC Mode, Flash, Metering Mode, White Balance, Self-timer, EV Shift 55 Advanced Settings When digital zoom is turned on, a textual description will display a image for certain icons when you press the shutter button to turn digital zoom on , the camera will appear on the display for about...
Owners Manual
Page 57
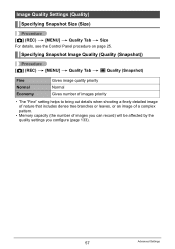
... (Snapshot)) Procedure [r] (REC) * [MENU] * Quality Tab * t Quality (Snapshot) Fine Normal Economy Gives image quality priority Normal Gives number of images priority • The "Fine" setting helps to bring out details when shooting a finely detailed image of nature that includes dense tree branches or leaves, or an image of a complex pattern. •...
... (Snapshot)) Procedure [r] (REC) * [MENU] * Quality Tab * t Quality (Snapshot) Fine Normal Economy Gives image quality priority Normal Gives number of images priority • The "Fine" setting helps to bring out details when shooting a finely detailed image of nature that includes dense tree branches or leaves, or an image of a complex pattern. •...
Owners Manual
Page 86
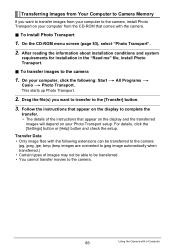
To transfer images to the camera. 86 Using the Camera with a Computer For details, click the [Settings] button or [Help] button and check the setup. Transferring Images from Your Computer to Camera Memory If you want to transfer images from the CD-ROM that appear on the display and the ..." file, install Photo Transport. . On your Photo Transport setup. Transfer Data • Only image files with the following : Start * All Programs * Casio * Photo Transport. On the CD-ROM menu screen (page 83), select "Photo Transport". 2. Follow the instructions that appear on the display to the...
To transfer images to the camera. 86 Using the Camera with a Computer For details, click the [Settings] button or [Help] button and check the setup. Transferring Images from Your Computer to Camera Memory If you want to transfer images from the CD-ROM that appear on the display and the ..." file, install Photo Transport. . On your Photo Transport setup. Transfer Data • Only image files with the following : Start * All Programs * Casio * Photo Transport. On the CD-ROM menu screen (page 83), select "Photo Transport". 2. Follow the instructions that appear on the display to the...
Owners Manual
Page 87
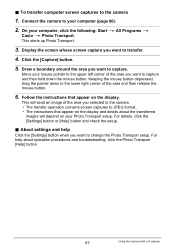
...• The instructions that appear on the display and details about operation procedures and troubleshooting, click the Photo Transport [Help] button. 87 Using the Camera with a Computer Move your Photo Transport setup. To transfer computer screen captures to your computer, click the following:... Start * All Programs * Casio * Photo Transport. Click the [Capture] button. 5. Draw a boundary around the area you selected to the camera. • The transfer operation converts screen captures to the upper left corner of...
...• The instructions that appear on the display and details about operation procedures and troubleshooting, click the Photo Transport [Help] button. 87 Using the Camera with a Computer Move your Photo Transport setup. To transfer computer screen captures to your computer, click the following:... Start * All Programs * Casio * Photo Transport. Click the [Capture] button. 5. Draw a boundary around the area you selected to the camera. • The transfer operation converts screen captures to the upper left corner of...
Owners Manual
Page 96
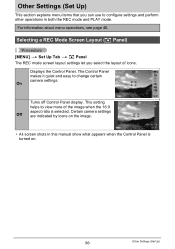
Displays the Control Panel. Certain camera settings Off are indicated by icons on . 96 Other Settings (Set Up) Other Settings (Set Up) This section explains menu items that you select the ... Control Panel is selected. The Control Panel makes it quick and easy to view more of icons. On Turns off Control Panel display. This setting helps to change certain camera settings. For information about menu operations, see page 46.
Displays the Control Panel. Certain camera settings Off are indicated by icons on . 96 Other Settings (Set Up) Other Settings (Set Up) This section explains menu items that you select the ... Control Panel is selected. The Control Panel makes it quick and easy to view more of icons. On Turns off Control Panel display. This setting helps to change certain camera settings. For information about menu operations, see page 46.
Owners Manual
Page 124
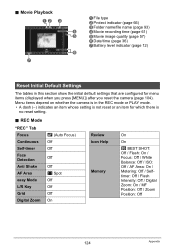
. REC Mode "REC" Tab Focus Continuous Self-timer Face Detection Anti Shake AF Area easy Mode L/R Key Grid Digital Zoom Q (Auto Focus) Off Off Off Off U Spot Off Off Off On Review Icon Help Memory On On b BEST SHOT: Off / Flash: On / Focus: Off / White Balance: Off / ISO: Off / AF Area:... On / Metering: Off / Selftimer: Off / Flash Intensity: Off / Digital Zoom: On / MF Position: Off / Zoom Position: Off 124 Appendix Menu items depend on whether the camera is in this ...
. REC Mode "REC" Tab Focus Continuous Self-timer Face Detection Anti Shake AF Area easy Mode L/R Key Grid Digital Zoom Q (Auto Focus) Off Off Off Off U Spot Off Off Off On Review Icon Help Memory On On b BEST SHOT: Off / Flash: On / Focus: Off / White Balance: Off / ISO: Off / AF Area:... On / Metering: Off / Selftimer: Off / Flash Intensity: Off / Digital Zoom: On / MF Position: Off / Zoom Position: Off 124 Appendix Menu items depend on whether the camera is in this ...


