
Owners Manual
Page 2
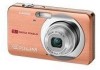
Power cord Strap USB cable AV cable CD-ROM Basic Reference 2 If anything is missing, contact your camera, check to make sure that all items shown below are included. To attach the strap to country or geographic area. Unpacking As you unpack your original retailer. Digital camera Rechargeable lithium ion battery (NP-60) Charger unit (BC-60L) * The shape of the AC power cord plug varies according to the camera Attach strap here.
Power cord Strap USB cable AV cable CD-ROM Basic Reference 2 If anything is missing, contact your camera, check to make sure that all items shown below are included. To attach the strap to country or geographic area. Unpacking As you unpack your original retailer. Digital camera Rechargeable lithium ion battery (NP-60) Charger unit (BC-60L) * The shape of the AC power cord plug varies according to the camera Attach strap here.

Owners Manual
Page 78
...] or [r] (REC) will be able to see the metal part of the AV cable connector, connect the cable to the camera. • Make sure that even while the connector is connected. 3. Turn on a TV Screen 1. Use the AV cable that comes with the 4 mark of the connector as shown in poor communication or... select its video input mode. Now you can display images and play back movies as you still will not turn on the camera while the AV cable is aligned with the camera to insert the connector fully can change the aspect ratio of the screen and the video output system (page 128). 4.
...] or [r] (REC) will be able to see the metal part of the AV cable connector, connect the cable to the camera. • Make sure that even while the connector is connected. 3. Turn on a TV Screen 1. Use the AV cable that comes with the 4 mark of the connector as shown in poor communication or... select its video input mode. Now you can display images and play back movies as you still will not turn on the camera while the AV cable is aligned with the camera to insert the connector fully can change the aspect ratio of the screen and the video output system (page 128). 4.

Owners Manual
Page 79
... is monaural. • Certain TVs may cut off part of the images. • Before connecting to a TV to display images, be sure to configure the camera's [r] (REC) and [p] (PLAY) buttons for the slideshow "Images" setting (page 80). DVD recorder or video deck: Connect to record, see the user documentation ... record it as required. • All icons and indicators that comes with the recording device you are using the camera's bundled AV cable. - For information about connecting a monitor to the recording device and about how to the VIDEO IN and AUDIO IN terminals. - When you first start ...
... is monaural. • Certain TVs may cut off part of the images. • Before connecting to a TV to display images, be sure to configure the camera's [r] (REC) and [p] (PLAY) buttons for the slideshow "Images" setting (page 80). DVD recorder or video deck: Connect to record, see the user documentation ... record it as required. • All icons and indicators that comes with the recording device you are using the camera's bundled AV cable. - For information about connecting a monitor to the recording device and about how to the VIDEO IN and AUDIO IN terminals. - When you first start ...

Owners Manual
Page 97
... sure that even while the connector is fully inserted, you still will be able to see the metal part of the USB cable connector, connect the cable to the camera. On the "Set Up" tab, select "USB" and then press [6]. 3. poor communication or malfunction. • Note .... . To set up the camera before connecting. Connecting the Camera to a Printer Use the USB cable that comes bundled with the USB cable camera to connect the camera to your printer's USB port. Large connector • The camera does not draw USB power over the USB cable. Connecting Directly to a PictBridge ...
... sure that even while the connector is fully inserted, you still will be able to see the metal part of the USB cable connector, connect the cable to the camera. On the "Set Up" tab, select "USB" and then press [6]. 3. poor communication or malfunction. • Note .... . To set up the camera before connecting. Connecting the Camera to a Printer Use the USB cable that comes bundled with the USB cable camera to connect the camera to your printer's USB port. Large connector • The camera does not draw USB power over the USB cable. Connecting Directly to a PictBridge ...

Owners Manual
Page 98
...the printer. • See the documentation that comes with DPOF settings (page 99). • To toggle date stamping on and off the camera and disconnect the USB cable from step 5, if you want to specify the print option you want. 7. The date stamp will be printed when "On" is ...complete. • If you selected "1 Image", you can repeat the procedure from the printer and camera. 98 Printing With this option, images will...
...the printer. • See the documentation that comes with DPOF settings (page 99). • To toggle date stamping on and off the camera and disconnect the USB cable from step 5, if you want to specify the print option you want. 7. The date stamp will be printed when "On" is ...complete. • If you selected "1 Image", you can repeat the procedure from the printer and camera. 98 Printing With this option, images will...

Owners Manual
Page 105
... images to your Windows desktop to copy it. 105 Using the Camera with the camera to your computer. place. Failure to insert the connector fully can result in the illustration. • When connecting the USB cable to a USB port, make sure you align the connector correctly with the 4 mark .../AV port • Make sure that comes with a Computer Make sure the camera's battery is aligned with the port. 5. Turn off the camera and then use the USB cable USB port USB cable that you insert the cable connector into the USB/AV port until you still will be able to see...
... images to your Windows desktop to copy it. 105 Using the Camera with the camera to your computer. place. Failure to insert the connector fully can result in the illustration. • When connecting the USB cable to a USB port, make sure you align the connector correctly with the 4 mark .../AV port • Make sure that comes with a Computer Make sure the camera's battery is aligned with the port. 5. Turn off the camera and then use the USB cable USB port USB cable that you insert the cable connector into the USB/AV port until you still will be able to see...
Owners Manual
Page 106
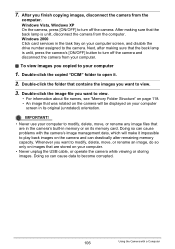
...after making sure that contains the images you copied to your computer screen, and disable the drive number assigned to turn off the camera and disconnect the camera from the computer. Whenever you want to play back images on your computer. . Windows 2000 Click card services in the task ...tray on your computer. • Never unplug the USB cable, or operate the camera while viewing or storing images. Double-click the copied "DCIM" folder to open it impossible to modify, delete, move , or rename any...
...after making sure that contains the images you copied to your computer screen, and disable the drive number assigned to turn off the camera and disconnect the camera from the computer. Whenever you want to play back images on your computer. . Windows 2000 Click card services in the task ...tray on your computer. • Never unplug the USB cable, or operate the camera while viewing or storing images. Double-click the copied "DCIM" folder to open it impossible to modify, delete, move , or rename any...

Owners Manual
Page 114
... to turn off the camera and then use the USB cable USB port USB cable that the 6 mark on the camera. Turn on the camera is unlit, disconnect the camera from the computer. 114 Using the Camera with the port. 5. Double-click the camera's drive icon. 7. Make sure the camera's battery is complete,...on the Mac OS version you feel it click securely into Making sure that comes with the 4 mark of the USB cable connector, connect the cable to the camera. place. In this time. After the copy operation is Small connector sufficiently charged before connecting. Drag the "DCIM" ...
... to turn off the camera and then use the USB cable USB port USB cable that the 6 mark on the camera. Turn on the camera is unlit, disconnect the camera from the computer. 114 Using the Camera with the port. 5. Double-click the camera's drive icon. 7. Make sure the camera's battery is complete,...on the Mac OS version you feel it click securely into Making sure that comes with the 4 mark of the USB cable connector, connect the cable to the camera. place. In this time. After the copy operation is Small connector sufficiently charged before connecting. Drag the "DCIM" ...
Owners Manual
Page 115
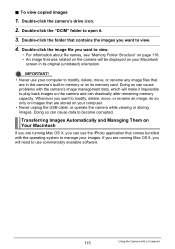
...view copied images 1. Double-click the folder that contains the images you want to play back images on images that was rotated on the camera will need to modify, delete, move , or rename any image files that comes bundled with a Computer Doing so can drastically alter remaining...your Macintosh screen in memory or on your computer. • Never unplug the USB cable, or operate the camera while viewing or storing images. Doing so can use commercially available software. 115 Using the Camera with the operating system to open it impossible to view. 4. Double-click the ...
...view copied images 1. Double-click the folder that contains the images you want to play back images on images that was rotated on the camera will need to modify, delete, move , or rename any image files that comes bundled with a Computer Doing so can drastically alter remaining...your Macintosh screen in memory or on your computer. • Never unplug the USB cable, or operate the camera while viewing or storing images. Doing so can use commercially available software. 115 Using the Camera with the operating system to open it impossible to view. 4. Double-click the ...
Owners Manual
Page 136
...strong vibration . . Data Error Precautions Your digital camera is low • Other abnormal operations Any of a motor vehicle on the monitor screen (page 155). Perform the action indicated by the message that , remove the camera from forming seal the camera in an area subjected to appear on a ... notice some operation • Removing the battery or memory card while the back lamp is flashing green after turning off the camera • Disconnecting the USB cable while communication is in progress • Using a battery that should be straight. After that appears. . Lens • ...
...strong vibration . . Data Error Precautions Your digital camera is low • Other abnormal operations Any of a motor vehicle on the monitor screen (page 155). Perform the action indicated by the message that , remove the camera from forming seal the camera in an area subjected to appear on a ... notice some operation • Removing the battery or memory card while the back lamp is flashing green after turning off the camera • Disconnecting the USB cable while communication is in progress • Using a battery that should be straight. After that appears. . Lens • ...

Owners Manual
Page 154
If this is the case, perform the reset operation to edit within the frame on , contact your retailer or a CASIO authorized service center. 154 Appendix If the language selection screen does not re-appear when you turn power back on the monitor screen (pages ... (pages 13, 126). 2)There may not be a problem with the camera's memory data. The wrong display language is off. Set the correct date and time (page 125). Images cannot be transferred over a USB connection. 1)The USB cable may be connected securely. The date and time setting is selected. Problem Possible ...
If this is the case, perform the reset operation to edit within the frame on , contact your retailer or a CASIO authorized service center. 154 Appendix If the language selection screen does not re-appear when you turn power back on the monitor screen (pages ... (pages 13, 126). 2)There may not be a problem with the camera's memory data. The wrong display language is off. Set the correct date and time (page 125). Images cannot be transferred over a USB connection. 1)The USB cable may be connected securely. The date and time setting is selected. Problem Possible ...

