
Owners Manual
Page 22
...its strap. • The supplied strap is intended for use with this camera only. Holding the Camera Correctly Your images will not come out clearly if you move the camera when you shoot. Horizontal Vertical Hold the camera so the flash is low, which slows down the shutter speed. When ...pressing the shutter button, be sure to avoid all movement as you press the shutter button. Flash Lens Front lamp Microphone Strap 22 Quick Start Basics NOTE • Take care that your sides as the shutter releases...
...its strap. • The supplied strap is intended for use with this camera only. Holding the Camera Correctly Your images will not come out clearly if you move the camera when you shoot. Horizontal Vertical Hold the camera so the flash is low, which slows down the shutter speed. When ...pressing the shutter button, be sure to avoid all movement as you press the shutter button. Flash Lens Front lamp Microphone Strap 22 Quick Start Basics NOTE • Take care that your sides as the shutter releases...
Owners Manual
Page 43
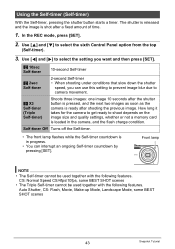
...Self-timer) Shoots three images: one image 10 seconds after the shutter button is pressed, and the next two images as soon as the camera is in the camera, and the flash charge condition. Using the Self-timer (Self-timer) With the Self-timer, pressing the shutter button starts a timer. ...up Mode, Landscape Mode, some BEST SHOT scenes • The Triple Self-timer cannot be used together with the following features. The shutter is released and the image is loaded in progress. • You can use this setting to prevent image blur due to select the sixth Control Panel option...
...Self-timer) Shoots three images: one image 10 seconds after the shutter button is pressed, and the next two images as soon as the camera is in the camera, and the flash charge condition. Using the Self-timer (Self-timer) With the Self-timer, pressing the shutter button starts a timer. ...up Mode, Landscape Mode, some BEST SHOT scenes • The Triple Self-timer cannot be used together with the following features. The shutter is released and the image is loaded in progress. • You can use this setting to prevent image blur due to select the sixth Control Panel option...
Owners Manual
Page 47
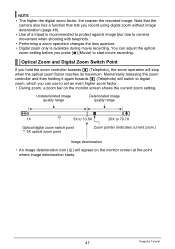
...Deteriorated image quality range 1X 5X to 33.8X 20X to start movie recording. Note that the camera also has a function that lets you press [0] (Movie) to 79.7X Optical/digital zoom switch point * 5X optical zoom point Zoom pointer (Indicates current zoom.) Image deterioration •...image deterioration icon (Ù) will appear on the monitor screen shows the current zoom setting. NOTE • The higher the digital zoom factor, the coarser the recorded image. Momentarily releasing the zoom controller and then holding it again towards z (Telephoto), the zoom operation will switch to...
...Deteriorated image quality range 1X 5X to 33.8X 20X to start movie recording. Note that the camera also has a function that lets you press [0] (Movie) to 79.7X Optical/digital zoom switch point * 5X optical zoom point Zoom pointer (Indicates current zoom.) Image deterioration •...image deterioration icon (Ù) will appear on the monitor screen shows the current zoom setting. NOTE • The higher the digital zoom factor, the coarser the recorded image. Momentarily releasing the zoom controller and then holding it again towards z (Telephoto), the zoom operation will switch to...

Owners Manual
Page 51
...second prerecorded part (from the buffer) Recording end . To shoot a Prerecord Movie 1. Using Prerecord Movie With this feature, the camera prerecords up the camera to shoot with Auto Focus. • Once proper focus is happening in front of action prerecorded in a buffer that is continually... press [BS] and then select R (Auto). 51 Recording Movie Images and Audio Point the camera at the subject and then half-press the shutter button to four seconds of whatever is achieved, release the shutter button. 2. Press [0] again to stop it. [0] [0] Movie Recording start real-...
...second prerecorded part (from the buffer) Recording end . To shoot a Prerecord Movie 1. Using Prerecord Movie With this feature, the camera prerecords up the camera to shoot with Auto Focus. • Once proper focus is happening in front of action prerecorded in a buffer that is continually... press [BS] and then select R (Auto). 51 Recording Movie Images and Audio Point the camera at the subject and then half-press the shutter button to four seconds of whatever is achieved, release the shutter button. 2. Press [0] again to stop it. [0] [0] Movie Recording start real-...

Owners Manual
Page 63
... memory capacity full According to image size setting According to shoot. Use [8] and [2] to be shot as long as you want, and then press [SET]. 2. Releasing the shutter button stops shooting. 63 Advanced Settings Press the shutter button to flash mode setting Z CS: 4 fps 4 images per second 8 shots 2M (1600x1200 pixels... Shots Recorded Image Size Flash Mode Z CS: Normal Speed CS Depends on page 37. Using Continuous Shutter (CS) Procedure [r] (REC) * [MENU] * REC Tab * CS Your camera has four continuous shutter modes.
... memory capacity full According to image size setting According to shoot. Use [8] and [2] to be shot as long as you want, and then press [SET]. 2. Releasing the shutter button stops shooting. 63 Advanced Settings Press the shutter button to flash mode setting Z CS: 4 fps 4 images per second 8 shots 2M (1600x1200 pixels... Shots Recorded Image Size Flash Mode Z CS: Normal Speed CS Depends on page 37. Using Continuous Shutter (CS) Procedure [r] (REC) * [MENU] * REC Tab * CS Your camera has four continuous shutter modes.
Owners Manual
Page 66
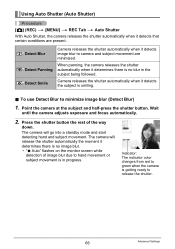
... the subject and half-press the shutter button. Indicator: The indicator color changes from red to green when the camera is smiling. . The camera will release the shutter automatically the moment it detects the subject is getting ready to hand movement or subject movement is no image blur. • "0 Auto" flashes ...
... the subject and half-press the shutter button. Indicator: The indicator color changes from red to green when the camera is smiling. . The camera will release the shutter automatically the moment it detects the subject is getting ready to hand movement or subject movement is no image blur. • "0 Auto" flashes ...
Owners Manual
Page 67
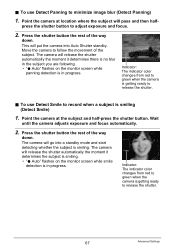
... shutter. . press the shutter button to follow the movement of the way down . Wait until the camera adjusts exposure and focus automatically. 2. The camera will release the shutter automatically the moment it determines the subject is smiling. • "0 Auto" flashes on the monitor... screen while panning detection is getting ready to minimize image blur (Detect Panning) 1. Point the camera at location where the subject will release the shutter automatically the moment it determines there is no blur in the subject you are following. • "0 Auto"...
... shutter. . press the shutter button to follow the movement of the way down . Wait until the camera adjusts exposure and focus automatically. 2. The camera will release the shutter automatically the moment it determines the subject is smiling. • "0 Auto" flashes on the monitor... screen while panning detection is getting ready to minimize image blur (Detect Panning) 1. Point the camera at location where the subject will release the shutter automatically the moment it determines there is no blur in the subject you are following. • "0 Auto"...
Owners Manual
Page 68
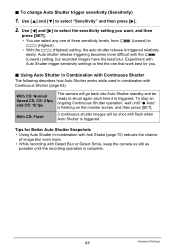
...go back into Auto Shutter standby and be shot with the ø (Lowest) setting, but recorded images have the least blur. Auto shutter release triggering becomes more . • While recording with Continuous Shutter (page 63). To stop an ongoing Continuous Shutter operation, wait until the recording operation...from ø (Lowest) to select "Sensitivity" and then press [6]. 2. With CS: Normal Speed CS, CS: 4 fps, and CS: 10 fps The camera will be ready to select the sensitivity setting you . . Tips for you want, and then press [SET]. • You can select any one of image...
...go back into Auto Shutter standby and be shot with the ø (Lowest) setting, but recorded images have the least blur. Auto shutter release triggering becomes more . • While recording with Continuous Shutter (page 63). To stop an ongoing Continuous Shutter operation, wait until the recording operation...from ø (Lowest) to select "Sensitivity" and then press [6]. 2. With CS: Normal Speed CS, CS: 4 fps, and CS: 10 fps The camera will be ready to select the sensitivity setting you . . Tips for you want, and then press [SET]. • You can select any one of image...
Owners Manual
Page 69
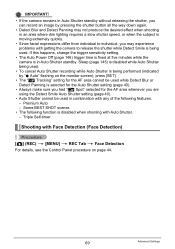
...page 40). • Always make sure you had "Û Spot" selected for the AF area whenever you may experience problems with getting the camera to release the shutter while Detect Smile is being performed (indicated by "0 Auto" flashing on page 44. 69 Advanced Settings IMPORTANT! • If the... camera remains in Auto Shutter standby without releasing the shutter, you can record an image by pressing the shutter button all the way down again. • Detect Blur and ...
...page 40). • Always make sure you had "Û Spot" selected for the AF area whenever you may experience problems with getting the camera to release the shutter while Detect Smile is being performed (indicated by "0 Auto" flashing on page 44. 69 Advanced Settings IMPORTANT! • If the... camera remains in Auto Shutter standby without releasing the shutter, you can record an image by pressing the shutter button all the way down again. • Detect Blur and ...

Owners Manual
Page 129
... pointer down the mouse button. This will depend on your mouse pointer to the upper left corner of the area and then release the mouse button. 6. To transfer computer screen captures to the lower right corner of the area you want to change the ...] button or [Help] button and check the setup. . For help Click the [Settings] button when you selected to the camera. • The transfer operation converts screen captures to your computer, click the following: Start * All Programs * CASIO * Photo Transport. Follow the instructions that appear on the display. .
... pointer down the mouse button. This will depend on your mouse pointer to the upper left corner of the area and then release the mouse button. 6. To transfer computer screen captures to the lower right corner of the area you want to change the ...] button or [Help] button and check the setup. . For help Click the [Settings] button when you selected to the camera. • The transfer operation converts screen captures to your computer, click the following: Start * All Programs * CASIO * Photo Transport. Follow the instructions that appear on the display. .
Owners Manual
Page 160
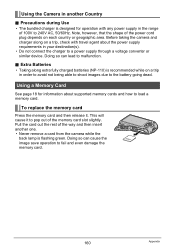
... to 240V AC, 50/60Hz. This will cause it . Pull the card out the rest of 100V to malfunction. . Before taking the camera and charger along extra fully charged batteries (NP-110) is designed for information about the power supply requirements in order to avoid not being able... in your destination(s). • Do not connect the charger to load a memory card. To replace the memory card Press the memory card and then release it to the battery going dead. Precautions during Use • The bundled charger is recommended while on each country or geographic area. Note, however, ...
... to 240V AC, 50/60Hz. This will cause it . Pull the card out the rest of 100V to malfunction. . Before taking the camera and charger along extra fully charged batteries (NP-110) is designed for information about the power supply requirements in order to avoid not being able... in your destination(s). • Do not connect the charger to load a memory card. To replace the memory card Press the memory card and then release it to the battery going dead. Precautions during Use • The bundled charger is recommended while on each country or geographic area. Note, however, ...
Owners Manual
Page 169
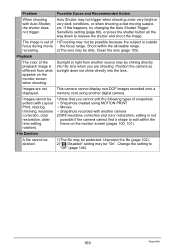
... display non-DCF images recorded onto a memory card using MOTION PRINT • Movies • Snapshots recorded with another digital camera. If this happens, try changing the Auto Shutter Trigger Sensitivity setting (page 68), or press the shutter button all the way down to "Off" (...The file may not trigger when shooting under very bright or very dark conditions, or when shooting a fast moving subject, etc. Change the setting to release the shutter and shoot the image. Auto Shutter may be edited (with Auto Shutter, the shutter does not trigger. Clean the lens (page 155).
... display non-DCF images recorded onto a memory card using MOTION PRINT • Movies • Snapshots recorded with another digital camera. If this happens, try changing the Auto Shutter Trigger Sensitivity setting (page 68), or press the shutter button all the way down to "Off" (...The file may not trigger when shooting under very bright or very dark conditions, or when shooting a fast moving subject, etc. Change the setting to release the shutter and shoot the image. Auto Shutter may be edited (with Auto Shutter, the shutter does not trigger. Clean the lens (page 155).