
Owners Manual
Page 6
... ❚ Deleting Continuous Shutter Images 86 ❚ Dividing Up a CS Group 86 Zooming an On-screen Image 87 Displaying the Image Menu 88 Displaying Images in the Calendar Screen 88 Viewing Snapshots and Movies on a TV Screen 89 ❚❙ Other Playback Functions (PLAY...) 91 Playing a Slideshow on the Camera Slideshow) . . 91 ❚ Saving Music from Your Computer to Camera Memory 92 Laying Out Snapshots with Layout Print Layout Print) . . 94 Creating a Snapshot of Movie Frames MOTION PRINT...
... ❚ Deleting Continuous Shutter Images 86 ❚ Dividing Up a CS Group 86 Zooming an On-screen Image 87 Displaying the Image Menu 88 Displaying Images in the Calendar Screen 88 Viewing Snapshots and Movies on a TV Screen 89 ❚❙ Other Playback Functions (PLAY...) 91 Playing a Slideshow on the Camera Slideshow) . . 91 ❚ Saving Music from Your Computer to Camera Memory 92 Laying Out Snapshots with Layout Print Layout Print) . . 94 Creating a Snapshot of Movie Frames MOTION PRINT...

Owners Manual
Page 9
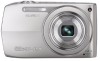
cn cm cl . Contacts 2[CHARGE] Lamp 3AC jack 3 9 Camera Front Back 1 234 5 8 9 bk bl [ ] [ ] [ ] [ ] [SET] 76 ck btbsbrbqbpbobnbm 1Zoom controller 9[BS] button (page 54) (pages 23, 46, 87, 88) bk[r] (REC) button 2Shutter button (... 5Front lamp 89, 115, 123, 132) (pages 43, 71) bnStrap hole (page 2) 6Microphone boConnector cover (pages 50, 105) bp[SET] button (page 31) 7Lens bq[MENU] button 8[AUTO] button (page 23) (page 61) br[p] (PLAY) button (pages 21, 27) bsBack lamp (pages 21, 24, 35) btControl button ([8] [2] [4] [6]) (pages 28, 31, 35...
cn cm cl . Contacts 2[CHARGE] Lamp 3AC jack 3 9 Camera Front Back 1 234 5 8 9 bk bl [ ] [ ] [ ] [ ] [SET] 76 ck btbsbrbqbpbobnbm 1Zoom controller 9[BS] button (page 54) (pages 23, 46, 87, 88) bk[r] (REC) button 2Shutter button (... 5Front lamp 89, 115, 123, 132) (pages 43, 71) bnStrap hole (page 2) 6Microphone boConnector cover (pages 50, 105) bp[SET] button (page 31) 7Lens bq[MENU] button 8[AUTO] button (page 23) (page 61) br[p] (PLAY) button (pages 21, 27) bsBack lamp (pages 21, 24, 35) btControl button ([8] [2] [4] [6]) (pages 28, 31, 35...

Owners Manual
Page 20
...result in non-conformity with the SD format, causing problems with compatibility, operation, etc. • Before formatting a new Eye-Fi card to use the camera to format a memory card. Formatting a memory card on it, will delete its contents. Turn on a computer can slow down or if you do... Select the "Set Up" tab, select "Format" and then press [6]. 3. In the case of an SD or SDHC memory card, formatting on the camera and press [MENU]. 2. Normally you notice any other files on a computer and then using it for the first time. 1. To format (initialize) a new memory card ...
...result in non-conformity with the SD format, causing problems with compatibility, operation, etc. • Before formatting a new Eye-Fi card to use the camera to format a memory card. Formatting a memory card on it, will delete its contents. Turn on a computer can slow down or if you do... Select the "Set Up" tab, select "Format" and then press [6]. 3. In the case of an SD or SDHC memory card, formatting on the camera and press [MENU]. 2. Normally you notice any other files on a computer and then using it for the first time. 1. To format (initialize) a new memory card ...

Owners Manual
Page 27
Viewing Snapshots Use the following procedure to view snapshots on the camera's monitor screen. • For information about the displayed snapshot also is included (page 174). • You also can clear the information to view only the ... recording a snapshot that is very important to you, it is displayed will display one of the snapshots currently stored in the PLAY mode or while a menu screen is recommended that you zoom the image and check its details after recording it. 2. Press [p] (PLAY) to enter the PLAY mode. • This will...
Viewing Snapshots Use the following procedure to view snapshots on the camera's monitor screen. • For information about the displayed snapshot also is included (page 174). • You also can clear the information to view only the ... recording a snapshot that is very important to you, it is displayed will display one of the snapshots currently stored in the PLAY mode or while a menu screen is recommended that you zoom the image and check its details after recording it. 2. Press [p] (PLAY) to enter the PLAY mode. • This will...

Owners Manual
Page 28
... the file you want to select "Yes" and then press [SET]. • This deletes the files you selected. • To exit the delete operation, press [MENU]. 28 Quick Start Basics IMPORTANT! • Remember that a file (image) delete operation cannot be undone. • Deleting an audio snapshot (page 105) deletes both the... memory becomes full, you can delete images you no longer need to select other files, repeat steps 2 and 3. • To exit the delete operation, press [MENU]. Repeat step 3 to free up storage and record more images. Use [8] and [2] to delete is displayed. 3.
... the file you want to select "Yes" and then press [SET]. • This deletes the files you selected. • To exit the delete operation, press [MENU]. 28 Quick Start Basics IMPORTANT! • Remember that a file (image) delete operation cannot be undone. • Deleting an audio snapshot (page 105) deletes both the... memory becomes full, you can delete images you no longer need to select other files, repeat steps 2 and 3. • To exit the delete operation, press [MENU]. Repeat step 3 to free up storage and record more images. Use [8] and [2] to delete is displayed. 3.

Owners Manual
Page 32
...items. • To return the Control Panel items to specify the eight items you want on a computer, etc. Pixel 32 Snapshot Tutorial Pixels A digital camera image is fixed and cannot be . However, you generally can use the following procedure to their initial defaults, reset the...and then press [SET]. Use [8], [2], [4], and [6] to the REC mode and displays the Control Panel. • To exit the item select operation, press [MENU]. Changing the Image Size (Size) . Specifying Control Panel Items You can do with the items currently selected for the Control Panel.
...items. • To return the Control Panel items to specify the eight items you want on a computer, etc. Pixel 32 Snapshot Tutorial Pixels A digital camera image is fixed and cannot be . However, you generally can use the following procedure to their initial defaults, reset the...and then press [SET]. Use [8], [2], [4], and [6] to the REC mode and displays the Control Panel. • To exit the item select operation, press [MENU]. Changing the Image Size (Size) . Specifying Control Panel Items You can do with the items currently selected for the Control Panel.

Owners Manual
Page 53
... extension) To play . ` is paused, press [4] or [6] to jump to the next marker and then press [SET] to start playback. Press [2] and then press [8] [2] [8] (DISP) [MENU] 53 Recording Movie Images and Audio In the PLAY mode, use [8] (DISP) during audio recording to toggle the monitor screen on a computer with Windows Media...
... extension) To play . ` is paused, press [4] or [6] to jump to the next marker and then press [SET] to start playback. Press [2] and then press [8] [2] [8] (DISP) [MENU] 53 Recording Movie Images and Audio In the PLAY mode, use [8] (DISP) during audio recording to toggle the monitor screen on a computer with Windows Media...

Owners Manual
Page 54
... multiple pages. This will cause the boundary to jump directly to achieve, and the camera sets up for details. • To return to scroll between menu pages. • You can access information about the currently selected scene. Use [8], [2], [4], and [6] to move the boundary to poor exposure and shutter ... To shoot an image with a collection of shooting conditions. See page 55 for it automatically. When you need to change the setup of the camera, simply find the scene that show a variety of different types of sample "scenes" that matches what you are trying to R (Auto). [BS...
... multiple pages. This will cause the boundary to jump directly to achieve, and the camera sets up for details. • To return to scroll between menu pages. • You can access information about the currently selected scene. Use [8], [2], [4], and [6] to move the boundary to poor exposure and shutter ... To shoot an image with a collection of shooting conditions. See page 55 for it automatically. When you need to change the setup of the camera, simply find the scene that show a variety of different types of sample "scenes" that matches what you are trying to R (Auto). [BS...

Owners Manual
Page 55
...The settings of the scene you selected remain in effect until you are stored in either direction. • To return to configure the camera with the settings for uploading (page 138). Movies recorded with the YouTube scene are shooting a movie). Maximum recording time while the YouTube... scene information screen for the currently selected scene. 3. Press [SET] to the scene menu, slide the zoom controller again. • To scroll between scenes, use [4] and [6]. • To configure the camera with the settings for the currently selected BEST SHOT scene, press [BS]. 55 Using ...
...The settings of the scene you selected remain in effect until you are stored in either direction. • To return to configure the camera with the settings for uploading (page 138). Movies recorded with the YouTube scene are shooting a movie). Maximum recording time while the YouTube... scene information screen for the currently selected scene. 3. Press [SET] to the scene menu, slide the zoom controller again. • To scroll between scenes, use [4] and [6]. • To configure the camera with the settings for the currently selected BEST SHOT scene, press [BS]. 55 Using ...

Owners Manual
Page 57
.... • The following are the settings that are saved for each user snapshot BEST SHOT scene. C 57 Using BEST SHOT Use [8] and [2] to 999 camera setups as a user BEST SHOT setup. Face Detection, Focus, EV Shift, White Balance, Flash, ISO, Metering, Lighting, Make-up to select "Save", and... then press [SET]. Creating Your Own BEST SHOT Setups You can save . 3. On the BEST SHOT scene menu, select the scene named BEST SHOT (Register User Scene). 2. Your BEST SHOT scene will be assigned the name "Recall User Scene", along with Premium ...
.... • The following are the settings that are saved for each user snapshot BEST SHOT scene. C 57 Using BEST SHOT Use [8] and [2] to 999 camera setups as a user BEST SHOT setup. Face Detection, Focus, EV Shift, White Balance, Flash, ISO, Metering, Lighting, Make-up to select "Save", and... then press [SET]. Creating Your Own BEST SHOT Setups You can save . 3. On the BEST SHOT scene menu, select the scene named BEST SHOT (Register User Scene). 2. Your BEST SHOT scene will be assigned the name "Recall User Scene", along with Premium ...

Owners Manual
Page 61
...Premium Auto" (page 23) will display the menu screen. • Menu contents are menu operations you want . • Pressing [MENU] interrupts the menu operation and exits the menu screen. Use [4] and [6] to select the tab where the item you can use to configure various camera settings. • You also can use ...[4] and [6] to select the menu item you want to change the setting. 5. In the REC mode, press [MENU]. Use [8] and [2] to configure is selected on the menu screen. Advanced Settings The following...
...Premium Auto" (page 23) will display the menu screen. • Menu contents are menu operations you want . • Pressing [MENU] interrupts the menu operation and exits the menu screen. Use [4] and [6] to select the tab where the item you can use to configure various camera settings. • You also can use ...[4] and [6] to select the menu item you want to change the setting. 5. In the REC mode, press [MENU]. Use [8] and [2] to configure is selected on the menu screen. Advanced Settings The following...
Owners Manual
Page 62
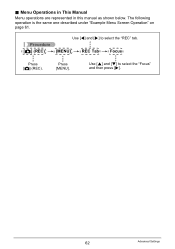
Menu Operations in This Manual Menu operations are represented in this manual as shown below. Procedure [r] (REC) * [MENU] * REC Tab * Focus Press [r] (REC). . The following operation is the same one described under "Example Menu Screen Operation" on page 61. Use [4] and [6] to select the "Focus" and then press [6]. 62 Advanced Settings Use [8] and [2] to select the "REC" tab. Press [MENU].
Menu Operations in This Manual Menu operations are represented in this manual as shown below. Procedure [r] (REC) * [MENU] * REC Tab * Focus Press [r] (REC). . The following operation is the same one described under "Example Menu Screen Operation" on page 61. Use [4] and [6] to select the "Focus" and then press [6]. 62 Advanced Settings Use [8] and [2] to select the "REC" tab. Press [MENU].

Owners Manual
Page 63
REC Mode Settings (REC) Selecting a Focus Mode (Focus) Procedure [r] (REC) * [MENU] * REC Tab * Focus For details, see the Control Panel procedure on Until memory card memory capacity full According to image size setting According to flash ... speed Maximum CS Shots Recorded Image Size Flash Mode Z CS: Normal Speed CS Depends on page 37. Using Continuous Shutter (CS) Procedure [r] (REC) * [MENU] * REC Tab * CS Your camera has four continuous shutter modes. Images continue to be shot as long as you want, and then press [SET]. 2. Releasing the shutter button...
REC Mode Settings (REC) Selecting a Focus Mode (Focus) Procedure [r] (REC) * [MENU] * REC Tab * Focus For details, see the Control Panel procedure on Until memory card memory capacity full According to image size setting According to flash ... speed Maximum CS Shots Recorded Image Size Flash Mode Z CS: Normal Speed CS Depends on page 37. Using Continuous Shutter (CS) Procedure [r] (REC) * [MENU] * REC Tab * CS Your camera has four continuous shutter modes. Images continue to be shot as long as you want, and then press [SET]. 2. Releasing the shutter button...

Owners Manual
Page 64
... you want and then press [SET]. Save All Saves all the images. Save Selected: Saves selected images. CS: 4 fps/10 fps 1. . Buttons Used for saving. [MENU] Saves the selected images and exits the image select operation. 3Use [8] and [2] to select the save method you want to save , press...
... you want and then press [SET]. Save All Saves all the images. Save Selected: Saves selected images. CS: 4 fps/10 fps 1. . Buttons Used for saving. [MENU] Saves the selected images and exits the image select operation. 3Use [8] and [2] to select the save method you want to save , press...

Owners Manual
Page 65
...number of CS images indicated on page 43. 65 Advanced Settings Some BEST SHOT scenes - Using the Self-timer (Self-timer) Procedure [r] (REC) * [MENU] * REC Tab * Self-timer For details, see the Control Panel procedure on the monitor screen. This does not indicate malfunction. Make-up Mode, Landscape Mode...with any of the following. - Make sure your memory card has sufficient remaining capacity before shooting with using a continuous shutter mode, keep the camera still until shooting is finished. • Continuous shutter cannot be able to digital noise than that for storage.
...number of CS images indicated on page 43. 65 Advanced Settings Some BEST SHOT scenes - Using the Self-timer (Self-timer) Procedure [r] (REC) * [MENU] * REC Tab * Self-timer For details, see the Control Panel procedure on the monitor screen. This does not indicate malfunction. Make-up Mode, Landscape Mode...with any of the following. - Make sure your memory card has sufficient remaining capacity before shooting with using a continuous shutter mode, keep the camera still until shooting is finished. • Continuous shutter cannot be able to digital noise than that for storage.
Owners Manual
Page 66
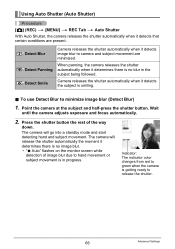
...Advanced Settings Press the shutter button the rest of image blur due to green when the camera is smiling. . Wait until the camera adjusts exposure and focus automatically. 2. The camera will release the shutter automatically the moment it determines there is in the subject being ...followed. Using Auto Shutter (Auto Shutter) Procedure [r] (REC) * [MENU] * REC Tab * Auto Shutter With Auto Shutter, the camera releases the shutter automatically when it detects that certain conditions are present. ¸ Detect Blur ¯ Detect Panning ...
...Advanced Settings Press the shutter button the rest of image blur due to green when the camera is smiling. . Wait until the camera adjusts exposure and focus automatically. 2. The camera will release the shutter automatically the moment it determines there is in the subject being ...followed. Using Auto Shutter (Auto Shutter) Procedure [r] (REC) * [MENU] * REC Tab * Auto Shutter With Auto Shutter, the camera releases the shutter automatically when it detects that certain conditions are present. ¸ Detect Blur ¯ Detect Panning ...
Owners Manual
Page 69
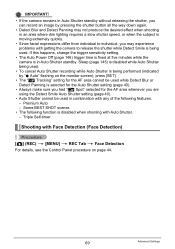
... any of the following function is disabled when shooting with getting the camera to release the shutter while Detect Smile is in Auto Shutter standby. Triple Self-timer Shooting with Face Detection (Face Detection) Procedure [r] (REC) * [MENU] * REC Tab * Face Detection For details, see the Control... you are using the Detect Smile Auto Shutter setting (page 40). • Auto Shutter cannot be used . IMPORTANT! • If the camera remains in Auto Shutter standby without releasing the shutter, you can record an image by "0 Auto" flashing on page 44. 69 Advanced Settings Premium...
... any of the following function is disabled when shooting with getting the camera to release the shutter while Detect Smile is in Auto Shutter standby. Triple Self-timer Shooting with Face Detection (Face Detection) Procedure [r] (REC) * [MENU] * REC Tab * Face Detection For details, see the Control... you are using the Detect Smile Auto Shutter setting (page 40). • Auto Shutter cannot be used . IMPORTANT! • If the camera remains in Auto Shutter standby without releasing the shutter, you can record an image by "0 Auto" flashing on page 44. 69 Advanced Settings Premium...

Owners Manual
Page 70
... Shake) Procedure [r] (REC) * [MENU] * REC Tab * Anti Shake You can turn off Anti Shake settings NOTE • Only Camera Stabilizer can cause slight deterioration of image resolution. • Anti Shake may not work properly when the camera is mounted on a tripod. Your digital camera is not recorded. Minimizes the effects of camera movement only Minimizes the...
... Shake) Procedure [r] (REC) * [MENU] * REC Tab * Anti Shake You can turn off Anti Shake settings NOTE • Only Camera Stabilizer can cause slight deterioration of image resolution. • Anti Shake may not work properly when the camera is mounted on a tripod. Your digital camera is not recorded. Minimizes the effects of camera movement only Minimizes the...

Owners Manual
Page 71
...which provides illumination for focusing in areas where lighting is dim. Front lamp 71 Advanced Settings Specifying the Auto Focus Area (AF Area) Procedure [r] (REC) * [MENU] * REC Tab * AF Area For details, see the Control Panel procedure on page 40. IMPORTANT! • Never look directly into the front lamp while it... is recommended when shooting portraits from short distances, etc. Using the Auto Focus Assist Light (AF Assist Light) Procedure [r] (REC) * [MENU] * REC Tab * AF Assist Light Half-pressing the shutter button while this function turned off is lit.
...which provides illumination for focusing in areas where lighting is dim. Front lamp 71 Advanced Settings Specifying the Auto Focus Area (AF Area) Procedure [r] (REC) * [MENU] * REC Tab * AF Area For details, see the Control Panel procedure on page 40. IMPORTANT! • Never look directly into the front lamp while it... is recommended when shooting portraits from short distances, etc. Using the Auto Focus Assist Light (AF Assist Light) Procedure [r] (REC) * [MENU] * REC Tab * AF Assist Light Half-pressing the shutter button while this function turned off is lit.

Owners Manual
Page 72
Changing the Focus Frame Shape (Focus Frame) Procedure [r] (REC) * [MENU] * REC Tab * Focus Frame You can use this setting to turn digital zoom on or off , operating the zoom controller zooms the image with face detection, the frame shape is ß. • On-...Random" is selected, one of the shapes shown below. Turning Digital Zoom On or Off (Digital Zoom) Procedure [r] (REC) * [MENU] * REC Tab * Digital Zoom You can use this procedure to change one of the four focus frames is selected randomly whenever the camera is turned on. • When shooting with optical zoom only....
Changing the Focus Frame Shape (Focus Frame) Procedure [r] (REC) * [MENU] * REC Tab * Focus Frame You can use this setting to turn digital zoom on or off , operating the zoom controller zooms the image with face detection, the frame shape is ß. • On-...Random" is selected, one of the shapes shown below. Turning Digital Zoom On or Off (Digital Zoom) Procedure [r] (REC) * [MENU] * REC Tab * Digital Zoom You can use this procedure to change one of the four focus frames is selected randomly whenever the camera is turned on. • When shooting with optical zoom only....
