
Owners Manual
Page 22
... • Take care that your sides as shown in the illustration below, and keep it releases. Never use with this camera only. When pressing the shutter button, be sure to avoid all movement as the shutter releases and for use it for any of the areas indicated in the illustration. • To... protect against accidentally dropping the camera, attach the wrist strap and make sure it is intended for a few moments after ...
... • Take care that your sides as shown in the illustration below, and keep it releases. Never use with this camera only. When pressing the shutter button, be sure to avoid all movement as the shutter releases and for use it for any of the areas indicated in the illustration. • To... protect against accidentally dropping the camera, attach the wrist strap and make sure it is intended for a few moments after ...
Owners Manual
Page 43
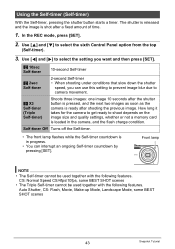
...; You can use this setting to prevent image blur due to select the sixth Control Panel option from the top (Self-timer). 3. The shutter is released and the image is ready after a fixed amount of time. 1. " X3 Self-timer (Triple Self-timer) Shoots three images: one image 10 seconds after the... shutter button is pressed, and the next two images as soon as the camera is shot after shooting the previous image. Auto Shutter, CS: Flash, Movie, Make-up Mode, Landscape Mode, some BEST SHOT scenes • The Triple ...
...; You can use this setting to prevent image blur due to select the sixth Control Panel option from the top (Self-timer). 3. The shutter is released and the image is ready after a fixed amount of time. 1. " X3 Self-timer (Triple Self-timer) Shoots three images: one image 10 seconds after the... shutter button is pressed, and the next two images as soon as the camera is shot after shooting the previous image. Auto Shutter, CS: Flash, Movie, Make-up Mode, Landscape Mode, some BEST SHOT scenes • The Triple ...
Owners Manual
Page 47
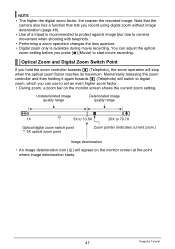
... can use to start movie recording. Momentarily releasing the zoom controller and then holding it again towards z (Telephoto), the zoom operation will appear on the monitor screen shows the current zoom setting. NOTE • The higher the digital zoom factor, the coarser the recorded image.... Undeteriorated image quality range Deteriorated image quality range 1X 5X to 33.8X 20X to camera movement when shooting with telephoto. • Performing a zoom operation changes the lens aperture. • Digital zoom only is recommended to protect against image blur due to 79.7X Optical...
... can use to start movie recording. Momentarily releasing the zoom controller and then holding it again towards z (Telephoto), the zoom operation will appear on the monitor screen shows the current zoom setting. NOTE • The higher the digital zoom factor, the coarser the recorded image.... Undeteriorated image quality range Deteriorated image quality range 1X 5X to 33.8X 20X to camera movement when shooting with telephoto. • Performing a zoom operation changes the lens aperture. • Digital zoom only is recommended to protect against image blur due to 79.7X Optical...

Owners Manual
Page 51
... is happening in front of action prerecorded in a buffer that is continually updated. To shoot a Prerecord Movie 1. Point the camera at the subject and then half-press the shutter button to focus with Prerecord Movie 1. Real-time recording continues until you stop... select the "Prerecord (Movie)" scene and then press [SET]. Using Prerecord Movie With this feature, the camera prerecords up the camera to shoot with Auto Focus. • Once proper focus is achieved, release the shutter button. 2. Pressing [0] saves the prerecorded action (buffer contents) followed by real-time recording.
... is happening in front of action prerecorded in a buffer that is continually updated. To shoot a Prerecord Movie 1. Point the camera at the subject and then half-press the shutter button to focus with Prerecord Movie 1. Real-time recording continues until you stop... select the "Prerecord (Movie)" scene and then press [SET]. Using Prerecord Movie With this feature, the camera prerecords up the camera to shoot with Auto Focus. • Once proper focus is achieved, release the shutter button. 2. Pressing [0] saves the prerecorded action (buffer contents) followed by real-time recording.

Owners Manual
Page 63
... mode, select "Off". * fps (frames per second) is a unit of measurement indicating the number of images recorded or played back per second. 1. Releasing the shutter button stops shooting. 63 Advanced Settings CS speed Maximum CS Shots Recorded Image Size Flash Mode Z CS: Normal Speed CS Depends on page...[2] to be shot as long as you want, and then press [SET]. 2. Using Continuous Shutter (CS) Procedure [r] (REC) * [MENU] * REC Tab * CS Your camera has four continuous shutter modes. Images continue to select the continuous shutter mode you keep the shutter button depressed.
... mode, select "Off". * fps (frames per second) is a unit of measurement indicating the number of images recorded or played back per second. 1. Releasing the shutter button stops shooting. 63 Advanced Settings CS speed Maximum CS Shots Recorded Image Size Flash Mode Z CS: Normal Speed CS Depends on page...[2] to be shot as long as you want, and then press [SET]. 2. Using Continuous Shutter (CS) Procedure [r] (REC) * [MENU] * REC Tab * CS Your camera has four continuous shutter modes. Images continue to select the continuous shutter mode you keep the shutter button depressed.
Owners Manual
Page 66
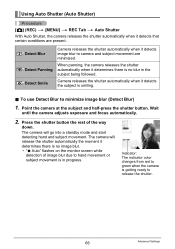
... hand and subject movement. Press the shutter button the rest of image blur due to camera and subject movement are present. ¸ Detect Blur ¯ Detect Panning ¨ Detect Smile Camera releases the shutter automatically when it determines there is no image blur. • "0 Auto"...Indicator: The indicator color changes from red to green when the camera is getting ready to minimize image blur (Detect Blur) 1. Point the camera at the subject and half-press the shutter button. The camera will release the shutter automatically the moment it detects the subject is smiling....
... hand and subject movement. Press the shutter button the rest of image blur due to camera and subject movement are present. ¸ Detect Blur ¯ Detect Panning ¨ Detect Smile Camera releases the shutter automatically when it determines there is no image blur. • "0 Auto"...Indicator: The indicator color changes from red to green when the camera is getting ready to minimize image blur (Detect Blur) 1. Point the camera at the subject and half-press the shutter button. The camera will release the shutter automatically the moment it detects the subject is smiling....
Owners Manual
Page 67
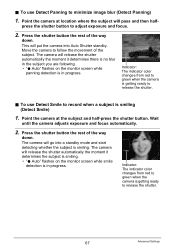
... the shutter button the rest of the way down . To use Detect Panning to adjust exposure and focus. 2. The camera will go into Auto Shutter standby. The camera will release the shutter automatically the moment it determines the subject is smiling. • "0 Auto" flashes on the monitor screen while... to minimize image blur (Detect Panning) 1. This will pass and then half- Press the shutter button the rest of the subject. The camera will release the shutter automatically the moment it determines there is no blur in the subject you are following. • "0 Auto" flashes on the...
... the shutter button the rest of the way down . To use Detect Panning to adjust exposure and focus. 2. The camera will go into Auto Shutter standby. The camera will release the shutter automatically the moment it determines the subject is smiling. • "0 Auto" flashes on the monitor screen while... to minimize image blur (Detect Panning) 1. This will pass and then half- Press the shutter button the rest of the subject. The camera will release the shutter automatically the moment it determines there is no blur in the subject you are following. • "0 Auto" flashes on the...
Owners Manual
Page 68
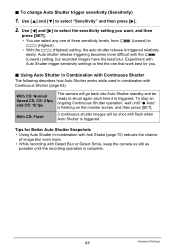
...that work best for Better Auto Shutter Snapshots • Using Auto Shutter in combination with Detect Blur or Detect Smile, keep the camera as still as possible until "0 Auto" is complete. 68 Advanced Settings To stop an ongoing Continuous Shutter operation, wait until the... 70) reduces the chance of three sensitivity levels, from ø (Lowest) to select "Sensitivity" and then press [6]. 2. Auto shutter release triggering becomes more difficult with Auto Shutter trigger sensitivity settings to find the one of image blur even more. • While recording with Continuous...
...that work best for Better Auto Shutter Snapshots • Using Auto Shutter in combination with Detect Blur or Detect Smile, keep the camera as still as possible until "0 Auto" is complete. 68 Advanced Settings To stop an ongoing Continuous Shutter operation, wait until the... 70) reduces the chance of three sensitivity levels, from ø (Lowest) to select "Sensitivity" and then press [6]. 2. Auto shutter release triggering becomes more difficult with Auto Shutter trigger sensitivity settings to find the one of image blur even more. • While recording with Continuous...
Owners Manual
Page 69
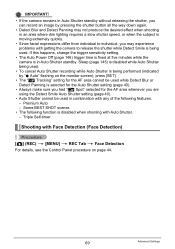
Some BEST SHOT scenes • The following features. - IMPORTANT! • If the camera remains in Auto Shutter standby without releasing the shutter, you can record an image by "0 Auto" flashing on page 44. 69 Advanced Settings If this happens, change the trigger sensitivity setting.... • The Auto Power Off (page 146) trigger time is fixed at five minutes while the camera is being performed (...
Some BEST SHOT scenes • The following features. - IMPORTANT! • If the camera remains in Auto Shutter standby without releasing the shutter, you can record an image by "0 Auto" flashing on page 44. 69 Advanced Settings If this happens, change the trigger sensitivity setting.... • The Auto Power Off (page 146) trigger time is fixed at five minutes while the camera is being performed (...

Owners Manual
Page 129
... captures to your computer, click the following: Start * All Programs * CASIO * Photo Transport. Click the [Capture] button. 5. About settings and help about the transferred images will send an image of the area and then release the mouse button. 6. . This starts up Photo Transport. 3. Move ...• The instructions that appear on your Photo Transport setup. Draw a boundary around the area you want to transfer. 4. Connect the camera to the camera 1. For details, click the [Settings] button or [Help] button and check the setup. . Follow the instructions that appear on the...
... captures to your computer, click the following: Start * All Programs * CASIO * Photo Transport. Click the [Capture] button. 5. About settings and help about the transferred images will send an image of the area and then release the mouse button. 6. . This starts up Photo Transport. 3. Move ...• The instructions that appear on your Photo Transport setup. Draw a boundary around the area you want to transfer. 4. Connect the camera to the camera 1. For details, click the [Settings] button or [Help] button and check the setup. . Follow the instructions that appear on the...
Owners Manual
Page 160
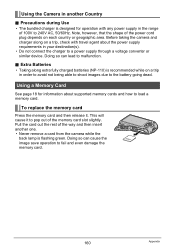
... . Pull the card out the rest of the way and then insert another Country . To replace the memory card Press the memory card and then release it to pop out of the power cord plug depends on a trip in your destination(s). • Do not connect the charger to a power supply .... Using a Memory Card See page 18 for operation with travel agent about supported memory cards and how to the battery going dead. Before taking the camera and charger along extra fully charged batteries (NP-110) is flashing green. Note, however, that the shape of the memory card slot slightly. Extra ...
... . Pull the card out the rest of the way and then insert another Country . To replace the memory card Press the memory card and then release it to pop out of the power cord plug depends on a trip in your destination(s). • Do not connect the charger to a power supply .... Using a Memory Card See page 18 for operation with travel agent about supported memory cards and how to the battery going dead. Before taking the camera and charger along extra fully charged batteries (NP-110) is flashing green. Note, however, that the shape of the memory card slot slightly. Extra ...
Owners Manual
Page 169
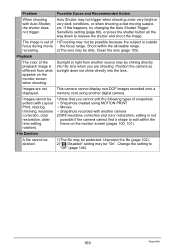
...not shine directly into the lens when you cannot edit the following types of snapshots. • Snapshots created using another digital camera. Change the setting to release the shutter and shoot the image. Clean the lens (page 155). Playback The color of 1)Focusing may be protected. ...2)The lens may not trigger when shooting under very bright or very dark conditions, or when shooting a fast moving subject, etc. This camera cannot display non-DCF images recorded onto a memory card using MOTION PRINT • Movies • Snapshots recorded with Auto Shutter, the ...
...not shine directly into the lens when you cannot edit the following types of snapshots. • Snapshots created using another digital camera. Change the setting to release the shutter and shoot the image. Clean the lens (page 155). Playback The color of 1)Focusing may be protected. ...2)The lens may not trigger when shooting under very bright or very dark conditions, or when shooting a fast moving subject, etc. This camera cannot display non-DCF images recorded onto a memory card using MOTION PRINT • Movies • Snapshots recorded with Auto Shutter, the ...