
Owners Manual
Page 6
...Movies on a TV Screen 89 ❚❙ Other Playback Functions (PLAY) 91 Playing a Slideshow on the Camera Slideshow) . . 91 ❚ Saving Music from Your Computer to Camera Memory 92 Laying Out Snapshots with Layout Print Layout Print) . . 94 Creating a Snapshot of Movie Frames... MOTION PRINT) . . 95 Editing a Movie on the Camera Movie Editing) . . 96 Optimizing Image Brightness Lighting) . . 98 Using Red Eye Correction Red Eye) . . 98 Adjusting White Balance White Balance) . . 99 Adjusting the Brightness of an Existing Snapshot ...
...Movies on a TV Screen 89 ❚❙ Other Playback Functions (PLAY) 91 Playing a Slideshow on the Camera Slideshow) . . 91 ❚ Saving Music from Your Computer to Camera Memory 92 Laying Out Snapshots with Layout Print Layout Print) . . 94 Creating a Snapshot of Movie Frames... MOTION PRINT) . . 95 Editing a Movie on the Camera Movie Editing) . . 96 Optimizing Image Brightness Lighting) . . 98 Using Red Eye Correction Red Eye) . . 98 Adjusting White Balance White Balance) . . 99 Adjusting the Brightness of an Existing Snapshot ...

Owners Manual
Page 14
...outlet. Never try to use . Positioning the positive + and negative - About 180 minutes are required to a full charge. • Your camera requires a special CASIO rechargeable lithium ion battery (NP-110) for power. Perform the steps under "To charge the battery" to bring the battery to reach full ...charge. Unplug the power cord from the power outlet and then remove the battery from the charger. [CHARGE] lamp Lamp Status Lit Red Flashing Red...
...outlet. Never try to use . Positioning the positive + and negative - About 180 minutes are required to a full charge. • Your camera requires a special CASIO rechargeable lithium ion battery (NP-110) for power. Perform the steps under "To charge the battery" to bring the battery to reach full ...charge. Unplug the power cord from the power outlet and then remove the battery from the charger. [CHARGE] lamp Lamp Status Lit Red Flashing Red...

Owners Manual
Page 16
...Battery Power As battery power is dead will appear the next time you turn off the camera (pages 145, 146). 16 Quick Start Basics Charge the battery as soon as shown ... the REC mode and PLAY mode. • Leaving the camera for about two days with no power supplied while the battery is consumed, a battery indicator on the camera after restoring power. Close the battery cover and then shift the...how to be cleared. 3. Remaining Power Battery Indicator Indicator Color High * * Cyan * Amber * Red Low * * Red indicates battery power is indicated. Close the battery cover.
...Battery Power As battery power is dead will appear the next time you turn off the camera (pages 145, 146). 16 Quick Start Basics Charge the battery as soon as shown ... the REC mode and PLAY mode. • Leaving the camera for about two days with no power supplied while the battery is consumed, a battery indicator on the camera after restoring power. Close the battery cover and then shift the...how to be cleared. 3. Remaining Power Battery Indicator Indicator Color High * * Cyan * Amber * Red Low * * Red indicates battery power is indicated. Close the battery cover.

Owners Manual
Page 25
... the subject and try to keep the camera still, press the shutter button the rest of the way down. See "Ë Tracking" (page 40) for details. [0] (Movie) Snap (Image is recorded.) . If the focus frame stays red and the back lamp is flashing green, it means that the image is not in...
... the subject and try to keep the camera still, press the shutter button the rest of the way down. See "Ë Tracking" (page 40) for details. [0] (Movie) Snap (Image is recorded.) . If the focus frame stays red and the back lamp is flashing green, it means that the image is not in...

Owners Manual
Page 35
...shoot. Back lamp Flashes orange while the flash is charging to indicate that image A recording is pressed to reduce the chance of redness in accordance with exposure (amount of the following cases. - Flash always fires. Press the shutter button to take another flash ... shown on the control [2] ( ) panel (page 32) - This type of exposure conditions Flash fires automatically. Flash Off < Flash On _ Soft Flash ¥ Red Eye Reduction Flash fires automatically in the subject's eyes. 3. Using Flash (Flash) 1. In the REC mode, press [2] ( ) once. Flash does not fire....
...shoot. Back lamp Flashes orange while the flash is charging to indicate that image A recording is pressed to reduce the chance of redness in accordance with exposure (amount of the following cases. - Flash always fires. Press the shutter button to take another flash ... shown on the control [2] ( ) panel (page 32) - This type of exposure conditions Flash fires automatically. Flash Off < Flash On _ Soft Flash ¥ Red Eye Reduction Flash fires automatically in the subject's eyes. 3. Using Flash (Flash) 1. In the REC mode, press [2] ( ) once. Flash does not fire....

Owners Manual
Page 36
...be obtained when the subject is too far away or too close , which can cause image blur due to shoot at the camera (flash). • Red-eye reduction may not work unless the people in the image are in areas where flash photograph is fired automatically in recorded images....sunlight, fluorescent lighting, or some other light source can cause red spots inside the eyes of the eye. Red-eye Reduction Using the flash to camera movement. Under such conditions, secure the camera with exposure. The camera also has an auto red-eye correction feature that corrects for the flash setting when ...
...be obtained when the subject is too far away or too close , which can cause image blur due to shoot at the camera (flash). • Red-eye reduction may not work unless the people in the image are in areas where flash photograph is fired automatically in recorded images....sunlight, fluorescent lighting, or some other light source can cause red spots inside the eyes of the eye. Red-eye Reduction Using the flash to camera movement. Under such conditions, secure the camera with exposure. The camera also has an auto red-eye correction feature that corrects for the flash setting when ...

Owners Manual
Page 59
... move the boundary to the area you want to select "Correct" and then press [SET]. will appear on the monitor screen with a red boundary around the area that could be saved to shoot the image. scene. 2. Before keystone correction After keystone correction Business cards and documents White...] and then select the "Business cards and documents" or "White board, etc." Press the shutter button to memory as it means that the camera detected more than one area that is . 3. If there is a black boundary, it is selected for keystone correction. Shooting Images of Business...
... move the boundary to the area you want to select "Correct" and then press [SET]. will appear on the monitor screen with a red boundary around the area that could be saved to shoot the image. scene. 2. Before keystone correction After keystone correction Business cards and documents White...] and then select the "Business cards and documents" or "White board, etc." Press the shutter button to memory as it means that the camera detected more than one area that is . 3. If there is a black boundary, it is selected for keystone correction. Shooting Images of Business...
Owners Manual
Page 66
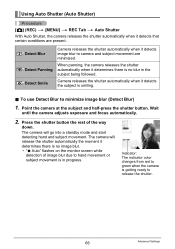
... on the monitor screen while detection of the way down. Indicator: The indicator color changes from red to green when the camera is smiling. . Wait until the camera adjusts exposure and focus automatically. 2. When panning, the camera releases the shutter automatically when it detects the subject is getting ready to minimize image blur (Detect...
... on the monitor screen while detection of the way down. Indicator: The indicator color changes from red to green when the camera is smiling. . Wait until the camera adjusts exposure and focus automatically. 2. When panning, the camera releases the shutter automatically when it detects the subject is getting ready to minimize image blur (Detect...
Owners Manual
Page 67
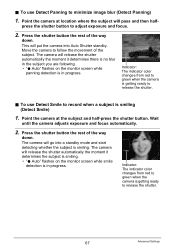
...minimize image blur (Detect Panning) 1. Wait until the camera adjusts exposure and focus automatically. 2. . press the shutter button to release the shutter. 67 Advanced Settings Indicator: The indicator color changes from red to green when the camera is getting ready to adjust exposure and focus. 2.... To use Detect Smile to follow the movement of the way down . Point the camera at the subject and half-press the shutter button...
...minimize image blur (Detect Panning) 1. Wait until the camera adjusts exposure and focus automatically. 2. . press the shutter button to release the shutter. 67 Advanced Settings Indicator: The indicator color changes from red to green when the camera is getting ready to adjust exposure and focus. 2.... To use Detect Smile to follow the movement of the way down . Point the camera at the subject and half-press the shutter button...

Owners Manual
Page 82
... to optimize the balance between bright areas and dark areas in Color Filters (Color Filter) Procedure [r] (REC) * [MENU] * Quality Tab * Color Filter Settings: Off, B/W, Sepia, Red, Green, Blue, Yellow, Pink, and Purple Controlling Image Sharpness (Sharpness) Procedure [r] (REC) * [MENU] * Quality Tab * Sharpness You can specify one of brightness correction than the...
... to optimize the balance between bright areas and dark areas in Color Filters (Color Filter) Procedure [r] (REC) * [MENU] * Quality Tab * Color Filter Settings: Off, B/W, Sepia, Red, Green, Blue, Yellow, Pink, and Purple Controlling Image Sharpness (Sharpness) Procedure [r] (REC) * [MENU] * Quality Tab * Sharpness You can specify one of brightness correction than the...

Owners Manual
Page 96
... (From-Point Cut) Cuts everything from which or to which you want to use one of the following procedures to pause. Editing a Movie on the Camera (Movie Editing) Procedure [p] (PLAY) * Movie Screen of Movie to be Edited * [MENU] * PLAY Tab * Movie Editing The Movie Editing feature lets you use and then... movie and pressing [SET] to edit out a specific part of a movie. } Cut (To-Point Cut) Cuts everything from the beginning of the movie. 1. Cut range (red) 96 Other Playback Functions (PLAY)
... (From-Point Cut) Cuts everything from which or to which you want to use one of the following procedures to pause. Editing a Movie on the Camera (Movie Editing) Procedure [p] (PLAY) * Movie Screen of Movie to be Edited * [MENU] * PLAY Tab * Movie Editing The Movie Editing feature lets you use and then... movie and pressing [SET] to edit out a specific part of a movie. } Cut (To-Point Cut) Cuts everything from the beginning of the movie. 1. Cut range (red) 96 Other Playback Functions (PLAY)

Owners Manual
Page 98
...to shoot at night or in a dimly lit room can use this setting to their normal colors when red eye occurs while using the flash. Correct Cancel Turns on the camera's monitor screen, the date and time indicates when the image was originally recorded, not when the image was... altered. Optimizing Image Brightness (Lighting) Procedure [p] (PLAY) * Snapshot Screen * [MENU] * PLAY Tab * Lighting You can cause red spots inside the eyes of people...
...to shoot at night or in a dimly lit room can use this setting to their normal colors when red eye occurs while using the flash. Correct Cancel Turns on the camera's monitor screen, the date and time indicates when the image was originally recorded, not when the image was... altered. Optimizing Image Brightness (Lighting) Procedure [p] (PLAY) * Snapshot Screen * [MENU] * PLAY Tab * Lighting You can cause red spots inside the eyes of people...

Owners Manual
Page 101
This will appear on the monitor screen with a red boundary around the resulting image, select an area that the camera detected more than one rectangular area in memory and not deleted. • If you correct the color of an old photograph. Use [4] and [6] to ... black boundary, it means that is smaller than the original image. • When you are restoring will display a selection boundary for trimming the on the camera's monitor screen, the date and time indicates when the image was originally recorded, not when the image was color corrected. 101 Other Playback Functions (PLAY...
This will appear on the monitor screen with a red boundary around the resulting image, select an area that the camera detected more than one rectangular area in memory and not deleted. • If you correct the color of an old photograph. Use [4] and [6] to ... black boundary, it means that is smaller than the original image. • When you are restoring will display a selection boundary for trimming the on the camera's monitor screen, the date and time indicates when the image was originally recorded, not when the image was color corrected. 101 Other Playback Functions (PLAY...

Owners Manual
Page 150
If the histogram appears too lopsided for some reason, you can even display individual histograms for R (red), G (green), and B (blue). Example Histograms A histogram towards the right side results when the overall image is at optimal lightness. 150 Configuring Monitor Screen Settings A histogram ...
If the histogram appears too lopsided for some reason, you can even display individual histograms for R (red), G (green), and B (blue). Example Histograms A histogram towards the right side results when the overall image is at optimal lightness. 150 Configuring Monitor Screen Settings A histogram ...

Owners Manual
Page 158
...mean that the battery is a registered trademark of FotoNation, Inc. Contact your nearest CASIO authorized service center. 158 Appendix FotoNation is included under license from YouTube, LLC. PrKERNELv4...If problems continue to a temperature where charging can be performed, the [CHARGE] lamp will light red. • Check if the charger and battery contacts are dirty. The presence of YouTube upload ...are dirty, wipe them clean with a dry cloth. If contacts are prohibited. Leave the camera in this product is within the range where charging can be performed. in Japan. Any...
...mean that the battery is a registered trademark of FotoNation, Inc. Contact your nearest CASIO authorized service center. 158 Appendix FotoNation is included under license from YouTube, LLC. PrKERNELv4...If problems continue to a temperature where charging can be performed, the [CHARGE] lamp will light red. • Check if the charger and battery contacts are dirty. The presence of YouTube upload ...are dirty, wipe them clean with a dry cloth. If contacts are prohibited. Leave the camera in this product is within the range where charging can be performed. in Japan. Any...

Owners Manual
Page 165
Lighting - Resize - Movie Converter - Protect - Date/Time - Dubbing - "Set Up" Tab • The contents of the "Set Up" tab are the same in the REC mode and PLAY mode. 165 Appendix Layout Print - MOTION PRINT 9 frames Movie Editing - White Balance - Rotation - Copy - Color Correction - Trimming - . PLAY Mode "PLAY" Tab Slideshow Images: All images / Time: 30 min / Interval: 3 sec / Effect: Pattern 1 Dynamic Photo - Brightness 0 Keystone - DPOF Printing - Divide Group - Red Eye -
Lighting - Resize - Movie Converter - Protect - Date/Time - Dubbing - "Set Up" Tab • The contents of the "Set Up" tab are the same in the REC mode and PLAY mode. 165 Appendix Layout Print - MOTION PRINT 9 frames Movie Editing - White Balance - Rotation - Copy - Color Correction - Trimming - . PLAY Mode "PLAY" Tab Slideshow Images: All images / Time: 30 min / Interval: 3 sec / Effect: Pattern 1 Dynamic Photo - Brightness 0 Keystone - DPOF Printing - Divide Group - Red Eye -

Owners Manual
Page 167
... not focused the image. When composing the image, make images appear coarse. Contact a CASIO authorized service center or your original retailer. In this case, turn on the monitor screen... (Macro) for non-flash shots. Camera powers down during Selftimer countdown. There is selected as "vertical smear", and does not indicate malfunction of the camera. Charge the battery (page 14). ... can cause an increase in digital noise. Problem Possible Cause and Recommended Action The subject is recorded in the case of a movie. The ? (Flash Off) icon flashes red on flash (page 35) ...
... not focused the image. When composing the image, make images appear coarse. Contact a CASIO authorized service center or your original retailer. In this case, turn on the monitor screen... (Macro) for non-flash shots. Camera powers down during Selftimer countdown. There is selected as "vertical smear", and does not indicate malfunction of the camera. Charge the battery (page 14). ... can cause an increase in digital noise. Problem Possible Cause and Recommended Action The subject is recorded in the case of a movie. The ? (Flash Off) icon flashes red on flash (page 35) ...

Owners Manual
Page 177
... Self-timer Approximate Trigger Times: 10 seconds, 2 seconds, Triple Self-timer Flash Modes Auto, Off, On, Soft, Red-eye reduction Flash Range (ISO Sensitivity: Auto)*1 Normal: 0.12 m*2 to 4.9 m (0.4'*2 to 16.1') (Wide Angle)...Flash CS: 0.2 m*2 to 2.8 m (0.7'*2 to 9.2') (Wide Angle) 0.6 m to 1.2 m (2.0' to the camera setup. Self-timer; Auto Shutter; Face Detection; Audio (Voice Recording) Approximate Maximum After Recording: 30 seconds per image ... dots Viewfinder Monitor Screen Timekeeping Function Built-in quartz digital clock Date and Time: Recorded with monaural audio); ...
... Self-timer Approximate Trigger Times: 10 seconds, 2 seconds, Triple Self-timer Flash Modes Auto, Off, On, Soft, Red-eye reduction Flash Range (ISO Sensitivity: Auto)*1 Normal: 0.12 m*2 to 4.9 m (0.4'*2 to 16.1') (Wide Angle)...Flash CS: 0.2 m*2 to 2.8 m (0.7'*2 to 9.2') (Wide Angle) 0.6 m to 1.2 m (2.0' to the camera setup. Self-timer; Auto Shutter; Face Detection; Audio (Voice Recording) Approximate Maximum After Recording: 30 seconds per image ... dots Viewfinder Monitor Screen Timekeeping Function Built-in quartz digital clock Date and Time: Recorded with monaural audio); ...

Owners Manual
Page 186
... move . 1. On the BEST SHOT scene menu screen, select "Dynamic Photo", which is the third scene. The camera will extract the subject automatically. 5 Creating a Dynamic Photo Image Do not allow the camera to move the red frame to shoot and extract the subject. Dynamic Photo images are created by extracting the subject out... Image Step 1: Shoot the subject. To extract the subject, you shoot once with the subject against the same background, without the subject. Turn on the camera and press the [BS] button. 2. Select "Dynamic Photo".
... move . 1. On the BEST SHOT scene menu screen, select "Dynamic Photo", which is the third scene. The camera will extract the subject automatically. 5 Creating a Dynamic Photo Image Do not allow the camera to move the red frame to shoot and extract the subject. Dynamic Photo images are created by extracting the subject out... Image Step 1: Shoot the subject. To extract the subject, you shoot once with the subject against the same background, without the subject. Turn on the camera and press the [BS] button. 2. Select "Dynamic Photo".