
Owners Manual
Page 26
...that the example screens and product illustrations shown in this manual, either in part or its entirety, is forbidden under copyright laws. • CASIO COMPUTER CO., LTD. shall not be held liable for any damages or ...8226; Any copying of the contents of Photo Loader with HOT ALBUM and/or Photo Transport. • CASIO COMPUTER CO., LTD. Except for any third party due to the use of the contents of this manual... The content of this manual has been checked at each step of the actual camera. is forbidden. Please contact us if you or any damages or loss suffered by the screens ...
...that the example screens and product illustrations shown in this manual, either in part or its entirety, is forbidden under copyright laws. • CASIO COMPUTER CO., LTD. shall not be held liable for any damages or ...8226; Any copying of the contents of Photo Loader with HOT ALBUM and/or Photo Transport. • CASIO COMPUTER CO., LTD. Except for any third party due to the use of the contents of this manual... The content of this manual has been checked at each step of the actual camera. is forbidden. Please contact us if you or any damages or loss suffered by the screens ...

Owners Manual
Page 42
... to take longer than operation under cold conditions is within the range of 10°C to 35°C (50°F to come out part way. GETTING READY 42 Replace the battery with its service life. Open the battery cover. 2. This is due to the characteristics of the... battery, not the camera. • Charge the battery in the direction indicated by a battery under normal temperatures. Stopper 3. Load a new battery. While still holding the stopper...
... to take longer than operation under cold conditions is within the range of 10°C to 35°C (50°F to come out part way. GETTING READY 42 Replace the battery with its service life. Open the battery cover. 2. This is due to the characteristics of the... battery, not the camera. • Charge the battery in the direction indicated by a battery under normal temperatures. Stopper 3. Load a new battery. While still holding the stopper...

Owners Manual
Page 50
... object ever get into the card slot, immediately turn off the camera, remove the battery, and contact your retailer or nearest CASIO authorized service center. • Never remove a card from the camera. Press the memory card and then release it, so it comes part way out. Replacing the Memory Card 1. Remove the memory card...
... object ever get into the card slot, immediately turn off the camera, remove the battery, and contact your retailer or nearest CASIO authorized service center. • Never remove a card from the camera. Press the memory card and then release it, so it comes part way out. Replacing the Memory Card 1. Remove the memory card...

Owners Manual
Page 84
... within the boundary and display it is selected as the focus mode, the metering mode automatically switches to enlarge, and then press [SET]. Recording with zoom continuous shutter. • The size of the image on the left side of the monitor screen is 12M, while the size of the... of the monitor screen until it in the center of the image on the right is 5M. • When Auto Focus is located at the part you do not need to shoot. Press the shutter button to keep the shutter button depressed. • Digital zoom is disabled while shooting with...
... within the boundary and display it is selected as the focus mode, the metering mode automatically switches to enlarge, and then press [SET]. Recording with zoom continuous shutter. • The size of the image on the left side of the monitor screen is 12M, while the size of the... of the monitor screen until it in the center of the image on the right is 5M. • When Auto Focus is located at the part you do not need to shoot. Press the shutter button to keep the shutter button depressed. • Digital zoom is disabled while shooting with...
Owners Manual
Page 85
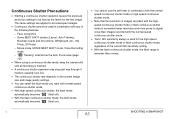
...settings are applied to digital noise than normal. Some BEST SHOT scenes (Layout, Auto Framing, Business Cards and Documents, Whiteboard, etc., Old Photo, ID Photo) - " Tracking" selected as the Auto Focus area (page 131) • When using a continuous shutter mode, keep the camera still until all ...with the normal-speed continuous shutter mode. • "Auto" ISO sensitivity always is finished. • A continuous shutter operation may stop part way through if memory capacity runs low. • The continuous shutter rate depends on the current image size and image quality settings. &#...
...settings are applied to digital noise than normal. Some BEST SHOT scenes (Layout, Auto Framing, Business Cards and Documents, Whiteboard, etc., Old Photo, ID Photo) - " Tracking" selected as the Auto Focus area (page 131) • When using a continuous shutter mode, keep the camera still until all ...with the normal-speed continuous shutter mode. • "Auto" ISO sensitivity always is finished. • A continuous shutter operation may stop part way through if memory capacity runs low. • The continuous shutter rate depends on the current image size and image quality settings. &#...

Owners Manual
Page 105
...You can also use MOTION PRINT (page 192) to extract still images of the Short Movie will shoot a Short Movie with a 4-second first part and a 4-second second part. 6. Use [W] and [X] to select the top option in the operation panel (Recording mode). 3. Pressing the shutter button at the subject, ...The total length of Short Movie scenes. This causes " " or " " to select the "Short Movie" scene and then press [SET]. With the camera pointed at this point will be eight seconds (four seconds before the shutter button was pressed plus four seconds after it was pressed). Using Short...
...You can also use MOTION PRINT (page 192) to extract still images of the Short Movie will shoot a Short Movie with a 4-second first part and a 4-second second part. 6. Use [W] and [X] to select the top option in the operation panel (Recording mode). 3. Pressing the shutter button at the subject, ...The total length of Short Movie scenes. This causes " " or " " to select the "Short Movie" scene and then press [SET]. With the camera pointed at this point will be eight seconds (four seconds before the shutter button was pressed plus four seconds after it was pressed). Using Short...

Owners Manual
Page 106
...option in front of the Short Movie counts down on the monitor screen. 4. When you press the shutter button, the remaining recording time of part two of the lens before you press the shutter button too late. Shutter button pressed. Movie Recording Start Recording End Past...to make sure that you never just miss that it captures about five seconds of whatever happened in the operation panel (Recording mode). 3. Keep the camera pointed at the right moment, press the shutter button. Past Movie is continually recorded and stored in a buffer before the shutter button was pressed ...
...option in front of the Short Movie counts down on the monitor screen. 4. When you press the shutter button, the remaining recording time of part two of the lens before you press the shutter button too late. Shutter button pressed. Movie Recording Start Recording End Past...to make sure that you never just miss that it captures about five seconds of whatever happened in the operation panel (Recording mode). 3. Keep the camera pointed at the right moment, press the shutter button. Past Movie is continually recorded and stored in a buffer before the shutter button was pressed ...
Owners Manual
Page 122
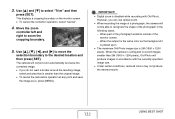
...Photo will not be able to the desired location and then press [SET]. IMPORTANT! • Digital zoom is , press [MENU]. When the camera is 2M (1600 × 1200 pixels). Use [S] and [T] to zoom the cropping boundary. 5. When the subject is the same color as -is disabled while recording ... conditions, restored colors may not produce the desired results. 122 USING BEST SHOT When part of the photograph extends outside of a photograph, the camera will produce images in the following cases. - Move the zoom controller left and right to select "Trim" and then press [SET]. However, you...
...Photo will not be able to the desired location and then press [SET]. IMPORTANT! • Digital zoom is , press [MENU]. When the camera is 2M (1600 × 1200 pixels). Use [S] and [T] to zoom the cropping boundary. 5. When the subject is the same color as -is disabled while recording ... conditions, restored colors may not produce the desired results. 122 USING BEST SHOT When part of the photograph extends outside of a photograph, the camera will produce images in the following cases. - Move the zoom controller left and right to select "Trim" and then press [SET]. However, you...
Owners Manual
Page 126
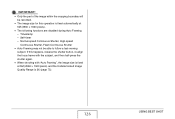
Self-timer - Timestamp - IMPORTANT! • Only the part of the image within the cropping boundary will be able to follow a fast-moving subject. Normal-speed Continuous Shutter, High-speed Continuous Shutter, Flash Continuous ...
Self-timer - Timestamp - IMPORTANT! • Only the part of the image within the cropping boundary will be able to follow a fast-moving subject. Normal-speed Continuous Shutter, High-speed Continuous Shutter, Flash Continuous ...

Owners Manual
Page 146
...-free exposure settings for a balanced exposure reading. On the "Quality" tab, select "Metering" and then press [X]. 3. The camera automatically determines shooting conditions according to the measured lighting pattern, and makes exposure settings accordingly. Multi (Multi Metering) Multi-pattern metering divides...on the center of shooting conditions. Specifying the Metering Mode The metering mode determines what part of a particular subject, without leaving settings totally up to the camera. Use this metering method when you want to exert some control over exposure, without...
...-free exposure settings for a balanced exposure reading. On the "Quality" tab, select "Metering" and then press [X]. 3. The camera automatically determines shooting conditions according to the measured lighting pattern, and makes exposure settings accordingly. Multi (Multi Metering) Multi-pattern metering divides...on the center of shooting conditions. Specifying the Metering Mode The metering mode determines what part of a particular subject, without leaving settings totally up to the camera. Use this metering method when you want to exert some control over exposure, without...

Owners Manual
Page 163
... either button increases the speed of the fast forward or fast reverse operation up to move around and view the parts of the image that do this: Do this camera. 163 VIEWING SNAPSHOTS AND MOVIES Toggle on-screen indicators on the monitor screen. Use [S] and [T]. Return from...in progress. IMPORTANT! • Playback may not be adjusted only while movie playback is zoomed, you can be possible for movies not recorded with this : Zoom in the direction of either button to scroll nonstop. Slide the zoom controller in up to a REC mode Press [ ]. Stop playback Press [MENU]. ...
... either button increases the speed of the fast forward or fast reverse operation up to move around and view the parts of the image that do this: Do this camera. 163 VIEWING SNAPSHOTS AND MOVIES Toggle on-screen indicators on the monitor screen. Use [S] and [T]. Return from...in progress. IMPORTANT! • Playback may not be adjusted only while movie playback is zoomed, you can be possible for movies not recorded with this : Zoom in the direction of either button to scroll nonstop. Slide the zoom controller in up to a REC mode Press [ ]. Stop playback Press [MENU]. ...
Owners Manual
Page 171
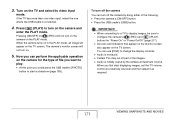
...8226; Audio is monaural. • Certain TVs may cut off part of the images. • Audio is connected. 4. When the camera turns on in the PLAY mode, an image will not turn off the camera You can perform the applicable operation on the camera for "Power On" or "Power On/Off" (page 217... Press [ ] (PLAY) to start displaying images, set the TV volume control at maximum volume. The camera's monitor screen will not turn on the TV screen. To turn off the camera by the camera at a relatively low level and then adjust it as required. 171 VIEWING SNAPSHOTS AND MOVIES Pressing [ON/OFF...
...8226; Audio is monaural. • Certain TVs may cut off part of the images. • Audio is connected. 4. When the camera turns on in the PLAY mode, an image will not turn off the camera You can perform the applicable operation on the camera for "Power On" or "Power On/Off" (page 217... Press [ ] (PLAY) to start displaying images, set the TV volume control at maximum volume. The camera's monitor screen will not turn on the TV screen. To turn off the camera by the camera at a relatively low level and then adjust it as required. 171 VIEWING SNAPSHOTS AND MOVIES Pressing [ON/OFF...

Owners Manual
Page 173
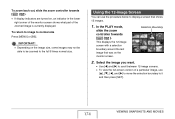
Zooming the Displayed Image Perform the following procedure to eight times its normal size. 1. Incorrect aspect ratio settings on the camera and/or the TV can use [W] and [X] to display the snapshot you plan to zoom. 2. Zoom Factor Image Area Part of the TV or other video equipment. • ...Images will not display correctly unless the camera's video signal output setting matches the video signal system of the image that is...
Zooming the Displayed Image Perform the following procedure to eight times its normal size. 1. Incorrect aspect ratio settings on the camera and/or the TV can use [W] and [X] to display the snapshot you plan to zoom. 2. Zoom Factor Image Area Part of the TV or other video equipment. • ...Images will not display correctly unless the camera's video signal output setting matches the video signal system of the image that is...
Owners Manual
Page 174
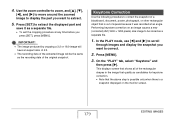
... then press [SET]. 174 VIEWING SNAPSHOTS AND MOVIES In the PLAY mode, slide the zoom controller towards If display indicators are turned on, an indicator in the lower right corner of the monitor screen shows what part of a particular image, use the procedure below to display a screen that was on ...the image size, some images may not be able to be zoomed to normal size Press [MENU] or [BS].
... then press [SET]. 174 VIEWING SNAPSHOTS AND MOVIES In the PLAY mode, slide the zoom controller towards If display indicators are turned on, an indicator in the lower right corner of the monitor screen shows what part of a particular image, use the procedure below to display a screen that was on ...the image size, some images may not be able to be zoomed to normal size Press [MENU] or [BS].

Owners Manual
Page 178
Zoom Factor Represents Snapshot Area Part of image that is also retained. 1. The original snapshot is currently displayed. 178 EDITING IMAGES On the "PLAY" tab, select "Trimming" and then press [X]. • This operation can crop a snapshot to trim parts you want to crop. 2. IMPORTANT! • You cannot resize a VGA (640 × 480 pixels) size...
Zoom Factor Represents Snapshot Area Part of image that is also retained. 1. The original snapshot is currently displayed. 178 EDITING IMAGES On the "PLAY" tab, select "Trimming" and then press [X]. • This operation can crop a snapshot to trim parts you want to crop. 2. IMPORTANT! • You cannot resize a VGA (640 × 480 pixels) size...
Owners Manual
Page 179
..., select "Keystone" and then press [X]. Performing keystone correction on the monitor screen. 179 EDITING IMAGES Press [SET] to extract the displayed part and save it was recorded at any time before you want to display the part you press [SET], press [MENU]. Use the zoom controller to zoom, and [S], [T], [W], and [X] to move around the...
..., select "Keystone" and then press [X]. Performing keystone correction on the monitor screen. 179 EDITING IMAGES Press [SET] to extract the displayed part and save it was recorded at any time before you want to display the part you press [SET], press [MENU]. Use the zoom controller to zoom, and [S], [T], [W], and [X] to move around the...

Owners Manual
Page 190
... of remaining memory capacity is not enough memory available, delete any files you no longer need to free up more. • Cutting a movie into two parts or splicing of two movies in place of the movie file you want to undo it isn't, press [SET] again. Use [S] and [T] to edit. 2....than the size of steps 1 through 3 above. 1 In the PLAY mode, select the movie you want to select the cut icon) is displayed on the camera. 1. Play back the movie you want to the paused movie playback screen. 190 EDITING IMAGES Press [T]. • You could also perform the following steps in...
... of remaining memory capacity is not enough memory available, delete any files you no longer need to free up more. • Cutting a movie into two parts or splicing of two movies in place of the movie file you want to undo it isn't, press [SET] again. Use [S] and [T] to edit. 2....than the size of steps 1 through 3 above. 1 In the PLAY mode, select the movie you want to select the cut icon) is displayed on the camera. 1. Play back the movie you want to the paused movie playback screen. 190 EDITING IMAGES Press [T]. • You could also perform the following steps in...

Owners Manual
Page 201
...NOTE • The number of snapshots that you want displayed during normal PLAY mode operations. FAVORITE folder snapshots remain in camera memory, even if you can repeat steps 4 and 5 to save the snapshot part only. ■ Copying a File to select "Save", and then press [SET]. Now you change to a different ... size (320 × 240 pixels). Use [S] and [T] to a memory card. Using the FAVORITE Folder The FAVORITE folder is located in the camera's built-in memory, and you can use it to store personal snapshots that can be stored in the FAVORITE folder depends on the image quality...
...NOTE • The number of snapshots that you want displayed during normal PLAY mode operations. FAVORITE folder snapshots remain in camera memory, even if you can repeat steps 4 and 5 to save the snapshot part only. ■ Copying a File to select "Save", and then press [SET]. Now you change to a different ... size (320 × 240 pixels). Use [S] and [T] to a memory card. Using the FAVORITE Folder The FAVORITE folder is located in the camera's built-in memory, and you can use it to store personal snapshots that can be stored in the FAVORITE folder depends on the image quality...
Owners Manual
Page 263
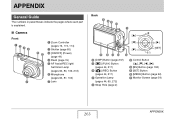
APPENDIX General Guide The numbers in parentheses indicate the pages where each part is explained. ■ Camera Front 1234 7 56 1 Zoom Controller (pages 73, 173, 174) 2 Shutter (page 65) 3 [ON/OFF] (Power) (page 44) 4 Flash (page 76) 5 AF Assist/REC light/ Self-timer Lamp (pages 64, ...
APPENDIX General Guide The numbers in parentheses indicate the pages where each part is explained. ■ Camera Front 1234 7 56 1 Zoom Controller (pages 73, 173, 174) 2 Shutter (page 65) 3 [ON/OFF] (Power) (page 44) 4 Flash (page 76) 5 AF Assist/REC light/ Self-timer Lamp (pages 64, ...
