
Owners Manual
Page 25
... or malfunction of Photo Loader and/or Photohands. • CASIO COMPUTER CO., LTD. is questionable, erroneous, etc. • Any copying of the contents of the actual camera. Please contact us if you notice anything that the example screens and product illustrations shown in part or its entirety, is forbidden. shall not be held...
... or malfunction of Photo Loader and/or Photohands. • CASIO COMPUTER CO., LTD. is questionable, erroneous, etc. • Any copying of the contents of the actual camera. Please contact us if you notice anything that the example screens and product illustrations shown in part or its entirety, is forbidden. shall not be held...

Owners Manual
Page 41
...than operation under cold conditions is within the range of 10°C to 35°C (50°F to the characteristics of the battery, not the camera. • Charge the battery in an area where the temperature is always less than normal or even cause charging to fail. • If a ...battery provides only very limited operation following a full charge, it there. • This will cause the battery to come out part way. Open the battery cover. 2. Replace the battery with its service life. GETTING READY 41 This is due to 95°F). Load a new battery. ...
...than operation under cold conditions is within the range of 10°C to 35°C (50°F to the characteristics of the battery, not the camera. • Charge the battery in an area where the temperature is always less than normal or even cause charging to fail. • If a ...battery provides only very limited operation following a full charge, it there. • This will cause the battery to come out part way. Open the battery cover. 2. Replace the battery with its service life. GETTING READY 41 This is due to 95°F). Load a new battery. ...

Owners Manual
Page 48
... is facing upwards (towards the monitor screen side of the way by hand. Pull the card out the rest of the camera), slide it into place as you hear it comes part way out. Load the other memory card. Front Back 3. Swing the battery cover closed, and then slide it securely into... the card slot all the way in until you press it against the camera. 2. Load a memory card into place. Press the memory card...
... is facing upwards (towards the monitor screen side of the way by hand. Pull the card out the rest of the camera), slide it into place as you hear it comes part way out. Load the other memory card. Front Back 3. Swing the battery cover closed, and then slide it securely into... the card slot all the way in until you press it against the camera. 2. Load a memory card into place. Press the memory card...
Owners Manual
Page 85
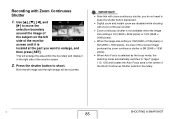
... enlarge the area within the boundary and display it is located at the part you do not need to keep the shutter button depressed. • Digital zoom and instant zoom are disabled while shooting with zoom continuous shutter. • Zoom continuous shutter is not available when the image size setting is 3:2 (3648...; When the image size setting is 10M (3648 × 2736 pixels) or 5M (2560 × 1920 pixels), the size of the zoomed image produced by zoom continuous shutter is 3M (2048 × 1536 pixels). • When Auto Focus is selected as the focus mode, the metering mode automatically...
... enlarge the area within the boundary and display it is located at the part you do not need to keep the shutter button depressed. • Digital zoom and instant zoom are disabled while shooting with zoom continuous shutter. • Zoom continuous shutter is not available when the image size setting is 3:2 (3648...; When the image size setting is 10M (3648 × 2736 pixels) or 5M (2560 × 1920 pixels), the size of the zoomed image produced by zoom continuous shutter is 3M (2048 × 1536 pixels). • When Auto Focus is selected as the focus mode, the metering mode automatically...

Owners Manual
Page 86
...a continuous shutter operation causes the exposure and focus settings to digital noise than images recorded with the normal-speed continuous shutter mode. • "Auto" ISO sensitivity always is used in combination with the zoom continuous shutter mode only. • Note that the resolution ... Photo, Pastel, Illustration, Cross, Movie. • When using a continuous shutter mode, keep the camera still until all recording is finished. • A continuous shutter operation may stop part way through if memory capacity runs low. • The continuous shutter rate depends on the current image...
...a continuous shutter operation causes the exposure and focus settings to digital noise than images recorded with the normal-speed continuous shutter mode. • "Auto" ISO sensitivity always is used in combination with the zoom continuous shutter mode only. • Note that the resolution ... Photo, Pastel, Illustration, Cross, Movie. • When using a continuous shutter mode, keep the camera still until all recording is finished. • A continuous shutter operation may stop part way through if memory capacity runs low. • The continuous shutter rate depends on the current image...

Owners Manual
Page 108
... background it is slightly inside of the boundary of a photograph, the camera will produce images in the following cases. - When part of the photograph extends outside of the photograph in accordance with Old Photo. IMPORTANT! • Digital zoom is , press [MENU]. When the camera is 2M (1600 × 1200 pixels). 5. When the subject is the...
... background it is slightly inside of the boundary of a photograph, the camera will produce images in the following cases. - When part of the photograph extends outside of the photograph in accordance with Old Photo. IMPORTANT! • Digital zoom is , press [MENU]. When the camera is 2M (1600 × 1200 pixels). 5. When the subject is the...

Owners Manual
Page 124
...reading. On the "Quality" tab, select "Metering" and then press [X]. 3. In the REC mode, press [MENU]. 2. The camera automatically determines shooting conditions according to select the setting you want and then press [SET]. This type of metering provides error-free exposure settings... and [T] to the measured lighting pattern, and makes exposure settings accordingly. Specifying the Metering Mode The metering mode determines what part of the subject is used for movies, regardless of shooting conditions. 124 ADVANCED SETTINGS Multi (Multi Metering) Multi-pattern metering divides...
...reading. On the "Quality" tab, select "Metering" and then press [X]. 3. In the REC mode, press [MENU]. 2. The camera automatically determines shooting conditions according to select the setting you want and then press [SET]. This type of metering provides error-free exposure settings... and [T] to the measured lighting pattern, and makes exposure settings accordingly. Specifying the Metering Mode The metering mode determines what part of the subject is used for movies, regardless of shooting conditions. 124 ADVANCED SETTINGS Multi (Multi Metering) Multi-pattern metering divides...

Owners Manual
Page 142
...switch to 3.5X • While an image is zoomed, you can be possible for movies not recorded with this camera. 142 VIEWING SNAPSHOTS AND MOVIES stop. Adjust volume • Volume can use [S] [T] [W] and [X] to move around and view the parts of the image that do not fit on or ... playback Pause or restart playback When paused, scroll forward or back frame-by-frame • Hold down [X] or [W]. Press [X] or [W]. Slide the zoom controller in progress. Press [SET]. Press [DISP]. Press [SET] to start playback. • The monitor screen will return to the selection screen in...
...switch to 3.5X • While an image is zoomed, you can be possible for movies not recorded with this camera. 142 VIEWING SNAPSHOTS AND MOVIES stop. Adjust volume • Volume can use [S] [T] [W] and [X] to move around and view the parts of the image that do not fit on or ... playback Pause or restart playback When paused, scroll forward or back frame-by-frame • Hold down [X] or [W]. Press [X] or [W]. Slide the zoom controller in progress. Press [SET]. Press [DISP]. Press [SET] to start playback. • The monitor screen will return to the selection screen in...

Owners Manual
Page 148
...] (AV output port) - To turn off the camera You can turn off part of the images. • Audio is monaural. • Certain TVs may cut off the camera by doing either of the following explains how to use the camera's USB cradle to connect to configure the camera's [ ] (REC) and [ ] (PLAY) buttons for the slideshow...
...] (AV output port) - To turn off the camera You can turn off part of the images. • Audio is monaural. • Certain TVs may cut off the camera by doing either of the following explains how to use the camera's USB cradle to connect to configure the camera's [ ] (REC) and [ ] (PLAY) buttons for the slideshow...

Owners Manual
Page 150
... are turned on, an indicator in the lower right corner of the monitor screen shows what part of the image after zooming. IMPORTANT! • Depending on the monitor screen up to zoom. 2. You can use [W] and [X] to display the snapshot you want to eight times its... normal size. 1. To return to image to a different part of the zoomed image is currently displayed. To zoom back out, slide the zoom controller towards [ ] ( ). Each press of the image that is currently displayed. In the PLAY mode, and use ...
... are turned on, an indicator in the lower right corner of the monitor screen shows what part of the image after zooming. IMPORTANT! • Depending on the monitor screen up to zoom. 2. You can use [W] and [X] to display the snapshot you want to eight times its... normal size. 1. To return to image to a different part of the zoomed image is currently displayed. To zoom back out, slide the zoom controller towards [ ] ( ). Each press of the image that is currently displayed. In the PLAY mode, and use ...

Owners Manual
Page 154
...cannot resize the following types of the original snapshot. Press [MENU]. 3. VGA (640 × 480 pixels) and smaller snapshots - Snapshots recorded with another camera • Resizing a snapshot shot with an aspect ratio of 16:9 or 3:2 will be the same as the recording date of snapshots. - In the... You can be cut off. On the "PLAY" tab, select "Trimming" and then press [X]. • This operation can crop a snapshot to trim parts you want to be performed only while a snapshot is also retained. 1. Zoom Factor Represents Snapshot Area Part of the image to crop. 2.
...cannot resize the following types of the original snapshot. Press [MENU]. 3. VGA (640 × 480 pixels) and smaller snapshots - Snapshots recorded with another camera • Resizing a snapshot shot with an aspect ratio of 16:9 or 3:2 will be the same as the recording date of snapshots. - In the... You can be cut off. On the "PLAY" tab, select "Trimming" and then press [X]. • This operation can crop a snapshot to trim parts you want to be performed only while a snapshot is also retained. 1. Zoom Factor Represents Snapshot Area Part of the image to crop. 2.

Owners Manual
Page 155
Use the zoom controller to zoom, and [S], [T], [W], and [X] to move around the zoomed image to display the part you want to extract. 5. Press [SET] to extract the displayed part and save it was recorded at any time before you cannot crop the following procedure to be stored as a ... to correct. 2. Snapshots created using MOTION PRINT - Performing keystone correction on the monitor screen. 155 EDITING IMAGES 4. Snapshots recorded with another camera • The image produced by cropping a 3:2 or 16:9 image will be performed if there is out of images. - Keystone Correction...
Use the zoom controller to zoom, and [S], [T], [W], and [X] to move around the zoomed image to display the part you want to extract. 5. Press [SET] to extract the displayed part and save it was recorded at any time before you cannot crop the following procedure to be stored as a ... to correct. 2. Snapshots created using MOTION PRINT - Performing keystone correction on the monitor screen. 155 EDITING IMAGES 4. Snapshots recorded with another camera • The image produced by cropping a 3:2 or 16:9 image will be performed if there is out of images. - Keystone Correction...

Owners Manual
Page 162
... Cut icon 3. If there is not enough memory available, delete any files you no longer need to free up more. • Cutting a movie into two parts or splicing of two movies in place of steps 1 through 3 above. 1 In the PLAY mode, select the movie you want to edit. Press [T]. •... You could also perform the following steps in to a single movies cannot be performed on the monitor screen. I Editing with this camera. • You will not be able to edit a movie if the amount of the movie file you edit a movie, only the result is not retained...
... Cut icon 3. If there is not enough memory available, delete any files you no longer need to free up more. • Cutting a movie into two parts or splicing of two movies in place of steps 1 through 3 above. 1 In the PLAY mode, select the movie you want to edit. Press [T]. •... You could also perform the following steps in to a single movies cannot be performed on the monitor screen. I Editing with this camera. • You will not be able to edit a movie if the amount of the movie file you edit a movie, only the result is not retained...

Owners Manual
Page 163
4. When the frame where you want the cut point to be is the part that will be cut. • To cancel the cut point). Point Cut) or " Cut" (From-Point Cut) and then press [SET]. • To cancel movie ... or fast reverse playback Pause or unpause movie playback Scroll paused playback one frame forward or back Press this button: [X] or [W] [SET] [X] or [W] • The part of the movie indicated in step 3. 6. This will return to select " Cut" (To- Use [S] and [T] to the screen in red on the displayed indicator bar...
4. When the frame where you want the cut point to be is the part that will be cut. • To cancel the cut point). Point Cut) or " Cut" (From-Point Cut) and then press [SET]. • To cancel movie ... or fast reverse playback Pause or unpause movie playback Scroll paused playback one frame forward or back Press this button: [X] or [W] [SET] [X] or [W] • The part of the movie indicated in step 3. 6. This will return to select " Cut" (To- Use [S] and [T] to the screen in red on the displayed indicator bar...

Owners Manual
Page 165
Repeat step 5 to select the frame you want to be cut point. • The part of the movie indicated in step 3. 6. 4. This will return to the screen in red on the displayed indicator bar is displayed, press [T]. 7. To do this: ... the frame where you want the first (From) cut point to use as the second (To) cut . 165 EDITING IMAGES This will be is the part that will return to the paused movie playback screen. 5. Use [S] and [T] to cut the movie (the cut editing operation, press [MENU]. Use the following operations...
Repeat step 5 to select the frame you want to be cut point. • The part of the movie indicated in step 3. 6. 4. This will return to the screen in red on the displayed indicator bar is displayed, press [T]. 7. To do this: ... the frame where you want the first (From) cut point to use as the second (To) cut . 165 EDITING IMAGES This will be is the part that will return to the paused movie playback screen. 5. Use [S] and [T] to cut the movie (the cut editing operation, press [MENU]. Use the following operations...

Owners Manual
Page 176
...in the FAVORITE folder will save the snapshot part only. 176 MANAGING YOUR FILES Use [S] and [T] to store personal snapshots that you do not want displayed during normal PLAY mode operations. Using the FAVORITE Folder The FAVORITE folder is located in the camera's built-in memory. 4. To unprotect ... Files : On" and then press [SET]. This protects all files in memory Perform the procedure under "Protecting All Files in Memory", but in camera memory, even if you can be used for snapshots only. Saving an audio snapshot in Memory 1. On the "PLAY" tab, select "Protect" and...
...in the FAVORITE folder will save the snapshot part only. 176 MANAGING YOUR FILES Use [S] and [T] to store personal snapshots that you do not want displayed during normal PLAY mode operations. Using the FAVORITE Folder The FAVORITE folder is located in the camera's built-in memory. 4. To unprotect ... Files : On" and then press [SET]. This protects all files in memory Perform the procedure under "Protecting All Files in Memory", but in camera memory, even if you can be used for snapshots only. Saving an audio snapshot in Memory 1. On the "PLAY" tab, select "Protect" and...

Owners Manual
Page 238
APPENDIX General Guide The numbers in parentheses indicate the pages where each part is explained. I Camera Front 1 234 1 Shutter (page 64) 2 [ON/OFF] (Power) (page 42) 3 Flash (page 76) 4 AF Assist/Self-timer Lamp (pages 62, 69, 81, 248) 5 Lens 6 Microphone (...) 65 Back 789 bkbl bm [S] bn [W] [T] [X] [SET] br bq bpbo 7 [DISP] Button (page 52) 8 [ ] (PLAY) Button (pages 42, 192) 9 [ ] (REC) Button (pages 42, 192) bk Zoom Controller (pages 72, 150, 151) bl Operation Lamp (pages 42, 64, 248) bm Strap Hole (page 2) bn Control Button ([S], [T], [W], [X]) bo [SET] Button bp [BS] Button...
APPENDIX General Guide The numbers in parentheses indicate the pages where each part is explained. I Camera Front 1 234 1 Shutter (page 64) 2 [ON/OFF] (Power) (page 42) 3 Flash (page 76) 4 AF Assist/Self-timer Lamp (pages 62, 69, 81, 248) 5 Lens 6 Microphone (...) 65 Back 789 bkbl bm [S] bn [W] [T] [X] [SET] br bq bpbo 7 [DISP] Button (page 52) 8 [ ] (PLAY) Button (pages 42, 192) 9 [ ] (REC) Button (pages 42, 192) bk Zoom Controller (pages 72, 150, 151) bl Operation Lamp (pages 42, 64, 248) bm Strap Hole (page 2) bn Control Button ([S], [T], [W], [X]) bo [SET] Button bp [BS] Button...
