
User Guide
Page 7
...the end of a lesson. ❐ Sing-along Simply connect a commercially available microphone to rate your keyboard to a computer, use special CASIO conversion software to the keyboard. 706A-E-007A E-5 Guidance that microphone. ❐ 100 built-in tunes, including piano pieces Built-in tunes ...are using. ❐ Song Memory function With lesson recording you can connect your performances during Step 1, Step 2 and Step 3 lessons by -step. Performance recording lets you record your performances, including Auto Accompaniment, in real time. ❐ Storing and ...
...the end of a lesson. ❐ Sing-along Simply connect a commercially available microphone to rate your keyboard to a computer, use special CASIO conversion software to the keyboard. 706A-E-007A E-5 Guidance that microphone. ❐ 100 built-in tunes, including piano pieces Built-in tunes ...are using. ❐ Song Memory function With lesson recording you can connect your performances during Step 1, Step 2 and Step 3 lessons by -step. Performance recording lets you record your performances, including Auto Accompaniment, in real time. ❐ Storing and ...
User Guide
Page 9
... E-39 Playing Back a Performance Recording E-41 Overdubbing a Performance Recording E-42 Deleting a Specific Part/Track E-42 Keyboard Settings E-43 Using Layer E-43 Using Split E-43 Using Layer and Split Together E-44 Transposing the...46 Tuning the Keyboard E-46 Connection to a Computer E-47 Connecting to a Computer E-47 Expanding the Selections in Tune E-38 Playing Back a Lesson Recording ......... E-37 Parts and Tracks E-37 Recording Play Along with an Ending Pattern E-36 Using One-touch Preset E-36 Song Memory Function ...... E-31 Selecting a Rhythm E-31 Playing a Rhythm ...
... E-39 Playing Back a Performance Recording E-41 Overdubbing a Performance Recording E-42 Deleting a Specific Part/Track E-42 Keyboard Settings E-43 Using Layer E-43 Using Split E-43 Using Layer and Split Together E-44 Transposing the...46 Tuning the Keyboard E-46 Connection to a Computer E-47 Connecting to a Computer E-47 Expanding the Selections in Tune E-38 Playing Back a Lesson Recording ......... E-37 Parts and Tracks E-37 Recording Play Along with an Ending Pattern E-36 Using One-touch Preset E-36 Song Memory Function ...... E-31 Selecting a Rhythm E-31 Playing a Rhythm ...

User Guide
Page 39
... • Since each track is recording or standing by re-recording only one of approximately 12,000 notes, which can be able to record anything for the other , you can edit a recording by for either the lesson recording or the performance recording. Performance Recording With performance recording, Song Memory operates like a tape recorder or sequencer. Start End Track 1 Auto...
... • Since each track is recording or standing by re-recording only one of approximately 12,000 notes, which can be able to record anything for the other , you can edit a recording by for either the lesson recording or the performance recording. Performance Recording With performance recording, Song Memory operates like a tape recorder or sequencer. Start End Track 1 Auto...

User Guide
Page 40
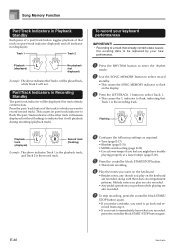
...: The above indicates the left -hand part will be played back, while the right-hand part will be deleted. Playback part (displayed) Recording part (flashing) Example: The above indicates that it will play along with the AC adaptor when replacing batteries. • Turning off the keyboard ... power. The part/track indicator of the keyboard's built-in tunes. Selecting Parts Press the part/track button that part on the keyboard (recording part). Part/Track Indicators in Playback Standby Each press of a part/track button toggles playback of the keyboard. This causes its part/track...
...: The above indicates the left -hand part will be played back, while the right-hand part will be deleted. Playback part (displayed) Recording part (flashing) Example: The above indicates that it will play along with the AC adaptor when replacing batteries. • Turning off the keyboard ... power. The part/track indicator of the keyboard's built-in tunes. Selecting Parts Press the part/track button that part on the keyboard (recording part). Part/Track Indicators in Playback Standby Each press of a part/track button toggles playback of the keyboard. This causes its part/track...

User Guide
Page 41
... block START/STOP button. To select this track: Track 1 Track 2 Press this point, if you want to select. This will play back everything you recorded up to that point. • If you want to hear what you play on the keyboard and the accompaniment of the built-in song you... selected, the following settings as required. • Tone (page E-17) • Tempo (page E-20) 6 Press the controller block START/STOP button. • This starts recording. 7 Play the notes for the part(s) you selected in step 4 on the display as you play along with a built-in tune 1 Press the SONG BANK...
... block START/STOP button. To select this track: Track 1 Track 2 Press this point, if you want to select. This will play back everything you recorded up to that point. • If you want to hear what you play on the keyboard and the accompaniment of the built-in song you... selected, the following settings as required. • Tone (page E-17) • Tempo (page E-20) 6 Press the controller block START/STOP button. • This starts recording. 7 Play the notes for the part(s) you selected in step 4 on the display as you play along with a built-in tune 1 Press the SONG BANK...
User Guide
Page 42
...Track 2 Playback (displayed) No playback (not displayed) Example: The above indicates Track 1 is the playback track, and Track 2 is the recording track. Press the part/track button of the other track will remain displayed (without flashing) to immediately hear what you play on the keyboard ...are also recorded. 7 To stop recording, press the controller block START/ STOP button again. • If you make a mistake, you want to indicate that track on...
...Track 2 Playback (displayed) No playback (not displayed) Example: The above indicates Track 1 is the playback track, and Track 2 is the recording track. Press the part/track button of the other track will remain displayed (without flashing) to immediately hear what you play on the keyboard ...are also recorded. 7 To stop recording, press the controller block START/ STOP button again. • If you make a mistake, you want to indicate that track on...

User Guide
Page 43
...You can play along with an intro pattern when you play a chord within the accompaniment keyboard range. NOTE • During performance recording playback, the entire range of the keyboard operates as required. Auto Accompaniment will start when you play something within the melody range ...this time to assign multiple tones to the keyboard. • Note that pause, skip forward, and skip back operations cannot be performed during performance recording. • Tone number • Rhythm number • INTRO button, SYNCHRO/ENDING button, NORMAL/ FILL-IN button, VARIATION/FILL-IN button ...
...You can play along with an intro pattern when you play a chord within the accompaniment keyboard range. NOTE • During performance recording playback, the entire range of the keyboard operates as required. Auto Accompaniment will start when you play something within the melody range ...this time to assign multiple tones to the keyboard. • Note that pause, skip forward, and skip back operations cannot be performed during performance recording. • Tone number • Rhythm number • INTRO button, SYNCHRO/ENDING button, NORMAL/ FILL-IN button, VARIATION/FILL-IN button ...

User Guide
Page 44
... cannot turn off rhythm and Auto Accompaniment. Because of this, the entire range of the keyboard becomes a melody keyboard when recording the Track 2, regardless of Track 1 and recording in Track 1. 1 Press the RHYTHM button to enter the rhythm mode. 2 Use the SONG MEMORY button to select... or RIGHT/TRACK 2 button. 3 Hold down the SONG MEMORY button. • This causes a confirmation message to appear on the display returns to record standby. record from step 2. • If you want to immediately hear what you want to Song Memory playback standby. NOTE • Track 2 is a melody...
... cannot turn off rhythm and Auto Accompaniment. Because of this, the entire range of the keyboard becomes a melody keyboard when recording the Track 2, regardless of Track 1 and recording in Track 1. 1 Press the RHYTHM button to enter the rhythm mode. 2 Use the SONG MEMORY button to select... or RIGHT/TRACK 2 button. 3 Hold down the SONG MEMORY button. • This causes a confirmation message to appear on the display returns to record standby. record from step 2. • If you want to immediately hear what you want to Song Memory playback standby. NOTE • Track 2 is a melody...

User Guide
Page 53
... to select Track 1. (Track 2 is not turned on . 1. Troubleshooting Problem No keyboard sound Possible Cause 1. Touch response is selected as the recording track. Track other than Track 1 is turned off . LOCAL CONTROL is too low. 4. Low battery power • Dim power supply indicator &#... microphone Action 1. Press the PLAY/STOP button to 00. Transpose or tuning is in the CASIO CHORD or FINGERED position. Press the lit key to NORMAL. 5. Cannot record Auto Accompaniment or rhythm. Sound output does not change when key pressure is used •...
... to select Track 1. (Track 2 is not turned on . 1. Troubleshooting Problem No keyboard sound Possible Cause 1. Touch response is selected as the recording track. Track other than Track 1 is turned off . LOCAL CONTROL is too low. 4. Low battery power • Dim power supply indicator &#... microphone Action 1. Press the PLAY/STOP button to 00. Transpose or tuning is in the CASIO CHORD or FINGERED position. Press the lit key to NORMAL. 5. Cannot record Auto Accompaniment or rhythm. Sound output does not change when key pressure is used •...

User Guide
Page 54
... microphone in tonal quality and volume between sample ranges. Increase the microphone volume setting. 2. Page E-29 Page E-29 This is too low. 2. Troubleshooting Problem Cannot record chord accompaniment data on ACCOMP OUT. Action Turn on a computer. Page E-29 Page E-29 1. Change the microphone on the keyboard. E-52 706A-E-054A Microphone volume...
... microphone in tonal quality and volume between sample ranges. Increase the microphone volume setting. 2. Page E-29 Page E-29 This is too low. 2. Troubleshooting Problem Cannot record chord accompaniment data on ACCOMP OUT. Action Turn on a computer. Page E-29 Page E-29 1. Change the microphone on the keyboard. E-52 706A-E-054A Microphone volume...

User Guide
Page 55
...and split. 3 lessons (Step 1, 2, 3) Repeat play of Songs: Recorded Data: Recording Method: Memory Capacity: Other Functions Transpose: Tuning: Terminals USB port Sustain/Assignable Jack: Headphone/Output Terminal: Output Impedance: Output Voltage: Microphone In: CTK-800 61 standard-size keys, 5 octaves (with microphone volume knob) Input ...with layer and split 32 notes maximum (16 for certain tones) 120 Variable (226 steps, = 30 to 255) 3 fingering methods (CASIO CHORD, FINGERED, FULL RANGE CHORD) START/STOP, INTRO, NORMAL/NORMAL FILL-IN, VARIATION/ VARIATION FILL-IN, SYNCHRO/ENDING 0 to 127 ...
...and split. 3 lessons (Step 1, 2, 3) Repeat play of Songs: Recorded Data: Recording Method: Memory Capacity: Other Functions Transpose: Tuning: Terminals USB port Sustain/Assignable Jack: Headphone/Output Terminal: Output Impedance: Output Voltage: Microphone In: CTK-800 61 standard-size keys, 5 octaves (with microphone volume knob) Input ...with layer and split 32 notes maximum (16 for certain tones) 120 Variable (226 steps, = 30 to 255) 3 fingering methods (CASIO CHORD, FINGERED, FULL RANGE CHORD) START/STOP, INTRO, NORMAL/NORMAL FILL-IN, VARIATION/ VARIATION FILL-IN, SYNCHRO/ENDING 0 to 127 ...
User Guide
Page 60
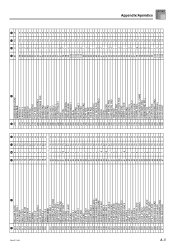
A-3 706A-E-115A 1 2 214 MELLOW FLUTE 215 PIPE SECTION 1 216 RECORDER 217 PAN FLUTE 1 218 BOTTLE BLOW 219 SHAKUHACHI 220 WHISTLE 1 221 OCARINA 222 PICCOLO 2 223 PIPE SECTION 2 224 SOFT FLUTE 225 WHISTLE 2 226 PAN FLUTE 2 ...
A-3 706A-E-115A 1 2 214 MELLOW FLUTE 215 PIPE SECTION 1 216 RECORDER 217 PAN FLUTE 1 218 BOTTLE BLOW 219 SHAKUHACHI 220 WHISTLE 1 221 OCARINA 222 PICCOLO 2 223 PIPE SECTION 2 224 SOFT FLUTE 225 WHISTLE 2 226 PAN FLUTE 2 ...


