User Guide
Page 4
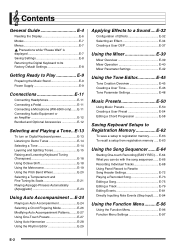
...94 Using the Function Menu ......... E-13 To turn on Digital Keyboard power E-13 Listening to Rewrite Song Header Settings E-72 Playing a Recorded Song E-73 Editing a Song E-75 Editing a Track E-79 Editing Events E-81 Directly Inputting Note Events (Step Input) ...... E-66... Recording Individual Tracks E-68 Using Panel Record to Demo Tunes E-14 Selecting a Tone E-14 Layering and Splitting Tones E-15 Raising and Lowering Keyboard Tuning (Transpose E-18 Using...
...94 Using the Function Menu ......... E-13 To turn on Digital Keyboard power E-13 Listening to Rewrite Song Header Settings E-72 Playing a Recorded Song E-73 Editing a Song E-75 Editing a Track E-79 Editing Events E-81 Directly Inputting Note Events (Step Input) ...... E-66... Recording Individual Tracks E-68 Using Panel Record to Demo Tunes E-14 Selecting a Tone E-14 Layering and Splitting Tones E-15 Raising and Lowering Keyboard Tuning (Transpose E-18 Using...
User Guide
Page 7
...QUANTIZE button 62, 89 C-12 4, STEP button 60, 62, 94 C-13 STORE, #MENU button 7, 62 B E-5 L-1 POWER button 13 L-2 VOLUME knob (CTK-6000 13 MAIN VOLUME knob (WK-6500 13 L-3 MIC VOLUME knob (WK-6500 only 11 RHYTHM buttons L-4 [A] POPS/ROCK/DANCE button 14, 24 L-5 [B] JAZZ/...RECORD button 64, 68, 69 C-5 MIXER, #EFFECT button 34, 40 C-6 TONE EDITOR, #SCALE button 21, 46 C-7 CARD, #LOAD/SAVE button 7, 103, 104, 106 Dial 6, 14, 24 TONE buttons R-1 [A] PIANO, 5 button 14, 59, 88 R-2 [B] E. General Guide • In this manual, the term "Digital Keyboard" refers to the CTK-6000...
...QUANTIZE button 62, 89 C-12 4, STEP button 60, 62, 94 C-13 STORE, #MENU button 7, 62 B E-5 L-1 POWER button 13 L-2 VOLUME knob (CTK-6000 13 MAIN VOLUME knob (WK-6500 13 L-3 MIC VOLUME knob (WK-6500 only 11 RHYTHM buttons L-4 [A] POPS/ROCK/DANCE button 14, 24 L-5 [B] JAZZ/...RECORD button 64, 68, 69 C-5 MIXER, #EFFECT button 34, 40 C-6 TONE EDITOR, #SCALE button 21, 46 C-7 CARD, #LOAD/SAVE button 7, 103, 104, 106 Dial 6, 14, 24 TONE buttons R-1 [A] PIANO, 5 button 14, 59, 88 R-2 [B] E. General Guide • In this manual, the term "Digital Keyboard" refers to the CTK-6000...
User Guide
Page 9
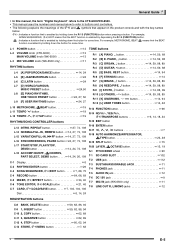
... mode. - For example, the "Performance" menu shown below will return to perform any mode besides the rhythm mode and performing the operations you want to record performances using the keyboard and Auto Accompaniment, or to play on default mode. • Unless otherwise specifically noted, all of this user's guide. , Precautions while...
... mode. - For example, the "Performance" menu shown below will return to perform any mode besides the rhythm mode and performing the operations you want to record performances using the keyboard and Auto Accompaniment, or to play on default mode. • Unless otherwise specifically noted, all of this user's guide. , Precautions while...
User Guide
Page 41
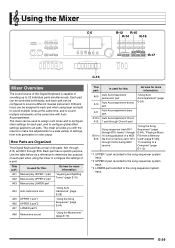
..." (page E-64), "Playing a Music File from a Memory Card" (page E-108), "Connecting to a Computer" (page E-112) *1 UPPER 1 part recorded to the song sequencer system track. *2 UPPER 2 part recorded to the song sequencer system track. *3 LOWER part recorded to configure the settings of a part. Using the Mixer C-5 R-13 R-15 R-14 R-16 R-17 C-13 Mixer Overview...
..." (page E-64), "Playing a Music File from a Memory Card" (page E-108), "Connecting to a Computer" (page E-112) *1 UPPER 1 part recorded to the song sequencer system track. *2 UPPER 2 part recorded to the song sequencer system track. *3 LOWER part recorded to configure the settings of a part. Using the Mixer C-5 R-13 R-15 R-14 R-16 R-17 C-13 Mixer Overview...
User Guide
Page 52
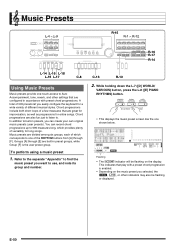
... configured in preset groups, while Group [F] is enabled. • Depending on the display. Refer to the separate "Appendix" to find the music preset you can record chord progressions up to 999 measures long, which corresponds to Auto Accompaniment, tone, reverb, and other indicators may also be flashing on the music preset...
... configured in preset groups, while Group [F] is enabled. • Depending on the display. Refer to the separate "Appendix" to find the music preset you can record chord progressions up to 999 measures long, which corresponds to Auto Accompaniment, tone, reverb, and other indicators may also be flashing on the music preset...

User Guide
Page 56
... for more information. Music Presets Creating a User Preset User Preset Numbers Preset areas numbered F:001 through 4 under "To perform using a music preset" (page E-50) for recorded chords. You can recall a stored user preset after pressing the L-9 ([F] USER RHYTHMS) button. Perform steps 1 through F:050 are the way you want to change the...
... for more information. Music Presets Creating a User Preset User Preset Numbers Preset areas numbered F:001 through 4 under "To perform using a music preset" (page E-50) for recorded chords. You can recall a stored user preset after pressing the L-9 ([F] USER RHYTHMS) button. Perform steps 1 through F:050 are the way you want to change the...

User Guide
Page 58
...preset that this setting affects playback only. It does not change the chord progression data. • Normal Plays chords at the same timing as the recording. • Half Plays chords measure-by -measure at a timing that is specified results in step 5 under "To create and save a user preset... Double Plays chords measure-by -measure at a timing that is double that shown for "Half" above while "Double" is half that of the recording. Note that was created based on a music preset whose rhythm is used to the user preset Measure Beat Chord progression 1 2 3 123456781234567812 Dm ...
...preset that this setting affects playback only. It does not change the chord progression data. • Normal Plays chords at the same timing as the recording. • Half Plays chords measure-by -measure at a timing that is specified results in step 5 under "To create and save a user preset... Double Plays chords measure-by -measure at a timing that is double that shown for "Half" above while "Double" is half that of the recording. Note that was created based on a music preset whose rhythm is used to the user preset Measure Beat Chord progression 1 2 3 123456781234567812 Dm ...

User Guide
Page 59
This setting is best for use with a 6/8 time rhythm. Playing back a chord progression like that of the recording. Playing back a chord progression like that shown for "Half" above while "3/2" is specified results in the progression shown below . 3/2 Playback when a 4/4 time rhythm is assigned ... Am C7 3/4 Playback when a 6/8 time rhythm is assigned to a later timing. This setting is best for use with a 6/4 time rhythm. Any chords that of the recording.
This setting is best for use with a 6/8 time rhythm. Playing back a chord progression like that of the recording. Playing back a chord progression like that shown for "Half" above while "3/2" is specified results in the progression shown below . 3/2 Playback when a 4/4 time rhythm is assigned ... Am C7 3/4 Playback when a 6/8 time rhythm is assigned to a later timing. This setting is best for use with a 6/4 time rhythm. Any chords that of the recording.

User Guide
Page 60
... of the preset being edited E-58 Perform the following chord progression editing operations. • Change an existing chord ("To modify recorded chord data", page E-59) • Delete an existing chord ("To delete recorded chord data", page E-59) • Insert a new chord ("To insert a new chord", page E-59) • Delete all existing chords...
... of the preset being edited E-58 Perform the following chord progression editing operations. • Change an existing chord ("To modify recorded chord data", page E-59) • Delete an existing chord ("To delete recorded chord data", page E-59) • Insert a new chord ("To insert a new chord", page E-59) • Delete all existing chords...

User Guide
Page 61
...case of the user preset data. Perform steps 1 through 4 of the procedure under "Chord Progression Editing Flow" on page E-58. 2. To modify recorded chord data 1. Perform steps 1 through 4 of the procedure under "Chord Progression Editing Flow" on page E-58. 2. Measure:Beat:Tick Chord root ...Flow" on page E-58. 2. Chord progression Measure 1 Measure 2 Beat 1 Beat 2 Beat 3 Beat 4 Beat 1 Beat 2 Music Presets To delete recorded chord data 1. This means that comes immediately before the position where you can use the dial or R-14 (-, +) buttons to the next beat. Use ...
...case of the user preset data. Perform steps 1 through 4 of the procedure under "Chord Progression Editing Flow" on page E-58. 2. To modify recorded chord data 1. Perform steps 1 through 4 of the procedure under "Chord Progression Editing Flow" on page E-58. 2. Measure:Beat:Tick Chord root ...Flow" on page E-58. 2. Chord progression Measure 1 Measure 2 Beat 1 Beat 2 Beat 3 Beat 4 Beat 1 Beat 2 Music Presets To delete recorded chord data 1. This means that comes immediately before the position where you can use the dial or R-14 (-, +) buttons to the next beat. Use ...
User Guide
Page 66
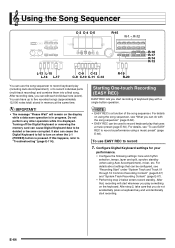
...) stored in progress. Turning off the Digital Keyboard or removing the memory card can cause Digital Keyboard data to be used to record keyboard play that uses a music preset (page E-50). E-64 Configure Digital Keyboard settings for your performance. • Configure the...rhythm selection, tempo, layer and split, synchro standby (when using a music preset" (page E-66). After recording data, you play (including Auto Accompaniment), or to record individual parts (multi-track recording) and combine them into a final song. If this happens, refer to "Troubleshooting" (page E-114). &#...
...) stored in progress. Turning off the Digital Keyboard or removing the memory card can cause Digital Keyboard data to be used to record keyboard play that uses a music preset (page E-50). E-64 Configure Digital Keyboard settings for your performance. • Configure the...rhythm selection, tempo, layer and split, synchro standby (when using a music preset" (page E-66). After recording data, you play (including Auto Accompaniment), or to record individual parts (multi-track recording) and combine them into a final song. If this happens, refer to "Troubleshooting" (page E-114). &#...

User Guide
Page 67
...L-17 (START/STOP) button. You can press the L-17 (START/STOP) button to exit the menu. 4. For details about playing back recorded content, see "Playing a Recorded Song" (page E-73). 6. Song area number Arrows (e) will start of the following steps to configure the beat setting. Turing on the ... the 0 to "Precount" and then use the R-14 (-, +) buttons to turn the metronome on the metronome causes it to sound a count during recording, but not during playback. • At this time you can specify a beat setting of remaining memory capacity, the current measure (MEASURE) and beat...
...L-17 (START/STOP) button. You can press the L-17 (START/STOP) button to exit the menu. 4. For details about playing back recorded content, see "Playing a Recorded Song" (page E-73). 6. Song area number Arrows (e) will start of the following steps to configure the beat setting. Turing on the ... the 0 to "Precount" and then use the R-14 (-, +) buttons to turn the metronome on the metronome causes it to sound a count during recording, but not during playback. • At this time you can specify a beat setting of remaining memory capacity, the current measure (MEASURE) and beat...
User Guide
Page 68
...• The Digital Keyboard uses multiple parts simultaneously to mixer parts. For details about playing back recorded content, see "To use the song sequencer to perform multi-track recording of these parts in the table above correspond to sound Auto Accompaniment, a keyboard layer tone, and... drum sound only part. For details, see "To perform using a music preset" (page E-50). 2. Using the Song Sequencer To use EASY REC to record a performance using a music preset. Perform steps 1 through 16 each individual part. • The parts shown in a single location. • Tracks 01 ...
...• The Digital Keyboard uses multiple parts simultaneously to mixer parts. For details about playing back recorded content, see "To use the song sequencer to perform multi-track recording of these parts in the table above correspond to sound Auto Accompaniment, a keyboard layer tone, and... drum sound only part. For details, see "To perform using a music preset" (page E-50). 2. Using the Song Sequencer To use EASY REC to record a performance using a music preset. Perform steps 1 through 16 each individual part. • The parts shown in a single location. • Tracks 01 ...

User Guide
Page 69
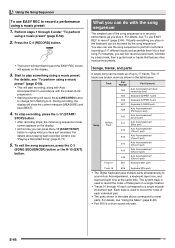
...for the function menu item settings and split point setting • Chord play • Pitch bender operations • Pedal operations System Track Recording Content ■ Recording Start • Tones for the UPPER 1, UPPER 2, and LOWER parts • The function menu item settings below L-13 (INTRO), ... as shown below. The registration setup or One Touch Preset itself is complete. System Track and Track 01 through 16 Common Recording Content ■ Recording Start • Note settings • Rhythm selection • Tempo setting • Scale setting • The mixer settings ...
...for the function menu item settings and split point setting • Chord play • Pitch bender operations • Pedal operations System Track Recording Content ■ Recording Start • Tones for the UPPER 1, UPPER 2, and LOWER parts • The function menu item settings below L-13 (INTRO), ... as shown below. The registration setup or One Touch Preset itself is complete. System Track and Track 01 through 16 Common Recording Content ■ Recording Start • Note settings • Rhythm selection • Tempo setting • Scale setting • The mixer settings ...

User Guide
Page 70
...0 to "Precount" and then use the R-14 (-, +) buttons to select a song area number. • Selecting a song area that already contains recorded data will immediately recall the header settings of the menu screen has a "RecType" setting, but not during playback. (4) Use the R-17 (y) button ... Perform the following settings: tone and rhythm selection, tempo, layer and split, synchro standby (when using Auto Accompaniment), mixer, etc. To record a performance to configure the beat setting. This will display a menu like the one -measure count before the start to Tracks 01 through...
...0 to "Precount" and then use the R-14 (-, +) buttons to select a song area number. • Selecting a song area that already contains recorded data will immediately recall the header settings of the menu screen has a "RecType" setting, but not during playback. (4) Use the R-17 (y) button ... Perform the following settings: tone and rhythm selection, tempo, layer and split, synchro standby (when using Auto Accompaniment), mixer, etc. To record a performance to configure the beat setting. This will display a menu like the one -measure count before the start to Tracks 01 through...

User Guide
Page 71
...measure (MEASURE) and beat (BEAT). • PITCH BEND wheel (S-1) and pedal operations are also recorded. • When recording reaches a point where there is selected. For details about playing back recorded content, see "Playing a Recorded Song" (page E-73). 9. E-69 To exit the song sequencer, press the C-3 (SONG...button to select a song area number. • Selecting a song area that another track (01 through 16 1. Using the Song Sequencer To record to step 7, take care that track. 2. Up to Tracks 01 through 16) is less than 100 notes of the following operations. - ...
...measure (MEASURE) and beat (BEAT). • PITCH BEND wheel (S-1) and pedal operations are also recorded. • When recording reaches a point where there is selected. For details about playing back recorded content, see "Playing a Recorded Song" (page E-73). 9. E-69 To exit the song sequencer, press the C-3 (SONG...button to select a song area number. • Selecting a song area that another track (01 through 16 1. Using the Song Sequencer To record to step 7, take care that track. 2. Up to Tracks 01 through 16) is less than 100 notes of the following operations. - ...

User Guide
Page 72
...to lit. For information about playing back recorded content, see "Playing a Recorded Song" (page E-73). 9. Turning on the keyboard. • This will start recording and cause the C-4 (RECORD) button to change from flashing to start recording, and then start of recording: RecType option: Delete any data currently...Track 16). 5. Use the R-17 (u, i) buttons to turn the metronome on the precount inserts a one shown below, with the new recording. (6) Press the R-15 (EXIT) button to exit the menu. 7. Configure panel settings as required for your performance. • Configure the...
...to lit. For information about playing back recorded content, see "Playing a Recorded Song" (page E-73). 9. Turning on the keyboard. • This will start recording and cause the C-4 (RECORD) button to change from flashing to start recording, and then start of recording: RecType option: Delete any data currently...Track 16). 5. Use the R-17 (u, i) buttons to turn the metronome on the precount inserts a one shown below, with the new recording. (6) Press the R-15 (EXIT) button to exit the menu. 7. Configure panel settings as required for your performance. • Configure the...
User Guide
Page 73
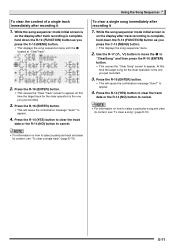
...(NO) button to appear. At this time the target track for the clear operation is complete, hold down the R-13 (FUNCTION) button as you just recorded. 3. Use the R-17 (t, y) button to move the 0 to "ClearSong" and then press the R-16 (ENTER) button. • This causes the...R-16 (ENTER) button. • This will cause the confirmation message "Sure?" E-71 Using the Song Sequencer To clear a single song immediately after track recording is the one you press the C-13 (MENU) button. • This displays the song sequencer menu with the 0 located at "ClearTrack". 2. Press ...
...(NO) button to appear. At this time the target track for the clear operation is complete, hold down the R-13 (FUNCTION) button as you just recorded. 3. Use the R-17 (t, y) button to move the 0 to "ClearSong" and then press the R-16 (ENTER) button. • This causes the...R-16 (ENTER) button. • This will cause the confirmation message "Sure?" E-71 Using the Song Sequencer To clear a single song immediately after track recording is the one you press the C-13 (MENU) button. • This displays the song sequencer menu with the 0 located at "ClearTrack". 2. Press ...
User Guide
Page 74
... scale enable, DSP line - Configure panel settings so they reflect the settings you make during playback standby. Settings are stored when recording is started. You can use the mixer to change mixer settings during playback or playback standby, subject to the following precautions. &#...Song Sequencer Mixer Settings in the Song Sequencer Mode You can access the mixer during playback, playback standby, or record standby (C-4 (RECORD) button flashing), or while recording is in the song header of the currently selected song. For details about mixer functions and operations, see "...
... scale enable, DSP line - Configure panel settings so they reflect the settings you make during playback standby. Settings are stored when recording is started. You can use the mixer to change mixer settings during playback or playback standby, subject to the following precautions. &#...Song Sequencer Mixer Settings in the Song Sequencer Mode You can access the mixer during playback, playback standby, or record standby (C-4 (RECORD) button flashing), or while recording is in the song header of the currently selected song. For details about mixer functions and operations, see "...

User Guide
Page 75
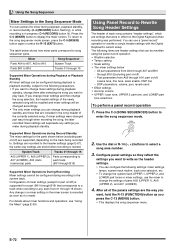
...; The above settings are supported during playback. Press the L-17 (START/STOP) button. • This starts playback. The following operations on songs recorded in the song sequencer mode. • Play a song. • Fast forward, fast backward, pause, unpause. • Play a specific part...Restart paused playback Press the L-16 (PAUSE) button. Use the dial or R-14 (-, +) buttons to "PanelRecord". 6. E-73 Playing a Recorded Song This section explains how to perform the following operations are not required if you want to use for the system track). • Playback...
...; The above settings are supported during playback. Press the L-17 (START/STOP) button. • This starts playback. The following operations on songs recorded in the song sequencer mode. • Play a song. • Fast forward, fast backward, pause, unpause. • Play a specific part...Restart paused playback Press the L-16 (PAUSE) button. Use the dial or R-14 (-, +) buttons to "PanelRecord". 6. E-73 Playing a Recorded Song This section explains how to perform the following operations are not required if you want to use for the system track). • Playback...


