User Guide
Page 7
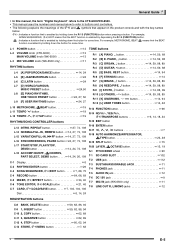
... 27, 73, 108 L-16 SYNCHRO/ENDING, PAUSE button ☞24, 27, 73, 108 L-17 START/STOP, PLAY/STOP, DEMO button 14, 24, 73, 108 L-18 ACCOMP ON/OFF, $CHORDS, PART SELECT, DEMO button 14... 89 C-12 4, STEP button 60, 62, 94 C-13 STORE, #MENU button 7, 62 B E-5 PIANO, 1 button 14, 59, 88 R-3 [C] ORGAN, 2 button 14, 59, 88, 89 R-4 [D] GUITAR, • button 14, 59, 88 R-5 [E] BASS, REST button 14, 94 R-6 [F] ...button. General Guide • In this manual, the term "Digital Keyboard" refers to the CTK-6000/WK-6500. • This manual uses the numbers and names below to refer to buttons and...
... 27, 73, 108 L-16 SYNCHRO/ENDING, PAUSE button ☞24, 27, 73, 108 L-17 START/STOP, PLAY/STOP, DEMO button 14, 24, 73, 108 L-18 ACCOMP ON/OFF, $CHORDS, PART SELECT, DEMO button 14... 89 C-12 4, STEP button 60, 62, 94 C-13 STORE, #MENU button 7, 62 B E-5 PIANO, 1 button 14, 59, 88 R-3 [C] ORGAN, 2 button 14, 59, 88, 89 R-4 [D] GUITAR, • button 14, 59, 88 R-5 [E] BASS, REST button 14, 94 R-6 [F] ...button. General Guide • In this manual, the term "Digital Keyboard" refers to the CTK-6000/WK-6500. • This manual uses the numbers and names below to refer to buttons and...

User Guide
Page 8
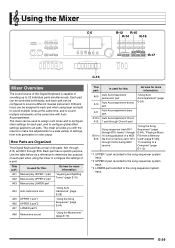
..., and other playback progresses. For details about parts, see "How Parts are counted up as beats per minute. The MEASURE and BEAT values are Organized" (page E-39). 3 Indicator areas The indicator area shows such information as :, and pointer (K) type indicators. This indicates that is affected by thick...Group A and Group B. In the case of 32 parts, 16 each in the lower left corner while Group A parts are sounded when you play something on the keyboard or when Auto Accompaniment is being used . It also can be changed . 4 Registration bank area This area shows the...
..., and other playback progresses. For details about parts, see "How Parts are counted up as beats per minute. The MEASURE and BEAT values are Organized" (page E-39). 3 Indicator areas The indicator area shows such information as :, and pointer (K) type indicators. This indicates that is affected by thick...Group A and Group B. In the case of 32 parts, 16 each in the lower left corner while Group A parts are sounded when you play something on the keyboard or when Auto Accompaniment is being used . It also can be changed . 4 Registration bank area This area shows the...
User Guide
Page 41
... Mixer Overview The sound source of this Digital Keyboard is capable of 32 parts: A01 through A16, and B01 through B16. How Parts are Organized This Digital Keyboard has a total of sounding up to 32 individual parts simultaneously. This part: Is used for this : Go here for more... individually, and each part can be used to assign such tones and to configure other settings for more information: A01 Manual play UPPER 1 part A02 Manual play UPPER 2 part A03 Manual play LOWER part "Layering and Splitting Tones" (page E-15) A04 Auto harmonize tone A05 UPPER 1 part*1 A06 UPPER 2 ...
... Mixer Overview The sound source of this Digital Keyboard is capable of 32 parts: A01 through A16, and B01 through B16. How Parts are Organized This Digital Keyboard has a total of sounding up to 32 individual parts simultaneously. This part: Is used for this : Go here for more... individually, and each part can be used to assign such tones and to configure other settings for more information: A01 Manual play UPPER 1 part A02 Manual play UPPER 2 part A03 Manual play LOWER part "Layering and Splitting Tones" (page E-15) A04 Auto harmonize tone A05 UPPER 1 part*1 A06 UPPER 2 ...

User Guide
Page 76
... the L-13 (REPEAT) button. Press the R-14 (+) button. The specified phrase plays back in step 4. • Playback stops automatically when it reaches the end of each part, see "How Parts are Organized" (page E-39). 5. Press the C-5 (MIXER) button to "Sol" (Solo). 7. Press the R-14 (-, +) buttons at the same time. • This causes...
... the L-13 (REPEAT) button. Press the R-14 (+) button. The specified phrase plays back in step 4. • Playback stops automatically when it reaches the end of each part, see "How Parts are Organized" (page E-39). 5. Press the C-5 (MIXER) button to "Sol" (Solo). 7. Press the R-14 (-, +) buttons at the same time. • This causes...
User Guide
Page 101
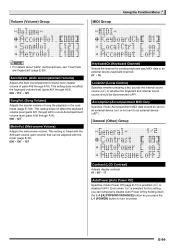
... Contrast (LCD Contrast) Adjusts display contrast. 01 - 09* - 17 AutoPower (Auto Power Off) Specifies if Auto Power Off (page E-13) is selected for sending keyboard play MIDI data to turn on *) or whether the keyboard and internal sound source should be disconnected (oFF). AccompOut (Accompaniment MIDI Out) Specifies if Auto Accompaniment... the card mode (page E-103). Volume (Volume) Group MIDI Group Using the Function Menu • For details about "parts" mentioned here, see "How Parts are Organized" (page E-39).
... Contrast (LCD Contrast) Adjusts display contrast. 01 - 09* - 17 AutoPower (Auto Power Off) Specifies if Auto Power Off (page E-13) is selected for sending keyboard play MIDI data to turn on *) or whether the keyboard and internal sound source should be disconnected (oFF). AccompOut (Accompaniment MIDI Out) Specifies if Auto Accompaniment... the card mode (page E-103). Volume (Volume) Group MIDI Group Using the Function Menu • For details about "parts" mentioned here, see "How Parts are Organized" (page E-39).


