Guide for Media Configuration Tool
Page 24
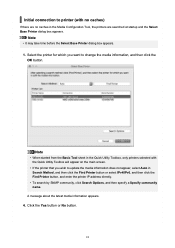
... click the OK button. Note • It may take time before the Select Base Printer dialog box appears. 1. Click the Yes button or No button. 24 A message about the latest media information appears. 4. Initial connection to update the media information does not appear, select Auto in the Media Configuration Tool, the...
... click the OK button. Note • It may take time before the Select Base Printer dialog box appears. 1. Click the Yes button or No button. 24 A message about the latest media information appears. 4. Initial connection to update the media information does not appear, select Auto in the Media Configuration Tool, the...
Guide for Accounting Manage
Page 2
... in This Document 4 Touch-enabled Device Users (Windows 5 Trademarks and Licenses 6 Accounting Manager Guide 21 General Notes (Accounting Manager 23 The Features of Accounting Manager 24 Starting Accounting Manager 25 Exiting Accounting Manager 26 Accounting Manager Basic Procedures 27 Accounting Manager Basic Procedures 28 Registering Printer 29 Configure unit costs, including...
... in This Document 4 Touch-enabled Device Users (Windows 5 Trademarks and Licenses 6 Accounting Manager Guide 21 General Notes (Accounting Manager 23 The Features of Accounting Manager 24 Starting Accounting Manager 25 Exiting Accounting Manager 26 Accounting Manager Basic Procedures 27 Accounting Manager Basic Procedures 28 Registering Printer 29 Configure unit costs, including...
Guide for Accounting Manage
Page 24
...to a file. Important • Accounting Manager displays estimates for management and always log in . These estimates will also vary depending on the Canon ink cost measurement conditions is recommended that you to use . You can export the collected job logs to do not include ink consumed in procedures... use the collected print job logs to collect job logs. The average error for items such as forced nozzle discharges by the cleaning mechanism. 24 The actual consumption may be collected. • To acquire job logs without omitting any job logs, it is ±15%. Note also ...
...to a file. Important • Accounting Manager displays estimates for management and always log in . These estimates will also vary depending on the Canon ink cost measurement conditions is recommended that you to use . You can export the collected job logs to do not include ink consumed in procedures... use the collected print job logs to collect job logs. The average error for items such as forced nozzle discharges by the cleaning mechanism. 24 The actual consumption may be collected. • To acquire job logs without omitting any job logs, it is ±15%. Note also ...
Guide for Device Management Console
Page 2
... 5 Device Management Console Guide 20 General Notes (Device Management Console 21 The Features of Device Management Console 22 Starting Device Management Console 23 Registering Printer 24 Deleting Printer 28 Checking Printer Status 31 Managing Printer Colors 34 Checking Color Calibration Execution Status 35 Checking Calibration Link 40 Performing Color Calibration 43...
... 5 Device Management Console Guide 20 General Notes (Device Management Console 21 The Features of Device Management Console 22 Starting Device Management Console 23 Registering Printer 24 Deleting Printer 28 Checking Printer Status 31 Managing Printer Colors 34 Checking Color Calibration Execution Status 35 Checking Calibration Link 40 Performing Color Calibration 43...

Guide for Device Management Console
Page 24
Note • This operation cannot be performed when acquiring information from File menu). The Printer Management dialog box appears. 2. Registering Printer Register the printer for printers that do not support color calibration. 1. Click Add Printer button. 24 Click button (or select Manage Printer from the printer. Note • The Calibration sheet does not appear for which you want to check the printer status or color calibration execution status.
Note • This operation cannot be performed when acquiring information from File menu). The Printer Management dialog box appears. 2. Registering Printer Register the printer for printers that do not support color calibration. 1. Click Add Printer button. 24 Click button (or select Manage Printer from the printer. Note • The Calibration sheet does not appear for which you want to check the printer status or color calibration execution status.
Guide for Free Layout
Page 2
... 15 The Features of Free Layout 16 Starting Free Layout 17 Description of Free Layout Screen 19 Free Layout Main Window 20 Preferences Dialog Box 24 Page Setup Dialog Box 26 Print Dialog Box 27 Zoom Dialog Box 28 Format Dialog Box 29 Various Free Layout Features 31 Laying out a Multiple...
... 15 The Features of Free Layout 16 Starting Free Layout 17 Description of Free Layout Screen 19 Free Layout Main Window 20 Preferences Dialog Box 24 Page Setup Dialog Box 26 Print Dialog Box 27 Zoom Dialog Box 28 Format Dialog Box 29 Various Free Layout Features 31 Laying out a Multiple...

Guide for Free Layout
Page 24
... when you select Preferences from the Canon imagePROGRAF Free Layout menu. Gridlines You can input a grid line width value in numerical characters so that they serve as a guide to laying out objects. Object Frame Configure the print settings for the object border. 24 You can change the number of...change the numbers by clicking either button or button. Grid Color Select the grid line color. Note • You can input between 10.0 and 200.0(mm) (between 1 and 10. • You can change the numbers by clicking either button or button. Units Select the ruler unit. Divisions...
... when you select Preferences from the Canon imagePROGRAF Free Layout menu. Gridlines You can input a grid line width value in numerical characters so that they serve as a guide to laying out objects. Object Frame Configure the print settings for the object border. 24 You can change the number of...change the numbers by clicking either button or button. Grid Color Select the grid line color. Note • You can input between 10.0 and 200.0(mm) (between 1 and 10. • You can change the numbers by clicking either button or button. Units Select the ruler unit. Divisions...
Guide for Previe
Page 24
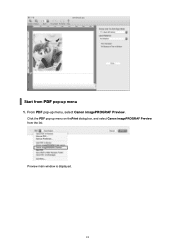
Preview main window is displayed. 24 Start from PDF pop-up menu on thePrint dialog box, and select Canon imagePROGRAF Preview from the list. Click the PDF pop-up menu 1. From PDF pop-up menu, select Canon imagePROGRAF Preview.
Preview main window is displayed. 24 Start from PDF pop-up menu on thePrint dialog box, and select Canon imagePROGRAF Preview from the list. Click the PDF pop-up menu 1. From PDF pop-up menu, select Canon imagePROGRAF Preview.

series User Manual
Page 24
... distribution may be used to license terms below. OR BUSINESS INTERRUPTION) HOWEVER CAUSED AND ON ANY THEORY OF LIABILITY, WHETHER IN CONTRACT, STRICT LIABILITY, OR 24 Use is subject to endorse or promote products derived from this software without modification, are permitted provided that the following conditions are met: * Redistributions of...
... distribution may be used to license terms below. OR BUSINESS INTERRUPTION) HOWEVER CAUSED AND ON ANY THEORY OF LIABILITY, WHETHER IN CONTRACT, STRICT LIABILITY, OR 24 Use is subject to endorse or promote products derived from this software without modification, are permitted provided that the following conditions are met: * Redistributions of...
series User Manual
Page 42
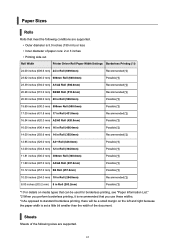
... less • Inner diameter of paper core: 2 or 3 inches • Printing side out Roll Width Printer Driver Roll Paper Width Settings Borderless Printing (*1) 24.00 inches (609.6 mm) 24 in Roll (609.6mm) Recommended(*2) 23.62 inches (600.0 mm) 600mm Roll (600.0mm) Possible(*3) 23.39 inches (594.0 mm) A1/A2 Roll...
... less • Inner diameter of paper core: 2 or 3 inches • Printing side out Roll Width Printer Driver Roll Paper Width Settings Borderless Printing (*1) 24.00 inches (609.6 mm) 24 in Roll (609.6mm) Recommended(*2) 23.62 inches (600.0 mm) 600mm Roll (600.0mm) Possible(*3) 23.39 inches (594.0 mm) A1/A2 Roll...
series User Manual
Page 44
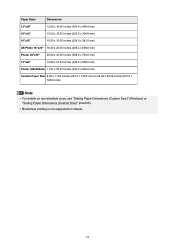
... (329.0 x 558.0 mm) Poster 300x900mm 11.81 x 35.43 inches (300.0 x 900.0 mm) Custom Paper Size 8.00 x 11.00 inches (203.2 × 279.4 mm) to 24.02 x 62.99 inches (610.0 × 1600.0 mm) Note • For details on non-standard sizes, see "Setting Paper Dimensions (Custom Size)" (Windows) or "Setting...
... (329.0 x 558.0 mm) Poster 300x900mm 11.81 x 35.43 inches (300.0 x 900.0 mm) Custom Paper Size 8.00 x 11.00 inches (203.2 × 279.4 mm) to 24.02 x 62.99 inches (610.0 × 1600.0 mm) Note • For details on non-standard sizes, see "Setting Paper Dimensions (Custom Size)" (Windows) or "Setting...
series User Manual
Page 98
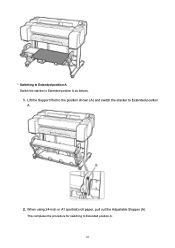
Lift the Support Rod to the position shown (A) and switch the stacker to Extended position A as follows. 1. When using 24-inch or A1 (portrait) roll paper, pull out the Adjustable Stopper (A). • Switching to Extended position A Switch the stacker to Extended position A. 2. This completes the procedure for switching to Extended position A. 98
Lift the Support Rod to the position shown (A) and switch the stacker to Extended position A as follows. 1. When using 24-inch or A1 (portrait) roll paper, pull out the Adjustable Stopper (A). • Switching to Extended position A Switch the stacker to Extended position A. 2. This completes the procedure for switching to Extended position A. 98
series User Manual
Page 158
... 6 Select whether A1 or 600 mm is applied when a roll of an intermediate size is detected. ◦ Roll paper setting 7 Select whether 600 mm or 24 inch is applied when a sheet of an intermediate size is detected. • Auto feed at power on When Enable is selected, the printer judges the...
... 6 Select whether A1 or 600 mm is applied when a roll of an intermediate size is detected. ◦ Roll paper setting 7 Select whether 600 mm or 24 inch is applied when a sheet of an intermediate size is detected. • Auto feed at power on When Enable is selected, the printer judges the...
series User Manual
Page 182
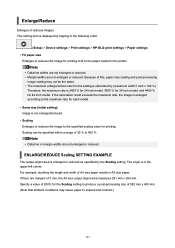
...left corner. Therefore, the maximum rate is enlarged or reduced as specified by the Scaling setting. If there are not enlarged or reduced. Because of 200% for printing. Note • Data line or margin widths are margins of A4 size paper results in the printer. For example, doubling the ... 3 mm, the A4 size output object area measures 291 mm x 204 mm. ENLARGE/REDUCE Scaling SETTING EXAMPLE The output object area is 2400 % for 24 inch model, 3600 % for 36 inch model, and 4400 % for printing to fit to 400 %. Enlarge/Reduce Enlarges or reduces images This setting item...
...left corner. Therefore, the maximum rate is enlarged or reduced as specified by the Scaling setting. If there are not enlarged or reduced. Because of 200% for printing. Note • Data line or margin widths are margins of A4 size paper results in the printer. For example, doubling the ... 3 mm, the A4 size output object area measures 291 mm x 204 mm. ENLARGE/REDUCE Scaling SETTING EXAMPLE The output object area is 2400 % for 24 inch model, 3600 % for 36 inch model, and 4400 % for printing to fit to 400 %. Enlarge/Reduce Enlarges or reduces images This setting item...
series User Manual
Page 280
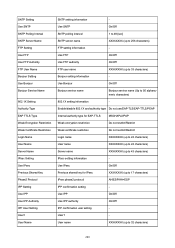
...-TTLS MSCHAPv2/PAP Weak encryption restriction Do not restrict/Restrict Weak certificate restriction Do not restrict/Restrict Login name XXXXXXXX (up to 24 characters) User name XXXXXXXX (up to 24 characters) Server name XXXXXXXX (up to 43 characters) IPsec setting information - Use Bonjour On/Off Bonjour service name Bonjour service name (Up...
...-TTLS MSCHAPv2/PAP Weak encryption restriction Do not restrict/Restrict Weak certificate restriction Do not restrict/Restrict Login name XXXXXXXX (up to 24 characters) User name XXXXXXXX (up to 24 characters) Server name XXXXXXXX (up to 43 characters) IPsec setting information - Use Bonjour On/Off Bonjour service name Bonjour service name (Up...
series User Manual
Page 298
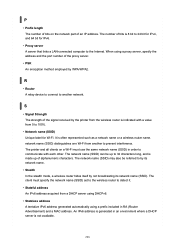
... using DHCPv6. • Stateless address A tentative IPv6 address generated automatically using a proxy server, specify the address and the port number of bits is 8 bit to 24 bit for IPv4, and 64 bit for Wi-Fi. An IPv6 address is generated in RA (Router Advertisement) and a MAC address. The printer and all...
... using DHCPv6. • Stateless address A tentative IPv6 address generated automatically using a proxy server, specify the address and the port number of bits is 8 bit to 24 bit for IPv4, and 64 bit for Wi-Fi. An IPv6 address is generated in RA (Router Advertisement) and a MAC address. The printer and all...
series User Manual
Page 322
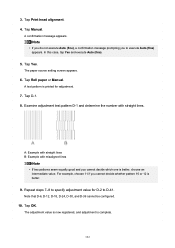
... you to D-41. Repeat steps 7-8 to specify adjustment value for adjustment. 7. A confirmation message appears. The paper source setting screen appears. 6. Tap D-1. 8. Note that D-6, D-12, D-18, D-24, D-30, and D-36 cannot be configured. 10. Tap Roll paper or Manual. A: Example with straight lines B: Example with straight lines. The adjustment value is now...
... you to D-41. Repeat steps 7-8 to specify adjustment value for adjustment. 7. A confirmation message appears. The paper source setting screen appears. 6. Tap D-1. 8. Note that D-6, D-12, D-18, D-24, D-30, and D-36 cannot be configured. 10. Tap Roll paper or Manual. A: Example with straight lines B: Example with straight lines. The adjustment value is now...
series User Manual
Page 621
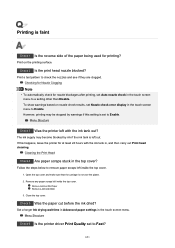
... print head nozzle blocked? Remove any paper scraps left inside the top cover. Checking for Nozzle Clogging Note • To automatically check for at least 24 hours with the ink tank out? If this setting is left with the ink tank in the touch screen menu to a setting other than Disable...
... print head nozzle blocked? Remove any paper scraps left inside the top cover. Checking for Nozzle Clogging Note • To automatically check for at least 24 hours with the ink tank out? If this setting is left with the ink tank in the touch screen menu to a setting other than Disable...

