Operation Guide
Page 5
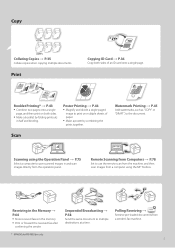
... multiple sheets of an ID card onto a single page. Scan Scanning using the Operation Panel → P.75 Select a computer to use the remote scan from the machine, and then scan images from the operation panel. Remote Scanning from Computers → P.78 Set to save scanned images in and scan images directly from a computer using the MF Toolbox...
... multiple sheets of an ID card onto a single page. Scan Scanning using the Operation Panel → P.75 Select a computer to use the remote scan from the machine, and then scan images from the operation panel. Remote Scanning from Computers → P.78 Set to save scanned images in and scan images directly from a computer using the MF Toolbox...
Operation Guide
Page 6
... Part of the Machine ......... 10 Front Side 10 Interior 12 Back Side 13 Learn the Functions of the Operation Panel 14 Switch to Copy/Fax/Scan Mode 16 Enter Text 17 Set Date and Time 18 Place Documents 19 Placing Documents on the Platen Glass 20 Placing Documents in the Feeder...
... Part of the Machine ......... 10 Front Side 10 Interior 12 Back Side 13 Learn the Functions of the Operation Panel 14 Switch to Copy/Fax/Scan Mode 16 Enter Text 17 Set Date and Time 18 Place Documents 19 Placing Documents on the Platen Glass 20 Placing Documents in the Feeder...
Operation Guide
Page 8
Scan Understand the Scanning Method 74 Scan a Document with the Operation Panel 75 Scanning a Document Using a Shortcut Key 77 Scan a Document with the MF Toolbox 78 Configuring Scan Settings Using the MF Toolbox 80 Scan a Document with the Scanner Driver 82 Maintenance and Management Clean the Machine 84 Cleaning the Exterior and Interior 84 Cleaning the Fixing Unit... The Clean Earth Campaign 108 Important Safety Instructions 109 Legal Notices 111 Laser Safety 114 8 (→ p.105) You can see frequentely asked questions about the scan function.
Scan Understand the Scanning Method 74 Scan a Document with the Operation Panel 75 Scanning a Document Using a Shortcut Key 77 Scan a Document with the MF Toolbox 78 Configuring Scan Settings Using the MF Toolbox 80 Scan a Document with the Scanner Driver 82 Maintenance and Management Clean the Machine 84 Cleaning the Exterior and Interior 84 Cleaning the Fixing Unit... The Clean Earth Campaign 108 Important Safety Instructions 109 Legal Notices 111 Laser Safety 114 8 (→ p.105) You can see frequentely asked questions about the scan function.
Operation Guide
Page 9
... Part of the Machine ......... 10 Front Side 10 Interior 12 Back Side 13 Learn the Functions of the Operation Panel 14 Switch to Copy/Fax/Scan Mode 16 Enter Text 17 Set Date and Time 18 Place Documents 19 Placing Documents on the Platen Glass 20 Placing Documents in the Feeder...
... Part of the Machine ......... 10 Front Side 10 Interior 12 Back Side 13 Learn the Functions of the Operation Panel 14 Switch to Copy/Fax/Scan Mode 16 Enter Text 17 Set Date and Time 18 Place Documents 19 Placing Documents on the Platen Glass 20 Placing Documents in the Feeder...

Operation Guide
Page 10
Document feeder tray Place your documents in this cover to load large size documents. Document return tray Returns documents after scanning. Document guides Adjust these handles to fit the document. Operation panel Use the panel to fit the paper. 10 Lift handles (left, right) Hold these ...
Document feeder tray Place your documents in this cover to load large size documents. Document return tray Returns documents after scanning. Document guides Adjust these handles to fit the document. Operation panel Use the panel to fit the paper. 10 Lift handles (left, right) Hold these ...

Operation Guide
Page 11
... extension Pull out the tray extension when using paper larger than 4" (10 cm) of space around the machine. Scanning area Scans documents from falling out of the machine. Paper guides Adjust these guides to scan non-standard size paper or books, as well as standard size paper (→P.20). Paper cassette (Auto) Load...
... extension Pull out the tray extension when using paper larger than 4" (10 cm) of space around the machine. Scanning area Scans documents from falling out of the machine. Paper guides Adjust these guides to scan non-standard size paper or books, as well as standard size paper (→P.20). Paper cassette (Auto) Load...
Operation Guide
Page 14
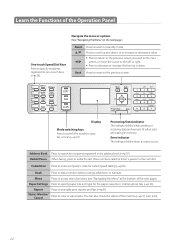
... occurs. Hook Press to enter a recipient's code for the paper cassette or multi-purpose tray (→p.26). Status Monitor/ Cancel Press to copy, fax, or scan (→p.27). Display Mode switching keys Press to switch the mode to view or cancel jobs. You can also check the status of the next...
... occurs. Hook Press to enter a recipient's code for the paper cassette or multi-purpose tray (→p.26). Status Monitor/ Cancel Press to copy, fax, or scan (→p.27). Display Mode switching keys Press to switch the mode to view or cancel jobs. You can also check the status of the next...
Operation Guide
Page 15
... [▼] to Wireless LAN. Wi-Fi Indicator Turns on when the machine is connected to highlight an item, and then press [OK]. Scan>PC1/ Scan>PC2 Press to send the scanned documents to the settings are not saved. Press [ ] (Menu). If you close the menu before you press [OK], the changes made to...
... [▼] to Wireless LAN. Wi-Fi Indicator Turns on when the machine is connected to highlight an item, and then press [OK]. Scan>PC1/ Scan>PC2 Press to send the scanned documents to the settings are not saved. Press [ ] (Menu). If you close the menu before you press [OK], the changes made to...
Operation Guide
Page 16
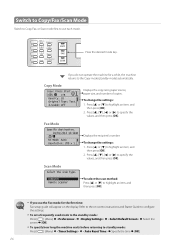
...each mode. To change the settings: 1. Displays the recipient's number. Press [▲] or [▼] to specify the values, and then press [OK]. Scan Mode Select the scan type. Refer to the on the display. Press or [►] to highlight an item, and then press [OK]. 2. To change the settings: 1.... the values, and then press [OK]. Press or [►] to highlight an item, and then press [OK]. 2. Computer Remote Scanner To select the scan method: Press [▲] or [▼] to highlight an item, and then press [OK]. • If you do not operate the machine for the ...
...each mode. To change the settings: 1. Displays the recipient's number. Press [▲] or [▼] to specify the values, and then press [OK]. Scan Mode Select the scan type. Refer to the on the display. Press or [►] to highlight an item, and then press [OK]. 2. To change the settings: 1.... the values, and then press [OK]. Press or [►] to highlight an item, and then press [OK]. 2. Computer Remote Scanner To select the scan method: Press [▲] or [▼] to highlight an item, and then press [OK]. • If you do not operate the machine for the ...

Operation Guide
Page 21
...guides are too loose or too tight, this may result in IMPORTANT misfeeds or paper jams. IMPORTANT • While scanning documents, do not add or remove documents. • When scanning is complete, remove the document from the document return tray to the width of the document. " # 5 Align... the document guides tightly to avoid paper jams. • Do not scan the same document more than 30 times. When a document is scanned repeatedly, the paper can become wrinkled, earmarked, or torn, which may result in paper jams. 21 Basic Operation 4...
...guides are too loose or too tight, this may result in IMPORTANT misfeeds or paper jams. IMPORTANT • While scanning documents, do not add or remove documents. • When scanning is complete, remove the document from the document return tray to the width of the document. " # 5 Align... the document guides tightly to avoid paper jams. • Do not scan the same document more than 30 times. When a document is scanned repeatedly, the paper can become wrinkled, earmarked, or torn, which may result in paper jams. 21 Basic Operation 4...
Operation Guide
Page 32
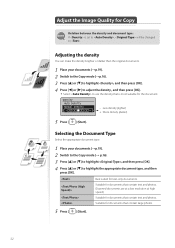
... that is set to , will be changed to highlight the appropriate document type, and then press [OK]. Suitable for documents that contain text and photos. (Scanned documents are at a low resolution at high speed.) Suitable for text-only documents. Best suited for documents that contain large photos. 5 Press [ ] (Start). 32...
... that is set to , will be changed to highlight the appropriate document type, and then press [OK]. Suitable for documents that contain text and photos. (Scanned documents are at a low resolution at high speed.) Suitable for text-only documents. Best suited for documents that contain large photos. 5 Press [ ] (Start). 32...
Operation Guide
Page 34
... [OK]. When placing your documents in the feeder When placing your documents on the platen glass, and then press [ ] (Start). • Press [ ] (Start) for every scanning. 3. After scanning all your documents. 34
... [OK]. When placing your documents in the feeder When placing your documents on the platen glass, and then press [ ] (Start). • Press [ ] (Start) for every scanning. 3. After scanning all your documents. 34

Operation Guide
Page 35
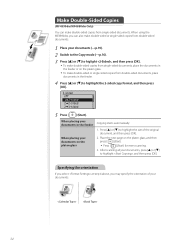
... 2 Switch to the Copy mode (→p.16). 3 Press [▲] or [▼] to highlight , and then press [OK]. 4 Press [▲] or [▼] to scan the entire page of multiple documents. 1 Place your documents (→p.19). 2 Switch to the Copy mode (→p.16). 3 Press [▲] or [▼] to highlight ,... [OK]. N on 1 Off 2 on 1 4 on 1 ID Card Copy 5 Press [▲] or [▼] to highlight the desired scan size, and then press [OK]. • For example, set scan size to to highlight , and then press [OK]. 5 Press [ ] (Start). 35 Copy Copy Multiple Pages onto One Sheet You can ...
... 2 Switch to the Copy mode (→p.16). 3 Press [▲] or [▼] to highlight , and then press [OK]. 4 Press [▲] or [▼] to scan the entire page of multiple documents. 1 Place your documents (→p.19). 2 Switch to the Copy mode (→p.16). 3 Press [▲] or [▼] to highlight ,... [OK]. N on 1 Off 2 on 1 4 on 1 ID Card Copy 5 Press [▲] or [▼] to highlight the desired scan size, and then press [OK]. • For example, set scan size to to highlight , and then press [OK]. 5 Press [ ] (Start). 35 Copy Copy Multiple Pages onto One Sheet You can ...
Operation Guide
Page 54
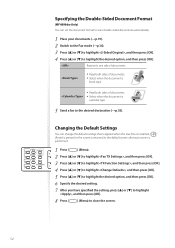
Changing the Default Settings You can set the document format to scan double-sided documents automatically. 1 Place your documents (→p.19). 2 Switch to the Fax mode (→p.16). 3 Press [▲] or [▼] to highlight , and then press [...
Changing the Default Settings You can set the document format to scan double-sided documents automatically. 1 Place your documents (→p.19). 2 Switch to the Fax mode (→p.16). 3 Press [▲] or [▼] to highlight , and then press [...
Operation Guide
Page 55
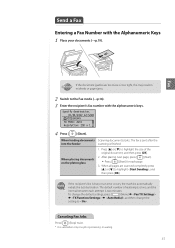
...settings, press [ ] (Menu) , and then change the setting to highlight , and then press [OK]. When loading documents Scanning documents starts. Press [▲] or [▼] to the Fax mode (→p.16). 3 Enter the recipient's fax number with the Alphanumeric Keys 1 Place your ... is valid when only one job is busy or an error occurs, the machine automatically redials the last destination. Fax If the document guides are scanned completely, press [▲] or [▼] to . After placing next page, press [ ] (Start). • Press [ ] (Start) for...
...settings, press [ ] (Menu) , and then change the setting to highlight , and then press [OK]. When loading documents Scanning documents starts. Press [▲] or [▼] to the Fax mode (→p.16). 3 Enter the recipient's fax number with the Alphanumeric Keys 1 Place your ... is valid when only one job is busy or an error occurs, the machine automatically redials the last destination. Fax If the document guides are scanned completely, press [▲] or [▼] to . After placing next page, press [ ] (Start). • Press [ ] (Start) for...
Operation Guide
Page 73
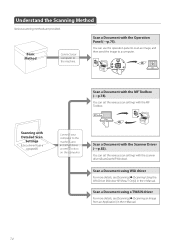
Understand the Scanning Method 74 Scan a Document with the Operation Panel 75 Scanning a Document Using a Shortcut Key 77 Scan a Document with the MF Toolbox 78 Configuring Scan Settings Using the MF Toolbox 80 Scan a Document with the Scanner Driver 82 73 Scan This chapter describes the basic scan functions.
Understand the Scanning Method 74 Scan a Document with the Operation Panel 75 Scanning a Document Using a Shortcut Key 77 Scan a Document with the MF Toolbox 78 Configuring Scan Settings Using the MF Toolbox 80 Scan a Document with the Scanner Driver 82 73 Scan This chapter describes the basic scan functions.
Operation Guide
Page 74
... the WIA Driver (Window XP/Vista/7 Only)] in the e-Manual. 74 Scan a Document with the Scanner Driver (→p.82). Scan a Document using a TWAIN driver For more details, see [Scanning] [Scanning an Image from a computer) Connect your computer to the machine. Scanning with the scanner driver (ScanGear MF Window). You can use the operation panel...
... the WIA Driver (Window XP/Vista/7 Only)] in the e-Manual. 74 Scan a Document with the Scanner Driver (→p.82). Scan a Document using a TWAIN driver For more details, see [Scanning] [Scanning an Image from a computer) Connect your computer to the machine. Scanning with the scanner driver (ScanGear MF Window). You can use the operation panel...
Operation Guide
Page 75
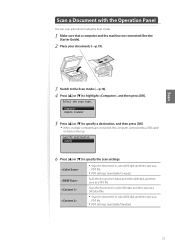
...documents (→p.19). Specify destination. USER01 6 Press [▲] or [▼] to highlight , and then press [OK]. Scan the document in color (300 dpi), and then save as a JPEG/Exif file. • Scan the document in black and white (300 dpi), and then save as a TIFF file. Select the... scan type. Scan a Document with the Operation Panel You can scan a document using the Scan mode. 1 Make sure that a computer and the machine are ...
...documents (→p.19). Specify destination. USER01 6 Press [▲] or [▼] to highlight , and then press [OK]. Scan the document in color (300 dpi), and then save as a JPEG/Exif file. • Scan the document in black and white (300 dpi), and then save as a TIFF file. Select the... scan type. Scan a Document with the Operation Panel You can scan a document using the Scan mode. 1 Make sure that a computer and the machine are ...
Operation Guide
Page 76
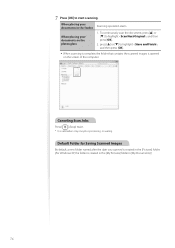
...highlight , and then press [OK]. • When scanning is complete, the folder that contains the scanned images is processing or waiting. To continuously scan the document, press [▲] or [▼] to start scanning. Default Folder for Saving Scanned Images By default, a new folder named after the... date you scanned is created in the [Pictures]...
...highlight , and then press [OK]. • When scanning is complete, the folder that contains the scanned images is processing or waiting. To continuously scan the document, press [▲] or [▼] to start scanning. Default Folder for Saving Scanned Images By default, a new folder named after the... date you scanned is created in the [Pictures]...
Operation Guide
Page 77
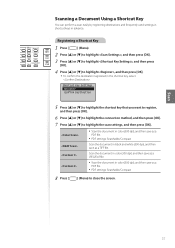
...settings: Searchable/Compact 8 Press [ ] (Menu) to highlight the scan settings, and then press [OK]. • Scan the document in color (300 dpi), and then save as a PDF file. • PDF settings: Searchable/Compact Scan the document in black and white (300 dpi), and then save ... Press [▲] or [▼] to highlight , and then press [OK]. • To confirm the destination registered in advance. Scan Scanning a Document Using a Shortcut Key You can perform a scan easily by registering destinations and frequently used settings in shortcut keys in the shortcut key, select .
...settings: Searchable/Compact 8 Press [ ] (Menu) to highlight the scan settings, and then press [OK]. • Scan the document in color (300 dpi), and then save as a PDF file. • PDF settings: Searchable/Compact Scan the document in black and white (300 dpi), and then save ... Press [▲] or [▼] to highlight , and then press [OK]. • To confirm the destination registered in advance. Scan Scanning a Document Using a Shortcut Key You can perform a scan easily by registering destinations and frequently used settings in shortcut keys in the shortcut key, select .


