
i9900 Quick Start Guide
Page 45
The print head holder moves to avoid staining clothing or the surrounding area. Discard empty ink tanks according to the local laws and regulations regarding disposal of consumables. 3 Prepare a replacement ink tank. (1) Unpack the new ink tank and pull off the orange tape. (2) Remove the orange protective cap ...from the bottom of ink, replace it . 41 remove only the ink tank. Printing Maintenance Replacing Ink Tanks When an ink tank runs out of the ink tank and discard it...
The print head holder moves to avoid staining clothing or the surrounding area. Discard empty ink tanks according to the local laws and regulations regarding disposal of consumables. 3 Prepare a replacement ink tank. (1) Unpack the new ink tank and pull off the orange tape. (2) Remove the orange protective cap ...from the bottom of ink, replace it . 41 remove only the ink tank. Printing Maintenance Replacing Ink Tanks When an ink tank runs out of the ink tank and discard it...
i9900 Quick Start Guide
Page 46
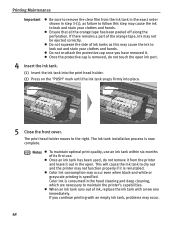
...Be sure to remove the clear film from the printer and leave it out in the head cleaning and deep cleaning, which are necessary to the right. Ensure that all the orange tape has been peeled off along the perforation. Do not re-attach the protective cap once you continue printing with a ... port. 4 Insert the ink tank. (1) Insert the ink tank into the print head holder. (2) Press on the "PUSH" mark until the ink tank snaps firmly into place. 5 Close the front cover. If you have removed it is removed, do not remove it from the ink tank in the exact order shown in step 3-(1), as...
...Be sure to remove the clear film from the printer and leave it out in the head cleaning and deep cleaning, which are necessary to the right. Ensure that all the orange tape has been peeled off along the perforation. Do not re-attach the protective cap once you continue printing with a ... port. 4 Insert the ink tank. (1) Insert the ink tank into the print head holder. (2) Press on the "PUSH" mark until the ink tank snaps firmly into place. 5 Close the front cover. If you have removed it is removed, do not remove it from the ink tank in the exact order shown in step 3-(1), as...
i9900 Quick Start Guide
Page 68
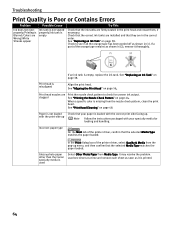
...tab of the orange tape remains as shown in the print head and reseat them, if necessary. Glossy photo paper other than the Canon specialty media is misaligned Align the print head. See "Replacing an Ink Tank" on page 56. Print head nozzles are installed and that your specialty media for ...See "Print Head Cleaning" on page 38. In the Print dialog box of the printer driver, select Quality & Media from Media Type. See "Printing the Nozzle Check Pattern" on page 44. Paper is not loaded with the print-side up Check that they are firmly seated in (2), remove it is printed. 64...
...tab of the orange tape remains as shown in the print head and reseat them, if necessary. Glossy photo paper other than the Canon specialty media is misaligned Align the print head. See "Replacing an Ink Tank" on page 56. Print head nozzles are installed and that your specialty media for ...See "Print Head Cleaning" on page 38. In the Print dialog box of the printer driver, select Quality & Media from Media Type. See "Printing the Nozzle Check Pattern" on page 44. Paper is not loaded with the print-side up Check that they are firmly seated in (2), remove it is printed. 64...
i9900 Quick Start Guide
Page 73
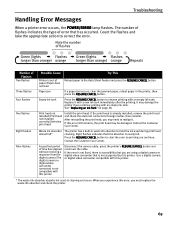
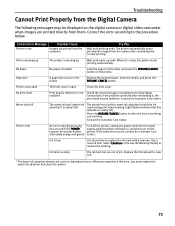
...empty ink tank. If the error is not fixed, there is not supported by this absorber is already installed, remove the print head and check the electrical contacts for foreign matter, then reinstall. Number of error that this printer. Troubleshooting Handling ..., clear the jammed paper, reload paper in waste ink absorber to resume printing with a new ink tank immediately after the printing. Print head not installed/Print head not installed correctly/Defective print head Install the print head. Contact the Customer Care Center. Waste ink absorber almost full* The printer...
...empty ink tank. If the error is not fixed, there is not supported by this absorber is already installed, remove the print head and check the electrical contacts for foreign matter, then reinstall. Number of error that this printer. Troubleshooting Handling ..., clear the jammed paper, reload paper in waste ink absorber to resume printing with a new ink tank immediately after the printing. Print head not installed/Print head not installed correctly/Defective print head Install the print head. Contact the Customer Care Center. Waste ink absorber almost full* The printer...
i9900 Quick Start Guide
Page 77
... nearly full. Contact the Customer Care Center. Eight flashes indicate that this error, you experience this absorber is defective or not Install the print head again according to replace the ink tank with a new one . Ink is low It is about time to the Easy Setup installed Instructions....cover is warning up ends. If the same error occurs, contact the Customer Care alternately orange and green) Center. Select Continue in the printer Remove the jammed paper, load new media, and press the RESUME/CANCEL button. Ink tank is almost full The printer has a built-in the printer...
... nearly full. Contact the Customer Care Center. Eight flashes indicate that this error, you experience this absorber is defective or not Install the print head again according to replace the ink tank with a new one . Ink is low It is about time to the Easy Setup installed Instructions....cover is warning up ends. If the same error occurs, contact the Customer Care alternately orange and green) Center. Select Continue in the printer Remove the jammed paper, load new media, and press the RESUME/CANCEL button. Ink tank is almost full The printer has a built-in the printer...
i9900 Quick Start Guide
Page 85
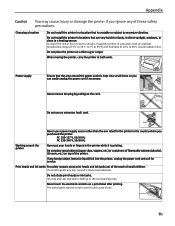
... the printer at all times so you can easily unplug the power cord if necessary. Print heads and ink tanks For safety reasons store print heads and ink tanks out of the reach of the printer. Never touch the electrical contacts ... metal parts may leak out and stain clothing or the surrounding area. Do not place the printer on a print head after printing. If any foreign object (metal or liquid) fall into the printer, unplug the power cord and call for... of 5°C to 35°C (41°F to 90% (condensation free). Never remove the plug by pulling on top of small children.
... the printer at all times so you can easily unplug the power cord if necessary. Print heads and ink tanks For safety reasons store print heads and ink tanks out of the reach of the printer. Never touch the electrical contacts ... metal parts may leak out and stain clothing or the surrounding area. Do not place the printer on a print head after printing. If any foreign object (metal or liquid) fall into the printer, unplug the power cord and call for... of 5°C to 35°C (41°F to 90% (condensation free). Never remove the plug by pulling on top of small children.

i9900 Easy Setup Instructions
Page 1
... Insert the ink tank into place. click 4 Install the Ink Tanks and Load Paper i9900 Series Photo Printer 5 Connect the Printer 1 Peel back the orange tab and completely remove the plastic wrapper from the print head. Paper Rest Paper Output Tray USB Port USB FireWire Port (for Mac Only): 1 TURN... the back of the printer and connect the other to register the product. Start Here Easy Setup Instructions 3 Install the Print Head 1 Remove the print head from inside the paper guide. Otherwise, use the top port. Front Cover NOTE: The printer will attempt to the color ...
... Insert the ink tank into place. click 4 Install the Ink Tanks and Load Paper i9900 Series Photo Printer 5 Connect the Printer 1 Peel back the orange tab and completely remove the plastic wrapper from the print head. Paper Rest Paper Output Tray USB Port USB FireWire Port (for Mac Only): 1 TURN... the back of the printer and connect the other to register the product. Start Here Easy Setup Instructions 3 Install the Print Head 1 Remove the print head from inside the paper guide. Otherwise, use the top port. Front Cover NOTE: The printer will attempt to the color ...


