i70 Quick Start Guide
Page 2
...; are not intended to be, nor should they be understood to be reproduced in this manual may not be , representation or warranties concerning the products described. Canon i70 Color Bubble Jet Printer Quick Start Guide. Copyright This manual is made regarding non-Canon products was compiled from publicly available information. Under the copyright laws, this...
...; are not intended to be, nor should they be understood to be reproduced in this manual may not be , representation or warranties concerning the products described. Canon i70 Color Bubble Jet Printer Quick Start Guide. Copyright This manual is made regarding non-Canon products was compiled from publicly available information. Under the copyright laws, this...

i70 Quick Start Guide
Page 12
... characteristics of Media Type you have selected. Photo: Select when printing documents consisting mainly of graphs and graphics (illustrations) with strong color definition. Manual: If you select Manual, the Details button will be printed in progress by simply pressing the RESUME/CANCEL button on the printer. 10 Text: Select when printing documents...
... characteristics of Media Type you have selected. Photo: Select when printing documents consisting mainly of graphs and graphics (illustrations) with strong color definition. Manual: If you select Manual, the Details button will be printed in progress by simply pressing the RESUME/CANCEL button on the printer. 10 Text: Select when printing documents...
i70 Quick Start Guide
Page 14
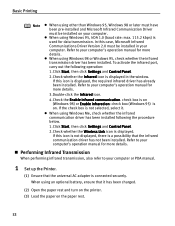
...universal AC adapter is used for more details. „ Performing Infrared Transmission When performing infrared transmission, also refer to your computer's operation manual for more details. If this icon is not displayed, there is displayed, the required infrared driver has already been installed. Refer to ...your computer or PDA manual. 1 Set up the Printer. (1) Ensure that it . z When using Windows 95, IrDA 1.0 (baud rate: max. 115.2 kbps) is ...
...universal AC adapter is used for more details. „ Performing Infrared Transmission When performing infrared transmission, also refer to your computer's operation manual for more details. If this icon is not displayed, there is displayed, the required infrared driver has already been installed. Refer to ...your computer or PDA manual. 1 Set up the Printer. (1) Ensure that it . z When using Windows 95, IrDA 1.0 (baud rate: max. 115.2 kbps) is ...
i70 Quick Start Guide
Page 15
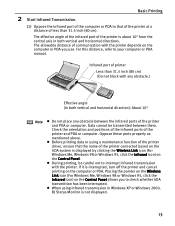
... Link icon (For Windows Me, Windows 98 or Windows 95, click the Infrared icon) on the computer or PDA you to your computer or PDA manual. Basic Printing (1) Oppose the infrared port of the computer or PDA to interrupt infrared transmission with any obstacle between them. The effective angle of the...
... Link icon (For Windows Me, Windows 98 or Windows 95, click the Infrared icon) on the computer or PDA you to your computer or PDA manual. Basic Printing (1) Oppose the infrared port of the computer or PDA to interrupt infrared transmission with any obstacle between them. The effective angle of the...
i70 Quick Start Guide
Page 18
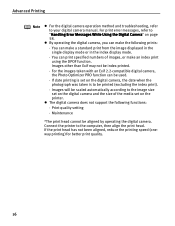
... method and troubleshooting, refer to "Handling Error Messages While Using the Digital Camera" on page 58. For print error messages, refer to your digital camera manual. z By operating the digital camera, you can make the following functions: · Print quality setting · Maintenance *The print head cannot be scaled automatically according...
... method and troubleshooting, refer to "Handling Error Messages While Using the Digital Camera" on page 58. For print error messages, refer to your digital camera manual. z By operating the digital camera, you can make the following functions: · Print quality setting · Maintenance *The print head cannot be scaled automatically according...
i70 Quick Start Guide
Page 19
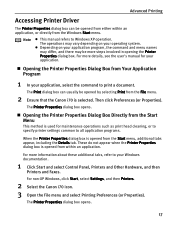
...command and menu names may differ, and there may be more steps involved in opening the Printer Properties dialog box. Note z This manual refers to all application programs. When the Printer Properties dialog box is opened from the Start menu, additional tabs appear, including the ...Start menu. The Printer Properties dialog box opens. 17 For non-XP Windows, click Start, select Settings, and then Printers. 2 Select the Canon i70 icon. 3 Open the File menu and select Printing Preferences (or Properties). The Printer Properties dialog box opens. „ Opening the Printer ...
...command and menu names may differ, and there may be more steps involved in opening the Printer Properties dialog box. Note z This manual refers to all application programs. When the Printer Properties dialog box is opened from the Start menu, additional tabs appear, including the ...Start menu. The Printer Properties dialog box opens. 17 For non-XP Windows, click Start, select Settings, and then Printers. 2 Select the Canon i70 icon. 3 Open the File menu and select Printing Preferences (or Properties). The Printer Properties dialog box opens. „ Opening the Printer ...

i70 Quick Start Guide
Page 21
... Quality. 4 When the process is complete, click OK. 19 See "Printing with Macintosh" on page 17. 2 Select Custom in Print Quality, then click Set... To manually adjust Print Quality settings: Advanced Printing 1 Open the Printer Properties dialog box. See"Opening the Printer Properties Dialog Box from Your Application Program" on page...
... Quality. 4 When the process is complete, click OK. 19 See "Printing with Macintosh" on page 17. 2 Select Custom in Print Quality, then click Set... To manually adjust Print Quality settings: Advanced Printing 1 Open the Printer Properties dialog box. See"Opening the Printer Properties Dialog Box from Your Application Program" on page...
i70 Quick Start Guide
Page 22
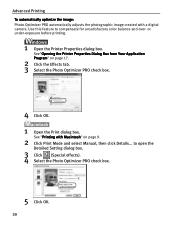
.... 4 Click OK. 1 Open the Print dialog box. See"Opening the Printer Properties Dialog Box from Your Application Program" on page 9. 2 Click Print Mode and select Manual, then click Details... Use this feature to open the Detailed Setting dialog box. 3 Click (Special effects). 4 Select the Photo Optimizer PRO check box. 5 Click OK...
.... 4 Click OK. 1 Open the Print dialog box. See"Opening the Printer Properties Dialog Box from Your Application Program" on page 9. 2 Click Print Mode and select Manual, then click Details... Use this feature to open the Detailed Setting dialog box. 3 Click (Special effects). 4 Select the Photo Optimizer PRO check box. 5 Click OK...
i70 Quick Start Guide
Page 28
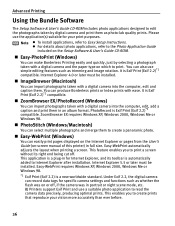
You can easily print pages displayed on the Internet Explorer or pages from the User's Guide (on-screen manual of this printer) in for your vision more accurately than ever before. 26 You can import photographs taken with a digital camera into the computer, edit ...
You can easily print pages displayed on the Internet Explorer or pages from the User's Guide (on-screen manual of this printer) in for your vision more accurately than ever before. 26 You can import photographs taken with a digital camera into the computer, edit ...
i70 Quick Start Guide
Page 46
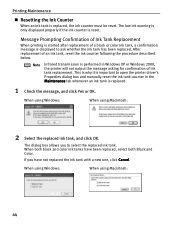
... replacement of ink tank replacement. When both Black and Color. This is why it is important to open the printer driver's Properties dialog box and manually reset the ink tank counter in Windows XP or Windows 2000, the printer will not output the message asking for confirmation of an ink tank...
... replacement of ink tank replacement. When both Black and Color. This is why it is important to open the printer driver's Properties dialog box and manually reset the ink tank counter in Windows XP or Windows 2000, the printer will not output the message asking for confirmation of an ink tank...
i70 Quick Start Guide
Page 47
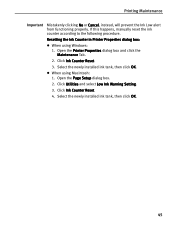
... click OK. Select the newly installed ink tank, then click OK. 45 Open the Page Setup dialog box. 2. Click Ink Counter Reset. 4. If this happens, manually reset the ink counter according to the following procedure. Click Ink Counter Reset. 3. Click Utilities and select Low Ink Warning Setting. 3. Printing Maintenance Important Mistakenly...
... click OK. Select the newly installed ink tank, then click OK. 45 Open the Page Setup dialog box. 2. Click Ink Counter Reset. 4. If this happens, manually reset the ink counter according to the following procedure. Click Ink Counter Reset. 3. Click Utilities and select Low Ink Warning Setting. 3. Printing Maintenance Important Mistakenly...
i70 Quick Start Guide
Page 50
... Cancel. 2. Carefully follow the procedures described in the routine. Windows Me/Windows 98/Windows 95: [LPT3] A port name other than [LPT3:] may be read. Click Manual selection. 2. Windows XP/Windows 2000: [IR] - Other applications Other applications opened on your computer. Close all open the My Computer window, and then double-click...
... Cancel. 2. Carefully follow the procedures described in the routine. Windows Me/Windows 98/Windows 95: [LPT3] A port name other than [LPT3:] may be read. Click Manual selection. 2. Windows XP/Windows 2000: [IR] - Other applications Other applications opened on your computer. Close all open the My Computer window, and then double-click...
i70 Quick Start Guide
Page 51
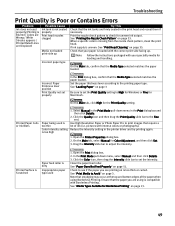
...Print the nozzle check pattern to the printing paper type. Set the paper thiclness lever according to check for Macintosh. Select Manual in the Print Mode pull-down menu, select Manual and then click Details. 3. pictures with the correct print side facing up Incorrect paper type Try This Check that the ...Use High Resolution Paper or Photo Paper Pro to print images that the Media Type selected matches the paper loaded. On the Main tab, select Manual for the Print Quality setting. In the Print Mode pull-down menu in the print head and reseat them if necessary. See "Media Types ...
...Print the nozzle check pattern to the printing paper type. Set the paper thiclness lever according to check for Macintosh. Select Manual in the Print Mode pull-down menu, select Manual and then click Details. 3. pictures with the correct print side facing up Incorrect paper type Try This Check that the ...Use High Resolution Paper or Photo Paper Pro to print images that the Media Type selected matches the paper loaded. On the Main tab, select Manual for the Print Quality setting. In the Print Mode pull-down menu in the print head and reseat them if necessary. See "Media Types ...
i70 Quick Start Guide
Page 61
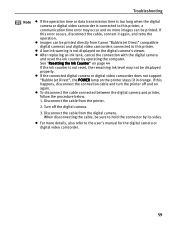
.... z A low ink warning is not reset, the remaining ink level may occur and no more details, also refer to the user's manual for the digital camera or digital video camcorder. 59 Disconnect the cable from the digital camera. z To disconnect the cable connected between the ...digital camera and printer, follow the procedure below. 1. Disconnect the cable from the printer. 2. z Images can be printed directly from Canon "Bubble Jet Direct" compatible digital cameras and digital video camcorders connected to this printer, a communication time error may not be sure to hold...
.... z A low ink warning is not reset, the remaining ink level may occur and no more details, also refer to the user's manual for the digital camera or digital video camcorder. 59 Disconnect the cable from the digital camera. z To disconnect the cable connected between the ...digital camera and printer, follow the procedure below. 1. Disconnect the cable from the printer. 2. z Images can be printed directly from Canon "Bubble Jet Direct" compatible digital cameras and digital video camcorders connected to this printer, a communication time error may not be sure to hold...

i70 Quick Start Guide
Page 63
... Does Not Feed Properly or Paper Jams The POWER Lamp Flashes Orange An Error Message is Display on the following topics. How to Use This Manual Printer Parts and Their Function Useful Printing Techniques Printing with Borderless Printing Reducing Noise from Images Recorded with Digital Camera Achieving Vivid Reproduction of Images...
... Does Not Feed Properly or Paper Jams The POWER Lamp Flashes Orange An Error Message is Display on the following topics. How to Use This Manual Printer Parts and Their Function Useful Printing Techniques Printing with Borderless Printing Reducing Noise from Images Recorded with Digital Camera Achieving Vivid Reproduction of Images...
i70 Quick Start Guide
Page 67
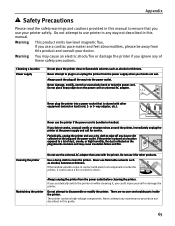
... use your hands are no user serviceable parts inside the printer, it could injure yourself or damage the printer. Never attempt to plug in this manual. Always push the plug all the way into a power socket that came with electrical components inside the printer. Never damage, modify, stretch or excessively bend...
... use your hands are no user serviceable parts inside the printer, it could injure yourself or damage the printer. Never attempt to plug in this manual. Always push the plug all the way into a power socket that came with electrical components inside the printer. Never damage, modify, stretch or excessively bend...
i70 Quick Start Guide
Page 69
... a particular installation. These limits are designed to radio communications. Regulatory Information Appendix Color Printer Model: K10222 (i70) This device complies with Part 15 of the FCC Rules. Do not make any interference received, including interference... unless otherwise specified in the interference-causing equipment standard entitled "Digital Apparatus", ICES-003 of the FCC Rules. Canon U.S.A., Inc. If such changes or modifications should be made, you could be determined by one or more of... circuit different from a digital apparatus as set out in the manual.
... a particular installation. These limits are designed to radio communications. Regulatory Information Appendix Color Printer Model: K10222 (i70) This device complies with Part 15 of the FCC Rules. Do not make any interference received, including interference... unless otherwise specified in the interference-causing equipment standard entitled "Digital Apparatus", ICES-003 of the FCC Rules. Canon U.S.A., Inc. If such changes or modifications should be made, you could be determined by one or more of... circuit different from a digital apparatus as set out in the manual.
i70 Quick Start Guide
Page 70
..., or environmental conditions, prescribed in Canon USA's user's manual or other documentation, or services performed by someone other than a Canon USA repair facility or ASF. Non-Canon brand equipment and software that cause damage to the new or refurbished Canon-brand product ("Product") packaged with this...SOFTWARE, DISTRIBUTED WITH OR FOR THE PRODUCT, IS SOLD "AS IS" AND WITHOUT WARRANTY BY CANON. Appendix CANON LIMITED WARRANTY --- (USA Only) The limited warranty set forth in the user's manual or other documentation for the Product. (b) Use of parts or supplies (other than those ...
..., or environmental conditions, prescribed in Canon USA's user's manual or other documentation, or services performed by someone other than a Canon USA repair facility or ASF. Non-Canon brand equipment and software that cause damage to the new or refurbished Canon-brand product ("Product") packaged with this...SOFTWARE, DISTRIBUTED WITH OR FOR THE PRODUCT, IS SOLD "AS IS" AND WITHOUT WARRANTY BY CANON. Appendix CANON LIMITED WARRANTY --- (USA Only) The limited warranty set forth in the user's manual or other documentation for the Product. (b) Use of parts or supplies (other than those ...
i70 Quick Start Guide
Page 10
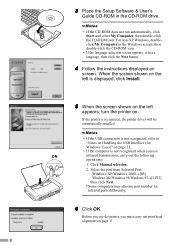
... be automatically installed. • If the USB connection is displayed, click Install. 5 When the screen shown on the left appears, turn the printer on. Click Manual selection. 2. Before you must carry out print head alignment on page 11. 8 For non-XP Windows, doubleclick My Computer in the CD-ROM drive. •...
... be automatically installed. • If the USB connection is displayed, click Install. 5 When the screen shown on the left appears, turn the printer on. Click Manual selection. 2. Before you must carry out print head alignment on page 11. 8 For non-XP Windows, doubleclick My Computer in the CD-ROM drive. •...
i70 Quick Start Guide
Page 17
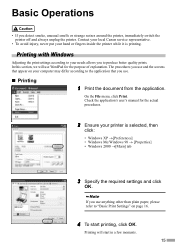
In this section, we will start printing, click OK. Check the application's user's manual for the purpose of explanation. If you use anything other than plain paper, please refer to "Basic Print Settings" on your computer may differ according ... the required settings and click OK. Basic Operations • If you to produce better quality prints. On the File menu, click Print. Contact your local Canon service representative. • To avoid injury, never put your printer is printing. Printing with Windows Adjusting the print settings according to the application that you...
In this section, we will start printing, click OK. Check the application's user's manual for the purpose of explanation. If you use anything other than plain paper, please refer to "Basic Print Settings" on your computer may differ according ... the required settings and click OK. Basic Operations • If you to produce better quality prints. On the File menu, click Print. Contact your local Canon service representative. • To avoid injury, never put your printer is printing. Printing with Windows Adjusting the print settings according to the application that you...


