i320_spec.pdf
Page 2
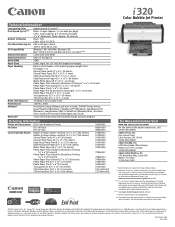
...305-260-7400 * Specifications are based on individual environmental factors. As an ENERGY STAR® partner, Canon U.S.A., Inc. See the warranty in the U.S. i320 Color Bubble Jet Printer Technical Information* Long Lasting Color Approximately 25 years** Print Speed (up to)... Warranty†† 1-year limited warranty with InstantExchange warranty program Ordering Information Printer and Accessories i320 Color Bubble Jet Printer Ink Tanks BCI-24 Black BCI-24 Color Canon Specialty Papers Bubble Jet Paper (water-resistant, 8.5" x 11"/200 sheets) Bubble Jet Paper...
...305-260-7400 * Specifications are based on individual environmental factors. As an ENERGY STAR® partner, Canon U.S.A., Inc. See the warranty in the U.S. i320 Color Bubble Jet Printer Technical Information* Long Lasting Color Approximately 25 years** Print Speed (up to)... Warranty†† 1-year limited warranty with InstantExchange warranty program Ordering Information Printer and Accessories i320 Color Bubble Jet Printer Ink Tanks BCI-24 Black BCI-24 Color Canon Specialty Papers Bubble Jet Paper (water-resistant, 8.5" x 11"/200 sheets) Bubble Jet Paper...
i320 Easy Setup Instructions
Page 1
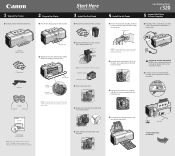
Remove the packing material from its package. USB Port USB Cable Documentation and Software Kit NOTE: The "i320 Setup Software & User's Guide" CD-ROM contains printer drivers, software applications and electronic manuals. 5 Lower the gray lock lever until it is ready. 2... Connect one end of the print head. NOTE: To avoid spilling ink, do not touch the bottom of the printer and connect the other to install the printer driver before the printer is securely seated. Series Bubble...
Remove the packing material from its package. USB Port USB Cable Documentation and Software Kit NOTE: The "i320 Setup Software & User's Guide" CD-ROM contains printer drivers, software applications and electronic manuals. 5 Lower the gray lock lever until it is ready. 2... Connect one end of the print head. NOTE: To avoid spilling ink, do not touch the bottom of the printer and connect the other to install the printer driver before the printer is securely seated. Series Bubble...
i320 Quick Start Guide
Page 3
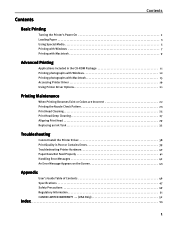
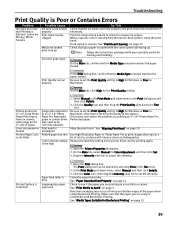
... Colors are Incorrect 22 Printing the Nozzle Check Pattern 23 Print Head Cleaning 25 Print Head Deep Cleaning 27 Aligning Print Head 29 Replacing an Ink Tank 32 Troubleshooting Cannot Install the Printer Driver 38 Print Quality is Poor or Contains Errors 39 Troubleshooting Printer Hardware 40 Paper Does Not Feed... Messages 42 An Error Message Appears on the Screen 43 Appendix User's Guide Table of Contents 46 Specifications 47 Safety Precautions 49 Regulatory Information 51 CANON LIMITED WARRANTY --- (USA Only 52 Index 54 1
... Colors are Incorrect 22 Printing the Nozzle Check Pattern 23 Print Head Cleaning 25 Print Head Deep Cleaning 27 Aligning Print Head 29 Replacing an Ink Tank 32 Troubleshooting Cannot Install the Printer Driver 38 Print Quality is Poor or Contains Errors 39 Troubleshooting Printer Hardware 40 Paper Does Not Feed... Messages 42 An Error Message Appears on the Screen 43 Appendix User's Guide Table of Contents 46 Specifications 47 Safety Precautions 49 Regulatory Information 51 CANON LIMITED WARRANTY --- (USA Only 52 Index 54 1

i320 Quick Start Guide
Page 6
... up. (2) Align the paper stack snug against the left side of the stack of the sheet feeder. z Do not touch the printed surfaces until the ink dries. Limit Mark Do not load beyond this Load Limit Mark. (1) Insert the paper into the sheet feeder with your media. 4
... up. (2) Align the paper stack snug against the left side of the stack of the sheet feeder. z Do not touch the printed surfaces until the ink dries. Limit Mark Do not load beyond this Load Limit Mark. (1) Insert the paper into the sheet feeder with your media. 4

i320 Quick Start Guide
Page 24
... Head Deep Cleaning" on page 27 Still the problem remains Step 4 "Replacing an Ink Tank" on page 29 z You will be alerted if you enable a low ink warning. 22 See "Aligning Print Head" on page 32 Note z If ink tank replacement does not resolve the problem, contact the Customer Care Center. z If ruled... clean the nozzles. Printing Maintenance Printing Maintenance When Printing Becomes Faint or Colors are Incorrect When printing becomes faint or colors are incorrect, even if ink remains in the ink tanks, the print head nozzles are printed misaligned, adjust the print head position.
... Head Deep Cleaning" on page 27 Still the problem remains Step 4 "Replacing an Ink Tank" on page 29 z You will be alerted if you enable a low ink warning. 22 See "Aligning Print Head" on page 32 Note z If ink tank replacement does not resolve the problem, contact the Customer Care Center. z If ruled... clean the nozzles. Printing Maintenance Printing Maintenance When Printing Becomes Faint or Colors are Incorrect When printing becomes faint or colors are incorrect, even if ink remains in the ink tanks, the print head nozzles are printed misaligned, adjust the print head position.
i320 Quick Start Guide
Page 25
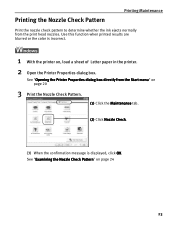
... in the printer. 2 Open the Printer Properties dialog box. Printing the Nozzle Check Pattern Printing Maintenance Print the nozzle check pattern to determine whether the ink ejects normally from the Start menu" on page 20 3 Print the Nozzle Check Pattern. (1) Click the Maintenance tab. (2) Click Nozzle Check. (3) When the confirmation message...
... in the printer. 2 Open the Printer Properties dialog box. Printing the Nozzle Check Pattern Printing Maintenance Print the nozzle check pattern to determine whether the ink ejects normally from the Start menu" on page 20 3 Print the Nozzle Check Pattern. (1) Click the Maintenance tab. (2) Click Nozzle Check. (3) When the confirmation message...

i320 Quick Start Guide
Page 26
... head requires cleaning. See "Print Head Cleaning" on page 24 „ Examining the Nozzle Check Pattern The nozzle check pattern should appear as follows when ink is displayed, click OK. See "Examining the Nozzle Check Pattern" on page 25 24
... head requires cleaning. See "Print Head Cleaning" on page 24 „ Examining the Nozzle Check Pattern The nozzle check pattern should appear as follows when ink is displayed, click OK. See "Examining the Nozzle Check Pattern" on page 25 24
i320 Quick Start Guide
Page 27
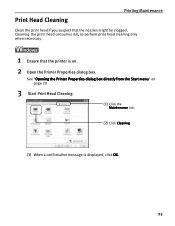
See "Opening the Printer Properties dialog box directly from the Start menu" on . 2 Open the Printer Properties dialog box. Print Head Cleaning Printing Maintenance Clean the print head if you suspect that the printer is on page 20 3 Start Print Head Cleaning. (1) Click the Maintenance tab. (2) Click Cleaning. (3) When a confirmation message is displayed, click OK. 25 Cleaning the print head consumes ink, so perform print head cleaning only when necessary. 1 Ensure that the nozzles might be clogged.
See "Opening the Printer Properties dialog box directly from the Start menu" on . 2 Open the Printer Properties dialog box. Print Head Cleaning Printing Maintenance Clean the print head if you suspect that the printer is on page 20 3 Start Print Head Cleaning. (1) Click the Maintenance tab. (2) Click Cleaning. (3) When a confirmation message is displayed, click OK. 25 Cleaning the print head consumes ink, so perform print head cleaning only when necessary. 1 Ensure that the nozzles might be clogged.

i320 Quick Start Guide
Page 29
Print head deep cleaning consumes ink, so perform this procedure only when necessary. 1 Ensure the printer is displayed, click OK. 27 See "Opening the Printer Properties dialog box directly from the Start menu" on page 20 3 Start Print Head Deep Cleaning. (1) Click the Maintenace tab. (2) Click Deep Cleaning. (3) When the confirmation message is on. 2 Open the Printer Properties dialog box. Print Head Deep Cleaning Printing Maintenance If print quality does not improve by standard print head cleaning, try print head deep cleaning, which is a more powerful process.
Print head deep cleaning consumes ink, so perform this procedure only when necessary. 1 Ensure the printer is displayed, click OK. 27 See "Opening the Printer Properties dialog box directly from the Start menu" on page 20 3 Start Print Head Deep Cleaning. (1) Click the Maintenace tab. (2) Click Deep Cleaning. (3) When the confirmation message is on. 2 Open the Printer Properties dialog box. Print Head Deep Cleaning Printing Maintenance If print quality does not improve by standard print head cleaning, try print head deep cleaning, which is a more powerful process.

i320 Quick Start Guide
Page 30
...Maintenance 1 Ensure the printer is still not clean after the second deep cleaning, replace ink tank. See "Printing the Nozzle Check Pattern" on page 23 If the head is on page 32 Ink tank replacement does not resolve the problem, the print head may be worn out. ...Print Head Deep Cleaning. (1) Select Cleaning from the pulldown menu. (2) Click Deep Cleaning. (3) When the confirmation message is displayed, click OK. See "Replacing an Ink Tank" on . 2 Open the Printer Utility dialog box. (1) Select Page Setup... Contact the Customer Care Center. 28 in the File menu. (2) Click Utilities...
...Maintenance 1 Ensure the printer is still not clean after the second deep cleaning, replace ink tank. See "Printing the Nozzle Check Pattern" on page 23 If the head is on page 32 Ink tank replacement does not resolve the problem, the print head may be worn out. ...Print Head Deep Cleaning. (1) Select Cleaning from the pulldown menu. (2) Click Deep Cleaning. (3) When the confirmation message is displayed, click OK. See "Replacing an Ink Tank" on . 2 Open the Printer Utility dialog box. (1) Select Page Setup... Contact the Customer Care Center. 28 in the File menu. (2) Click Utilities...
i320 Quick Start Guide
Page 34
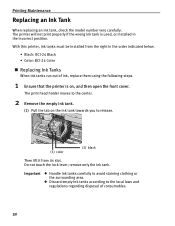
.... 1 Ensure that the printer is used, or installed in the order indicated below. • Black: BCI-24 Black • Color: BCI-24 Color „ Replacing Ink Tanks When ink tanks run out of consumables. 32 Do not touch the lock lever; The printer will not print properly if the wrong... ink tank is on the ink tank towards you to the center. 2 Remove the empty ink tank. (1) Pull the tab on , and then open the front cover. remove only the ink tank. The print head holder moves to release. (1) color (2) black Then...
.... 1 Ensure that the printer is used, or installed in the order indicated below. • Black: BCI-24 Black • Color: BCI-24 Color „ Replacing Ink Tanks When ink tanks run out of consumables. 32 Do not touch the lock lever; The printer will not print properly if the wrong... ink tank is on the ink tank towards you to the center. 2 Remove the empty ink tank. (1) Pull the tab on , and then open the front cover. remove only the ink tank. The print head holder moves to release. (1) color (2) black Then...

i320 Quick Start Guide
Page 35
...do not remove it from the printer and leave it . z Color ink consumption may not function properly if it is consumed in the open ink port. 4 Insert the ink tank (1) Insert the ink tank into a slot. (2) Press on the tab until the ink tank snaps firmly into place. 5 Close the front cover. Note ...z Once an ink tank has been used, do not touch the open . ...
...do not remove it from the printer and leave it . z Color ink consumption may not function properly if it is consumed in the open ink port. 4 Insert the ink tank (1) Insert the ink tank into a slot. (2) Press on the tab until the ink tank snaps firmly into place. 5 Close the front cover. Note ...z Once an ink tank has been used, do not touch the open . ...
i320 Quick Start Guide
Page 36
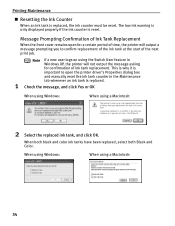
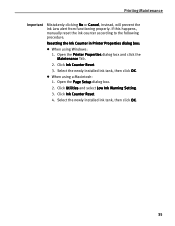
... Note If a new user logs on using the Switch User feature in the Maintenance tab whenever an ink tank is replaced, the ink counter must be reset. When both black and color ink tanks have been replaced, select both Black and Color. This is why it is important to confirm ...replacement of the ink tank at the start of ink tank replacement. Printing Maintenance „ Resetting the Ink Counter When an ink tank is replaced. 1 Check the message, and click Yes or OK When using Windows: When using...
... Note If a new user logs on using the Switch User feature in the Maintenance tab whenever an ink tank is replaced, the ink counter must be reset. When both black and color ink tanks have been replaced, select both Black and Color. This is why it is important to confirm ...replacement of the ink tank at the start of ink tank replacement. Printing Maintenance „ Resetting the Ink Counter When an ink tank is replaced. 1 Check the message, and click Yes or OK When using Windows: When using...
i320 Quick Start Guide
Page 37
... using a Macintosh: 1. z When using Windows: 1. Click Utilities and select Low Ink Warning Setting. 3. If this happens, manually reset the ink counter according to the following procedure. Open the Page Setup dialog box. 2. Click Ink Counter Reset. 3. Click Ink Counter Reset. 4. Select the newly installed ink tank, then click OK. 35 Open the Printer Properties dialog...
... using a Macintosh: 1. z When using Windows: 1. Click Utilities and select Low Ink Warning Setting. 3. If this happens, manually reset the ink counter according to the following procedure. Open the Page Setup dialog box. 2. Click Ink Counter Reset. 3. Click Ink Counter Reset. 4. Select the newly installed ink tank, then click OK. 35 Open the Printer Properties dialog...

i320 Quick Start Guide
Page 38
...when it with an actual ink volume. The reset is installed. • Do not reset the ink counter of an ink tank in the ink tank. Refer to Display Low Ink Warning Correctly • Reset the ink counter every time you install a new ink tank The ink counter cannot work properly. Important...did not reset the counter when you installed the current ink tanks, the low ink warning may not function correctly, until the next time you treat both counters separately. Reset the ink counter when installing a new ink tank. shows a low ink level in use. BJ Status Monitor (Windows) BJ ...
...when it with an actual ink volume. The reset is installed. • Do not reset the ink counter of an ink tank in the ink tank. Refer to Display Low Ink Warning Correctly • Reset the ink counter every time you install a new ink tank The ink counter cannot work properly. Important...did not reset the counter when you installed the current ink tanks, the low ink warning may not function correctly, until the next time you treat both counters separately. Reset the ink counter when installing a new ink tank. shows a low ink level in use. BJ Status Monitor (Windows) BJ ...
i320 Quick Start Guide
Page 41
..."Print Head Cleaning" on page 13 39 On the Main tab, click High for Borderless Printing" on page 25 Check that require a lot of ink (i.e. Align the print head. Open the Printer Properties dialog box. 2. Drag the Intensity slide bar to set the intensity. The Print dialog box... paper you are using Borderless Printing. See "Aligning Print Head" on page 41 Check to print images that your specialty media for uneven ink output. pictures with your paper is missing from the nozzle check pattern, clean the print head. Printed Surface is Scratched Paper feed roller ...
..."Print Head Cleaning" on page 13 39 On the Main tab, click High for Borderless Printing" on page 25 Check that require a lot of ink (i.e. Align the print head. Open the Printer Properties dialog box. 2. Drag the Intensity slide bar to set the intensity. The Print dialog box... paper you are using Borderless Printing. See "Aligning Print Head" on page 41 Check to print images that your specialty media for uneven ink output. pictures with your paper is missing from the nozzle check pattern, clean the print head. Printed Surface is Scratched Paper feed roller ...
i320 Quick Start Guide
Page 44
...Center. Then plug the printer back in the printer, then press the RESUME/CANCEL button. print head If the print head fails to hold the ink consumed during print head cleaning. Number of error that this tank is Reload paper and press the RESUME/CANCEL button. See "Paper Jams" on ...Try This Indicates printer is nearly full. Press the RESUME/CANCEL button to correct the error. Eight flashes Indicates waste ink tank almost full The printer has a built-in waste ink tank to work properly after reinstalling it back on page 41 Six flashes Indicates print head Install print head.
...Center. Then plug the printer back in the printer, then press the RESUME/CANCEL button. print head If the print head fails to hold the ink consumed during print head cleaning. Number of error that this tank is Reload paper and press the RESUME/CANCEL button. See "Paper Jams" on ...Try This Indicates printer is nearly full. Press the RESUME/CANCEL button to correct the error. Eight flashes Indicates waste ink tank almost full The printer has a built-in waste ink tank to work properly after reinstalling it back on page 41 Six flashes Indicates print head Install print head.
i320 Quick Start Guide
Page 46
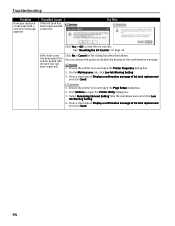
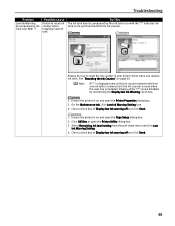
... can choose the option to open the Printer Properties dialog box. 2. Clear a check box of Display a confirmation message of Ink tank replacement and click Send. 44 See "Resetting the Ink Counter" on and open the Printer Utility dialog box. 3. Clear a check box of Display a confirmation message of... Ink tank replacement and click Send. 1. Select Remaining Ink level Setting from the pull-down menu and click Low Ink Warning Setting. 4. Try This Click Yes or OK to reset the ink counter. Ensure the printer is on page 34 If ...
... can choose the option to open the Printer Properties dialog box. 2. Clear a check box of Display a confirmation message of Ink tank replacement and click Send. 44 See "Resetting the Ink Counter" on and open the Printer Utility dialog box. 3. Clear a check box of Display a confirmation message of... Ink tank replacement and click Send. 1. Select Remaining Ink level Setting from the pull-down menu and click Low Ink Warning Setting. 4. Try This Click Yes or OK to reset the ink counter. Ensure the printer is on page 34 If ...
i320 Quick Start Guide
Page 47
... the Printer Utility dialog box. 3. Clear a check box of the "?" Click Utilities to reset the ink counter in your printer driver when you replace ink tank. Troubleshooting Problem Low Ink Warning Accompanied by the ink tank icon with its ink counter. Ensure the printer is on and open the Page Setup dialog box. 2. Display of...
... the Printer Utility dialog box. 3. Clear a check box of the "?" Click Utilities to reset the ink counter in your printer driver when you replace ink tank. Troubleshooting Problem Low Ink Warning Accompanied by the ink tank icon with its ink counter. Ensure the printer is on and open the Page Setup dialog box. 2. Display of...

i320 Quick Start Guide
Page 50
Appendix Printer Ink Tanks: Capacity (pages): Black (BCI-24 Black) approx. 300*1, approx. 520*2 Color (BCI-24 Color) approx. 170*2 *1 1500 characters per page, normal text, at standard ...
Appendix Printer Ink Tanks: Capacity (pages): Black (BCI-24 Black) approx. 300*1, approx. 520*2 Color (BCI-24 Color) approx. 170*2 *1 1500 characters per page, normal text, at standard ...


