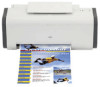

i350 Quick Start Guide
Page 1
BUBBLE JET PRINTER Quick Start Guide Table of Contents Preface 1 Shipping Materials 1 Introduction 1 Setting Up 2 Preparing the Printer 2 Installing the Print Head 3 Connecting the Printer to the Computer 6 Loading Paper 7 Installing the Printer Driver 8 Aligning the Print Head 13 Basic Operations 17 Printing with Windows 17 Printing with Macintosh 19 Print Head Maintenance 21 Appendix 22 Notes on Handling the USB Interface (for Windows Users) 23 For Further Details... 23 BE QA7-2714-V01
BUBBLE JET PRINTER Quick Start Guide Table of Contents Preface 1 Shipping Materials 1 Introduction 1 Setting Up 2 Preparing the Printer 2 Installing the Print Head 3 Connecting the Printer to the Computer 6 Loading Paper 7 Installing the Printer Driver 8 Aligning the Print Head 13 Basic Operations 17 Printing with Windows 17 Printing with Macintosh 19 Print Head Maintenance 21 Appendix 22 Notes on Handling the USB Interface (for Windows Users) 23 For Further Details... 23 BE QA7-2714-V01
i350 Quick Start Guide
Page 5
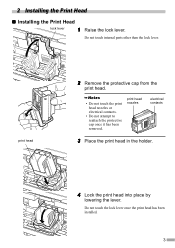
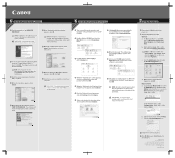
Do not touch internal parts other than the lock lever. Do not touch the lock lever once the print head has been installed. 3 print head nozzles electrical contacts 3 Place the print head in the holder. 4 Lock the print head into place by lowering the lever. 2 Installing the Print Head „ Installing the Print Head lock lever 1 Raise the lock lever. print head 2 Remove the protective cap from the print head. • Do not touch the print head nozzles or electrical contacts. • Do not attempt to reattach the protective cap once it has been removed.
Do not touch internal parts other than the lock lever. Do not touch the lock lever once the print head has been installed. 3 print head nozzles electrical contacts 3 Place the print head in the holder. 4 Lock the print head into place by lowering the lever. 2 Installing the Print Head „ Installing the Print Head lock lever 1 Raise the lock lever. print head 2 Remove the protective cap from the print head. • Do not touch the print head nozzles or electrical contacts. • Do not attempt to reattach the protective cap once it has been removed.
i350 Quick Start Guide
Page 6
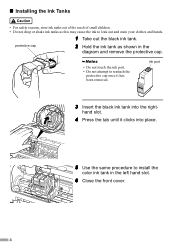
„ Installing the Ink Tanks • For safety reasons, store ink tanks out of the reach of small children. • Do not drop or shake ink tanks ... right- hand slot. 4 Press the tab until it has been removed. ink port 3 Insert the black ink tank into place. 5 Use the same procedure to install the color ink tank in the diagram and remove the protective cap. • Do not touch the ink port. • Do not attempt to leak...
„ Installing the Ink Tanks • For safety reasons, store ink tanks out of the reach of small children. • Do not drop or shake ink tanks ... right- hand slot. 4 Press the tab until it has been removed. ink port 3 Insert the black ink tank into place. 5 Use the same procedure to install the color ink tank in the diagram and remove the protective cap. • Do not touch the ink port. • Do not attempt to leak...

i350 Quick Start Guide
Page 7
If an ink tank is installed improperly, the warning message appears when you try to reinstall ink tanks. 5 Follow the above instructions in Steps 3 to 6 to print.
If an ink tank is installed improperly, the warning message appears when you try to reinstall ink tanks. 5 Follow the above instructions in Steps 3 to 6 to print.
i350 Quick Start Guide
Page 8
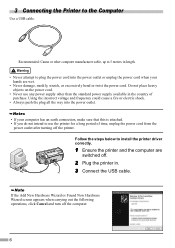
Follow the steps below to use the printer for a long period of purchase. Recommended: Canon or other than the standard power supply available in the country of time, unplug the power cord from the power outlet after turning off the ... into the power outlet. • If your computer has an earth connection, make sure that this is attached. • If you do not intend to install the printer driver correctly. 1 Ensure the printer and the computer are wet. • Never damage, modify, stretch, or excessively bend or twist the power cord...
Follow the steps below to use the printer for a long period of purchase. Recommended: Canon or other than the standard power supply available in the country of time, unplug the power cord from the power outlet after turning off the ... into the power outlet. • If your computer has an earth connection, make sure that this is attached. • If you do not intend to install the printer driver correctly. 1 Ensure the printer and the computer are wet. • Never damage, modify, stretch, or excessively bend or twist the power cord...
i350 Quick Start Guide
Page 9
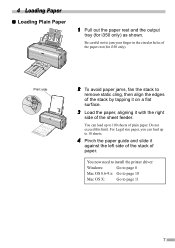
... side 2 To avoid paper jams, fan the stack to 100 sheets of the sheet feeder. Be careful not to page 11 7 You now need to install the printer driver: Windows: Go to page 8 Mac OS 8.6-9.x: Go to page 10 Mac OS X: Go to jam your finger in the circular holes of...
... side 2 To avoid paper jams, fan the stack to 100 sheets of the sheet feeder. Be careful not to page 11 7 You now need to install the printer driver: Windows: Go to page 8 Mac OS 8.6-9.x: Go to page 10 Mac OS X: Go to jam your finger in the circular holes of...
i350 Quick Start Guide
Page 10
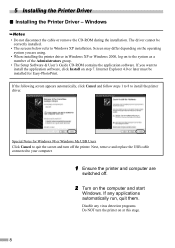
... on step 7. Screen may differ depending on the operating system you want to your computer. 1 Ensure the printer and computer are using. • When installing the printer driver in Windows XP or Windows 2000, log on the computer and start Windows. Internet Explorer 4.0 or later must be correctly... installed. • The screens below refer to the system as a member of the Administrators group. • The Setup Software & User's Guide CD-ROM contains the...
... on step 7. Screen may differ depending on the operating system you want to your computer. 1 Ensure the printer and computer are using. • When installing the printer driver in Windows XP or Windows 2000, log on the computer and start Windows. Internet Explorer 4.0 or later must be correctly... installed. • The screens below refer to the system as a member of the Administrators group. • The Setup Software & User's Guide CD-ROM contains the...
i350 Quick Start Guide
Page 11
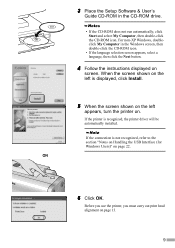
When the screen shown on the left is displayed, click Install. 5 When the screen shown on the left appears, turn the printer on page 13. 9 Before you use the printer, you must carry out print head ... "Notes on Handling the USB Interface (for Windows Users)" on screen. ON 6 Click OK. If the connection is recognized, the printer driver will be automatically installed. For non-XP Windows, doubleclick My Computer in the CD-ROM drive. • If the CD-ROM does not run automatically, click Start and select...
When the screen shown on the left is displayed, click Install. 5 When the screen shown on the left appears, turn the printer on page 13. 9 Before you use the printer, you must carry out print head ... "Notes on Handling the USB Interface (for Windows Users)" on screen. ON 6 Click OK. If the connection is recognized, the printer driver will be automatically installed. For non-XP Windows, doubleclick My Computer in the CD-ROM drive. • If the CD-ROM does not run automatically, click Start and select...
i350 Quick Start Guide
Page 12
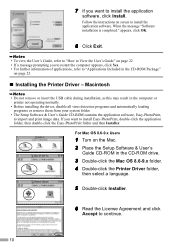
... page 22. • If a message prompting you want to install the application software. Follow the instructions on page 23. „ Installing the Printer Driver - Macintosh • Do not remove or insert the USB cable during installation, as this may result in the computer or printer not operating ... Turn on the Mac. 2 Place the Setup Software & User's Guide CD-ROM in the CD-ROM Package" on screen to install the application software, click Install. If you to restart the computer appears, click Yes. • For further information of applications, refer to "Applications Included in ...
... page 22. • If a message prompting you want to install the application software. Follow the instructions on page 23. „ Installing the Printer Driver - Macintosh • Do not remove or insert the USB cable during installation, as this may result in the computer or printer not operating ... Turn on the Mac. 2 Place the Setup Software & User's Guide CD-ROM in the CD-ROM Package" on screen to install the application software, click Install. If you to restart the computer appears, click Yes. • For further information of applications, refer to "Applications Included in ...
i350 Quick Start Guide
Page 13
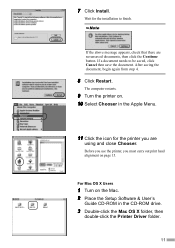
... restarts. 9 Turn the printer on the Mac. 2 Place the Setup Software & User's Guide CD-ROM in the Apple Menu. 11 Click the icon for the installation to be saved, click Cancel then save the document. For Mac OS X Users 1 Turn on . 10 Select Chooser in the CD-ROM drive. 3 Double-click..., you are no unsaved documents, then click the Continue button. Wait for the printer you must carry out print head alignment on page 15. 7 Click Install.
... restarts. 9 Turn the printer on the Mac. 2 Place the Setup Software & User's Guide CD-ROM in the Apple Menu. 11 Click the icon for the installation to be saved, click Cancel then save the document. For Mac OS X Users 1 Turn on . 10 Select Chooser in the CD-ROM drive. 3 Double-click..., you are no unsaved documents, then click the Continue button. Wait for the printer you must carry out print head alignment on page 15. 7 Click Install.
i350 Quick Start Guide
Page 14
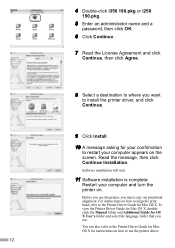
... and select the language folder that you must carry out print head alignment. Restart your computer appears on . 4 Double-click i350 190.pkg or i250 190.pkg. 5 Enter an administrator name and a password, then click OK. 6 Click Continue. 7 Read the License Agreement and click Continue, ...then click Agree. 8 Select a destination to where you want to install the printer driver, and click Continue. 9 Click Install. 10 A message asking for your confirmation to restart your computer and turn the printer on the screen.
... and select the language folder that you must carry out print head alignment. Restart your computer appears on . 4 Double-click i350 190.pkg or i250 190.pkg. 5 Enter an administrator name and a password, then click OK. 6 Click Continue. 7 Read the License Agreement and click Continue, ...then click Agree. 8 Select a destination to where you want to install the printer driver, and click Continue. 9 Click Install. 10 A message asking for your confirmation to restart your computer and turn the printer on the screen.
i350 Quick Start Guide
Page 16
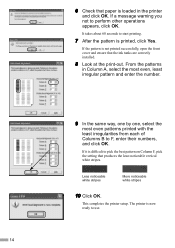
... the printer and click OK. If it is difficult to pick the best pattern on Column F, pick the setting that the ink tanks are correctly installed. 8 Look at the print-out. Less noticeable white stripes More noticeable white stripes 10 Click OK. This completes the printer setup. The printer is printed...
... the printer and click OK. If it is difficult to pick the best pattern on Column F, pick the setting that the ink tanks are correctly installed. 8 Look at the print-out. Less noticeable white stripes More noticeable white stripes 10 Click OK. This completes the printer setup. The printer is printed...
i350 Quick Start Guide
Page 17
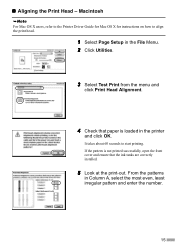
... menu and click Print Head Alignment. 4 Check that paper is not printed successfully, open the front cover and ensure that the ink tanks are correctly installed. 5 Look at the print-out. „ Aligning the Print Head -
... menu and click Print Head Alignment. 4 Check that paper is not printed successfully, open the front cover and ensure that the ink tanks are correctly installed. 5 Look at the print-out. „ Aligning the Print Head -
i350 Quick Start Guide
Page 23
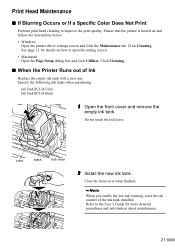
.... • Macintosh Open the Page Setup dialog box and click Utilities. Click Cleaning. color black lock lever 2 Install the new ink tank. Click Cleaning. „ When the Printer Runs out of the ink tank installed. When you enable the low ink warning, reset the ink counter of Ink Replace the empty ink...
.... • Macintosh Open the Page Setup dialog box and click Utilities. Click Cleaning. color black lock lever 2 Install the new ink tank. Click Cleaning. „ When the Printer Runs out of the ink tank installed. When you enable the low ink warning, reset the ink counter of Ink Replace the empty ink...
i350 Quick Start Guide
Page 24
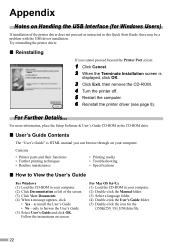
...Turn the printer off. 5 Restart the computer. 6 Reinstall the printer driver (see page 8). Follow the instructions on your computer. only to install the User's Guide • No - For Further Details... For Mac OS 8.6-9.x (1) Load the CD-ROM in your computer. (2) Click Documentation...Double-click the Manual folder. (3) Select a language folder. (4) Double-click the User's Guide folder. (5) Double-click the icon for Windows Users) If installation of the screen. (3) Click View Documents. (4) When a message appears, click • Yes - to browse the User's Guide (5) Select User's ...
...Turn the printer off. 5 Restart the computer. 6 Reinstall the printer driver (see page 8). Follow the instructions on your computer. only to install the User's Guide • No - For Further Details... For Mac OS 8.6-9.x (1) Load the CD-ROM in your computer. (2) Click Documentation...Double-click the Manual folder. (3) Select a language folder. (4) Double-click the User's Guide folder. (5) Double-click the icon for Windows Users) If installation of the screen. (3) Click View Documents. (4) When a message appears, click • Yes - to browse the User's Guide (5) Select User's ...
i350 Quick Start Guide
Page 25
...Easy-PhotoPrint (Windows/Macintosh) You can make a Borderless Printing (i350 only) easily and quickly, just by selecting a photograph taken with pre-installed Windows XP, Windows 2000, Windows Me, or Windows 98. (This includes Windows XP, Windows 2000, or Windows Me upgraded from User's... added to use simple editing features such as trimming and image rotation. Duplex Printing - Photo Optimizer Pro Additional Systems Requirements for printer driver installation Mac OS 8.6-9.x: 30 MB Mac OS X v.10.2.1 or later: 100 MB • The following functions are not supported when using...
...Easy-PhotoPrint (Windows/Macintosh) You can make a Borderless Printing (i350 only) easily and quickly, just by selecting a photograph taken with pre-installed Windows XP, Windows 2000, Windows Me, or Windows 98. (This includes Windows XP, Windows 2000, or Windows Me upgraded from User's... added to use simple editing features such as trimming and image rotation. Duplex Printing - Photo Optimizer Pro Additional Systems Requirements for printer driver installation Mac OS 8.6-9.x: 30 MB Mac OS X v.10.2.1 or later: 100 MB • The following functions are not supported when using...
i350 Easy Setup Instructions
Page 1
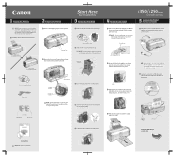
...Packing material Print head holder Serial number Raise the gray lock lever on side two. NOTE: The serial number is securely seated. 4 Install the Ink Tanks i350/i250 Series Color Bubble Jet Printer 5 Connect the Printer To Your Computer Remove the black ink tank (BCI-24 Black) from the product you... the remaining slot. Continue with Step 6 on the printer. Shipping Tape 50 Series Color Bubble Jet Printer Open the front cover. Start Here 3 Install the Print Head Remove the print head from the printer. Ink Tanks BCI-24 Color Pull out the paper rest and the output tray (i350...
...Packing material Print head holder Serial number Raise the gray lock lever on side two. NOTE: The serial number is securely seated. 4 Install the Ink Tanks i350/i250 Series Color Bubble Jet Printer 5 Connect the Printer To Your Computer Remove the black ink tank (BCI-24 Black) from the product you... the remaining slot. Continue with Step 6 on the printer. Shipping Tape 50 Series Color Bubble Jet Printer Open the front cover. Start Here 3 Install the Print Head Remove the print head from the printer. Ink Tanks BCI-24 Color Pull out the paper rest and the output tray (i350...
i350 Easy Setup Instructions
Page 2
... OK. Read the License Agreement, then click Yes to proceed with the installation, click Continue Installation. Click Yes if you are registered trademarks or trademarks of the printer, to be installed. Start the alignment procedure. Windows: a. Right-click the Canon i350 or i250 icon, then click . Follow the on and LEAVE THE PRINTER OFF. d. Macintosh...
... OK. Read the License Agreement, then click Yes to proceed with the installation, click Continue Installation. Click Yes if you are registered trademarks or trademarks of the printer, to be installed. Start the alignment procedure. Windows: a. Right-click the Canon i350 or i250 icon, then click . Follow the on and LEAVE THE PRINTER OFF. d. Macintosh...


