ZoomBrowser EX 6.5 for Windows Instruction Manual
Page 3
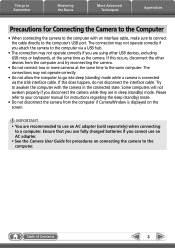
... Connecting the Camera to the Computer • When connecting the camera to the computer with the camera in sleep (standby) mode. Try to your computer manual for instructions regarding the sleep (standby) mode. • Do not disconnect the camera from the computer and try reconnecting the camera. • Do not connect two...
... Connecting the Camera to the Computer • When connecting the camera to the computer with the camera in sleep (standby) mode. Try to your computer manual for instructions regarding the sleep (standby) mode. • Do not disconnect the camera from the computer and try reconnecting the camera. • Do not connect two...

ZoomBrowser EX 6.5 for Windows Instruction Manual
Page 9
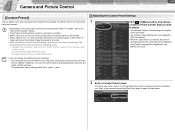
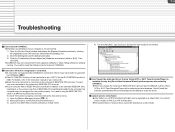
...to the one at the right appears, click [Downloads Images From Canon Camera using Canon CameraWindow], then click [OK]. 4. In this software manual assume that appears, click the link to display CameraWindow. 1. IMPORTANT • The instructions in the AutoPlay window. Please also refer to "Precautions for software...OK] in this case, double-click the ZoomBrowser EX icon on the task bar. 2. Click [Downloads Images From Canon Camera using Canon CameraWindow]. In the screen that you have correctly installed the software. Click on the desktop to the computer. Table of...
...to the one at the right appears, click [Downloads Images From Canon Camera using Canon CameraWindow], then click [OK]. 4. In this software manual assume that appears, click the link to display CameraWindow. 1. IMPORTANT • The instructions in the AutoPlay window. Please also refer to "Precautions for software...OK] in this case, double-click the ZoomBrowser EX icon on the task bar. 2. Click [Downloads Images From Canon Camera using Canon CameraWindow]. In the screen that you have correctly installed the software. Click on the desktop to the computer. Table of...

CONSOLE_V1-1_ENG.pdf
Page 18
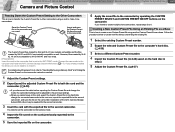
... all the sound files. The recorded [MPEG2ES] picture cannot be added to the same file. 1 frame is recorded and added to the instruction manual of the software. 2 Select the [Preview resolution] of the recording picture will not be saved. For details, refer to the same file each time...picture displayed in "File Name.WAV". When the audio mode is set to 4CH, the sounds on channel 1 and 2 will be output to the instruction manual of the software or consult the software manufacturer. 2 Select a mode for recoding onto the hard disk. [Standard] A new file will be created each...
... all the sound files. The recorded [MPEG2ES] picture cannot be added to the same file. 1 frame is recorded and added to the instruction manual of the software. 2 Select the [Preview resolution] of the recording picture will not be saved. For details, refer to the same file each time...picture displayed in "File Name.WAV". When the audio mode is set to 4CH, the sounds on channel 1 and 2 will be output to the instruction manual of the software or consult the software manufacturer. 2 Select a mode for recoding onto the hard disk. [Standard] A new file will be created each...

CONSOLE_V1-1_ENG.pdf
Page 34
... to [-] in stronger cyan tones. • [B Gain]: Adjust the blue gain of the detected area. When connecting the XL H1 or XL2, this function will not be activated. [Color Correction] „ Determining and Adjusting the Color To Be Corrected The color correction will be set...tones, and to [-] in stronger yellow tones. 1 Click of the color to be detected. You can switch over each parameter, refer to the camcorder instruction manual. • The area that will be corrected will be activated. • To set color. • [Color Phase]: Select the basic color phase (0-...
... to [-] in stronger cyan tones. • [B Gain]: Adjust the blue gain of the detected area. When connecting the XL H1 or XL2, this function will not be activated. [Color Correction] „ Determining and Adjusting the Color To Be Corrected The color correction will be set...tones, and to [-] in stronger yellow tones. 1 Click of the color to be detected. You can switch over each parameter, refer to the camcorder instruction manual. • The area that will be corrected will be activated. • To set color. • [Color Phase]: Select the basic color phase (0-...

CONSOLE_V1-1_ENG.pdf
Page 35
...], [Chroma], [Area] and [Y Level] by moving the sliders. • For details about each of [Area Select]. For details about each parameter, refer to the camcorder instruction manual. „ Setting the Skin Detail Area 1 Click the [Detail] tab and of the terms, refer to finish the setting. The [Hue], [Chroma], [Area] and [Y Level...
...], [Chroma], [Area] and [Y Level] by moving the sliders. • For details about each of [Area Select]. For details about each parameter, refer to the camcorder instruction manual. „ Setting the Skin Detail Area 1 Click the [Detail] tab and of the terms, refer to finish the setting. The [Hue], [Chroma], [Area] and [Y Level...
CONSOLE_V1-1_ENG.pdf
Page 37
...a new name and press the [Enter] key again to the camcorder instruction manual. Depending on the camcorder connected, some parameters differ. The new settings will be used when recording. When using XL2, you need to set the camcorder's recording program to EXT.CONT. ...You can also select items by pressing [2] (down), [4] (left), [6] (right), and [8] (up) keys. - For details, refer to the camcorder instruction manual. The [Custom Preset] window cannot be displayed in the following cases. - You can adjust, load, save the new settings. Changing the position ...
...a new name and press the [Enter] key again to the camcorder instruction manual. Depending on the camcorder connected, some parameters differ. The new settings will be used when recording. When using XL2, you need to set the camcorder's recording program to EXT.CONT. ...You can also select items by pressing [2] (down), [4] (left), [6] (right), and [8] (up) keys. - For details, refer to the camcorder instruction manual. The [Custom Preset] window cannot be displayed in the following cases. - You can adjust, load, save the new settings. Changing the position ...
CONSOLE_V1-1_ENG.pdf
Page 41
... the existing file. 1 Select the existing Custom Preset number. 2 Export the selected Custom Preset file to the EXT.CONT. However, files created by XL2/ XL H1 are not compatible to XH G1/XH A1 and vice versa. [Preparations] Insert the card to the camcorder that is set the camcorder...created by XL2 and XL H1 are mutually compatible as a Base This is how to make clone camcorders. Creating a New Custom Preset File Using an Existing File as well. For details about the steps 3 to 6, refer to "Inserting/Removing a Memory Card" and "Using the Custom Preset" on the camcorder instruction manual. 1 ...
... the existing file. 1 Select the existing Custom Preset number. 2 Export the selected Custom Preset file to the EXT.CONT. However, files created by XL2/ XL H1 are not compatible to XH G1/XH A1 and vice versa. [Preparations] Insert the card to the camcorder that is set the camcorder...created by XL2 and XL H1 are mutually compatible as a Base This is how to make clone camcorders. Creating a New Custom Preset File Using an Existing File as well. For details about the steps 3 to 6, refer to "Inserting/Removing a Memory Card" and "Using the Custom Preset" on the camcorder instruction manual. 1 ...
CONSOLE_V1-1_ENG.pdf
Page 59
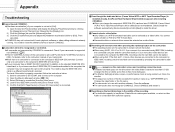
...installed already, the [Found New Hardware Wizard] window appears when starting CONSOLE. ÎWhen you have more other devices are connected to the instruction manual of your camcorder. ÎMore than 0.5 GB. Close the software. ÎThe camcorder does not recognize CONSOLE. For details, refer to...XL2 and 1 or more than 2 IEEE1394 (DV) boards/cards added to the computer, the computer may not be selected as a video folder. Cannot select a video folder. ÎOnly folders on the hard disk stops in use with [Canon Virtual VCR]. 5) Confirm that [AV/C Tape Device] or [Canon...
...installed already, the [Found New Hardware Wizard] window appears when starting CONSOLE. ÎWhen you have more other devices are connected to the instruction manual of your camcorder. ÎMore than 0.5 GB. Close the software. ÎThe camcorder does not recognize CONSOLE. For details, refer to...XL2 and 1 or more than 2 IEEE1394 (DV) boards/cards added to the computer, the computer may not be selected as a video folder. Cannot select a video folder. ÎOnly folders on the hard disk stops in use with [Canon Virtual VCR]. 5) Confirm that [AV/C Tape Device] or [Canon...
Console Software Operations Manual
Page 17
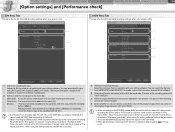
... of the preview image. For details, refer to 4CH, the sounds on channel 3 and 4 will be saved. When the audio mode is set to the instruction manual of the preview image appears odd, select [OFF]. When recording an [MPEG2ES] picture, WAV sound files with the same file name as the recording...] picture, WAV sound files with the same file name as the recording file will be added to the same file. 1 frame is set to the instruction manual of the software. 2 Select the [Preview resolution] of the recording picture will be recorded in "File Name_sub.WAV".
... of the preview image. For details, refer to 4CH, the sounds on channel 3 and 4 will be saved. When the audio mode is set to the instruction manual of the preview image appears odd, select [OFF]. When recording an [MPEG2ES] picture, WAV sound files with the same file name as the recording...] picture, WAV sound files with the same file name as the recording file will be added to the same file. 1 frame is set to the instruction manual of the software. 2 Select the [Preview resolution] of the recording picture will be recorded in "File Name_sub.WAV".
Console Software Operations Manual
Page 27
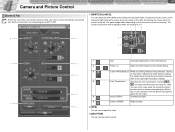
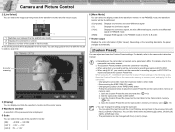
... white balance to the preset setting. 3 3 4 4 5 Custom White Balance While one of the presets is set the shutter speed. You can set to the camcorder instruction manual. The panel image differs depending on [Control] tab. left clicking the mouse turns the pointer to apply the new value. Click the [Enter] key again...
... white balance to the preset setting. 3 3 4 4 5 Custom White Balance While one of the presets is set the shutter speed. You can set to the camcorder instruction manual. The panel image differs depending on [Control] tab. left clicking the mouse turns the pointer to apply the new value. Click the [Enter] key again...
Console Software Operations Manual
Page 31
... memory or memory card. ( 4-13) You can also select items by pressing [2] (down the line with the mouse to the camcorder instruction manual. The [Custom Preset] window cannot be tri-partitioned. [Composite]: Displays a luminance and color-difference signal [Y]: Displays the luminance signal [YUV...selected line number. 3 Selects a number of the TAPE/CARD switch - Changing the position of lines used when recording. When using XL2, you need to set the camcorder's recording program to EXT.CONT. When using XL H1, you need to set the camcorder's recording program...
... memory or memory card. ( 4-13) You can also select items by pressing [2] (down the line with the mouse to the camcorder instruction manual. The [Custom Preset] window cannot be tri-partitioned. [Composite]: Displays a luminance and color-difference signal [Y]: Displays the luminance signal [YUV...selected line number. 3 Selects a number of the TAPE/CARD switch - Changing the position of lines used when recording. When using XL2, you need to set the camcorder's recording program to EXT.CONT. When using XL H1, you need to set the camcorder's recording program...
Console Software Operations Manual
Page 50
...the software automatically (Recommended)] and click [Next] to [ON]. Set the DV CONTROL function to install the driver. Even though the dedicated driver (Canon Virtual VCR or AV/C Tape Recorder/Player) is connected. Check if your camcorder is supported by CONSOLE ( iii). ÎThe DV CONTROL function ...is connected to the computer, the computer may not be detected as new hardware. You need to close the software and try to the instruction manual of your computer is already running. Cannot select a video folder. ÎOnly folders on FAT32 or FAT16 hard disks. ÎRemovable ...
...the software automatically (Recommended)] and click [Next] to [ON]. Set the DV CONTROL function to install the driver. Even though the dedicated driver (Canon Virtual VCR or AV/C Tape Recorder/Player) is connected. Check if your camcorder is supported by CONSOLE ( iii). ÎThe DV CONTROL function ...is connected to the computer, the computer may not be detected as new hardware. You need to close the software and try to the instruction manual of your computer is already running. Cannot select a video folder. ÎOnly folders on FAT32 or FAT16 hard disks. ÎRemovable ...

XL2 Instruction Manual
Page 22
... with a dry soft cloth (make sure to dust or dirt. If necessary, clean it stops and remove the lens. 3. Attach the dust caps to the instruction manual of the mount, or expose them to turn off the camcorder during cleaning). 22 Align the red mark on the lens with the red mark...
... with a dry soft cloth (make sure to dust or dirt. If necessary, clean it stops and remove the lens. 3. Attach the dust caps to the instruction manual of the mount, or expose them to turn off the camcorder during cleaning). 22 Align the red mark on the lens with the red mark...

XL2 Instruction Manual
Page 52
...-300 Microphone Adapter), AUDIO2 (RCA terminals) or REAR (XLR terminals). Connect the device to the RCA terminals of AUDIO2. 2. Connect a microphone to the MA-300 instruction manual. 2. Attach the optional MA-300 Microphone Adapter to the advanced accessory shoe. • With the MA-300, you can use balanced microphones on the phantom...
...-300 Microphone Adapter), AUDIO2 (RCA terminals) or REAR (XLR terminals). Connect the device to the RCA terminals of AUDIO2. 2. Connect a microphone to the MA-300 instruction manual. 2. Attach the optional MA-300 Microphone Adapter to the advanced accessory shoe. • With the MA-300, you can use balanced microphones on the phantom...

XL2 Instruction Manual
Page 87
... Refer also to VIDEO. Turn off all devices before starting the connections. 2. If connecting to a VCR, set the input selector to the TV or VCR instruction manual. E STV-150 Stereo Video Cable (supplied) Signal flow S-150 S-video Cable (supplied) Signal flow INPUT VIDEO AUDIO L R S(S1)-VIDEO Playback 1. Connect the S-150 S-video Cable...
... Refer also to VIDEO. Turn off all devices before starting the connections. 2. If connecting to a VCR, set the input selector to the TV or VCR instruction manual. E STV-150 Stereo Video Cable (supplied) Signal flow S-150 S-video Cable (supplied) Signal flow INPUT VIDEO AUDIO L R S(S1)-VIDEO Playback 1. Connect the S-150 S-video Cable...

XL2 Instruction Manual
Page 88
.../VCR. 3. When connecting to the RCA terminal, set the input selector to RCA. Connect the STV-150 Stereo Video Cable to the TV or VCR instruction manual. If connecting to a VCR, set the RCA/BNC selector to LINE. Signal flow STV-150 Stereo Video Cable (supplied) INPUT VIDEO AUDIO L R 1.
.../VCR. 3. When connecting to the RCA terminal, set the input selector to RCA. Connect the STV-150 Stereo Video Cable to the TV or VCR instruction manual. If connecting to a VCR, set the RCA/BNC selector to LINE. Signal flow STV-150 Stereo Video Cable (supplied) INPUT VIDEO AUDIO L R 1.

XL2 Instruction Manual
Page 96
... to copy appears. Connected device: Load a blank cassette and set the device to a VCR or a digital video device. Locate the scene you wish to the instruction manual of the original. ❍ When connecting a digital video device: - Stop playback. ❍ When connecting a VCR, the quality of the edited tape will be guaranteed for...
... to copy appears. Connected device: Load a blank cassette and set the device to a VCR or a digital video device. Locate the scene you wish to the instruction manual of the original. ❍ When connecting a digital video device: - Stop playback. ❍ When connecting a VCR, the quality of the edited tape will be guaranteed for...

XL2 Instruction Manual
Page 99
... a VCR or 8mm video camcorder, you can also connect to digital signals and output the digital signals via the DV terminal. Refer also to the instruction manual of the connected device.
... a VCR or 8mm video camcorder, you can also connect to digital signals and output the digital signals via the DV terminal. Refer also to the instruction manual of the connected device.

XL2 Instruction Manual
Page 101
...Computer Using a DV (IEEE1394) Cable E You can also download the DV-PC Recorder from tape to computer. Refer to the instruction manual of Windows XP can transfer recordings to the computer's hard disk. Users of the software. If the problem persists, disconnect the interface... Windows 98 Second Edition and on and reconnect them. ❍ The XL2 cannot be installed automatically. Editing 101 For details, refer to the instruction manual of your computer/capture board to transfer video recording from the Canon Homepage to record video/audio to a computer equipped with DV Messenger....
...Computer Using a DV (IEEE1394) Cable E You can also download the DV-PC Recorder from tape to computer. Refer to the instruction manual of Windows XP can transfer recordings to the computer's hard disk. Users of the software. If the problem persists, disconnect the interface... Windows 98 Second Edition and on and reconnect them. ❍ The XL2 cannot be installed automatically. Editing 101 For details, refer to the instruction manual of your computer/capture board to transfer video recording from the Canon Homepage to record video/audio to a computer equipped with DV Messenger....
XL2 Instruction Manual
Page 124
...LIMITATIONS Except as a permanent record of the repair expense before using it apply to follow instructions contained in normal use of any kind by CUSA. You will be distributed with Canon DV camcorders are covered only by the manufacturer or producer thereof. This limited warranty does...set forth below is used for the DV Camcorder, which may issue with respect to such non-Canon brand items is in lieu of all defects encountered in the instruction manual; After your Bill of Sale as otherwise required by applicable legislation, this limited warranty for other...
...LIMITATIONS Except as a permanent record of the repair expense before using it apply to follow instructions contained in normal use of any kind by CUSA. You will be distributed with Canon DV camcorders are covered only by the manufacturer or producer thereof. This limited warranty does...set forth below is used for the DV Camcorder, which may issue with respect to such non-Canon brand items is in lieu of all defects encountered in the instruction manual; After your Bill of Sale as otherwise required by applicable legislation, this limited warranty for other...


