
XH G1S / XH A1S Instruction Manual
Page 5
...HDV native 1080/24p, 1080/30p recording Use the 24F or 30F mode for high-definition video. Enhanced customization Custom functions ( 97) and custom display ( 103) options give it with a total of 1.67 mega pixels and 1,440x1,080 effective pixels), the camcorder offers a horizontal resolution of professional broadcast cameras. CCDs (each with the XH G1S / XH... -TV programs, commercials, music videos or movies- In addition, you can now manually focus while using the zoom. 3CCD system By using both audio inputs or combine one audio input and the built-in 0.5 dB increments ( 64) &#...
...HDV native 1080/24p, 1080/30p recording Use the 24F or 30F mode for high-definition video. Enhanced customization Custom functions ( 97) and custom display ( 103) options give it with a total of 1.67 mega pixels and 1,440x1,080 effective pixels), the camcorder offers a horizontal resolution of professional broadcast cameras. CCDs (each with the XH G1S / XH... -TV programs, commercials, music videos or movies- In addition, you can now manually focus while using the zoom. 3CCD system By using both audio inputs or combine one audio input and the built-in 0.5 dB increments ( 64) &#...

XH G1S / XH A1S Instruction Manual
Page 13
... System. Connect only devices with mounting screws longer than the buttons on the camcorder. 13 The terminal allows you to the adapter base. To use tripods with the mark to the camcorder. Front view Back view Introduction External microphone holder ( 50) Tally lamp .../memory card compartment ( 16) Dioptric adjustment lever ( 19) VIEWFINDER COMPONENT OUT terminal ( 80) terminal A/V1 terminal ( 79) HDV indicator HDV/DV terminal ( 81, 86, 88) (headphones) terminal HD/SD COMPONENT OUT terminal ( 80) START/STOP button ( 30) Memory card slot ( 26) Battery attachment unit ( 16) BATT...
... System. Connect only devices with mounting screws longer than the buttons on the camcorder. 13 The terminal allows you to the adapter base. To use tripods with the mark to the camcorder. Front view Back view Introduction External microphone holder ( 50) Tally lamp .../memory card compartment ( 16) Dioptric adjustment lever ( 19) VIEWFINDER COMPONENT OUT terminal ( 80) terminal A/V1 terminal ( 79) HDV indicator HDV/DV terminal ( 81, 86, 88) (headphones) terminal HD/SD COMPONENT OUT terminal ( 80) START/STOP button ( 30) Memory card slot ( 26) Battery attachment unit ( 16) BATT...
XH G1S / XH A1S Instruction Manual
Page 23
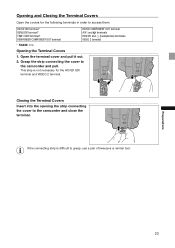
... tweezers or similar tool. Preparations 23 Grasp the strip connecting the cover to the camcorder and close the terminal. Opening and Closing the Terminal Covers Open the covers for the HD/SD SDI terminal and VIDEO 2 terminal. Closing the Terminal Covers Insert into the opening... the strip connecting the cover to the camcorder and pull. HD/SD SDI terminal* GENLOCK terminal* TIME CODE terminal* VIEWFINDER COMPONENT OUT terminal HD/SD COMPONENT OUT terminal A/V1 and terminals HDV/DV and (headphones) terminals VIDEO 2 terminal * only. This step...
... tweezers or similar tool. Preparations 23 Grasp the strip connecting the cover to the camcorder and close the terminal. Opening and Closing the Terminal Covers Open the covers for the HD/SD SDI terminal and VIDEO 2 terminal. Closing the Terminal Covers Insert into the opening... the strip connecting the cover to the camcorder and pull. HD/SD SDI terminal* GENLOCK terminal* TIME CODE terminal* VIEWFINDER COMPONENT OUT terminal HD/SD COMPONENT OUT terminal A/V1 and terminals HDV/DV and (headphones) terminals VIDEO 2 terminal * only. This step...
XH G1S / XH A1S Instruction Manual
Page 34
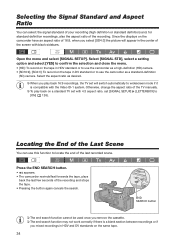
... SETUP]. Select the aspect ratio as a standard-definition (SD) camera. Select [SIGNAL STD], select a setting option and select [YES] to confirm the selection and close the menu. • [HD]: To record on the tape in HDV standard or to use the camcorder as desired. When you remove the ... last few seconds of the TV manually. To play back 16:9 recordings, the TV set [SIGNAL SETUP] [LETTERBOX] to use the camcorder as a high-definition (HD) camera. • [SD16:9], [SD4:3]: To record on the tape in the center of 16:9, when you select [SD4:3] the picture will switch...
... SETUP]. Select the aspect ratio as a standard-definition (SD) camera. Select [SIGNAL STD], select a setting option and select [YES] to confirm the selection and close the menu. • [HD]: To record on the tape in HDV standard or to use the camcorder as desired. When you remove the ... last few seconds of the TV manually. To play back 16:9 recordings, the TV set [SIGNAL SETUP] [LETTERBOX] to use the camcorder as a high-definition (HD) camera. • [SD16:9], [SD4:3]: To record on the tape in the center of 16:9, when you select [SD4:3] the picture will switch...

XH G1S / XH A1S Instruction Manual
Page 39
... In record pause, press the MAGN. buttons. appears and the central part of the screen will be output as is to the HD/SD SDI terminal ( only) and the HDV/DV terminal. With the custom function [CUSTOM REC] ( 97) you can select to have the magnified picture recorded on... the tape ( mode only) as displayed on the camcorder's viewfinder screen. Using the Focus Assist Functions (Peaking and Magnifying) In order to make manual...
... In record pause, press the MAGN. buttons. appears and the central part of the screen will be output as is to the HD/SD SDI terminal ( only) and the HDV/DV terminal. With the custom function [CUSTOM REC] ( 97) you can select to have the magnified picture recorded on... the tape ( mode only) as displayed on the camcorder's viewfinder screen. Using the Focus Assist Functions (Peaking and Magnifying) In order to make manual...

XH G1S / XH A1S Instruction Manual
Page 46
... or an NTSC composite video signal when recording in HD. 46 The camcorder offers the following synchronization options. The user bit of the camcorder's time code will automatically be 2:3 pulldown data (when recording in 24F mode or playing back movies that are HDV 1080/24p, the signal is not available if you ... 24F mode or playing back movies that are HDV 1080/24p). Time Code OUT Set the TIME CODE switch to OUT to [HD 24P 2:3], the user bit of the time code signal will be output also through the TIME CODE terminal. The camcorder's internal time code is set to start the...
... or an NTSC composite video signal when recording in HD. 46 The camcorder offers the following synchronization options. The user bit of the camcorder's time code will automatically be 2:3 pulldown data (when recording in 24F mode or playing back movies that are HDV 1080/24p, the signal is not available if you ... 24F mode or playing back movies that are HDV 1080/24p). Time Code OUT Set the TIME CODE switch to OUT to [HD 24P 2:3], the user bit of the time code signal will be output also through the TIME CODE terminal. The camcorder's internal time code is set to start the...

XH G1S / XH A1S Instruction Manual
Page 47
... disconnect the cable from . - the correct time code will disappear). When the camcorder is set to it can be incorrect. When recording in HD standard but the camcorder is set to SD standard. The phase difference between the external Genlock signal and ...While a time code signal is being recorded on the side panel will be synchronized to HD standard, Genlock synchronization is possible even if the external Genlock signal is in SD standard. Turning the camcorder off/on once the phase synchronization has stabilized. - "GENLOCK" will flash until the ...
... disconnect the cable from . - the correct time code will disappear). When the camcorder is set to it can be incorrect. When recording in HD standard but the camcorder is set to SD standard. The phase difference between the external Genlock signal and ...While a time code signal is being recorded on the side panel will be synchronized to HD standard, Genlock synchronization is possible even if the external Genlock signal is in SD standard. Turning the camcorder off/on once the phase synchronization has stabilized. - "GENLOCK" will flash until the ...

XH G1S / XH A1S Instruction Manual
Page 49
...and 2, leaving the other channels unused. • Audio cannot be dubbed using this camcorder. • Audio recorded with the built-in microphone. Selecting the Sensitivity of wind. HDV The audio transfer rate is 384 kbps and the sampling frequency is recorded on two ...HD/SD SDI terminal will be suppressed along with the sound of the Built-in Microphone You can select the most appropriate setting, given your recording conditions, for recording audio with this setting some low-frequency sounds may be 48 kHz regardless of the built-in microphone to [NORMAL] or [HIGH...
...and 2, leaving the other channels unused. • Audio cannot be dubbed using this camcorder. • Audio recorded with the built-in microphone. Selecting the Sensitivity of wind. HDV The audio transfer rate is 384 kbps and the sampling frequency is recorded on two ...HD/SD SDI terminal will be suppressed along with the sound of the Built-in Microphone You can select the most appropriate setting, given your recording conditions, for recording audio with this setting some low-frequency sounds may be 48 kHz regardless of the built-in microphone to [NORMAL] or [HIGH...

XH G1S / XH A1S Instruction Manual
Page 75
...(1 or 2) button. Press the button again to color display. [MAGN.B.LOCK] MAGN. LOCK button. The time code will be canceled when you turn the camcorder on/off, change the operating mode between recording and playback or change the position of the / (card/tape) switch. [AUDIO LEVEL] Audio Level Indicator ...code hold will continue running normally even while the time code display is on the video signal output from the TIME CODE*, HD/SD SDI*, (LANC) and HDV/DV terminals will not be shown in color). Pressing the button will still be displayed with the custom keys. button to ...
...(1 or 2) button. Press the button again to color display. [MAGN.B.LOCK] MAGN. LOCK button. The time code will be canceled when you turn the camcorder on/off, change the operating mode between recording and playback or change the position of the / (card/tape) switch. [AUDIO LEVEL] Audio Level Indicator ...code hold will continue running normally even while the time code display is on the video signal output from the TIME CODE*, HD/SD SDI*, (LANC) and HDV/DV terminals will not be shown in color). Pressing the button will still be displayed with the custom keys. button to ...

XH G1S / XH A1S Instruction Manual
Page 80
... COMPONENT OUT or VIEWFINDER COMPONENT OUT Terminal Use the HD/SD COMPONENT OUT terminal to monitor the picture on the TV or monitor you wish to use the VIEWFINDER COMPONENT OUT terminal to monitor the video that the camcorder is recording and use . 4. Markers (safety zone guide, level/grid... markers, etc.) are determined by the display level selected with the DISP. button ( 33). Close the menu. Select [SDI OUTPUT] and set to [ON] or [ON(OSD)]. 3. Activate the HD/SD SDI output ...
... COMPONENT OUT or VIEWFINDER COMPONENT OUT Terminal Use the HD/SD COMPONENT OUT terminal to monitor the picture on the TV or monitor you wish to use the VIEWFINDER COMPONENT OUT terminal to monitor the video that the camcorder is recording and use . 4. Markers (safety zone guide, level/grid... markers, etc.) are determined by the display level selected with the DISP. button ( 33). Close the menu. Select [SDI OUTPUT] and set to [ON] or [ON(OSD)]. 3. Activate the HD/SD SDI output ...

XH G1S / XH A1S Instruction Manual
Page 81
... monitor or TV to recognize the camera. • If necessary, turn on the DV conversion and select whether to convert a tape recorded in HD to the TV using the A/V1 terminal or the VIDEO 2 terminal. During fast forward playback, rewind playback and reverse playback of a... External Connections 81 3 Using the HDV/DV Terminal Open the terminal cover CV-250F DV Cable (optional) or commercially available 6 pin-6 pin DV cable 4-pin 6-pin • When connecting the camcorder to a monitor or TV that supports DV input, you connect the camcorder to SD with the following procedure (...
... monitor or TV to recognize the camera. • If necessary, turn on the DV conversion and select whether to convert a tape recorded in HD to the TV using the A/V1 terminal or the VIDEO 2 terminal. During fast forward playback, rewind playback and reverse playback of a... External Connections 81 3 Using the HDV/DV Terminal Open the terminal cover CV-250F DV Cable (optional) or commercially available 6 pin-6 pin DV cable 4-pin 6-pin • When connecting the camcorder to a monitor or TV that supports DV input, you connect the camcorder to SD with the following procedure (...

XH G1S / XH A1S Instruction Manual
Page 82
...129; During fast forward playback, rewind playback and reverse playback of a tape recorded in HDV standard, the picture may be played automatically in the previous section ( 80). • ...Select the appropriate component video signal depending on the TV or monitor you connect the camcorder to a TV set with a 4:3 aspect ratio, change the [LETTERBOX] setting appropriately. Select [.... 82 Open the menu and select [SIGNAL SETUP]. Connection to a Standard Definition TV or Monitor 1 Using the HD/SD COMPONENT OUT or VIEWFINDER COMPONENT OUT Terminal • Refer to the connection...
...129; During fast forward playback, rewind playback and reverse playback of a tape recorded in HDV standard, the picture may be played automatically in the previous section ( 80). • ...Select the appropriate component video signal depending on the TV or monitor you connect the camcorder to a TV set with a 4:3 aspect ratio, change the [LETTERBOX] setting appropriately. Select [.... 82 Open the menu and select [SIGNAL SETUP]. Connection to a Standard Definition TV or Monitor 1 Using the HD/SD COMPONENT OUT or VIEWFINDER COMPONENT OUT Terminal • Refer to the connection...
XH G1S / XH A1S Instruction Manual
Page 86
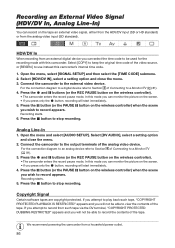
...81). 4. For the connection diagram to a digital device refer to Section 3 of the tape. Connect the camcorder to the output terminals of Connecting to a Monitor/TV ( 81). 3. For the connection diagram to an...If you press only the button, recording will start immediately. 4. HDV/DV In When recording from a household power outlet. 86 Connect the camcorder to use instead this mode you can monitor the picture on ...can record on the tape an external video signal, either from the HDV/DV input (SD or HD standard) or from such tape via the DV terminal, "COPYRIGHT PROTECTED...
...81). 4. For the connection diagram to a digital device refer to Section 3 of the tape. Connect the camcorder to the output terminals of Connecting to a Monitor/TV ( 81). 3. For the connection diagram to an...If you press only the button, recording will start immediately. 4. HDV/DV In When recording from a household power outlet. 86 Connect the camcorder to use instead this mode you can monitor the picture on ...can record on the tape an external video signal, either from the HDV/DV input (SD or HD standard) or from such tape via the DV terminal, "COPYRIGHT PROTECTED...

XH G1S / XH A1S Instruction Manual
Page 88
...or a commercially available 6 pin-6 pin DV cable. HDV output: Set [PLAYBACK STD] to [HDV] and [HD DOWN-CONV] to [OFF]. - HDV input: Set [PLAYBACK STD] to [HDV] and [HD DOWN-CONV] to [OFF]. - Connecting to a Computer To connect the camcorder to the instruction manual of the video editing software. ...software. Adjust the [SIGNAL SETUP] [PLAYBACK STD] and [HD DOWN-CONV] settings in HDV standard: Set [PLAYBACK STD] to [HDV] and [HD DOWN-CONV] to [ON]. For video input from the camcorder to the camcorder: - For the minimum system requirements for video editing, refer to ...
...or a commercially available 6 pin-6 pin DV cable. HDV output: Set [PLAYBACK STD] to [HDV] and [HD DOWN-CONV] to [OFF]. - HDV input: Set [PLAYBACK STD] to [HDV] and [HD DOWN-CONV] to [OFF]. - Connecting to a Computer To connect the camcorder to the instruction manual of the video editing software. ...software. Adjust the [SIGNAL SETUP] [PLAYBACK STD] and [HD DOWN-CONV] settings in HDV standard: Set [PLAYBACK STD] to [HDV] and [HD DOWN-CONV] to [ON]. For video input from the camcorder to the camcorder: - For the minimum system requirements for video editing, refer to ...

XH G1S / XH A1S Instruction Manual
Page 104
... menu. Custom display files saved with a Canon XL H1S, XL H1A, XH G1 or XH A1 cannot be used with this camcorder. List of the custom function file currently active: [OFF], [ON] 09 [RECORDING STD] HD Standard Icon Setting Options: [OFF], [ON] 10 [DV REC MODE] Recording Mode in Standard Definition Setting Options: [OFF], [ON] 11 [FRAME...
... menu. Custom display files saved with a Canon XL H1S, XL H1A, XH G1 or XH A1 cannot be used with this camcorder. List of the custom function file currently active: [OFF], [ON] 09 [RECORDING STD] HD Standard Icon Setting Options: [OFF], [ON] 10 [DV REC MODE] Recording Mode in Standard Definition Setting Options: [OFF], [ON] 11 [FRAME...

XH G1S / XH A1S Instruction Manual
Page 126
... [HD DOWN-CONV] Setting [PLAYBACK STD] Setting [AUTO] [HDV] [DV] HDV [ON] DV DV No output [OFF] HDV HDV No output DV [ON] DV No output DV [OFF] DV No output DV The down -convert the video signal output from the HDV/DV terminal while playing back a tape recorded in standard definition (SD) with another camcorder), only...
... [HD DOWN-CONV] Setting [PLAYBACK STD] Setting [AUTO] [HDV] [DV] HDV [ON] DV DV No output [OFF] HDV HDV No output DV [ON] DV No output DV [OFF] DV No output DV The down -convert the video signal output from the HDV/DV terminal while playing back a tape recorded in standard definition (SD) with another camcorder), only...

XH G1S / XH A1S Instruction Manual
Page 128
... usage by 1.5 times. Depending on this camcorder, a tape that was recorded in LP mode with another digital device or vice versa, the picture and sound may not be distorted. RESET, CONTINUOUS 1 Available only when recording in standard definition (SD). 2 only. 1 - - - -...INPUT XLR REC CH CH1, CH1/CH2 LOW CUT OFF, LC1, LC2 MIC SENSIT. NORMAL, HIGH XLR 1 TRIM +12dB, +6dB, 0dB, -6dB, -12dB XLR 2 TRIM XLR ALC LINK...SUPER FINE, FINE, NORMAL IMAGE SIZE [SIGNAL STD.] is set to [HD] or [SD16:9]: LW 1920x1080, SW 848X480 [SIGNAL STD.] is set to [SD4:3]: L 1440x1080, ...
... usage by 1.5 times. Depending on this camcorder, a tape that was recorded in LP mode with another digital device or vice versa, the picture and sound may not be distorted. RESET, CONTINUOUS 1 Available only when recording in standard definition (SD). 2 only. 1 - - - -...INPUT XLR REC CH CH1, CH1/CH2 LOW CUT OFF, LC1, LC2 MIC SENSIT. NORMAL, HIGH XLR 1 TRIM +12dB, +6dB, 0dB, -6dB, -12dB XLR 2 TRIM XLR ALC LINK...SUPER FINE, FINE, NORMAL IMAGE SIZE [SIGNAL STD.] is set to [HD] or [SD16:9]: LW 1920x1080, SW 848X480 [SIGNAL STD.] is set to [SD4:3]: L 1440x1080, ...

XH G1S / XH A1S Instruction Manual
Page 135
... Changing the Recording to other programmed AE mode to Changing the frame rate* programmed AE mode Easy Recording Reset Returns to off Reset Changing between HD and SD* / Modes Shutter speed setting in Tv mode Aperture setting in Av mode Aperture, shutter speed setting in M Manual mode Custom white balance Exposure... exposure lock , MENU settings TV SCREEN on /off On-screen display settings Gain fine tuning Gain limit Iris limit Power Off Returns to off the camcorder or changing operating modes.
... Changing the Recording to other programmed AE mode to Changing the frame rate* programmed AE mode Easy Recording Reset Returns to off Reset Changing between HD and SD* / Modes Shutter speed setting in Tv mode Aperture setting in Av mode Aperture, shutter speed setting in M Manual mode Custom white balance Exposure... exposure lock , MENU settings TV SCREEN on /off On-screen display settings Gain fine tuning Gain limit Iris limit Power Off Returns to off the camcorder or changing operating modes.
XH G1S / XH A1S Instruction Manual
Page 150
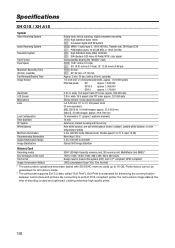
... File Format Image Compression Method 1920 x 1080, 1440 x 1080, 848 x 480, 640 x 480 pixels Design rule for all memory cards. ** The camcorder supports Exif 2.2 (also called "Exif Print"). wide, 16:9 aspect ratio TFT color, approx. 269,000 dots 2.8 in . wide, 16:9 aspect ratio...digital sound, 16 bit (48 kHz) or 12 bit (32 kHz) HD High Definition Video (HDV) 1080/60i SD EIA standard (525 lines, 60 fields) NTSC color signal Videocassettes bearing the "MiniDV" mark. Specifications XH G1S / XH A1S System Video Recording System Audio Recording System Television System Tape Format Tape...
... File Format Image Compression Method 1920 x 1080, 1440 x 1080, 848 x 480, 640 x 480 pixels Design rule for all memory cards. ** The camcorder supports Exif 2.2 (also called "Exif Print"). wide, 16:9 aspect ratio TFT color, approx. 269,000 dots 2.8 in . wide, 16:9 aspect ratio...digital sound, 16 bit (48 kHz) or 12 bit (32 kHz) HD High Definition Video (HDV) 1080/60i SD EIA standard (525 lines, 60 fields) NTSC color signal Videocassettes bearing the "MiniDV" mark. Specifications XH G1S / XH A1S System Video Recording System Audio Recording System Television System Tape Format Tape...
XH G1S / XH A1S Instruction Manual
Page 152
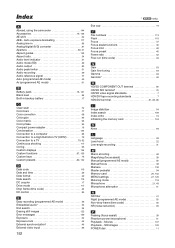
Index A Abroad, using the camcorder 144 Accessories 10, 148 AE shift 62 AEB - Movies 107 Playback -...Color matrix 95 Color phase 95 Compact power adapter 16 Condensation 144 Connection to a computer 88 Connection to a High Definition TV (HDTV 79 Connection to a TV 79, 82 Continuous shooting 117 Coring 95 Custom displays 134 Custom functions ... Gain 63 Gain fine-tuning 64 Gamma 94 Genlock 46 H HD/SD COMPONENT OUT terminal 80 HD/SD SDI terminal 79 HD/SD video signal standards 7 HDV/DV tape recording standards 7 HDV/DV terminal 81, 86, 88 I Image stabilizer 54 Index search...
Index A Abroad, using the camcorder 144 Accessories 10, 148 AE shift 62 AEB - Movies 107 Playback -...Color matrix 95 Color phase 95 Compact power adapter 16 Condensation 144 Connection to a computer 88 Connection to a High Definition TV (HDTV 79 Connection to a TV 79, 82 Continuous shooting 117 Coring 95 Custom displays 134 Custom functions ... Gain 63 Gain fine-tuning 64 Gamma 94 Genlock 46 H HD/SD COMPONENT OUT terminal 80 HD/SD SDI terminal 79 HD/SD video signal standards 7 HDV/DV tape recording standards 7 HDV/DV terminal 81, 86, 88 I Image stabilizer 54 Index search...

