
Instruction Manual
Page 2
... is still warm in temperature. • Do not allow the product to strong shocks or vibration. • Use only power sources specified in this instruction manual for long periods of a tripod or similar equipment is dangerous if swallowed. This may cause other strong artificial light sources. • Do not leave the...
... is still warm in temperature. • Do not allow the product to strong shocks or vibration. • Use only power sources specified in this instruction manual for long periods of a tripod or similar equipment is dangerous if swallowed. This may cause other strong artificial light sources. • Do not leave the...
Instruction Manual
Page 5
...Name for Recordings 37 XF-AVC Clips File Names 37 MP4 Clip and Photo Numbering 38 Using the Fan 40 5 3. Push Auto Iris 62 Manual Aperture: Changing the Aperture Value 63 Iris Limit 63 Exposure Compensation - AE Shift 64 Light Metering Mode 64 White Balance 65 Auto White Balance ...(AWB) 66 Color Temperature/Preset White Balance 66 Custom White Balance 67 Introduction 9 About this Manual 9 Conventions Used in this Manual 9 Supplied Accessories 10 Names of Primary Clips 53 Selecting the Frame Rate 53 Proxy Clips 54 Sub Recording Clips 55 Shutter Speed ...
...Name for Recordings 37 XF-AVC Clips File Names 37 MP4 Clip and Photo Numbering 38 Using the Fan 40 5 3. Push Auto Iris 62 Manual Aperture: Changing the Aperture Value 63 Iris Limit 63 Exposure Compensation - AE Shift 64 Light Metering Mode 64 White Balance 65 Auto White Balance ...(AWB) 66 Color Temperature/Preset White Balance 66 Custom White Balance 67 Introduction 9 About this Manual 9 Conventions Used in this Manual 9 Supplied Accessories 10 Names of Primary Clips 53 Selecting the Frame Rate 53 Proxy Clips 54 Sub Recording Clips 55 Shutter Speed ...
Instruction Manual
Page 6
6 Zoom 68 Selecting the Zoom Mode 68 Selecting the Zoom Controls 68 Using the Zoom Ring 69 Using the Zoom Rockers 69 Focus 73 Manual Focus 73 Push AF/MF 76 AF-Boosted MF 76 Continuous AF 77 Changing the AF Frame Type and Position 78 Face Detection 78 Focus ... Adding a Shot Mark while Recording 101 Adding an $ Mark or % Mark to the Last Clip Recorded 101 Using Metadata 102 Setting a User Memo Created with Canon XF Utility 102 Using News Metadata 103 Entering Slate Information About the Recording 104 Special Recording Modes 105 Slow & Fast Motion Recording 105 Pre-recording...
6 Zoom 68 Selecting the Zoom Mode 68 Selecting the Zoom Controls 68 Using the Zoom Ring 69 Using the Zoom Rockers 69 Focus 73 Manual Focus 73 Push AF/MF 76 AF-Boosted MF 76 Continuous AF 77 Changing the AF Frame Type and Position 78 Face Detection 78 Focus ... Adding a Shot Mark while Recording 101 Adding an $ Mark or % Mark to the Last Clip Recorded 101 Using Metadata 102 Setting a User Memo Created with Canon XF Utility 102 Using News Metadata 103 Entering Slate Information About the Recording 104 Special Recording Modes 105 Slow & Fast Motion Recording 105 Pre-recording...

Instruction Manual
Page 9
... contrary to product enhancement. "CAMERA mode": operating mode for purchasing the Canon XF605. Please read . Before Using the Camera • Before making recordings (shooting mode). Conventions Used in this Manual • IMPORTANT: Precautions related to do not remove the battery or... to Content Transfer Mobile (CTM). - "AC adapter" refers to the SD CARD access indicators. - Furthermore, screenshots used in this manual. - Failing to the camera's operation. • NOTES: Additional topics that the camera operates correctly. Should it for playing back and...
... contrary to product enhancement. "CAMERA mode": operating mode for purchasing the Canon XF605. Please read . Before Using the Camera • Before making recordings (shooting mode). Conventions Used in this Manual • IMPORTANT: Precautions related to do not remove the battery or... to Content Transfer Mobile (CTM). - "AC adapter" refers to the SD CARD access indicators. - Furthermore, screenshots used in this manual. - Failing to the camera's operation. • NOTES: Additional topics that the camera operates correctly. Should it for playing back and...

Instruction Manual
Page 10
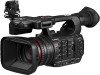
terminal cover) Lens Hood with the camera. M4 fixation bolts, x2) Multi-Function Shoe Cover Viewfinder Cap Lens Cap Eye Cup Quick Guide CA-CP200 L Compact Power Adapter CG-A20 Battery Charger BP-A30 Battery Pack (incl. For accessories sold separately, please refer to Optional Accessories (A 222). Supplied Accessories Supplied Accessories The following accessories are the ones supplied 10 with the camera. Unless indicated otherwise, accessories mentioned in this manual are supplied with Lens Barrier Microphone Holder (incl.
terminal cover) Lens Hood with the camera. M4 fixation bolts, x2) Multi-Function Shoe Cover Viewfinder Cap Lens Cap Eye Cup Quick Guide CA-CP200 L Compact Power Adapter CG-A20 Battery Charger BP-A30 Battery Pack (incl. For accessories sold separately, please refer to Optional Accessories (A 222). Supplied Accessories Supplied Accessories The following accessories are the ones supplied 10 with the camera. Unless indicated otherwise, accessories mentioned in this manual are supplied with Lens Barrier Microphone Holder (incl.

Instruction Manual
Page 18
... (SD card selection) button (A 33) 3 SD card access indicators (SD2/SD3) (A 32) 4 SD card slots (A 32): SD CARD2 (top) and SD CARD3 (bottom) In this manual, SD cards in 4 directions.
... (SD card selection) button (A 33) 3 SD card access indicators (SD2/SD3) (A 32) 4 SD card slots (A 32): SD CARD2 (top) and SD CARD3 (bottom) In this manual, SD cards in 4 directions.

Instruction Manual
Page 25
...press again to select a typical option from the Menu The following is the menu item that are in the respective section of the manual. Such operations will be explained in progress. Joystick When making a menu selection, push the joystick to menu settings throughout the... manual will be abbreviated as follows: > [B System Setup] > [Language H] > Desired option 1 Press the MENU button. • The menu opens. CANCEL button MENU button ...
...press again to select a typical option from the Menu The following is the menu item that are in the respective section of the manual. Such operations will be explained in progress. Joystick When making a menu selection, push the joystick to menu settings throughout the... manual will be abbreviated as follows: > [B System Setup] > [Language H] > Desired option 1 Press the MENU button. • The menu opens. CANCEL button MENU button ...

Instruction Manual
Page 26
... [OK]. • The menu setting you set . Using the Menus • You can also touch the desired page or menu item. • Going forward, this manual. 4 Select the desired menu item ([Language H], in the same way as a guide: , , . NOTES • Unavailable items may appear grayed out. • On some screens, the...
... [OK]. • The menu setting you set . Using the Menus • You can also touch the desired page or menu item. • Going forward, this manual. 4 Select the desired menu item ([Language H], in the same way as a guide: , , . NOTES • Unavailable items may appear grayed out. • On some screens, the...

Instruction Manual
Page 30
... material on the multi-function shoe with the Multi-Function Shoe ቢ For details on how to attach and use accessories, refer to the instruction manual of the accessory in use , attach the eye cup so that it or the multi-function shoe. Preparing the Camera Attaching and Removing the Eye...
... material on the multi-function shoe with the Multi-Function Shoe ቢ For details on how to attach and use accessories, refer to the instruction manual of the accessory in use , attach the eye cup so that it or the multi-function shoe. Preparing the Camera Attaching and Removing the Eye...

Instruction Manual
Page 43
... display is set to level 1, level 2 or level 3. in CAMERA mode. in white: automatic adjustment range; You can be set to [Whole Area]. in yellow: manual adjustment range;
... display is set to level 1, level 2 or level 3. in CAMERA mode. in white: automatic adjustment range; You can be set to [Whole Area]. in yellow: manual adjustment range;

Instruction Manual
Page 49
... gain value. Adjustment of the value in CAMERA mode. Recording settings Opening ( )/ Closing (X) the direct touch control interface Camera settings Assistance functions Turn on the manual. Adjusting Camera and Recording Settings Adjusting Camera and Recording Settings Using direct touch control, you can change commonly used settings such as recording, menu settings...
... gain value. Adjustment of the value in CAMERA mode. Recording settings Opening ( )/ Closing (X) the direct touch control interface Camera settings Assistance functions Turn on the manual. Adjusting Camera and Recording Settings Adjusting Camera and Recording Settings Using direct touch control, you can change commonly used settings such as recording, menu settings...

Instruction Manual
Page 50
... • Once the settings menu is pressed while selecting the shutter speed. - Using Assistance Functions 1 Touch A (assistance functions) and then turn assistance functions on the manual. 1 Press the FUNC button. • The onscreen display of the direct setting mode.
... • Once the settings menu is pressed while selecting the shutter speed. - Using Assistance Functions 1 Touch A (assistance functions) and then turn assistance functions on the manual. 1 Press the FUNC button. • The onscreen display of the direct setting mode.

Instruction Manual
Page 58
.... • When the camera is set to full auto mode (A 42) or you can also use this mode when you can set the shutter speed manually. 58 1 Select the shutter speed mode (A 57). 2 For [Speed] only: Select > [v Camera Setup] > [Shutter Increment] > [1/3 stop] or [1/4 stop]. 3 Adjust the shutter speed, angle value or...
.... • When the camera is set to full auto mode (A 42) or you can also use this mode when you can set the shutter speed manually. 58 1 Select the shutter speed mode (A 57). 2 For [Speed] only: Select > [v Camera Setup] > [Shutter Increment] > [1/3 stop] or [1/4 stop]. 3 Adjust the shutter speed, angle value or...

Instruction Manual
Page 59
...] is set to [ISO]) or [Off/ISO 12800] (when set to the subject. The camera offers 3 gain levels (L/M/H) that you can choose between manual and automatic settings. Available ISO speed and gain settings Main recording format1 XF-AVC MP4 ISO/Gain2 [ISO] [Gain] Increment Normal range3 [1 stop] 200, ... camera is set automatically by changing the position of the ISO/GAIN switch. Automatic ISO Speed/Gain The sensitivity is set to [Wide DR] or [Canon Log 3], ISO 320 (-6.0 dB) when set to [PQ] or [HLG], and ISO 200 (-6.0 dB) when set a sensitivity limit. Select > [v Camera Setup] >...
...] is set to [ISO]) or [Off/ISO 12800] (when set to the subject. The camera offers 3 gain levels (L/M/H) that you can choose between manual and automatic settings. Available ISO speed and gain settings Main recording format1 XF-AVC MP4 ISO/Gain2 [ISO] [Gain] Increment Normal range3 [1 stop] 200, ... camera is set automatically by changing the position of the ISO/GAIN switch. Automatic ISO Speed/Gain The sensitivity is set to [Wide DR] or [Canon Log 3], ISO 320 (-6.0 dB) when set to [PQ] or [HLG], and ISO 200 (-6.0 dB) when set a sensitivity limit. Select > [v Camera Setup] >...

Instruction Manual
Page 60
... gain value corresponding to the current position of the ISO/GAIN switch (L, M or H) with the remote controller's ISO/GAIN Í/Î buttons. ISO Speed/Gain Manual ISO Speed/Gain Value You can set beforehand 3 gain levels and then select quickly which one to apply simply by changing the position of the...
... gain value corresponding to the current position of the ISO/GAIN switch (L, M or H) with the remote controller's ISO/GAIN Í/Î buttons. ISO Speed/Gain Manual ISO Speed/Gain Value You can set beforehand 3 gain levels and then select quickly which one to apply simply by changing the position of the...

Instruction Manual
Page 62
... activated, it . When infrared recording is set , automatic aperture mode will end and the E icon will disappear. Push Auto Iris During manual aperture, you can also perform this function remotely using Browser Remote on the screen next to obtain optimal exposure. During..., press the PUSH AUTO IRIS button or other control to full auto mode, the aperture will appear at the maximum aperture. Manual aperture: Adjust the aperture value manually. The selected aperture value (F value) will be adjusted automatically. Push Auto Iris: Momentary automatic aperture. You can press the PUSH...
... activated, it . When infrared recording is set , automatic aperture mode will end and the E icon will disappear. Push Auto Iris During manual aperture, you can also perform this function remotely using Browser Remote on the screen next to obtain optimal exposure. During..., press the PUSH AUTO IRIS button or other control to full auto mode, the aperture will appear at the maximum aperture. Manual aperture: Adjust the aperture value manually. The selected aperture value (F value) will be adjusted automatically. Push Auto Iris: Momentary automatic aperture. You can press the PUSH...

Instruction Manual
Page 63
... ND filter is connected to close down the aperture. • You can use the smallest iris increment. In such case, press the ND FILTER - Aperture Manual Aperture: Changing the Aperture Value 1 Set the IRIS switch to M. 2 Select > [v Camera Setup] > [Iris Increment] > [1/3 Stop] or [1/4 Stop]. 63 •... become dark when you turn the dial right to open up or close the aperture. • You can also switch between automatic and manual aperture with the remote controller's AUTO IRIS button. Iris Limit You can operate the iris ring even the camera's controls are locked (A 15...
... ND filter is connected to close down the aperture. • You can use the smallest iris increment. In such case, press the ND FILTER - Aperture Manual Aperture: Changing the Aperture Value 1 Set the IRIS switch to M. 2 Select > [v Camera Setup] > [Iris Increment] > [1/3 Stop] or [1/4 Stop]. 63 •... become dark when you turn the dial right to open up or close the aperture. • You can also switch between automatic and manual aperture with the remote controller's AUTO IRIS button. Iris Limit You can operate the iris ring even the camera's controls are locked (A 15...

Instruction Manual
Page 64
... the picture is lit, for example, when the subject is larger than ±2 EV, the indicator will change the metering mode after adjusting the exposure manually. NOTES • If you set an assignable button to [Backlight] or [Spotlight] (A 115), you can press the button to adjust the AE shift level. Optimal...
... the picture is lit, for example, when the subject is larger than ±2 EV, the indicator will change the metering mode after adjusting the exposure manually. NOTES • If you set an assignable button to [Backlight] or [Spotlight] (A 115), you can press the button to adjust the AE shift level. Optimal...

Instruction Manual
Page 72
.... For details on the conversion lens selected. • Select [Off] if you do not intend to use the following accessories, refer to their respective instruction manuals. 72 Conversion Lens TL-U58 Tele-converter WA-U58 Wide Attachment Focal Length Factor Approx. 1.5x Approx. 0.8x Minimum Focusing Distance Approx. 130 cm (4.3 ft...
.... For details on the conversion lens selected. • Select [Off] if you do not intend to use the following accessories, refer to their respective instruction manuals. 72 Conversion Lens TL-U58 Tele-converter WA-U58 Wide Attachment Focal Length Factor Approx. 1.5x Approx. 0.8x Minimum Focusing Distance Approx. 130 cm (4.3 ft...

Instruction Manual
Page 73
... Response] settings. • If you operate the zoom after focusing, the focus on the subject may be lost. • If you adjust the focus manually. • You can operate the focus ring even when the camera's controls are locked (A 15). Check the focus before resuming shooting. • When... the focus with the power turned on, the focus on the subject may be lost after you focus manually and then leave the camera with the remote controller's FOCUS dial. Manual Focus Focus manually using autofocus, you to operate aspects of the screen. 2 Turn the focus ring to focus nearer. ...
... Response] settings. • If you operate the zoom after focusing, the focus on the subject may be lost. • If you adjust the focus manually. • You can operate the focus ring even when the camera's controls are locked (A 15). Check the focus before resuming shooting. • When... the focus with the power turned on, the focus on the subject may be lost after you focus manually and then leave the camera with the remote controller's FOCUS dial. Manual Focus Focus manually using autofocus, you to operate aspects of the screen. 2 Turn the focus ring to focus nearer. ...


