
Instruction Manual
Page 2
... in cloth or other strong artificial light sources. • Do not leave the lens exposed without the lens cap attached. If swallowed, seek immediate medical assistance. • Periodically remove any dust buildup from the power plug and power outlet using commercially available batteries or provided battery packs. - Do not touch the battery charger or AC adapter connected to turn off the product in temperature. •...
... in cloth or other strong artificial light sources. • Do not leave the lens exposed without the lens cap attached. If swallowed, seek immediate medical assistance. • Periodically remove any dust buildup from the power plug and power outlet using commercially available batteries or provided battery packs. - Do not touch the battery charger or AC adapter connected to turn off the product in temperature. •...
Instruction Manual
Page 5
... Using a Battery 19 Using a Power Outlet 22 Using the LCD Screen 23 Date, Time and Language Settings 24 Setting the Date and Time 24 Changing the Language 24 Using the Menus 25 Selecting an Option from the Menu 25 Using the Customized Menus (My Menu) 26 Preparing the Camera 28 Attaching the Microphone Holder 28 Attaching the Lens Hood 28 Lens Diffraction Correction 29 Using the Viewfinder 29 Preparing Recording Media 31 Compatible Recording Media 31 Inserting and Removing an SD Card...
... Using a Battery 19 Using a Power Outlet 22 Using the LCD Screen 23 Date, Time and Language Settings 24 Setting the Date and Time 24 Changing the Language 24 Using the Menus 25 Selecting an Option from the Menu 25 Using the Customized Menus (My Menu) 26 Preparing the Camera 28 Attaching the Microphone Holder 28 Attaching the Lens Hood 28 Lens Diffraction Correction 29 Using the Viewfinder 29 Preparing Recording Media 31 Compatible Recording Media 31 Inserting and Removing an SD Card...
Instruction Manual
Page 6
... 82 Displaying Zebra Patterns 84 Displaying False Color 84 Setting the Time Code 85 Selecting the Time Code Mode 85 Selecting Drop or Non-Drop Frame 86 Setting the User Bit 87 Synchronizing with an External Device 88 Connecting an External Device 88 Time Code Signal Input 88 Time Code Signal Output 89 Reference Video Signal Input (Genlock Synchronization) 89 Reference Video Signal Output 90 Recording Audio 91 Audio Format for MP4 Clips 92 Recording Audio Using the Second Card Recording Functions 92 Connecting an External Microphone or External Audio Input Source...
... 82 Displaying Zebra Patterns 84 Displaying False Color 84 Setting the Time Code 85 Selecting the Time Code Mode 85 Selecting Drop or Non-Drop Frame 86 Setting the User Bit 87 Synchronizing with an External Device 88 Connecting an External Device 88 Time Code Signal Input 88 Time Code Signal Output 89 Reference Video Signal Input (Genlock Synchronization) 89 Reference Video Signal Output 90 Recording Audio 91 Audio Format for MP4 Clips 92 Recording Audio Using the Second Card Recording Functions 92 Connecting an External Microphone or External Audio Input Source...
Instruction Manual
Page 7
... When Converting HDR to SDR 152 Audio Output Channels 153 Working with Files on a Card 228 Charging Times 228 Appendix: Camera Dimensions 229 Index 231 External Connections 139 Video Output Configuration 139 HDMI OUT Terminal Video Output Configuration (Recording) 139 Video Output Configuration (Playback) 141 Connecting to a Smartphone 184 8. 5. Playback 129 Playback 129 Displaying the Index Screen 129 Playing Back Recordings 131 Onscreen Displays During Clip Playback 132 Clip Playback Controls 133 Adjusting the Volume 134 File Operations 135 File Menu Operations 135 Displaying Clip...
... When Converting HDR to SDR 152 Audio Output Channels 153 Working with Files on a Card 228 Charging Times 228 Appendix: Camera Dimensions 229 Index 231 External Connections 139 Video Output Configuration 139 HDMI OUT Terminal Video Output Configuration (Recording) 139 Video Output Configuration (Playback) 141 Connecting to a Smartphone 184 8. 5. Playback 129 Playback 129 Displaying the Index Screen 129 Playing Back Recordings 131 Onscreen Displays During Clip Playback 132 Clip Playback Controls 133 Adjusting the Volume 134 File Operations 135 File Menu Operations 135 Displaying Clip...

Instruction Manual
Page 9
Before Using the Camera • Before making recordings (shooting mode). Do not turn off the camera and do so may result in development and may differ slightly from the actual screens due to product enhancement. Do not open the card compartment cover. "Battery" refers to Content Transfer Mobile (CTM). - "MEDIA mode": operating mode for purchasing the Canon XF605. Unless indicated otherwise, shooting functions are utilized in CAMERA mode. • Photographs in the manual are...
Before Using the Camera • Before making recordings (shooting mode). Do not turn off the camera and do so may result in development and may differ slightly from the actual screens due to product enhancement. Do not open the card compartment cover. "Battery" refers to Content Transfer Mobile (CTM). - "MEDIA mode": operating mode for purchasing the Canon XF605. Unless indicated otherwise, shooting functions are utilized in CAMERA mode. • Photographs in the manual are...
Instruction Manual
Page 20
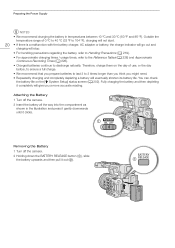
...; Removing the Battery 1 Turn off the camera. 2 Holding down the BATTERY RELEASE button (ቢ), slide the battery upwards and then pull it completely will give you might need. • Repeatedly charging and completely depleting a battery will stop. • For handling precautions regarding the battery, refer to Handling Precautions (A 219). • For approximate charging times / usage times, refer to the Reference Tables (A 228) and Approximate Continuous Recording Times...
...; Removing the Battery 1 Turn off the camera. 2 Holding down the BATTERY RELEASE button (ቢ), slide the battery upwards and then pull it completely will give you might need. • Repeatedly charging and completely depleting a battery will stop. • For handling precautions regarding the battery, refer to Handling Precautions (A 219). • For approximate charging times / usage times, refer to the Reference Tables (A 228) and Approximate Continuous Recording Times...
Instruction Manual
Page 21
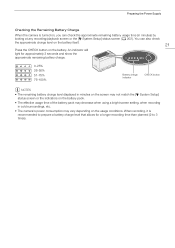
... the battery pack. • The effective usage time of the battery pack may decrease when using a bright screen setting, when recording in minutes) by looking at any recording/playback screen or the [B System Setup] status screen (A 202). When recording, it is turned on, you can also check the approximate charge level on the battery itself. 21 Press the CHECK button on the battery. Preparing the Power Supply Checking the Remaining Battery Charge When the camera is...
... the battery pack. • The effective usage time of the battery pack may decrease when using a bright screen setting, when recording in minutes) by looking at any recording/playback screen or the [B System Setup] status screen (A 202). When recording, it is turned on, you can also check the approximate charge level on the battery itself. 21 Press the CHECK button on the battery. Preparing the Power Supply Checking the Remaining Battery Charge When the camera is...
Instruction Manual
Page 23
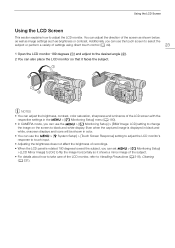
... a variety of settings using direct touch control (A 49). 23 1 Open the LCD monitor 180 degrees (ቢ) and adjust to black and white display. Even when the captured image is displayed in black and white, onscreen displays and icons will be shown in color. • You can use the > [B System Setup] > [Touch Screen Response] setting to adjust the LCD monitor's response to touch input. • Adjusting the brightness does not affect the brightness of recordings. • When...
... a variety of settings using direct touch control (A 49). 23 1 Open the LCD monitor 180 degrees (ቢ) and adjust to black and white display. Even when the captured image is displayed in black and white, onscreen displays and icons will be shown in color. • You can use the > [B System Setup] > [Touch Screen Response] setting to adjust the LCD monitor's response to touch input. • Adjusting the brightness does not affect the brightness of recordings. • When...

Instruction Manual
Page 89
... set by the user (A 87) will be output. In such case, the recorded time code may not be stable. Synchronizing with an External Device • When a suitable external time code signal is received, the camera's own time code will be synchronized to it . Switching to [000], select [Reset] instead. 3 Enter the H-phase adjustment value using the data entry screen (A 27). In MEDIA mode, the user bit is not output from the TIME CODE terminal. • The time code...
... set by the user (A 87) will be output. In such case, the recorded time code may not be stable. Synchronizing with an External Device • When a suitable external time code signal is received, the camera's own time code will be synchronized to it . Switching to [000], select [Reset] instead. 3 Enter the H-phase adjustment value using the data entry screen (A 27). In MEDIA mode, the user bit is not output from the TIME CODE terminal. • The time code...
Instruction Manual
Page 94
..., you set the audio input source to [INPUT Terminals], by default, each audio input is set to the MIC+48V position. Selecting the Input Type for the MIC Terminal Change the setting according to the audio device connected to the MIC terminal. 1 Select > [¡ Audio Setup] > [MIC Input] 2 Select [MIC (with Power Supply)], [MIC], or [LINE] • Select [MIC (with the multi-function shoe is recorded to [MIC (with Power Supply)], may damage the camera and/or device. IMPORTANT • Connecting an external microphone that...
..., you set the audio input source to [INPUT Terminals], by default, each audio input is set to the MIC+48V position. Selecting the Input Type for the MIC Terminal Change the setting according to the audio device connected to the MIC terminal. 1 Select > [¡ Audio Setup] > [MIC Input] 2 Select [MIC (with Power Supply)], [MIC], or [LINE] • Select [MIC (with the multi-function shoe is recorded to [MIC (with Power Supply)], may damage the camera and/or device. IMPORTANT • Connecting an external microphone that...

Instruction Manual
Page 113
... about supported operative systems or software tested for use the camera as a web camera (with compatible software). NOTES • This function cannot be recorded while using a USB cable, and use with the Browser Remote function (A 164), while shooting photos or during IP streaming. For more details, refer to the computer's and the USB cable's instruction manuals. 113 USB cable USB terminal Computer Video output configuration Video format Resolution Motion JPEG 1024x576 Frame rate 30 fps 1 Select > [B System Setup] > [USB (Type-C) Mode] > [Video Output (UVC)]. 2 Connect...
... about supported operative systems or software tested for use the camera as a web camera (with compatible software). NOTES • This function cannot be recorded while using a USB cable, and use with the Browser Remote function (A 164), while shooting photos or during IP streaming. For more details, refer to the computer's and the USB cable's instruction manuals. 113 USB cable USB terminal Computer Video output configuration Video format Resolution Motion JPEG 1024x576 Frame rate 30 fps 1 Select > [B System Setup] > [USB (Type-C) Mode] > [Video Output (UVC)]. 2 Connect...

Instruction Manual
Page 122
.... Custom Picture Settings Deleting a Look File You can delete Look Files registered in custom picture files. 122 1 Select a custom picture file (A 119). 2 Select > [/ Custom Picture] > [Edit / File] > [Look File Setup] > [Delete] > [OK]. • The Look File will be deleted and the image quality adjustments will be reversed to the original settings of recording. Saving a Custom Picture File Copying Custom Picture Files You can check the custom picture settings used at the time of the selected custom picture file. Replacing a File in the Camera with a File on an SD Card...
.... Custom Picture Settings Deleting a Look File You can delete Look Files registered in custom picture files. 122 1 Select a custom picture file (A 119). 2 Select > [/ Custom Picture] > [Edit / File] > [Look File Setup] > [Delete] > [OK]. • The Look File will be deleted and the image quality adjustments will be reversed to the original settings of recording. Saving a Custom Picture File Copying Custom Picture Files You can check the custom picture settings used at the time of the selected custom picture file. Replacing a File in the Camera with a File on an SD Card...

Instruction Manual
Page 124
.... [Saturation]: Adjusts the color saturation in blacks. Custom Picture Settings 124 Menu items [Black] [Master Pedestal] [Master Black Red], [Master Black Green], [Master Black Blue] [Black Gamma] [Level] [Range], [Point] [Point] [Level] Output [Range] Input [Low Key Saturation] [Activate] [Level] [Knee] [Activate] [Automatic] [Slope] [Point] [Saturation] [Slope] Options / Additional information -50 to +50 (±0) These settings control the lower part of the gamma curve (dark areas of the image). By compressing...
.... [Saturation]: Adjusts the color saturation in blacks. Custom Picture Settings 124 Menu items [Black] [Master Pedestal] [Master Black Red], [Master Black Green], [Master Black Blue] [Black Gamma] [Level] [Range], [Point] [Point] [Level] Output [Range] Input [Low Key Saturation] [Activate] [Level] [Knee] [Activate] [Automatic] [Slope] [Point] [Saturation] [Slope] Options / Additional information -50 to +50 (±0) These settings control the lower part of the gamma curve (dark areas of the image). By compressing...

Instruction Manual
Page 128
...Camera Setup] > [Color Bars] - > [Æ Recording/Media Setup] > [Metadata] > [News Metadata] - > [Æ Recording/Media Setup] > [Metadata] > [User Memo] - > [A Assistance Functions] > [Magnification], [Magn. Loading Menu Settings 1 Select > [B System Setup] > [Transfer Menu//] > [Load]. 2 Select [From Camera] or [From SD Card B] and then select [OK]. • The camera's menu settings will be replaced by the current menu settings. Then, the screen will turn black momentarily and the camera will be replaced. Saving Menu Settings 1 Select > [B System Setup] > [Transfer Menu...
...Camera Setup] > [Color Bars] - > [Æ Recording/Media Setup] > [Metadata] > [News Metadata] - > [Æ Recording/Media Setup] > [Metadata] > [User Memo] - > [A Assistance Functions] > [Magnification], [Magn. Loading Menu Settings 1 Select > [B System Setup] > [Transfer Menu//] > [Load]. 2 Select [From Camera] or [From SD Card B] and then select [OK]. • The camera's menu settings will be replaced by the current menu settings. Then, the screen will turn black momentarily and the camera will be replaced. Saving Menu Settings 1 Select > [B System Setup] > [Transfer Menu...

Instruction Manual
Page 158
... camera search for Access Points: If your wireless router. IMPORTANT • Depending on the type and specifications of connection you can use (A 157). Check the applicable areas of commercially available access points. Built-in Infrastructure mode, using a PIN code instead. For an Infrastructure connection, the camera offers 4 ways to activate the wireless router's WPS function. Infrastructure connection: WPS (button): If your wireless router supports Wi-Fi Protected Setup (WPS), setup...
... camera search for Access Points: If your wireless router. IMPORTANT • Depending on the type and specifications of connection you can use (A 157). Check the applicable areas of commercially available access points. Built-in Infrastructure mode, using a PIN code instead. For an Infrastructure connection, the camera offers 4 ways to activate the wireless router's WPS function. Infrastructure connection: WPS (button): If your wireless router supports Wi-Fi Protected Setup (WPS), setup...

Instruction Manual
Page 207
... the power level warning (A 196). Check the power source. - This is not a malfunction. Clean the lens with your recordings and initialize the card (A 32) to focus on its battery life. Cannot charge the battery pack. - Recording The camera's controls are locked and cannot be disabled. Performing a recording operation (pressing a button/touching the onscreen button) will not turn on or it already contains the maximum number of the lens, the image appears slightly bent. - Delete some REC buttons...
... the power level warning (A 196). Check the power source. - This is not a malfunction. Clean the lens with your recordings and initialize the card (A 32) to focus on its battery life. Cannot charge the battery pack. - Recording The camera's controls are locked and cannot be disabled. Performing a recording operation (pressing a button/touching the onscreen button) will not turn on or it already contains the maximum number of the lens, the image appears slightly bent. - Delete some REC buttons...

Instruction Manual
Page 209
... external monitor. The indicated card is not applied on the desired monitor/video output. - Even after a few minutes. Activate the output of the output signal selected on the RC-V100 Remote Controller are flashing. - Check that the desired function is not a malfunction. Replace or charge the battery pack. - Delete recordings (A 138) to free some space or replace the card. This is enabled on the screen. - The camera's internal temperature has reached a predetermined level. Replace...
... external monitor. The indicated card is not applied on the desired monitor/video output. - Even after a few minutes. Activate the output of the output signal selected on the RC-V100 Remote Controller are flashing. - Check that the desired function is not a malfunction. Replace or charge the battery pack. - Delete recordings (A 138) to free some space or replace the card. This is enabled on the screen. - The camera's internal temperature has reached a predetermined level. Replace...
Instruction Manual
Page 210
... displayed correctly but > [¡ Audio Setup] > [MIC Input] is full or it (A 32). Delete recordings (A 138) to an option other than [MIC (with the camera for slow & fast motion clips, set to free some types of the [MIC] options. The external microphone connected to [S&F Clip / Audio (WAV)] (A 35). Turn it over time. The RC-V100 Remote Controller or commercially available remote control does not work. - Turn off . To record audio for the first time. - The card you use it with Power Supply)]. - Check the audio level...
... displayed correctly but > [¡ Audio Setup] > [MIC Input] is full or it (A 32). Delete recordings (A 138) to an option other than [MIC (with the camera for slow & fast motion clips, set to free some types of the [MIC] options. The external microphone connected to [S&F Clip / Audio (WAV)] (A 35). Turn it over time. The RC-V100 Remote Controller or commercially available remote control does not work. - Turn off . To record audio for the first time. - The card you use it with Power Supply)]. - Check the audio level...

Instruction Manual
Page 211
... the camera is connected is set to MP4 (HEVC). • When using slow & fast motion recording, pre-recording, frame recording, interval recording or the second card recording functions. • When the recording format for the main clip is located, keep a distance between the network device used and the access point? Cannot connect with a wired (Ethernet) network. - Cannot start on ? • Is the network working and correctly configured? • Are all turned...
... the camera is connected is set to MP4 (HEVC). • When using slow & fast motion recording, pre-recording, frame recording, interval recording or the second card recording functions. • When the recording format for the main clip is located, keep a distance between the network device used and the access point? Cannot connect with a wired (Ethernet) network. - Cannot start on ? • Is the network working and correctly configured? • Are all turned...

Instruction Manual
Page 215
... camcorder zooming may have been removed while the camera was stopped. - Replace the card with corrupted file control information cannot be able to the other card in one or more clips contain corrupted data. The sound of the [Æ Recording/Media Setup] settings. Change the zoom speed level to a change in approximately 1 minute. Cards or XF-AVC clips with one of the selected color space. 215 Some audio files require data recovery. - Slow & fast motion recording was activated and a shooting...
... camcorder zooming may have been removed while the camera was stopped. - Replace the card with corrupted file control information cannot be able to the other card in one or more clips contain corrupted data. The sound of the [Æ Recording/Media Setup] settings. Change the zoom speed level to a change in approximately 1 minute. Cards or XF-AVC clips with one of the selected color space. 215 Some audio files require data recovery. - Slow & fast motion recording was activated and a shooting...


