Instruction Manual
Page 5
Recording 41 Recording Video and Photos 41 Recording 41 Onscreen Displays 43 Reviewing a Recording 48 Adjusting Camera and Recording Settings 49 Performing Basic Settings with Direct Touch Control 49 Direct Setting Mode (FUNC Button) 50 Video Recording Configuration: ...
Recording 41 Recording Video and Photos 41 Recording 41 Onscreen Displays 43 Reviewing a Recording 48 Adjusting Camera and Recording Settings 49 Performing Basic Settings with Direct Touch Control 49 Direct Setting Mode (FUNC Button) 50 Video Recording Configuration: ...

Instruction Manual
Page 14
... 1 14 2 3 4 5 6 7 8 9 12 10 11 13 14 15 16 17 18 19 1 Accessory shoe 2 Grip zoom rocker (A 69) 3 MAGN. (magnification) button (A 75)/ Assignable button Camera 6 (A 115) 4 u (review recording) button (A 48)/ Assignable button Camera 5 (A 115) 5 Multi-function shoe (A 30) Using accessories with screws may damage the multi-function shoe. 6 Multi-function shoe cover...
... 1 14 2 3 4 5 6 7 8 9 12 10 11 13 14 15 16 17 18 19 1 Accessory shoe 2 Grip zoom rocker (A 69) 3 MAGN. (magnification) button (A 75)/ Assignable button Camera 6 (A 115) 4 u (review recording) button (A 48)/ Assignable button Camera 5 (A 115) 5 Multi-function shoe (A 30) Using accessories with screws may damage the multi-function shoe. 6 Multi-function shoe cover...
Instruction Manual
Page 42
..., those settings will be recorded with the camera will be seamless. • You can assign the [REC] function to assignable button Camera 4 and use the review function (A 48) to 6 hours. The focus mode, however, will not be set to autofocus. * The light metering mode (A 64) will be set to...clip, or when slow & fast motion recording is in the following cases - The camera will be liable for auto mode if it to [Gain]). Canon shall not be set to [Standard], AE shift (A 64) will continuously adjust the brightness and white balance automatically*. For more details, refer to Using...
..., those settings will be recorded with the camera will be seamless. • You can assign the [REC] function to assignable button Camera 4 and use the review function (A 48) to 6 hours. The focus mode, however, will not be set to autofocus. * The light metering mode (A 64) will be set to...clip, or when slow & fast motion recording is in the following cases - The camera will be liable for auto mode if it to [Gain]). Canon shall not be set to [Standard], AE shift (A 64) will continuously adjust the brightness and white balance automatically*. For more details, refer to Using...

Instruction Manual
Page 48
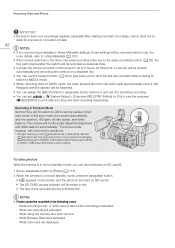
...to a different position in the video (A 133). • Press CANCEL or flick down on . • You cannot review clips when continuous recording is played back for the selected duration. [Ð REVIEW] appears on the screen. • There will be output from the built-in speaker but the audio will play...a recording, the camera will be no sound from the × (headphone) terminal and HDMI OUT terminal. • You can review all or part of the clip. Allows you to review just the last 4 seconds of the last clip recorded even with the camera set to CAMERA mode. 48 1 Select > [B System...
...to a different position in the video (A 133). • Press CANCEL or flick down on . • You cannot review clips when continuous recording is played back for the selected duration. [Ð REVIEW] appears on the screen. • There will be output from the built-in speaker but the audio will play...a recording, the camera will be no sound from the × (headphone) terminal and HDMI OUT terminal. • You can review all or part of the clip. Allows you to review just the last 4 seconds of the last clip recorded even with the camera set to CAMERA mode. 48 1 Select > [B System...
Instruction Manual
Page 118
... resumes the playback. - Ü 131 [INDEX/Cancel Resume]1 Returns to adjust it stopped. Ü 131 [ User Setting]1 Customizable slot. Records a photo. Ü - 175 Ü - 42 [Review Recording] Plays back the last clip recorded in order to the index screen. Adds a shot mark to the index screen.
... resumes the playback. - Ü 131 [INDEX/Cancel Resume]1 Returns to adjust it stopped. Ü 131 [ User Setting]1 Customizable slot. Records a photo. Ü - 175 Ü - 42 [Review Recording] Plays back the last clip recorded in order to the index screen. Adds a shot mark to the index screen.
Instruction Manual
Page 165
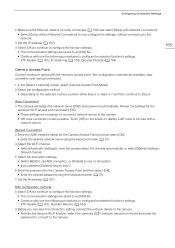
... method. • Depending on the screen to display a QR code to step 8. [Easy Connection] 3 The camera will assign the network name (SSID) and password automatically. Review the settings for the Camera Access Point and then select [OK]. • Enter the desired password using the keyboard screen (A 27). 4 Select the Wi-Fi...
... method. • Depending on the screen to display a QR code to step 8. [Easy Connection] 3 The camera will assign the network name (SSID) and password automatically. Review the settings for the Camera Access Point and then select [OK]. • Enter the desired password using the keyboard screen (A 27). 4 Select the Wi-Fi...
Instruction Manual
Page 168
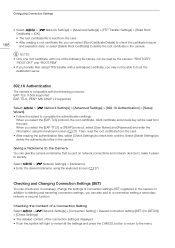
... Settings (SET) You can be able to trust the destination server. 802.1X Authentication The camera is displayed. • Push the joystick left/right to review all the settings and press the CANCEL button to return to [SET20]) > [Check Settings]. • The detailed content of the connection setting is compatible with...
... Settings (SET) You can be able to trust the destination server. 802.1X Authentication The camera is displayed. • Push the joystick left/right to review all the settings and press the CANCEL button to return to [SET20]) > [Check Settings]. • The detailed content of the connection setting is compatible with...

Instruction Manual
Page 170
... ([MODE] files) saved in the camera and change the various settings as necessary. When [Manual Setting] is displayed. • Push the joystick left/right to review all the settings and press the CANCEL button to return to [Enable] 5 Select [Manual Address] (manually entered IPv6 address), [Prefix Length] (bits available for the...
... ([MODE] files) saved in the camera and change the various settings as necessary. When [Manual Setting] is displayed. • Push the joystick left/right to review all the settings and press the CANCEL button to return to [Enable] 5 Select [Manual Address] (manually entered IPv6 address), [Prefix Length] (bits available for the...
Instruction Manual
Page 195
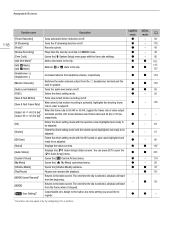
...[Standard + RC-V100], [RC-V100 (REMOTE B)], [RC-V100 (REMOTE A)], [Standard] (A 111) NU Protocol refers to a Canon proprietary communication protocol that can be assigned, refer to the detailed table (A 116). Menu item [Camera] [Browser Remote] [REMOTE A/B]... Setting options and additional information 1: [Powered IS], 2: [Peaking: All], 3: [Zebra: All], 4: [WFM: All], 5: [Review Recording], 6: [Magnification], 7: [Magnification] (MEDIA mode: [INDEX]), 8: [FUNC], 9: [Status], 10: [DISP], 11: [(NONE)] 1: [Magnification], 2: [Peaking: All], 3: ...
...[Standard + RC-V100], [RC-V100 (REMOTE B)], [RC-V100 (REMOTE A)], [Standard] (A 111) NU Protocol refers to a Canon proprietary communication protocol that can be assigned, refer to the detailed table (A 116). Menu item [Camera] [Browser Remote] [REMOTE A/B]... Setting options and additional information 1: [Powered IS], 2: [Peaking: All], 3: [Zebra: All], 4: [WFM: All], 5: [Review Recording], 6: [Magnification], 7: [Magnification] (MEDIA mode: [INDEX]), 8: [FUNC], 9: [Status], 10: [DISP], 11: [(NONE)] 1: [Magnification], 2: [Peaking: All], 3: ...
Instruction Manual
Page 196
...Off] (A 14) When this setting is set to [Off], the power indicator will not be updated while recording video. [Video Output (UVC)], [Canon App(s) for iPhone], [PTP Connection/GP-E2] (A 113) Select [PTP Connection/GP-E2] when connecting the GP-E2 GPS Receiver to the camera ...[Onscreen REC/STBY Button] [Touch Screen Response] [Power Supply LED] [Tally Lamp (Front)], [Tally Lamp (Rear)], [SD Card Access LED] [Fan Mode] [Review Recording] [GPS Auto Time]2 [USB (Type-C) Mode] [DC IN Warning (V)] [Reset Hour Meter] [Certification Information] [Firmware] [Camera] Setting options and additional ...
...Off] (A 14) When this setting is set to [Off], the power indicator will not be updated while recording video. [Video Output (UVC)], [Canon App(s) for iPhone], [PTP Connection/GP-E2] (A 113) Select [PTP Connection/GP-E2] when connecting the GP-E2 GPS Receiver to the camera ...[Onscreen REC/STBY Button] [Touch Screen Response] [Power Supply LED] [Tally Lamp (Front)], [Tally Lamp (Rear)], [SD Card Access LED] [Fan Mode] [Review Recording] [GPS Auto Time]2 [USB (Type-C) Mode] [DC IN Warning (V)] [Reset Hour Meter] [Certification Information] [Firmware] [Camera] Setting options and additional ...
Instruction Manual
Page 233
... PIN code connection mode (WPS 166 Playback 129 Plug-in power (microphone 94 Power indicator 14 Power supply 19 AC adapter (DC IN 22, 226 Canon battery packs 19 Checking power levels/remaining battery charge 21, 45, 202 Power level warnings 196 POWER switch 14 Powered IS 81 Pre-recording 107... signal input 89 Relay recording 35 Remote controller 111 Remote operation 111, 177 REMOTE terminal 111 Resetting all camera settings 195 Resolution (frame size 53 Reviewing a clip 48 Root certificate (FTPS 167
... PIN code connection mode (WPS 166 Playback 129 Plug-in power (microphone 94 Power indicator 14 Power supply 19 AC adapter (DC IN 22, 226 Canon battery packs 19 Checking power levels/remaining battery charge 21, 45, 202 Power level warnings 196 POWER switch 14 Powered IS 81 Pre-recording 107... signal input 89 Relay recording 35 Remote controller 111 Remote operation 111, 177 REMOTE terminal 111 Resetting all camera settings 195 Resolution (frame size 53 Reviewing a clip 48 Root certificate (FTPS 167


