XF100 / XF105 Instruction Manual
Page 6
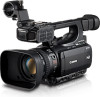
...more freedom to aid in the same way. Custom functions (0 107) and custom onscreen displays (0 108) give the camcorder the functionality of any multi-camera shooting setup. Added and improved functionality Other functions include improved image stabilization (0 53), the option to add metadata to use the built-in microphone, ...) when recording. You can assign often-used functions to assignable buttons (0 97) so that you can transfer your setting preferences to other XF105/XF100 camcorders in order to recordings (0 82), and the Intelligent System-compatible battery pack (0 173).
...more freedom to aid in the same way. Custom functions (0 107) and custom onscreen displays (0 108) give the camcorder the functionality of any multi-camera shooting setup. Added and improved functionality Other functions include improved image stabilization (0 53), the option to add metadata to use the built-in microphone, ...) when recording. You can assign often-used functions to assignable buttons (0 97) so that you can transfer your setting preferences to other XF105/XF100 camcorders in order to recordings (0 82), and the Intelligent System-compatible battery pack (0 173).
XF100 / XF105 Instruction Manual
Page 8
...in or External Microphone Connected to the MIC Terminal 77 Using Line Input or an External Microphone Connected to an SD Card 109 Loading Camera Settings from an SD Card 109 5. 8 Setting the Time Code 70 Selecting the Running Mode 70 Selecting Drop or Non-Drop ... 102 Available Custom Picture Settings 102 Customizing Functions and Onscreen Displays 107 Customizing Functions 107 Customizing Onscreen Displays 108 Saving and Loading Camera Settings 109 Saving Camera Settings to an XLR Terminal 78 Adjusting the Audio Level 80 Monitoring the Audio with Headphones 81 Using Metadata 82 Setting a ...
...in or External Microphone Connected to the MIC Terminal 77 Using Line Input or an External Microphone Connected to an SD Card 109 Loading Camera Settings from an SD Card 109 5. 8 Setting the Time Code 70 Selecting the Running Mode 70 Selecting Drop or Non-Drop ... 102 Available Custom Picture Settings 102 Customizing Functions and Onscreen Displays 107 Customizing Functions 107 Customizing Onscreen Displays 108 Saving and Loading Camera Settings 109 Saving Camera Settings to an XLR Terminal 78 Adjusting the Audio Level 80 Monitoring the Audio with Headphones 81 Using Metadata 82 Setting a ...
XF100 / XF105 Instruction Manual
Page 9
...Clip 122 Adding or Deleting Shot Marks from an Index Screen 122 Changing a Clip's Thumbnail 123 6. Photos 138 Taking Photos 138 Taking Photos in CAMERA Mode 138 Capturing Photos in a Clip 121 Displaying an Index Screen of Shot Marks 121 Displaying a Frame Index Screen of Messages 165 Handling Precautions 168... Channel 129 Selecting the Output Level of the AV Terminal 130 Saving Clips to a Computer 131 System Requirements 131 Installing and Uninstalling Canon XF Utility (Windows) 132 Installing and Uninstalling Canon XF Utility (Mac OS) 134 Viewing the Software Instruction Manuals 137 7.
...Clip 122 Adding or Deleting Shot Marks from an Index Screen 122 Changing a Clip's Thumbnail 123 6. Photos 138 Taking Photos 138 Taking Photos in CAMERA Mode 138 Capturing Photos in a Clip 121 Displaying an Index Screen of Shot Marks 121 Displaying a Frame Index Screen of Messages 165 Handling Precautions 168... Channel 129 Selecting the Output Level of the AV Terminal 130 Saving Clips to a Computer 131 System Requirements 131 Installing and Uninstalling Canon XF Utility (Windows) 132 Installing and Uninstalling Canon XF Utility (Mac OS) 134 Viewing the Software Instruction Manuals 137 7.
XF100 / XF105 Instruction Manual
Page 10
... before you for future reference. 1 Introduction 10 About this Manual Thank you use the camcorder and retain it for purchasing the Canon XF105/XF100. "Screen" refers to a CompactFlash (CF) card. "Recording media" refers to the model shown in the icon. •...; The following terms are simulated pictures taken with a still camera. Please read . • Illustrations in this manual. Conventions Used in this Manual • IMPORTANT: Precautions...
... before you for future reference. 1 Introduction 10 About this Manual Thank you use the camcorder and retain it for purchasing the Canon XF105/XF100. "Screen" refers to a CompactFlash (CF) card. "Recording media" refers to the model shown in the icon. •...; The following terms are simulated pictures taken with a still camera. Please read . • Illustrations in this manual. Conventions Used in this Manual • IMPORTANT: Precautions...

XF100 / XF105 Instruction Manual
Page 13
...) button (0 23) 8 RESET button (0 163) 9 INDEX button (0 112)/ U (review recording) button (0 87) 10 S (white balance adjustment) button (0 61) 11 WB (white balance) button (0 60) 12 CAMERA switch (0 42) 13 CF card slot cover switches for CF card slot A (CFj) and CF card slot B (CFl) 2 CF card slots A (CFj) and B (CFl) (0 35...
...) button (0 23) 8 RESET button (0 163) 9 INDEX button (0 112)/ U (review recording) button (0 87) 10 S (white balance adjustment) button (0 61) 11 WB (white balance) button (0 60) 12 CAMERA switch (0 42) 13 CF card slot cover switches for CF card slot A (CFj) and CF card slot B (CFl) 2 CF card slots A (CFj) and B (CFl) (0 35...

XF100 / XF105 Instruction Manual
Page 25
.... • Push the BATT. RELEASE key and pull out the DC coupler. Turning the Camcorder On and Off The camcorder has two operating modes: CAMERA ( ) mode for making recordings and MEDIA ( ) mode for mode. The ON/OFF indicator will turn off the camcorder Move the d switch to... OFF. The ON/OFF indicator will illuminate in green. CAMERA mode MEDIA mode To turn off the camcorder before connecting or disconnecting the compact power adapter. Preparing the Power Supply When Using the Optional CA...
.... • Push the BATT. RELEASE key and pull out the DC coupler. Turning the Camcorder On and Off The camcorder has two operating modes: CAMERA ( ) mode for making recordings and MEDIA ( ) mode for mode. The ON/OFF indicator will turn off the camcorder Move the d switch to... OFF. The ON/OFF indicator will illuminate in green. CAMERA mode MEDIA mode To turn off the camcorder before connecting or disconnecting the compact power adapter. Preparing the Power Supply When Using the Optional CA...
XF100 / XF105 Instruction Manual
Page 35
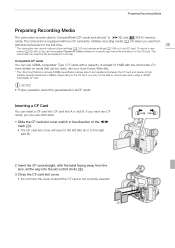
... not force the cover closed if the CF card is equipped with two CF card slots. Initialize recording media (0 37) when you use the supplied Canon XF Utility software to the right (slot B). 2 Insert the CF card straight, with the camcorder. For more details on cards that can use UDMA... operation cannot be guaranteed for the first time. 35 * The camcorder can record custom picture settings (0 101) and camera settings (0 109) on the CF card, you can be used, visit your local Canon Web site. * The Ultra Direct Memory Access (UDMA) specification allows data to be able to the SD card....
... not force the cover closed if the CF card is equipped with two CF card slots. Initialize recording media (0 37) when you use the supplied Canon XF Utility software to the right (slot B). 2 Insert the CF card straight, with the camcorder. For more details on cards that can use UDMA... operation cannot be guaranteed for the first time. 35 * The camcorder can record custom picture settings (0 101) and camera settings (0 109) on the CF card, you can be used, visit your local Canon Web site. * The Ultra Direct Memory Access (UDMA) specification allows data to be able to the SD card....
XF100 / XF105 Instruction Manual
Page 40
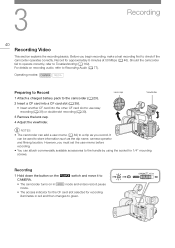
... check if the camcorder operates correctly. Recording 1 Hold down the button on the d switch and move it to CAMERA. • The camcorder turns on recording audio, refer to a clip as the clip name, camera operator and filming location. For details on in red and then changes to the handle by using the...
... check if the camcorder operates correctly. Recording 1 Hold down the button on the d switch and move it to CAMERA. • The camcorder turns on recording audio, refer to a clip as the clip name, camera operator and filming location. For details on in red and then changes to the handle by using the...
XF100 / XF105 Instruction Manual
Page 42
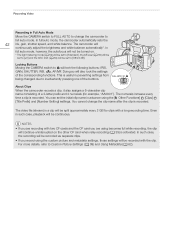
Recording Video Recording in Full Auto Mode Move the CAMERA switch to FULL AUTO to change the clip name after the clip is recorded. In full auto mode, however, the autofocus will not be set ... 42 iris, gain, shutter speed, and white balance. The camcorder will lock the following buttons: IRIS, GAIN, SHUTTER, WB, S, AF/MF. Locking Buttons Moving the CAMERA switch to [Standard], the AE level (0 59) will be set the initial clip name in such case, playback will also lock the settings of the...
Recording Video Recording in Full Auto Mode Move the CAMERA switch to FULL AUTO to change the clip name after the clip is recorded. In full auto mode, however, the autofocus will not be set ... 42 iris, gain, shutter speed, and white balance. The camcorder will lock the following buttons: IRIS, GAIN, SHUTTER, WB, S, AF/MF. Locking Buttons Moving the CAMERA switch to [Standard], the AE level (0 59) will be set the initial clip name in such case, playback will also lock the settings of the...
XF100 / XF105 Instruction Manual
Page 47
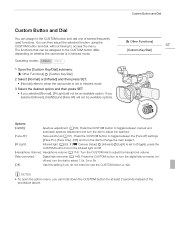
... 6x. [Off]: Use this setting if you selected [Normal], [IR Light] will not be available options. Turn the CUSTOM dial to access the menu. If [l Camera Setup] [Infrared] [Light] is set to [Toggle], press the CUSTOM button to turn the dial to adjust the aperture. [Face AF]: Face autofocus (0 51). Custom...
... 6x. [Off]: Use this setting if you selected [Normal], [IR Light] will not be available options. Turn the CUSTOM dial to access the menu. If [l Camera Setup] [Infrared] [Light] is set to [Toggle], press the CUSTOM button to turn the dial to adjust the aperture. [Face AF]: Face autofocus (0 51). Custom...
XF100 / XF105 Instruction Manual
Page 50
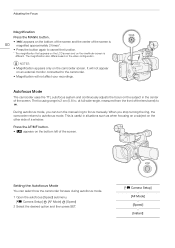
... of the screen. When you can select how the camcorder focuses during autofocus mode. 1 Open the autofocus [Speed] submenu. [l Camera Setup] [AF Mode] [Speed] 2 Select the desired option and then press SET. [l Camera Setup] [AF Mode] [Speed] [Instant] NOTES • Magnification appears only on the subject in the center of the lens...
... of the screen. When you can select how the camcorder focuses during autofocus mode. 1 Open the autofocus [Speed] submenu. [l Camera Setup] [AF Mode] [Speed] 2 Select the desired option and then press SET. [l Camera Setup] [AF Mode] [Speed] [Instant] NOTES • Magnification appears only on the subject in the center of the lens...
XF100 / XF105 Instruction Manual
Page 51
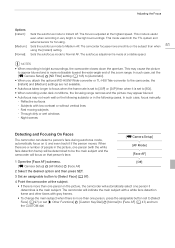
...Focusing On Faces The camcorder can detect a person's face during autofocus mode, automatically focus on that person's face. [l Camera Setup] [AF Mode] [Face AF] 1 Open the [Face AF] submenu. [Off] [l Camera Setup] [AF Mode] [Face AF] 2 Select the desired option and then press SET. 3 Set an assignable button... blurred. • Autofocus may cause the picture to [Face AF] (0 47) and turn the CUSTOM dial. The autofocus adjustment is set the [l Camera Setup] [ND Filter] setting (0 145) to [Automatic]. • When you attach the optional WD-H58W Wide-converter or TL-H58 Tele-converter to...
...Focusing On Faces The camcorder can detect a person's face during autofocus mode, automatically focus on that person's face. [l Camera Setup] [AF Mode] [Face AF] 1 Open the [Face AF] submenu. [Off] [l Camera Setup] [AF Mode] [Face AF] 2 Select the desired option and then press SET. 3 Set an assignable button... blurred. • Autofocus may cause the picture to [Face AF] (0 47) and turn the CUSTOM dial. The autofocus adjustment is set the [l Camera Setup] [ND Filter] setting (0 145) to [Automatic]. • When you attach the optional WD-H58W Wide-converter or TL-H58 Tele-converter to...
XF100 / XF105 Instruction Manual
Page 52
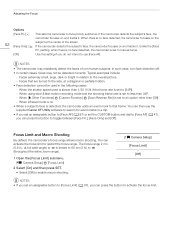
...to 60 cm (2 ft.) to f (throughout the entire zoom range). 1 Open the [Focus Limit] submenu. [l Camera Setup] [Focus Limit] 2 Select [On] and then press SET. • Select [Off] to enable macro shooting. [l Camera Setup] [Focus Limit] [Off] NOTES • If you set the CUSTOM button and dial to [Face AF...the subject's face, the camcorder focuses on and tracks it . Faces that frame. at full wide-angle) to f is set to use the supplied Canon XF Utility software to search for event marks in relation to toggle between [Face Pri.], [Face Only] and [Off]. When the shutter speed used ...
...to 60 cm (2 ft.) to f (throughout the entire zoom range). 1 Open the [Focus Limit] submenu. [l Camera Setup] [Focus Limit] 2 Select [On] and then press SET. • Select [Off] to enable macro shooting. [l Camera Setup] [Focus Limit] [Off] NOTES • If you set the CUSTOM button and dial to [Face AF...the subject's face, the camcorder focuses on and tracks it . Faces that frame. at full wide-angle) to f is set to use the supplied Canon XF Utility software to search for event marks in relation to toggle between [Face Pri.], [Face Only] and [Off]. When the shutter speed used ...
XF100 / XF105 Instruction Manual
Page 53
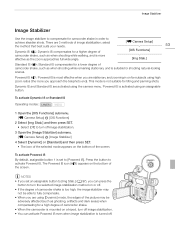
...walking, and is suitable for shooting natural-looking scenes. To activate Dynamic IS or Standard IS Operating modes: 1 Open the [OIS Functions] submenu. [l Camera Setup] [OIS Functions] 2 Select [Img Stab.] and then press SET. • Select [Off] to turn the selected image stabilization method on or ...off. • If the degree of camcorder shake is turned off image stabilization. 3 Open the [Image Stabilizer] submenu. [l Camera Setup] [Image Stabilizer] 4 Select [Dynamic] or [Standard] and then press SET. • The icon of the selected mode appears on the ...
...walking, and is suitable for shooting natural-looking scenes. To activate Dynamic IS or Standard IS Operating modes: 1 Open the [OIS Functions] submenu. [l Camera Setup] [OIS Functions] 2 Select [Img Stab.] and then press SET. • Select [Off] to turn the selected image stabilization method on or ...off. • If the degree of camcorder shake is turned off image stabilization. 3 Open the [Image Stabilizer] submenu. [l Camera Setup] [Image Stabilizer] 4 Select [Dynamic] or [Standard] and then press SET. • The icon of the selected mode appears on the ...
XF100 / XF105 Instruction Manual
Page 54
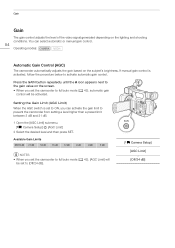
Setting the Gain Limit (AGC Limit) When the AGC switch is activated, follow the procedure below to [Off/24 dB]. [l Camera Setup] [AGC Limit] [Off/24 dB] Available Gain Limits Off/24 dB 21 dB 18 dB 15 dB 12 dB 9 dB 6 dB 3 dB NOTES • ... be set the camcorder to prevent the camcorder from setting a level higher than a preset limit between 3 dB and 21 dB. 1 Open the [AGC Limit] submenu. [l Camera Setup] [AGC Limit] 2 Select the desired level and then press SET. Gain Gain The gain control adjusts the level of the video signal generated depending...
Setting the Gain Limit (AGC Limit) When the AGC switch is activated, follow the procedure below to [Off/24 dB]. [l Camera Setup] [AGC Limit] [Off/24 dB] Available Gain Limits Off/24 dB 21 dB 18 dB 15 dB 12 dB 9 dB 6 dB 3 dB NOTES • ... be set the camcorder to prevent the camcorder from setting a level higher than a preset limit between 3 dB and 21 dB. 1 Open the [AGC Limit] submenu. [l Camera Setup] [AGC Limit] 2 Select the desired level and then press SET. Gain Gain The gain control adjusts the level of the video signal generated depending...
XF100 / XF105 Instruction Manual
Page 55
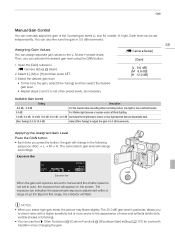
... fine-tune the gain in 0.5 dB increments. NOTES • When you can activate the desired gain level using the GAIN button. 55 [l Camera Setup] [Gain] 1 Open the [Gain] submenu. [l Camera Setup] [Gain] 2 Select [L], [M] or [H] and then press SET. 3 Select the desired gain level. • To fine-tune the gain, select [Fine Tuning...
... fine-tune the gain in 0.5 dB increments. NOTES • When you can activate the desired gain level using the GAIN button. 55 [l Camera Setup] [Gain] 1 Open the [Gain] submenu. [l Camera Setup] [Gain] 2 Select [L], [M] or [H] and then press SET. 3 Select the desired gain level. • To fine-tune the gain, select [Fine Tuning...
XF100 / XF105 Instruction Manual
Page 57
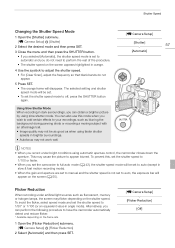
... detect and reduce flicker. * Available depending on the frame rate. 1 Open the [Flicker Reduction] submenu. [l Camera Setup] [Flicker Reduction] 2 Select [Automatic] and then press SET. [l Camera Setup] [Flicker Reduction] [Off] To avoid the flicker, select speed mode and set the shutter speed to off... when using automatic aperture control, the camcorder closes down the aperture. Shutter Speed Changing the Shutter Speed Mode 1 Open the [Shutter] submenu. [l Camera Setup] [Shutter] 2 Select the desired mode and then press SET. 3 Close the menu and then press the SHUTTER button. • If...
... detect and reduce flicker. * Available depending on the frame rate. 1 Open the [Flicker Reduction] submenu. [l Camera Setup] [Flicker Reduction] 2 Select [Automatic] and then press SET. [l Camera Setup] [Flicker Reduction] [Off] To avoid the flicker, select speed mode and set the shutter speed to off... when using automatic aperture control, the camcorder closes down the aperture. Shutter Speed Changing the Shutter Speed Mode 1 Open the [Shutter] submenu. [l Camera Setup] [Shutter] 2 Select the desired mode and then press SET. 3 Close the menu and then press the SHUTTER button. • If...

XF100 / XF105 Instruction Manual
Page 58
... or change the depth of field by adjusting the aperture. When it to manual and the shutter speed is [F8.0]. NOTES • If you set [l Camera Setup] [ND Filter] to [Automatic], the ND filter will activate automatically depending on the screen. • When you can use the CUSTOM dial to manually...
... or change the depth of field by adjusting the aperture. When it to manual and the shutter speed is [F8.0]. NOTES • If you set [l Camera Setup] [ND Filter] to [Automatic], the ND filter will activate automatically depending on the screen. • When you can use the CUSTOM dial to manually...

XF100 / XF105 Instruction Manual
Page 59
... you activate automatic aperture control (excluding full auto mode). Averages the light metered from 15 AE levels. 1 Open the [AE Shift] submenu. [l Camera Setup] [AE Shift] 2 Select an AE level and then press SET. Adjusting the Aperture • When you set a high aperture value. Available... AE Levels +2.0 +1.5 +1.25 +1.0 +0.75 +0.5 +0.25 ±0 -0.25 -0.5 -0.75 -1.0 -1.25 -1.5 -2.0 [l Camera Setup] [AE Shift] [±0] NOTES • You cannot adjust the AE level if the camcorder is lit. In such case, set the ND filter to...
... you activate automatic aperture control (excluding full auto mode). Averages the light metered from 15 AE levels. 1 Open the [AE Shift] submenu. [l Camera Setup] [AE Shift] 2 Select an AE level and then press SET. Adjusting the Aperture • When you set a high aperture value. Available... AE Levels +2.0 +1.5 +1.25 +1.0 +0.75 +0.5 +0.25 ±0 -0.25 -0.5 -0.75 -1.0 -1.25 -1.5 -2.0 [l Camera Setup] [AE Shift] [±0] NOTES • You cannot adjust the AE level if the camcorder is lit. In such case, set the ND filter to...
XF100 / XF105 Instruction Manual
Page 60
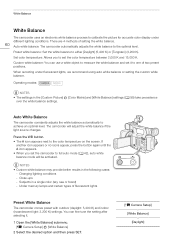
...-ups - You can use a white object to measure the white balance and set it . 1 Open the [White Balance] submenu. [l Camera Setup] [White Balance] 2 Select the desired option and then press SET. [l Camera Setup] [White Balance] [Daylight] White Balance White Balance The camcorder uses an electronic white balance process to calibrate the picture...
...-ups - You can use a white object to measure the white balance and set it . 1 Open the [White Balance] submenu. [l Camera Setup] [White Balance] 2 Select the desired option and then press SET. [l Camera Setup] [White Balance] [Daylight] White Balance White Balance The camcorder uses an electronic white balance process to calibrate the picture...


