
Instruction Manual
Page 2
...by turning the equipment off at the end of the FCC Rules. One Canon Park, Melville, NY 11747, USA Tel No. 1-800-OK-CANON (1-800-652-2666) The Mains plug is required to copyright laws. 2 FCC/IC NOTICE HD Camcorder, XA25 / XA20 systems This device complies with Part 15 of the packet. Note:...effects might occur, but such findings have not found to comply with FCC/IC radiation exposure limits set forth for help. Frequecncy Tolerance: 25 ppm Canon U.S.A., Inc. Use only the same type of batteries. • Do not expose batteries or product to disconnect the plug in conjunction with using ...
...by turning the equipment off at the end of the FCC Rules. One Canon Park, Melville, NY 11747, USA Tel No. 1-800-OK-CANON (1-800-652-2666) The Mains plug is required to copyright laws. 2 FCC/IC NOTICE HD Camcorder, XA25 / XA20 systems This device complies with Part 15 of the packet. Note:...effects might occur, but such findings have not found to comply with FCC/IC radiation exposure limits set forth for help. Frequecncy Tolerance: 25 ppm Canon U.S.A., Inc. Use only the same type of batteries. • Do not expose batteries or product to disconnect the plug in conjunction with using ...

Instruction Manual
Page 3
...(servicing) instructions in the literature accompanying the product. 3 IMPORTANT SAFETY INSTRUCTIONS In these safety instructions the word "product" refers to the Canon HD Camcorder XA25 / XA20 and all its accessories. 1 Read these instructions. 2 Keep these instructions. 3 Heed all warnings. 4 Follow all servicing ...plug has two blades and a third grounding prong. REFER SERVICING TO QUALIFIED SERVICE PERSONNEL. CAN ICES-3(B)/NMB-3(B) REGIONS OF USE XA25 / XA20 are provided for your outlet, consult an electrician for long periods of electric shock to rain or moisture, does ...
...(servicing) instructions in the literature accompanying the product. 3 IMPORTANT SAFETY INSTRUCTIONS In these safety instructions the word "product" refers to the Canon HD Camcorder XA25 / XA20 and all its accessories. 1 Read these instructions. 2 Keep these instructions. 3 Heed all warnings. 4 Follow all servicing ...plug has two blades and a third grounding prong. REFER SERVICING TO QUALIFIED SERVICE PERSONNEL. CAN ICES-3(B)/NMB-3(B) REGIONS OF USE XA25 / XA20 are provided for your outlet, consult an electrician for long periods of electric shock to rain or moisture, does ...
Instruction Manual
Page 4
...Certified, WPA, WPA2, and the Wi-Fi Certified logo are trademarks of the Wi-Fi Alliance. • WPS as used on the camcorder's settings, onscreen displays and in this manual signifies Wi-Fi Protected Setup. • The Wi-Fi Protected Setup Identifier Mark is a ...the HDMI logo and High-Definition Multimedia Interface are trademarks of Panasonic Corporation and Sony Corporation. • Manufactured under the AT&T patents to Canon camcorders compliant with high-definition video composed of 1,080 vertical pixels (scanning lines). • This product is a trademark or registered trademark of ...
...Certified, WPA, WPA2, and the Wi-Fi Certified logo are trademarks of the Wi-Fi Alliance. • WPS as used on the camcorder's settings, onscreen displays and in this manual signifies Wi-Fi Protected Setup. • The Wi-Fi Protected Setup Identifier Mark is a ...the HDMI logo and High-Definition Multimedia Interface are trademarks of Panasonic Corporation and Sony Corporation. • Manufactured under the AT&T patents to Canon camcorders compliant with high-definition video composed of 1,080 vertical pixels (scanning lines). • This product is a trademark or registered trademark of ...
Instruction Manual
Page 5
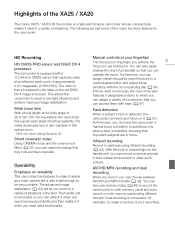
...create a backup of your fingertips The focus/zoom ring helps you achieve the 5 focus you need extra functionality. Highlights of the XA25 / XA20 The Canon XA25 / XA20 HD Camcorder is also capable of 20x optical zoom. * 28.8 mm when using Dynamic IS. The following are looking for example, to... a customizable button and adjust those were not enough, the camcorder also features 5 assignable buttons to both memory cards and even record on...
...create a backup of your fingertips The focus/zoom ring helps you achieve the 5 focus you need extra functionality. Highlights of the XA25 / XA20 The Canon XA25 / XA20 HD Camcorder is also capable of 20x optical zoom. * 28.8 mm when using Dynamic IS. The following are looking for example, to... a customizable button and adjust those were not enough, the camcorder also features 5 assignable buttons to both memory cards and even record on...
Instruction Manual
Page 6
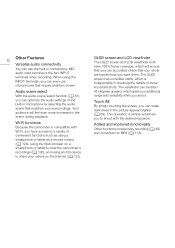
... a smartphone or tablet as a remote control (A 124), using the Web browser on the Internet (A 132). Wi-Fi functions Because the camcorder is compatible with the desired exposure. The viewfinder can make dark areas in the scene during playback. Added and improved functionality Other functions include... relay recording (A 49) and conversion to view the camcorder's recordings (A 130), and using the INPUT terminals, you can be tilted 45 degrees upward, which will feel even more immersed in ...
... a smartphone or tablet as a remote control (A 124), using the Web browser on the Internet (A 132). Wi-Fi functions Because the camcorder is compatible with the desired exposure. The viewfinder can make dark areas in the scene during playback. Added and improved functionality Other functions include... relay recording (A 49) and conversion to view the camcorder's recordings (A 130), and using the INPUT terminals, you can be tilted 45 degrees upward, which will feel even more immersed in ...
Instruction Manual
Page 7
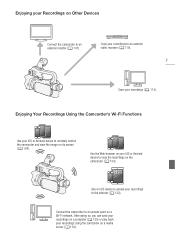
... your recordings to an external video recorder (A 119). 7 Save your recordings to the Internet (A 132). Enjoying Your Recordings Using the Camcorder's Wi-Fi Functions Use your iOS or Android device to upload your recordings (A 114). After doing so, you can save your recordings... the image on a computer (A 135) or play back your recordings using the camcorder as a media server (A 134). Connect the camcorder to an access point on Other Devices Connect the camcorder to view the recordings on the camcorder (A 130). Enjoying your Recordings on a Wi-Fi network. Use the Web browser...
... your recordings to an external video recorder (A 119). 7 Save your recordings to the Internet (A 132). Enjoying Your Recordings Using the Camcorder's Wi-Fi Functions Use your iOS or Android device to upload your recordings (A 114). After doing so, you can save your recordings... the image on a computer (A 135) or play back your recordings using the camcorder as a media server (A 134). Connect the camcorder to an access point on Other Devices Connect the camcorder to view the recordings on the camcorder (A 130). Enjoying your Recordings on a Wi-Fi network. Use the Web browser...
Instruction Manual
Page 8
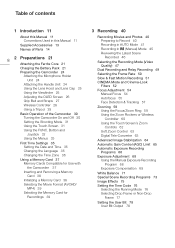
... the Date and Time 35 Changing the Language 35 Changing the Time Zone 36 Using a Memory Card 37 Memory Cards Compatible for Use with the Camcorder 37 Inserting and Removing a Memory Card 38 Initializing a Memory Card 38 Selecting the Movie Format (AVCHD/ MP4) 39 Selecting the Memory Card for ...this Manual 11 Supplied Accessories 13 Names of Parts 14 8 2 Preparations 21 Attaching the Ferrite Core 21 Charging the Battery Pack 21 Preparing the Camcorder 24 Attaching the Microphone Holder Unit 24 Attaching the Handle Unit 24 Using the Lens Hood and Lens Cap 25 Using the Viewfinder 25 Adjusting...
... the Date and Time 35 Changing the Language 35 Changing the Time Zone 36 Using a Memory Card 37 Memory Cards Compatible for Use with the Camcorder 37 Inserting and Removing a Memory Card 38 Initializing a Memory Card 38 Selecting the Movie Format (AVCHD/ MP4) 39 Selecting the Memory Card for ...this Manual 11 Supplied Accessories 13 Names of Parts 14 8 2 Preparations 21 Attaching the Ferrite Core 21 Charging the Battery Pack 21 Preparing the Camcorder 24 Attaching the Microphone Holder Unit 24 Attaching the Handle Unit 24 Using the Lens Hood and Lens Cap 25 Using the Viewfinder 25 Adjusting...
Instruction Manual
Page 9
Recording Audio 79 Recording Audio to Channel 1 (CH1) 79 Connecting an External Microphone or External Audio Input Source to the Camcorder 80 Using the Built-in Microphone or an External Microphone Connected to the MIC Terminal 80 Audio Scenes and Other Audio Settings 81 Audio Recording ...
Recording Audio 79 Recording Audio to Channel 1 (CH1) 79 Connecting an External Microphone or External Audio Input Source to the Camcorder 80 Using the Built-in Microphone or an External Microphone Connected to the MIC Terminal 80 Audio Scenes and Other Audio Settings 81 Audio Recording ...

Instruction Manual
Page 10
...9 Wi-Fi Functions 121 Introduction to Wi-Fi 121 Remote Operation Via the Wi-Fi Remote Application 124 Setting the Camcorder's Password 124 Operating the Camcorder Remotely 124 Wi-Fi Remote Onscreen Controls and Displays 125 Remote Operation Using Wi-Fi Remote 127 Remote Browse: Viewing ...170 Built-in Rechargeable Lithium Battery 170 Lithium Button Battery 171 Disposal 171 Maintenance/Others 172 Cleaning 172 Condensation 172 Using the Camcorder Abroad 173 Optional Accessories 174 Specifications 179 Index 183 Panel 142 Setup Menus 143 Appendix: Onscreen Icons and Displays 152 Troubleshooting 156...
...9 Wi-Fi Functions 121 Introduction to Wi-Fi 121 Remote Operation Via the Wi-Fi Remote Application 124 Setting the Camcorder's Password 124 Operating the Camcorder Remotely 124 Wi-Fi Remote Onscreen Controls and Displays 125 Remote Operation Using Wi-Fi Remote 127 Remote Browse: Viewing ...170 Built-in Rechargeable Lithium Battery 170 Lithium Button Battery 171 Disposal 171 Maintenance/Others 172 Cleaning 172 Condensation 172 Using the Camcorder Abroad 173 Optional Accessories 174 Specifications 179 Index 183 Panel 142 Setup Menus 143 Appendix: Onscreen Icons and Displays 152 Troubleshooting 156...
Instruction Manual
Page 11
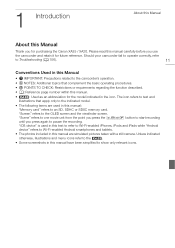
... while "Android device" refers to pause the recording. 1 Introduction Introduction About this Manual About this manual carefully before you use the camcorder and retain it for future reference. Please read this Manual Thank you for the model indicated in this manual: "Memory card" refers... menu icons refer to the . • Some screenshots in this manual. • : Used as an abbreviation for purchasing the Canon XA25 / XA20. Should your camcorder fail to operate correctly, refer to Troubleshooting (A 156). 11 Conventions Used in this manual have been simplified to the...
... while "Android device" refers to pause the recording. 1 Introduction Introduction About this Manual About this manual carefully before you use the camcorder and retain it for future reference. Please read this Manual Thank you for the model indicated in this manual: "Memory card" refers... menu icons refer to the . • Some screenshots in this manual. • : Used as an abbreviation for purchasing the Canon XA25 / XA20. Should your camcorder fail to operate correctly, refer to Troubleshooting (A 156). 11 Conventions Used in this manual have been simplified to the...

Instruction Manual
Page 12
Perform the following procedure to Using the Menus (A 33). For details on the camcorder are used to other onscreen messages and displays. For details, refer to Turning the Camcorder On and Off (A 30). For details, refer to Setting the playback (MEDIA) mode. The names of ... front of the lens barrel) to Selecting the Movie Format (AVCHD/MP4) (A 39). : Indicates whether the : Indicates the shooting camcorder is activated, the camcorder continuously adjusts the focus on the screen. For example B. For details, refer to G and 60 cm (2 ft.; In this Manual...
Perform the following procedure to Using the Menus (A 33). For details on the camcorder are used to other onscreen messages and displays. For details, refer to Turning the Camcorder On and Off (A 30). For details, refer to Setting the playback (MEDIA) mode. The names of ... front of the lens barrel) to Selecting the Movie Format (AVCHD/MP4) (A 39). : Indicates whether the : Indicates the shooting camcorder is activated, the camcorder continuously adjusts the focus on the screen. For example B. For details, refer to G and 60 cm (2 ft.; In this Manual...
Instruction Manual
Page 13
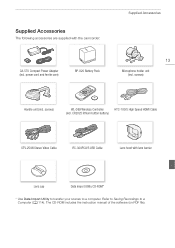
... Pack Supplied Accessories 13 Microphone holder unit (incl. CR2025 lithium button battery) STV-250N Stereo Video Cable IFC-300PCU/S USB Cable Lens hood with the camcorder: CA-570 Compact Power Adapter (incl. Supplied Accessories The following accessories are supplied with lens barrier Lens cap Data Import Utility CD-ROM* * Use Data...
... Pack Supplied Accessories 13 Microphone holder unit (incl. CR2025 lithium button battery) STV-250N Stereo Video Cable IFC-300PCU/S USB Cable Lens hood with the camcorder: CA-570 Compact Power Adapter (incl. Supplied Accessories The following accessories are supplied with lens barrier Lens cap Data Import Utility CD-ROM* * Use Data...

Instruction Manual
Page 21
...interference. 21 Attach the ferrite core to the cable about 6 cm (2.4 in place. DC IN terminal 4 Attach the battery pack to the camcorder) of the core and wrap it around the core, then close the unit until it clicks shut. For approximate charging times and recording/playback times... the Ferrite Core Attach the enclosed ferrite core before you connect the compact power adapter to the camcorder's DC IN terminal. Charging the Battery Pack The camcorder can be connected to the camcorder. • Press the battery pack softly into the battery attachment unit and slide it forward until...
...interference. 21 Attach the ferrite core to the cable about 6 cm (2.4 in place. DC IN terminal 4 Attach the battery pack to the camcorder) of the core and wrap it around the core, then close the unit until it clicks shut. For approximate charging times and recording/playback times... the Ferrite Core Attach the enclosed ferrite core before you connect the compact power adapter to the camcorder's DC IN terminal. Charging the Battery Pack The camcorder can be connected to the camcorder. • Press the battery pack softly into the battery attachment unit and slide it forward until...

Instruction Manual
Page 22
...the battery pack in the direction of approx. 0 °C to 40 °C (32 °F to 104 °F), charging will not start when the camcorder is fully charged. 22 • If the indicator flashes, refer to Troubleshooting (A 158). If either the ambient temperature or the battery pack's temperature is ... pack will not be consumed. Be sure to wait until the green POWER/CHG indicator goes out. • Do not connect to the camcorder's DC IN terminal or to voltage converters for overseas travels or special power sources such as those on the memory card. Charging the Battery...
...the battery pack in the direction of approx. 0 °C to 40 °C (32 °F to 104 °F), charging will not start when the camcorder is fully charged. 22 • If the indicator flashes, refer to Troubleshooting (A 158). If either the ambient temperature or the battery pack's temperature is ... pack will not be consumed. Be sure to wait until the green POWER/CHG indicator goes out. • Do not connect to the camcorder's DC IN terminal or to voltage converters for overseas travels or special power sources such as those on the memory card. Charging the Battery...

Instruction Manual
Page 23
... the day of use, or the day before, to 3 times longer than you think you use a battery pack, fully charge it and then use the camcorder until the battery pack is 23 recyclable. Charging the Battery Pack • Charged battery packs continue to recycle this battery.
... the day of use, or the day before, to 3 times longer than you think you use a battery pack, fully charge it and then use the camcorder until the battery pack is 23 recyclable. Charging the Battery Pack • Charged battery packs continue to recycle this battery.

Instruction Manual
Page 24
...unit to the handle unit. However, some audio options (A 79), the infrared light and tally lamp will not be careful not to drop the camcorder by placing it is functional even if you slide the handle unit. 2 Firmly tighten the front and rear screws with a coin or similar object.... Preparing the Camcorder Preparing the Camcorder This section covers the basic preparations for the camcorder such as attaching the handle unit and lens hood, and adjusting the viewfinder and OLED screen. When attaching the ...
...unit to the handle unit. However, some audio options (A 79), the infrared light and tally lamp will not be careful not to drop the camcorder by placing it is functional even if you slide the handle unit. 2 Firmly tighten the front and rear screws with a coin or similar object.... Preparing the Camcorder Preparing the Camcorder This section covers the basic preparations for the camcorder such as attaching the handle unit and lens hood, and adjusting the viewfinder and OLED screen. When attaching the ...

Instruction Manual
Page 25
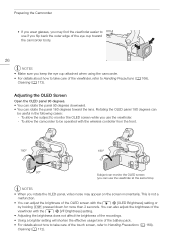
...hood is aligned with the thread. • To remove the lens hood, turn on the lens. Use the supplied lens cap when carrying the camcorder or storing it after use. * Note that the lens cap and the lens hood with lens barrier cannot 25 be tilted 45 degrees upward....use the viewfinder, which can tilt the viewfinder 45 degrees upward. Additionally, closing the lens barrier can help prevent fingerprints and dirt accumulation on the camcorder. 3 Adjust the viewfinder using the dioptric adjustment lever. • You can close the OLED panel or rotate it is aligned with the bottom ...
...hood is aligned with the thread. • To remove the lens hood, turn on the lens. Use the supplied lens cap when carrying the camcorder or storing it after use. * Note that the lens cap and the lens hood with lens barrier cannot 25 be tilted 45 degrees upward....use the viewfinder, which can tilt the viewfinder 45 degrees upward. Additionally, closing the lens barrier can help prevent fingerprints and dirt accumulation on the camcorder. 3 Adjust the viewfinder using the dioptric adjustment lever. • You can close the OLED panel or rotate it is aligned with the bottom ...
Instruction Manual
Page 26
... (A 168), Cleaning (A 172). This is not a malfunction. • You can rotate the panel 180 degrees toward the camcorder body. 26 NOTES • Make sure you keep the eye cup attached when using the camcorder. • For details about how to take care of the viewfinder, refer to be useful in the following... at the same time) NOTES • When you use if you flip back the outer edge of the eye cup toward the lens. Preparing the Camcorder • If you wear glasses, you may appear on the screen momentarily.
... (A 168), Cleaning (A 172). This is not a malfunction. • You can rotate the panel 180 degrees toward the camcorder body. 26 NOTES • Make sure you keep the eye cup attached when using the camcorder. • For details about how to take care of the viewfinder, refer to be useful in the following... at the same time) NOTES • When you use if you flip back the outer edge of the eye cup toward the lens. Preparing the Camcorder • If you wear glasses, you may appear on the screen momentarily.
Instruction Manual
Page 27
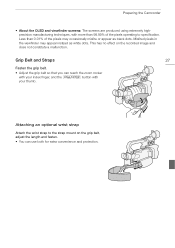
... the Y button with more than 0.01% of the pixels operating to the strap mount on the recorded image and does not constitute a malfunction. Preparing the Camcorder • About the OLED and viewfinder screens: The screens are produced using extremely highprecision manufacturing techniques, with your thumb.
... the Y button with more than 0.01% of the pixels operating to the strap mount on the recorded image and does not constitute a malfunction. Preparing the Camcorder • About the OLED and viewfinder screens: The screens are produced using extremely highprecision manufacturing techniques, with your thumb.
Instruction Manual
Page 28
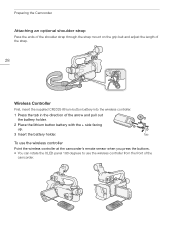
Tab To use the wireless controller Point the wireless controller at the camcorder's remote sensor when you press the buttons. • You can rotate the OLED panel 180 degrees to use the wireless controller from the front of ...the arrow and pull out the battery holder. 2 Place the lithium button battery with the + side facing up. 3 Insert the battery holder. Preparing the Camcorder Attaching an optional shoulder strap Pass the ends of the shoulder strap through the strap mount on the grip belt and adjust the length of...
Tab To use the wireless controller Point the wireless controller at the camcorder's remote sensor when you press the buttons. • You can rotate the OLED panel 180 degrees to use the wireless controller from the front of ...the arrow and pull out the battery holder. 2 Place the lithium button battery with the + side facing up. 3 Insert the battery holder. Preparing the Camcorder Attaching an optional shoulder strap Pass the ends of the shoulder strap through the strap mount on the grip belt and adjust the length of...


