Instruction Manual
Page 5
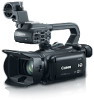
... also features 5 assignable buttons to be very portable. You can make it ideal in infrared light on both memory cards and even record on the handle unit, you shoot in a variety of situations in focus. Wide zoom lens With a focal length at an effective pixel count of approximately 2.91 ...to create a backup of your fingertips The focus/zoom ring helps you achieve the 5 focus you can operate the zoom. Highlights of the XA25 / XA20 The Canon XA25 / XA20 HD Camcorder is then processed by the state-of-the-art DIGIC DV 4 image processor. Manual controls at your recording.
... also features 5 assignable buttons to be very portable. You can make it ideal in infrared light on both memory cards and even record on the handle unit, you shoot in a variety of situations in focus. Wide zoom lens With a focal length at an effective pixel count of approximately 2.91 ...to create a backup of your fingertips The focus/zoom ring helps you achieve the 5 focus you can operate the zoom. Highlights of the XA25 / XA20 The Canon XA25 / XA20 HD Camcorder is then processed by the state-of-the-art DIGIC DV 4 image processor. Manual controls at your recording.
Instruction Manual
Page 8
... 14 8 2 Preparations 21 Attaching the Ferrite Core 21 Charging the Battery Pack 21 Preparing the Camcorder 24 Attaching the Microphone Holder Unit 24 Attaching the Handle Unit 24 Using the Lens Hood and Lens Cap 25 Using the Viewfinder 25 Adjusting the OLED Screen 26 Grip Belt and Straps 27 Wireless...
... 14 8 2 Preparations 21 Attaching the Ferrite Core 21 Charging the Battery Pack 21 Preparing the Camcorder 24 Attaching the Microphone Holder Unit 24 Attaching the Handle Unit 24 Using the Lens Hood and Lens Cap 25 Using the Viewfinder 25 Adjusting the OLED Screen 26 Grip Belt and Straps 27 Wireless...

Instruction Manual
Page 10
... a Computer or FTP Server 135 Wi-Fi Connection Using an Access Point 137 Wi-Fi Protected Setup (WPS) 137 Searching for Wi-Fi Functions 165 Handling Precautions 168 Camcorder 168 Battery Pack 169 Memory Card 170 Built-in Rechargeable Lithium Battery 170 Lithium Button Battery 171 Disposal 171 Maintenance/Others 172...
... a Computer or FTP Server 135 Wi-Fi Connection Using an Access Point 137 Wi-Fi Protected Setup (WPS) 137 Searching for Wi-Fi Functions 165 Handling Precautions 168 Camcorder 168 Battery Pack 169 Memory Card 170 Built-in Rechargeable Lithium Battery 170 Lithium Button Battery 171 Disposal 171 Maintenance/Others 172...
Instruction Manual
Page 13
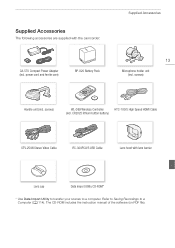
... Cable Lens hood with the camcorder: CA-570 Compact Power Adapter (incl. screws) WL-D89 Wireless Controller HTC-100/S High Speed HDMI Cable (incl. screws) Handle unit (incl. The CD-ROM includes the instruction manual of the software (on PDF file). Refer to Saving Recordings to a computer. Supplied Accessories The following...
... Cable Lens hood with the camcorder: CA-570 Compact Power Adapter (incl. screws) WL-D89 Wireless Controller HTC-100/S High Speed HDMI Cable (incl. screws) Handle unit (incl. The CD-ROM includes the instruction manual of the software (on PDF file). Refer to Saving Recordings to a computer. Supplied Accessories The following...

Instruction Manual
Page 17
Top view Names of Parts 1 23 45 17 2 67 1 Built-in stereo microphone (A 79) 2 Handle attachment unit (A 24) 3 Mode switch (A 31) 4 Zoom rocker (A 59) 5 ACCESS indicator (A 40) 6 Power switch (A 30) 7 POWER / CHG (battery charging) indicator (A 21)
Top view Names of Parts 1 23 45 17 2 67 1 Built-in stereo microphone (A 79) 2 Handle attachment unit (A 24) 3 Mode switch (A 31) 4 Zoom rocker (A 59) 5 ACCESS indicator (A 40) 6 Power switch (A 30) 7 POWER / CHG (battery charging) indicator (A 21)

Instruction Manual
Page 19
... 4 5 67 89 10 19 11 12 13 14 15 16 1 Microphone holder unit (A 79) 2 Microphone lock screw (A 79) 3 Accessory shoe Cold shoe for attaching accessories. 4 Handle zoom rocker (A 60) 5 START/STOP lock (C) lever (A 45) 6 START/STOP button (A 40) 7 Sensitivity switches for INPUT 1 (CH1) and INPUT 2 (CH2) (A 86) 8 INPUT terminal ON/OFF... clamp (A 79) 12 INPUT 1 (CH1) and INPUT 2 (CH2) terminals (collectively referred to as "INPUT terminals") (A 86) 13 Infrared light (A 94) 14 Tally lamp (A 41) 15 Handle unit front screw (A 24) 16 Handle unit rear screws (A 24)
... 4 5 67 89 10 19 11 12 13 14 15 16 1 Microphone holder unit (A 79) 2 Microphone lock screw (A 79) 3 Accessory shoe Cold shoe for attaching accessories. 4 Handle zoom rocker (A 60) 5 START/STOP lock (C) lever (A 45) 6 START/STOP button (A 40) 7 Sensitivity switches for INPUT 1 (CH1) and INPUT 2 (CH2) (A 86) 8 INPUT terminal ON/OFF... clamp (A 79) 12 INPUT 1 (CH1) and INPUT 2 (CH2) terminals (collectively referred to as "INPUT terminals") (A 86) 13 Infrared light (A 94) 14 Tally lamp (A 41) 15 Handle unit front screw (A 24) 16 Handle unit rear screws (A 24)

Instruction Manual
Page 24
...in place. • Make sure the front and rear screws are raised when you remove the handle unit. When attaching the lens hood, grip belt and straps, be available. Attaching the Handle Unit 1 Align the handle unit with a coin or similar object. However, some audio options (A 79), the infrared light...careful not to drop the camcorder by placing it is functional even if you slide the handle unit. 2 Firmly tighten the front and rear screws with the handle attachment unit and then slide the handle unit forward until it on a table or other stable surface. 24 Attaching the Microphone Holder...
...in place. • Make sure the front and rear screws are raised when you remove the handle unit. When attaching the lens hood, grip belt and straps, be available. Attaching the Handle Unit 1 Align the handle unit with a coin or similar object. However, some audio options (A 79), the infrared light...careful not to drop the camcorder by placing it is functional even if you slide the handle unit. 2 Firmly tighten the front and rear screws with the handle attachment unit and then slide the handle unit forward until it on a table or other stable surface. 24 Attaching the Microphone Holder...
Instruction Manual
Page 26
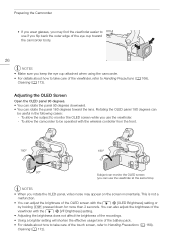
...sure you keep the eye cup attached when using the camcorder. • For details about how to take care of the touch screen, refer to Handling Precautions (A 168), Cleaning (A 172). Adjusting the OLED Screen Open the OLED panel 90 degrees. • You can rotate the panel 90 degrees ... setting will shorten the effective usage time of the battery pack. • For details about how to take care of the viewfinder, refer to Handling Precautions (A 168), Cleaning (A 172). Rotating the OLED panel 180 degrees can be operated with the wireless controller from the front. 180° 180...
...sure you keep the eye cup attached when using the camcorder. • For details about how to take care of the touch screen, refer to Handling Precautions (A 168), Cleaning (A 172). Adjusting the OLED Screen Open the OLED panel 90 degrees. • You can rotate the panel 90 degrees ... setting will shorten the effective usage time of the battery pack. • For details about how to take care of the viewfinder, refer to Handling Precautions (A 168), Cleaning (A 172). Rotating the OLED panel 180 degrees can be operated with the wireless controller from the front. 180° 180...
Instruction Manual
Page 41
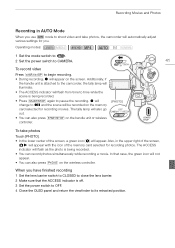
...screen, a green icon (g) will appear. When you . The tally lamp will also go out. • You can also press Z on the handle unit or wireless controller. [PHOTO] To take photos, the camcorder will automatically adjust various settings for you have finished recording 1 Set the lens barrier switch... appear. • You can also press Y on the wireless controller. The ACCESS indicator will be recorded on the screen. Additionally, if the handle unit is attached to the camcorder, the tally lamp will illuminate. • The ACCESS indicator will flash from time to time while the scene ...
...screen, a green icon (g) will appear. When you . The tally lamp will also go out. • You can also press Z on the handle unit or wireless controller. [PHOTO] To take photos, the camcorder will automatically adjust various settings for you have finished recording 1 Set the lens barrier switch... appear. • You can also press Y on the wireless controller. The ACCESS indicator will be recorded on the screen. Additionally, if the handle unit is attached to the camcorder, the tally lamp will illuminate. • The ACCESS indicator will flash from time to time while the scene ...
Instruction Manual
Page 43
... to connect the camcorder to a device capable of the OLED screen with the q > [OLED Brightness] setting. Shooting method Icon Most general situations; Canon shall not be continuous. Return the lever to its previous position to enable use this START/STOP button. Even in (zooming toward T); In such cases...do not plan to C in a scene will be liable for any loss or corruption of the following precautions while the ACCESS indicator is on the handle unit has a lock lever to use the viewfinder (A 25). NOTES • The START/STOP button on or flashing. Do not disconnect the ...
... to connect the camcorder to a device capable of the OLED screen with the q > [OLED Brightness] setting. Shooting method Icon Most general situations; Canon shall not be continuous. Return the lever to its previous position to enable use this START/STOP button. Even in (zooming toward T); In such cases...do not plan to C in a scene will be liable for any loss or corruption of the following precautions while the ACCESS indicator is on the handle unit has a lock lever to use the viewfinder (A 25). NOTES • The START/STOP button on or flashing. Do not disconnect the ...

Instruction Manual
Page 45
... or stop recording with the settings, for any loss or corruption of the camcorder's settings to your recordings regularly (A 114), especially after making important recordings. Canon shall not be liable for example, by using Special Scene recording programs (A 73). NOTES • The START/STOP button on or flashing. Set the lock... save your preference. Do not change the camcorder's operating mode. • Be sure to CAMERA. 3 Record movies and photos. • The procedure is on the handle unit has a lock lever to use this START/STOP button.
... or stop recording with the settings, for any loss or corruption of the camcorder's settings to your recordings regularly (A 114), especially after making important recordings. Canon shall not be liable for example, by using Special Scene recording programs (A 73). NOTES • The START/STOP button on or flashing. Set the lock... save your preference. Do not change the camcorder's operating mode. • Be sure to CAMERA. 3 Record movies and photos. • The procedure is on the handle unit has a lock lever to use this START/STOP button.

Instruction Manual
Page 59
... on the screen digitally. * Digital zoom is not available in mode, you can use the focus/zoom ring, the zoom rockers on the camcorder and handle unit, the zoom buttons on the wireless controller or the zoom controls on the screen indicates the approximate zoom position. Using the Focus/Zoom Ring...
... on the screen digitally. * Digital zoom is not available in mode, you can use the focus/zoom ring, the zoom rockers on the camcorder and handle unit, the zoom buttons on the wireless controller or the zoom controls on the screen indicates the approximate zoom position. Using the Focus/Zoom Ring...

Instruction Manual
Page 60
... to select a constant speed. 5 Touch [X]. press harder for faster zooms. Setting the Zoom Speed You can also use the zoom buttons on the camcorder or handle unit toward S (telephoto) to zoom out. to -end), the camcorder will increase and may be recorded in . • You can set the zoom speed for...
... to select a constant speed. 5 Touch [X]. press harder for faster zooms. Setting the Zoom Speed You can also use the zoom buttons on the camcorder or handle unit toward S (telephoto) to zoom out. to -end), the camcorder will increase and may be recorded in . • You can set the zoom speed for...

Instruction Manual
Page 61
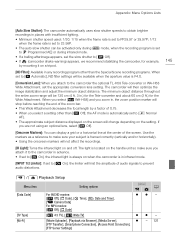
...select. Also, when pre-recording is set to -end), the camcorder will increase and may be recorded in the scene. 3 Touch [Handle Rocker Zoom Speed]. 4 Touch [X]. 5 Touch [ð] or [ñ] or drag your finger along the bar to select a constant speed. ...[Zoom Speed Level]. 1 Open the [High-Speed Zoom] screen. [FUNC.] > [MENU] > p > [High-Speed Zoom] 2 Touch [i On] and then touch [X]. Approximate zoom speeds* (handle unit's zoom rocker) Selected constant speed [Zoom Speed Level] setting [] Slow] [[ Normal] [Z Fast] 1 (slowest) 4 min. 45 sec. 3 min. 1 min. 16 (fastest) 4 sec...
...select. Also, when pre-recording is set to -end), the camcorder will increase and may be recorded in the scene. 3 Touch [Handle Rocker Zoom Speed]. 4 Touch [X]. 5 Touch [ð] or [ñ] or drag your finger along the bar to select a constant speed. ...[Zoom Speed Level]. 1 Open the [High-Speed Zoom] screen. [FUNC.] > [MENU] > p > [High-Speed Zoom] 2 Touch [i On] and then touch [X]. Approximate zoom speeds* (handle unit's zoom rocker) Selected constant speed [Zoom Speed Level] setting [] Slow] [[ Normal] [Z Fast] 1 (slowest) 4 min. 45 sec. 3 min. 1 min. 16 (fastest) 4 sec...

Instruction Manual
Page 79
... about channel 2. See Recording Audio to Channel 1 (CH1) This camcorder features many convenient options for channel 1 (CH1) and channel 2 (CH2). Handle unit Attached Not attached INPUT terminal ON/OFF switch position ON OFF - LPCM audio playback is also available for scenes recorded with a sampling frequency of... Recording Audio You can enjoy two-channel linear PCM audio recording with those recording modes. * Only available when the handle unit is attached to the camcorder. The following table provides a summary of selecting the audio recorded to channel 1, which depends on...
... about channel 2. See Recording Audio to Channel 1 (CH1) This camcorder features many convenient options for channel 1 (CH1) and channel 2 (CH2). Handle unit Attached Not attached INPUT terminal ON/OFF switch position ON OFF - LPCM audio playback is also available for scenes recorded with a sampling frequency of... Recording Audio You can enjoy two-channel linear PCM audio recording with those recording modes. * Only available when the handle unit is attached to the camcorder. The following table provides a summary of selecting the audio recorded to channel 1, which depends on...
Instruction Manual
Page 80
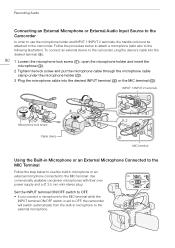
...-in microphone or an external microphone connected to the MIC terminal. Follow the procedure below to use the microphone holder and INPUT 1/INPUT 2 terminals, the handle unit must be attached to the camcorder.
...-in microphone or an external microphone connected to the MIC terminal. Follow the procedure below to use the microphone holder and INPUT 1/INPUT 2 terminals, the handle unit must be attached to the camcorder.

Instruction Manual
Page 94
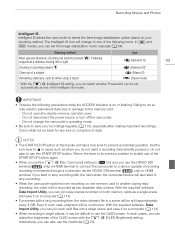
Make sure you attach the handle unit to the camcorder in advance. 94 Operating modes: Activating Infrared Mode Follow the procedure below . NOTES • When the camcorder is in infrared mode, ...
Make sure you attach the handle unit to the camcorder in advance. 94 Operating modes: Activating Infrared Mode Follow the procedure below . NOTES • When the camcorder is in infrared mode, ...

Instruction Manual
Page 98
... button. panel. [ Audio Scene] Functions the same as selecting [x AGC Limit] (A 65) in advance. panel. [j Off] Does not assign a function to mode. ** Requires attaching the handle unit in the FUNC. Assignable Buttons [ AGC Limit]* Functions the same as selecting [- panel. [ Focus]* Functions the same as selecting [ä Mic Level] (A 82) in...
... button. panel. [ Audio Scene] Functions the same as selecting [x AGC Limit] (A 65) in advance. panel. [j Off] Does not assign a function to mode. ** Requires attaching the handle unit in the FUNC. Assignable Buttons [ AGC Limit]* Functions the same as selecting [- panel. [ Focus]* Functions the same as selecting [ä Mic Level] (A 82) in...
Instruction Manual
Page 143
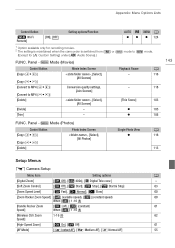
...; Start], [® Stop], [¯ Start & Stop] 63 [Zoom Speed Level] [Z Fast], [[ Normal], [] Slow] 60 [Zoom Rocker Zoom Speed] [Y] (variable speed), [X] (constant speed) 60 When [X]: 1-16 (8) [Handle Rocker Zoom [j] (off), [X] (constant) 61 Speed] When [X]: 1-16 (8) [Wireless Ctrlr Zoom 1-16 (8) 62 Speed] [High-Speed Zoom] [i On], [j Off] 61 [AF Mode] [= Instant AF], [? FUNC...
...; Start], [® Stop], [¯ Start & Stop] 63 [Zoom Speed Level] [Z Fast], [[ Normal], [] Slow] 60 [Zoom Rocker Zoom Speed] [Y] (variable speed), [X] (constant speed) 60 When [X]: 1-16 (8) [Handle Rocker Zoom [j] (off), [X] (constant) 61 Speed] When [X]: 1-16 (8) [Wireless Ctrlr Zoom 1-16 (8) 62 Speed] [High-Speed Zoom] [i On], [j Off] 61 [AF Mode] [= Instant AF], [? FUNC...
Instruction Manual
Page 145
...] zz - [Movie Uploader], [Playback via Browser], [Media Server], z [FTP Transfer], [Smartphone Connection], [Access Point Connection], [FTP Server Settings] - 121 The light is located on the handle unit so make sure your subject is always on and off. Use the markers as a reference to make sure you attach to the camcorder the...
...] zz - [Movie Uploader], [Playback via Browser], [Media Server], z [FTP Transfer], [Smartphone Connection], [Access Point Connection], [FTP Server Settings] - 121 The light is located on the handle unit so make sure your subject is always on and off. Use the markers as a reference to make sure you attach to the camcorder the...